Inspection Woes: Troubleshooting a non-working horn
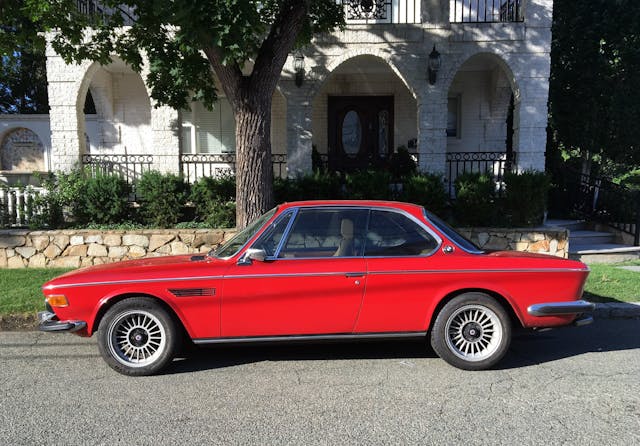
A few weeks ago, I wrote about taking Hampton, my 49,000-mile 1973 BMW 2002, on a road trip. What I didn’t say was that Hampton was actually my second choice. When I saw that the weather forecast for the weekend in Vermont appeared clear, my first inclination was to drive the jewel in the crown: “Rene,” the 1973 BMW E9 3.0CSi I’ve owned for 37 years. After all, Rene’s gorgeous Signal Red paint and tan leather interior mesh perfectly with the fall foliage.
The reason that I didn’t road-trip Rene was that when I pulled off her cover, I found that the inspection sticker had expired in September. This reminded me that when I last road-tripped the car down to Asheville, North Carolina, in May, a hole in the already-weak muffler had yawned open, making the exhaust, shall we say, throaty. Since I’d installed the PrimaFlow exhaust and HeaderCraft headers on the car shortly after I bought it in 1986, I had nothing to complain about in terms of the longevity of the parts. But this, combined with the regular inspection woes of a vintage car—Rene’s taillights are notoriously finicky, and no amount of cleaning terminals and bending them to make firmer contact with the tips of the bulbs seems to make them reliable—made me think that getting the car stickered wouldn’t be a simple 20-minute trip to and from the inspection station, and even odds were that it might result in rejection. So, I whispered promises of “another day” in Rene’s ear, covered her back up, and took Hampton instead.
It’s important to keep your promises to those you love, so when my wife and I got back from Vermont, I had a look at Rene’s inspection issues.
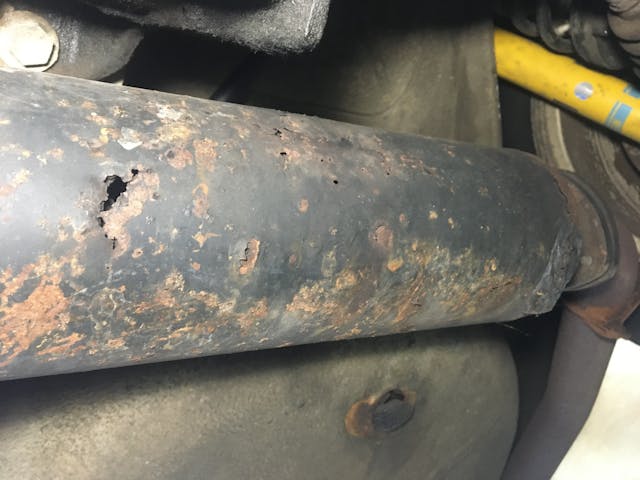
When I put the car up on the mid-rise lift and looked at the muffler, the problem was immediately obvious. The muffler was riddled with rust holes.
I’ve written numerous stories about exhaust work—you can look here and here—and talked at length about how, if you’re smart, you’ll replace it all if any section is rotted out. The logic in this is several-fold. First, if any one section has actual rust holes, you can be certain that the other sections are far from pristine and are likely not far behind in terms of perforation. Second, even if the exhaust was original multi-piece and is held together with clamps, trying to remove a single section is often difficult, as sections that slide over each other become rust-and-heat-welded together over the decades (though I’ve discussed methods for separating them in the earlier articles). Third, even if you can get your hands on a new or good-used separate component (nearly impossible in my case, as I believe that PrimaFlow is long out of business), getting the new section to seal against the old ones can sometimes be maddeningly challenging. All this makes it so, if you have the money, the wise move is to just cut the whole rusty thing off with a Sawzall and install a fresh exhaust.
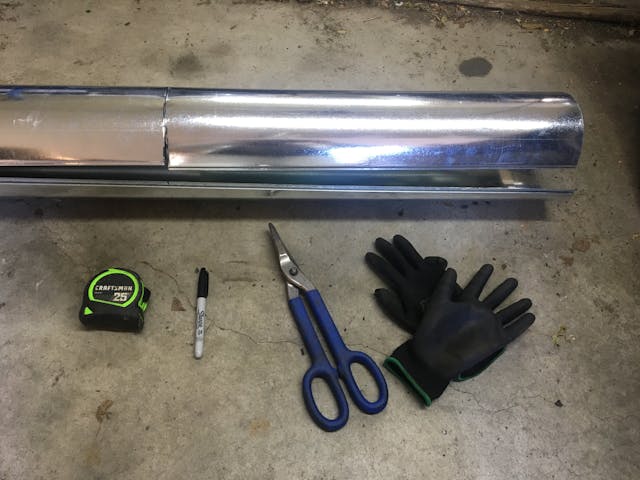
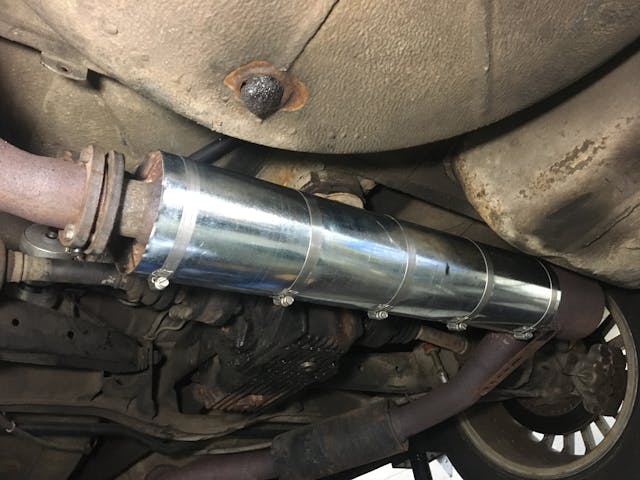
However (you knew there was a however, didn’t you?), one of my mantras is that with 13 cars, none of them get everything they need, and I make no apologies for my New England thriftiness. Original equipment exhausts for the lovely E9 coupe are no longer available. Aftermarket stainless exhausts are available from a few vendors, but they cost several thousand dollars. So, I did what I’ve done on a few other cars—I bought a section of stove pipe, cut it to fit, and band-clamped it in place to encase the entire muffler.
That left the regular pre-inspection wipers/lights/horn checkup. As expected, I needed to do some terminal-bending to get the taillights to stay on. The wipers moved across the windshield with all the speed of a 15-year-old dog being rousted off the sofa, but they worked. And the horn …
I said the horn …
Oh dear.
Over the decades, I’ve found horn issues to be quite common on my vintage cars. Fortunately, they’re usually straightforward to troubleshoot. Horn-doesn’t-honk problems can be caused by the horn itself going bad, the switch or its related contacts in the steering wheel not working, the relay that actually energizes the horn failing, or a wiring issue. I’d say that the order in which I listed them above roughly corresponds to their likelihood, but to troubleshoot a horn, you need to have some understanding of relays.
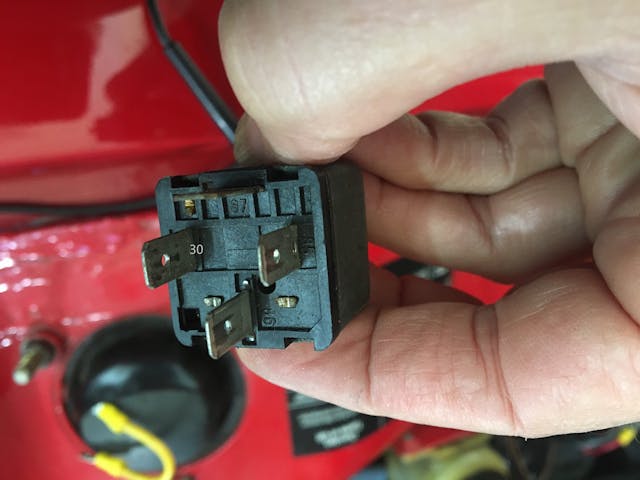
More information can be found in the first in a series I wrote on relays, but here are the basics. A relay is nothing more than a switch whose contacts are pulled together by an electromagnet. Standard terminal numbers are used on most of the relays installed on cars for the last 40 years. Terminals 86 and 85 are the connections to the electromagnet. Connect one of them to 12V and the other to ground (the polarity isn’t important) and it pulls the relay closed, which then connects terminal 30 to 87, which supplies voltage to whatever you want to turn on. The clicking sound that every relay makes when energized is the sound of the electromagnet pulling the contacts shut.
For a horn, because the horn contact goes through the steering column and you don’t want a twisting 12V contact to accidentally short out to ground, the ground side of the electromagnet in the relay is usually connected to the horn switch, not the positive side.

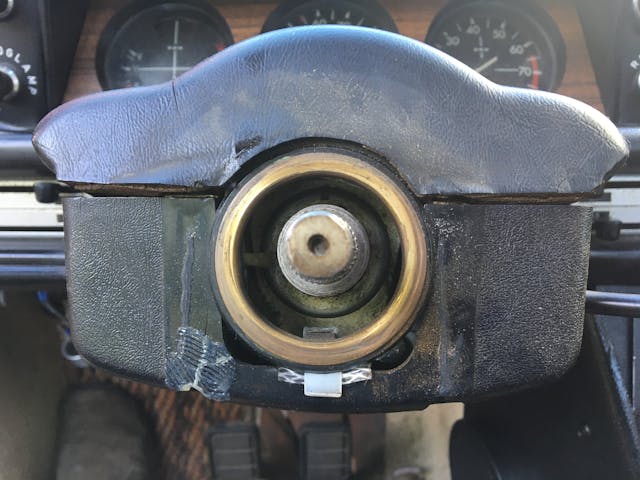
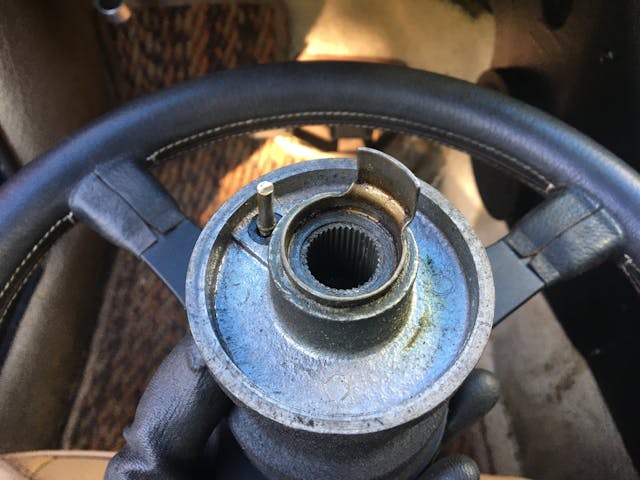
The horn switch usually has three parts. There’s the pushbutton switch itself that’s usually in the middle of the steering wheel or on the spokes. One side of the switch has a wire connected to it which goes to one of the electromagnet terminals (85 or 86) on the relay. The other side makes contact with ground, which is usually the metal frame of the steering wheel itself since it’s bolted to the well-grounded steering column. But because the switch is mounted on a rotating steering wheel, and because wires that twist 360 degrees are sure to break at some point, most steering wheels on vintage cars employ an arrangement with a circular contact ring and a little sprung plunger that touches it, enabling connection to the relay while the steering wheel is turning. The contact ring may be on the back of the steering wheel, and the sprung plunger may be mounted on the steering column, or it may be vice versa. Note that on modern cars with multi-function steering wheels with radio and cruise control operation, things other than the horn require this kind of a rotating contact, so it’s handled via a more complex “clock spring,” but on a vintage car, it’s almost always a simple ring-and-plunger arrangement.
So, from a relay-centric standpoint:
- Relay terminal 86 (or 85) is fed 12V.
- Relay terminal 85 (or 86) is connected through the horn’s sprung plunger and circular contact ring to the horn switch.
- Relay terminal 30 is fed 12V from the battery.
- Pressing the horn switch connects terminal 85 (or 86) to ground, which energizes the relay’s electromagnet, which pulls the switch closed, which connects 30 to 87, sending voltage to the horn.
- So as long as the horn works and its negative terminal is connected to ground, energizing the relay makes the horn blare.
Now that you can see how the relay factors into the horn’s functionality, you can see that the seat-of-the-pants way to diagnose horn problem is as follows:
- Turn the key to ignition and press the horn button.
- If you can hear the horn relay click each time you hit the horn button, it means that the relay, the horn button and its contacts, and the relay wiring are working, so if the horn doesn’t honk, the problem is with the horn or its wiring.
- But if you don’t hear the horn relay click, then the problem is either in the relay and its wiring, or the horn switch and its contacts.
In the electrical book I wrote for Bentley Publishers, there’s a highly-detailed blow-by-blow description on how to use a multimeter to check each of these steps, but here I’m going to assume that you know how to use a multimeter.
Most horns have a metal diaphragm inside that’s driven by a little contact-and-release electromagnet. Because they’re typically mounted behind the front grilles, horns exposed to a lot of weather, and they do eventually go bad. It’s best to rule them in or out as the culprit. You can easily take a pair of wires with alligator clips at both ends and stretch them from the battery to the horn. If the horn doesn’t blare when wired straight to the battery, clearly it’s bad.
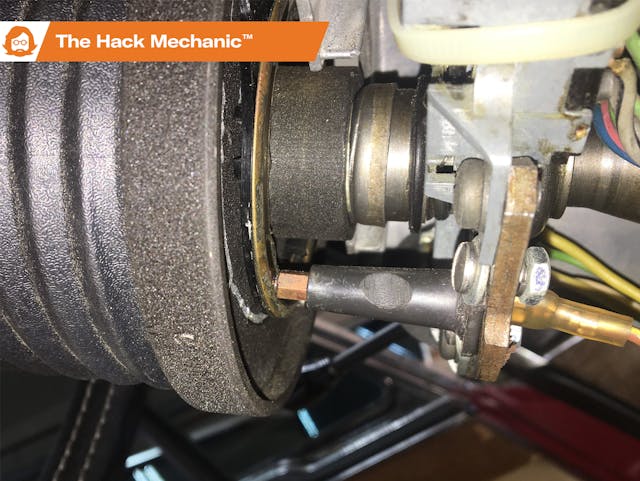
This is not quite as definitive a test, but you can also pull the horn relay out of its socket and use a short piece of jumper wire to connect socket 30 to 87, thus bypassing the relay and powering the horn directly. Note that this is how you would jumper any relay, whether it’s for the horn, high beams, or fuel pump.
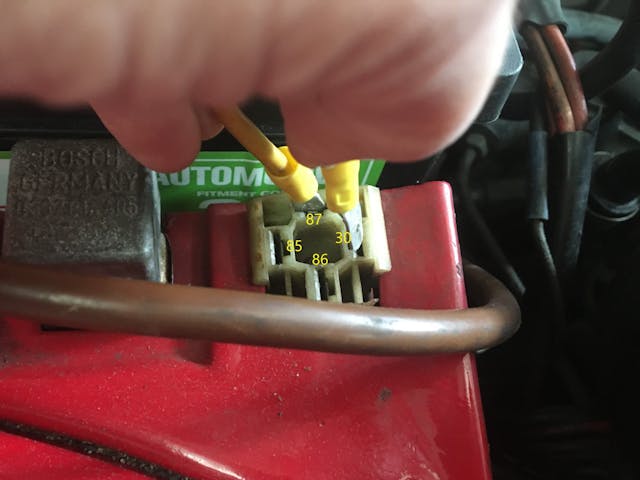
As the photos show, I did this with Rene, and the horn instantly blared. This indicated that the problem was either in the switch or the wiring between it and the relay.
So, I inspected the horn switch and its contacts. On a 50-year-old car, it’s not at all unusual for the plastic holding the sprung plunger to crack and the plunger and spring to fall out. Simple visual inspection usually reveals the answer. In my case, in order to see the plunger and contact ring, I needed to pull some of the trim pieces off the steering column, but it clearly revealed that the plunger and contact ring were both fine.
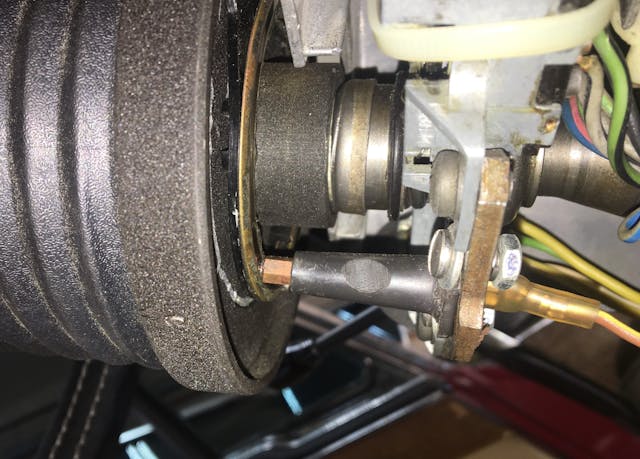
Just to be certain, I set my multimeter to measure resistance, connected it between the back of the plunger and ground, and verified that when I hit the horn button, the resistance between it and ground was essentially zero. So, hitting the button did complete the path from the wire connected to the plunger to ground.
If there was nothing wrong with the horn or the switch, then the problem had to be in the relay or its wiring. The high beam and horn relays on this car are the same. I verified that the high beams worked, then swapped relays. No difference. OK, so it’s not a relay problem, and the horn worked when I jumpered over the relay, so the high-current switch side of the relay (30 and 87) had to be fine. It had to be a problem on the low-current electromagnet side (86 and 85).
I used the multimeter and verified that relay socket terminal 85 had voltage on it.
This meant that the problem had to be that socket 86—the ground side of the electromagnet—wasn’t being grounded when the horn button was hit. I set the multimeter to measure resistance, connected it between terminal 86 and battery negative, and held in the horn button. Instead of the meter reading essentially zero resistance, it read infinite resistance, indicating that 86 was indeed not being grounded when the horn was hit.
Gotcha.
This is the part where most mechanics will say that they need a wiring diagram—that they need to see schematically how the horn button is connected to relay pin 86 and know what color the wire is. It is part of my Hack Mechanic creed—my internal wiring, if you will—that most of the time, a wiring diagram isn’t necessary for this sort of thing, because as long as things like moving doors or trunk lids aren’t an issue, it’s comparatively rare for wires to mysteriously break somewhere in the middle. It’s my experience that most of these mysteries can be solved by simply looking at the ends of the circuit. Most of the time, a metal terminal has pushed its way out of a 50-year-old plastic connector, or the terminal is hopelessly corroded, or the wire has broken off the end of the terminal.
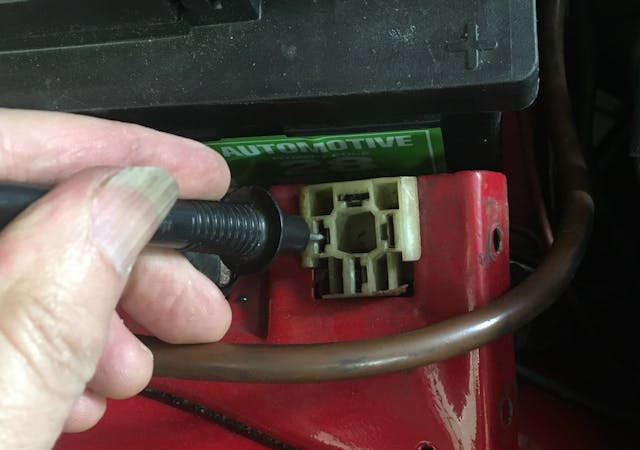
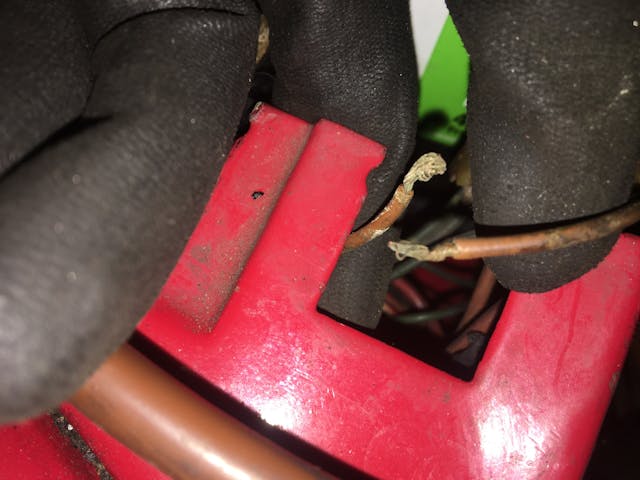
I looked at the fragile plastic socket from the top and didn’t see either of the first two issues. This meant that I needed to slide it out and look at the underside. I unclamped the battery to create room to carefully slide it forward. My eyes bulged out at what I saw underneath—the brown wire connected to the underside of terminal 86 was held in place with electrical tape.
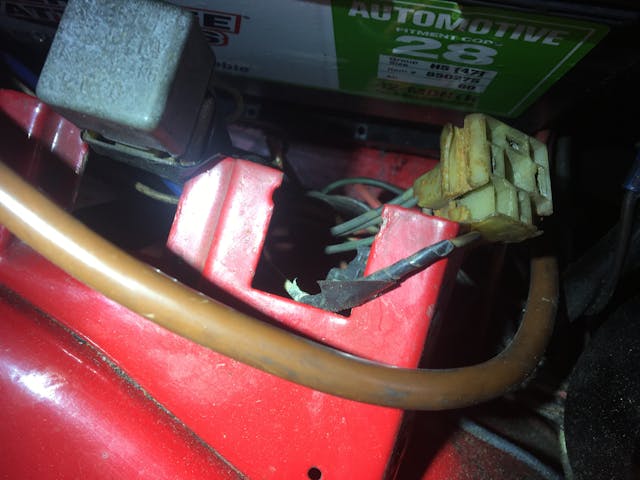
And, better yet, when I tugged the brown wire, it slid out of the tape. I unwrapped the tape and found that the wires had just been twisted together; there was no crimp or solder holding them. No wonder the horn stopped working.
Having owned Rene since 1986—I was a 28-year-old kid when I bought it—there are certain, ahem, things I’ve done to the car in the name of expediency, saving money (*cough-stovepipe-wrapped-muffler-cough*), or youthful stupidity. The license plate lights, for example, are spliced into the taillights using speaker wire and twist-on wire nuts. Hey, it was 1988, the car had just been painted, the guy who did it didn’t hook up the plate lights correctly, I couldn’t figure out why, I needed to get it inspected, and they’ve worked fine ever since. That I remember. But I have zero—I mean ZERO—memory of cutting the ground wire to the horn relay socket. It’s odd to blame a previous owner on a car you’ve owned for 37 years, but it’s what I got.
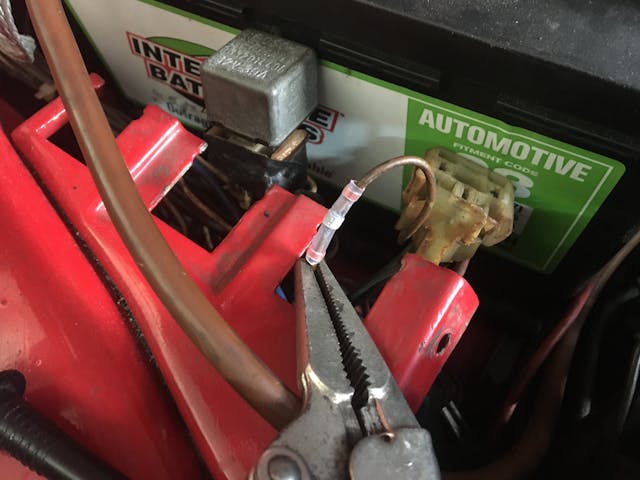
I temporarily twisted the wires together, put the relay back in, verified that the horn gleefully tooted when I hit the button, then installed the kind of butt-splice connector that, when heated with a heat gun, melts a glob of solder and heat-shrinks the tubing to create a weathertight seal.
And, with that, I got Rene inspected. Here’s hoping there’s still time in this spectacular New England fall to drive her before all the leaves are gone.
***
Rob Siegel’s latest book, The Best of the Hack MechanicTM: 35 years of hacks, kluges, and assorted automotive mayhem, is available on Amazon. His other seven books are available here, or you can order personally inscribed copies through his website, www.robsiegel.com.


67-72 c/k trucks give you lots of fun with horns.
The problem is usually the metallic rings behind the horn button. You see a lot of these trucks with no horn button and something wired onto a generic aftermarket push button on the dash.
I also enjoyed a 69 GMC deciding the horn should blare on steady at 3 am one morning. The fast fix was rip the wires out of the horn and sort it out later.
Sometimes corroded horns slowly die and the sound gets progressively pathetic and/or strange. I forget which vehicle, but something in my past quacked like a duck because of this –might of been a Mazda.
I am fortunate enough to live in a state that doesn’t inspect anything built before 1995.
When it comes to exhaust, it has been my general experience that the portion downstream of the cat ages 2 to 3 times faster than the portion upstream of the cat. I never replace 100 percent of an exhaust system largely for that reason. A quick trip around the exhaust with a chipping hammer will usually tell you where your trouble spots are
Same here in PA.
When horns die it’s usually because the diaphragm has gotten stuck. You can unstick it by twisting the horn adjuster nut/screw on the side of the horn. That’ll usually do it. Also, that adjustment is for tuning the sound of the horn. Feel free to make it sound like a Cadillac (C6th).
Bought a 71 MGB back in 1991 in Arkansas and was driving back to Wisconsin. About an hour into the trip, the horn just went off on it’s own. Without taking my foot off the gas, I calmly pulled the rubber horn button off the steering wheel, pulled out the plunger and continued on. Apparently, the PO’s bic pen fixed failed