When do-it-yourself exhaust repair is actually the right answer
If you’re faced with working on any portion of a car’s exhaust, most folks will tell you to replace it all. Seriously. It’s rarely worth trying to replace only one component that’s rusted out. If it’s rusty enough that it has blown a NASCAR-worthy hole, odds are that the rest of the exhaust is weak, too. Plus, even if the exhaust comes in separate pieces—muffler, center resonator, headpipe—then age, heat, and weather will effectively rust-weld them together, and separating them may be impossible.
I recently encountered this issue simultaneously on two of my cars. Earlier this year, I’d patched the holes in the muffler of my 1974 Lotus Europa Twin-Cam Special with chimney flashing because, although a replacement muffler was available, that muffler had become one with the headpipe, and a replacement headpipe was no longer available. But then, the gasket between the headpipe and the exhaust manifold failed, and while I was separating that flange, one of the manifold studs snapped off. Rather than continue to jury-rig it, I ponied up for new headers that bolt directly to a new muffler. Sometimes, as they say, you just have to pay the man.
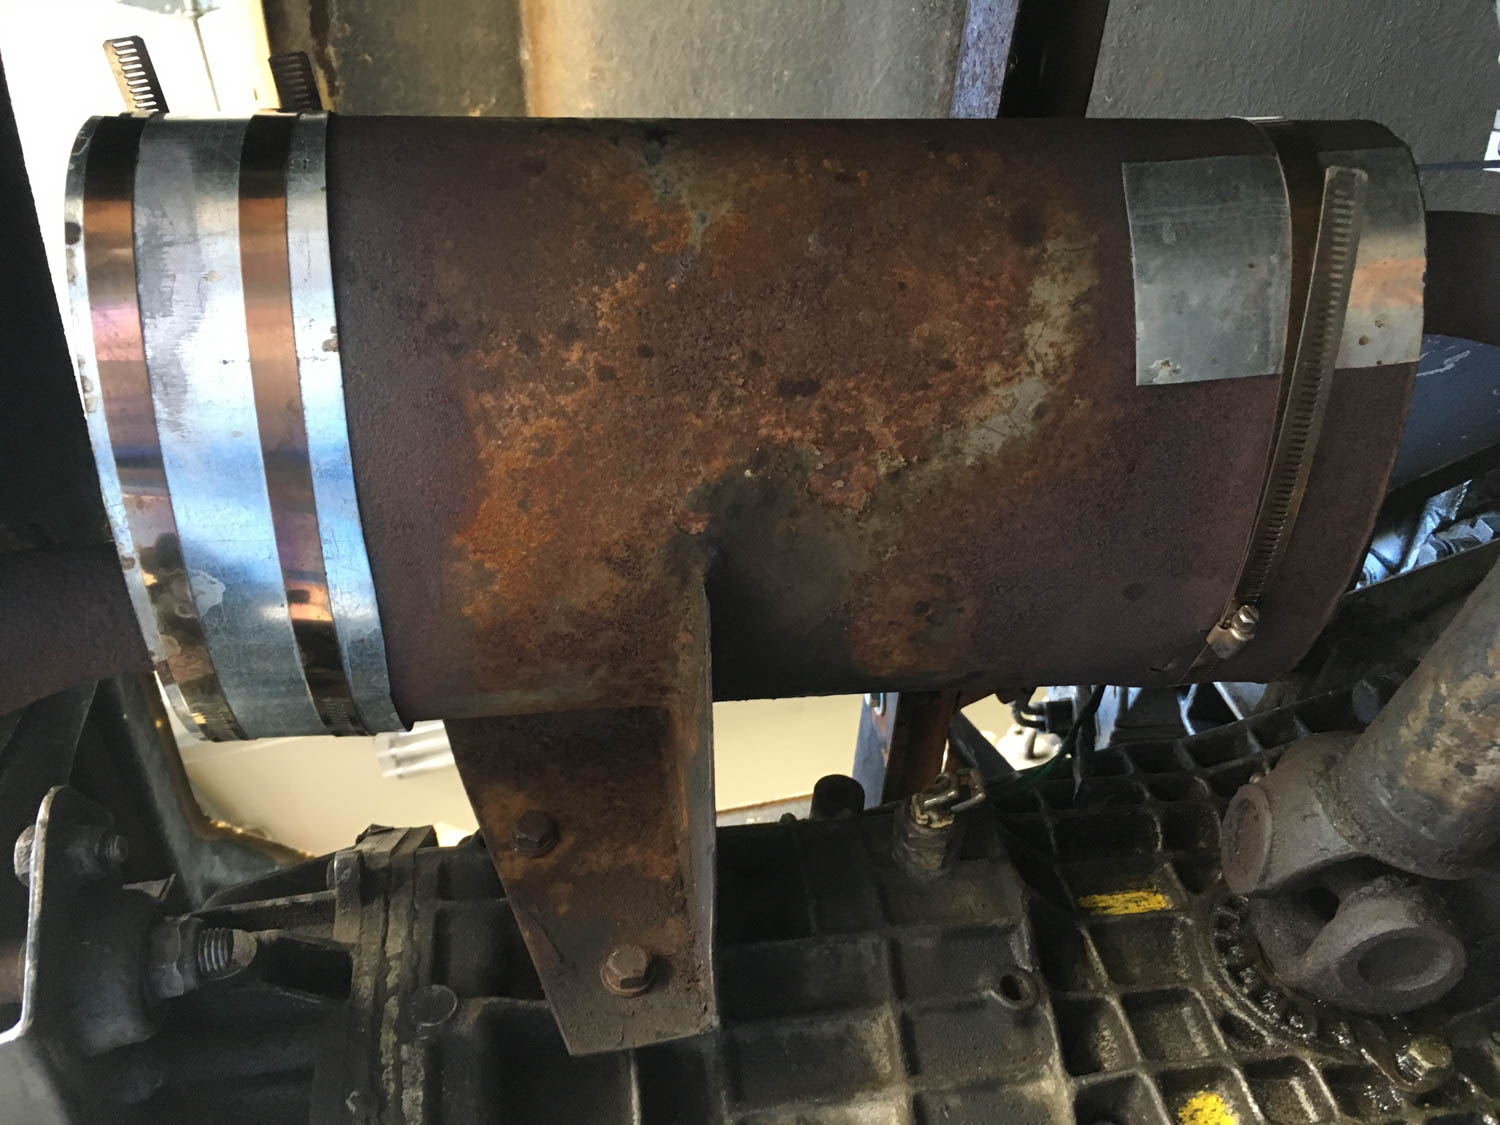
But on my 1972 BMW 2002tii, I took another tack. I’d made a verbal agreement to sell the car to a friend at near-market value, and I had forgotten that I’d patched a hole in the muffler with putty. Not surprisingly, rust was now perforating the muffler in other places. Since my friend wasn’t paying a “needs a muffler” price for the car, it was incumbent upon me to replace it.

I had a good, used OEM BMW muffler sitting under my porch, but when I looked at the car’s resonator-to-muffler attachment point, I despaired. This is a slip-over joint held in place by a clamp. Over the decades, the clamp becomes superfluous as the two halves become inseparable. Yet, unlike on the Lotus, I could see a glimmer of hope.

If you search the Internet for “exhaust pipe separator,” you’ll see a number of tools designed to pull apart slip-over joints like this. KTC Tools and Summit Racing used to sell them, but for reasons unclear, they’re no longer available. You’ll also see do-it-yourself versions that are nothing more than a pair of exhaust clamps, threaded rods, and nuts. In either case, you clamp them to the two halves of the exhaust requiring separation, then turn the bolts (or the nuts on the threaded rods) to force the clamps and exhaust pipes apart. They look like just what you need, but, frankly I’m skeptical that that action alone is enough to cause decades of rust to give up the ghost.

If you search YouTube for solutions to this problem, you’ll find videos where folks use heat, penetrating oil, twisting, screwing on a clamp and beating on it with a hammer to drive the muffler backward, careful use of a chisel, careful use of a Dremel tool and cutting wheel, or a combination of these. Although the smart move on my part would’ve been to take the car and the good, used muffler to an exhaust shop and pay them to cleanly cut the old one off and weld the good used one on, I decided to take one for the team and try what is nearly the automotive equivalent of getting out of the “friend zone.”
First, I took the clamp off. I thought I’d need to cut it off, but Silikroil penetrating oil loosened the rusty bolts.

I tried hammering a flat punch on the edge of the slip-fit pipe to see if I could knock it free. I couldn’t.

So I used a small chisel to carefully open up the slotted sections of the over-pipe.

When it was clear that the chisel was having a positive effect all the way around the pipe, I applied heat and wax to see if I could loosen up the whole section and simply pull it off.

Having chiseled the slots open, I tried grabbing the tailpipe and muffler and twisting the whole thing loose. There was no movement. I tried smacking on the ends of the chisel-flared sections with a hammer to push the whole section back. It didn’t work.

The next approach involved the Sawzall, or as I like to think of it, the Jack Nicholson-in-The-Shining of power tools. Usually, when I resort to breaking out the Sawzall as part of exhaust removal, it’s to wreck the whole thing, but in this case, I was surgical in my precision, cutting off the muffler close to the joint.


I was now close enough that I could smell success. I grabbed the Dremel tool with a cutting wheel on it and used it to extend one of the slots, being careful not to cut into the pipe beneath it.


I then used the chisel to peel back the slotted piece. Even though banging and pulling couldn’t pull the pieces apart, shearing and peeling the two surfaces like this made them surrender easily. I’m sure that all the heat and wax I had previously used were helpful.


I then cleaned up both this surface and the inside of the pipe of the used muffler with a wire wheel on a drill, applied a coating of muffler cement, and slid the muffler on. Incredibly, I even reused the original clamp. Total cost: Zero.

This technique destroys the exhaust component that has the outer slip-on piece and requires a hammer, chisel, Sawzall, Dremel tool with a cutting wheel, and plenty of patience. And it may not always work. But if you can see some delineation between the slip-over pipe and the one inside it, it’s worth a shot. May your exhaust-related surgery be as successful as mine was this time around.
***
Rob Siegel has been writing the column The Hack Mechanic™ for BMW CCA Roundel magazine for 33 years and is the author of five automotive books. His new book, Resurrecting Bertha: Buying back our wedding car after 26 years in storage, is available on Amazon (as are his other books). You can order personally inscribed copies here.