The best advice for exhaust work: Replace it all

Exhaust work, even under the best of circumstances, is a pain. Exhausts go in all clean and shiny and perfect-fitting, and eventually turn into a rusted-solid mass that often requires a Sawzall to get it out.
After all, if an exhaust has to be replaced, it’s almost always because a section of it has rusted through, and although the hole may be in only one place, typically the entire system is rusty—and that includes the fasteners and mating flanges, making the exhaust very difficult to disassemble. And even if you can get the pieces separated, sometimes they won’t seal when you put them back together due to rust on the mating flanges. So the best advice for exhaust work: Replace it all.
Of course, the meaning of “all” varies with the age and complexity of the car. On a vintage car with no catalytic converter, there’s usually a cast-iron exhaust manifold that lasts the life of the car. There is a manifold for each cylinder head. Each manifold is bolted, usually via a flat mating flange, to a head pipe, which then feeds a center exhaust resonator. The head pipe-to-resonator connection is usually a triangular mating flange with a sealing ring. In contrast, the muffler at the back of the car often has no flange, and instead often just slides onto the end of the resonator and is held in place with a clamp. Sometimes a separate tailpipe slides onto the end of the muffler.
So, in the simplest configuration, “replacing it all” consists of buying and installing three pieces—the head pipe, the resonator, and the muffler. But if the car was built after 1975, it probably has a catalytic converter integrated into the resonator. Thus, in a modern V-6, V-8, or V-12 with dual exhausts, you likely have two head pipes, two resonators with cats, two mufflers, and two tailpipes, for a total of eight pieces. Cost-wise, it adds up.
You can see how it’s tempting to eschew the advice to replace it all and instead see if you can replace only the damaged section and re-use everything else. On a lightly-used vintage car, maybe you can get away with it—if you can separate the individual pieces and fit them back together.
Particularly vexing is the connection between the muffler and the resonator, when one pipe is slid over the other and they’re clamped together. The clamp’s squeezing slightly crushes the pipes and creates a set of ridges that don’t easily separate. Plus, with age, heat, and weather exposure, the two pieces usually wind up rust-welded together. But let’s say that—using a torch, penetrating oil, biceps like Duane Johnson, and a big rubber hammer—you do manage to get them apart without destroying them. The ridge created by the clamp is still there on the piece you want to re-use, and often prevents you from mating it with a new piece.

This was the case with the exhaust on Bertha, the 1975 2002 I’d owned 30 years ago and recently bought back. Well, almost the case. The resonator was unusable due to almost complete separation of the forward flange, and I accidentally destroyed the exhaust headers removing them, but the muffler still looked fine. Unfortunately, even with heat, penetrating oil, and pounding, I could not get the muffler off the back of the resonator. But because I never throw anything out, I had a used head pipe and an Ansa muffler I’d successfully pulled off a parts car decades ago. Scarcely believing my good luck, I ordered a new matching Ansa center resonator. But when it arrived and I tried to mate the resonator and muffler, I found that the inlet pipe of the muffler had a clamp ridge that prevented it from sliding over the end of the new resonator. If only I could get rid of that ridge, I thought, I could use this muffler and save myself a hundred bucks.
Now, there are some standard jokes in the automotive world. You know, buying Lucas replacement wiring harness smoke, needing to add blinker fluid, etc. Among them is, when a bolt is too big, shout “Get the hole stretcher!” Well, I’m here to tell you, there is, in fact, a hole stretcher. Sort of.
It’s called a tailpipe expander or an exhaust stretcher (or, more generically, a pipe stretcher), and it’s designed for this exact application—returning beat-up pipes to round condition so they’ll mate with new pieces. A threaded rod goes through the center of two cone-shaped pieces, pulling them together. Metal slats slide up the conical surfaces, creating an expanding cylinder. In theory, you put the tool in the bunged-up tailpipe, crank down on the threaded rod with a wrench, and the cylindrical tool expands, returning the pipe to its rounded and ready-to-mate condition.
I read up on tailpipe expanders. Like many tools, they seemed to bifurcate into two categories: Expensive professional-quality tools, and affordable Chinese-made knock-offs. In the former category is the $165 Lisle 17530, a set of five small-to-large collets and a threaded body that’s designed to be driven by an impact wrench. Now, I’ll spend the money on a high-quality tool if it’s something I think I’ll use over and over (I own a pricey Mastercool Hydra-Krimp 71500 to crimp fittings onto A/C hoses, and I love interacting with it every time I use it), but I’m a hobbyist, not a professional, I’d never even heard of a tailpipe expander, and this was the first time I could recall running into the need for its capability (usually you just can’t get the muffler off the resonator, and that’s that). Plus, the $100 cost of a new muffler was less than the cost of the Lisle set.
So I looked on the inexpensive end of the scale. The Chinese knock-offs of the Lisle set were as low as $25, but the reviews on Amazon had clear red flags, with many people reporting that the tool broke on first use.
I wondered if I could buy only the one Lisle tool I needed for my 1.75-inch tailpipe. I found that there was an a la carte medium-sized Lisle tool available on Amazon for about $30, but the reviews very clearly said that it was not the same quality as the tools in the big Lisle set, and was no better than the cheap stuff.
Then, I saw that Harbor Freight had a tool that fit my tailpipe for about $16. There’s a Harbor Freight store about 10 miles from me. Even though the reviews of the tool were essentially the same as those on Amazon, the siren’s song of being able to jump in the car, buy the tool, bring it home, try it, see if it solved my problem, and return it if it broke were strong enough to seduce me.
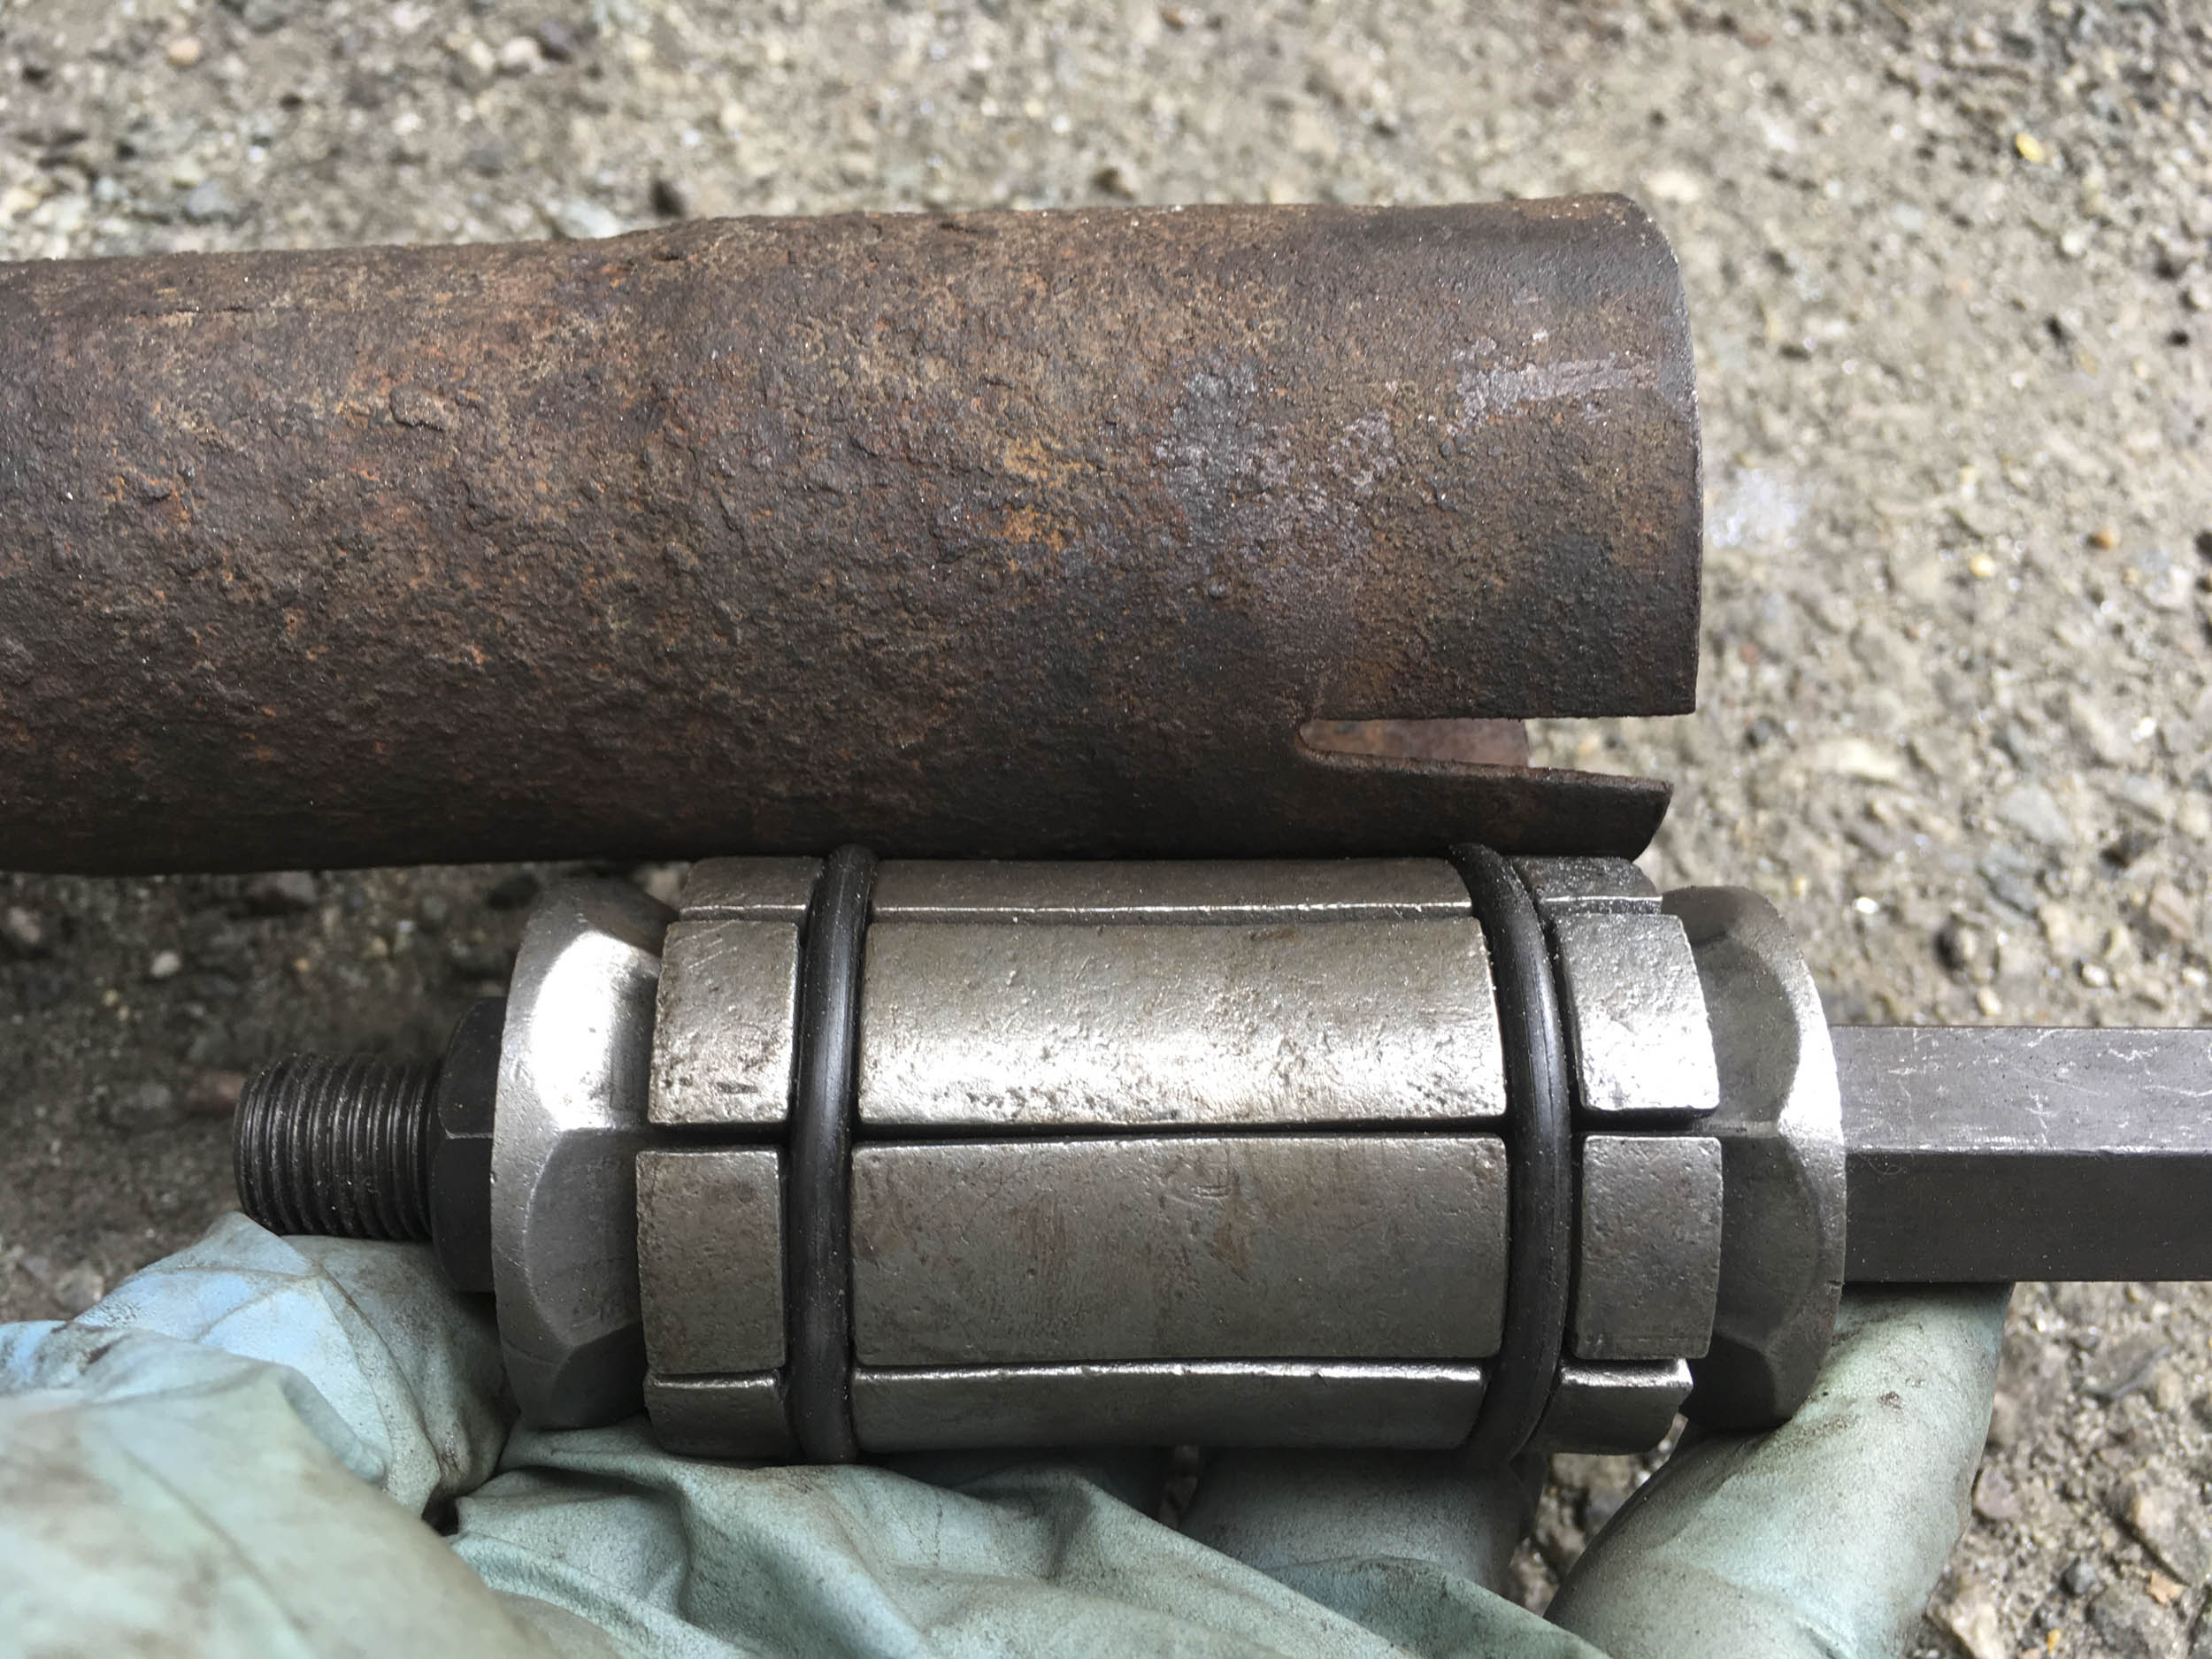
So, how did it work? Well… Part of the problem has nothing to do with the tool. As is the case on many mufflers, if you look at the photo below, you can see that on the end of the inlet section of the muffler, the widened-diameter part that’s supposed to slide over the end of the resonator is about 4 inches long. At the end of it, there is a slit that allows the end of the pipe to open up a little wider and easily slide over the end of the resonator. The ridge from the clamp is behind the slit. Thus, when you try to use the stretcher—which is also about 4 inches long—and crank on it, it expands the part of the pipe with the slit in it, which, because of the slit, expands quite easily. This prevents the tool from pushing adequately against the part with the ridge, which, after all, is what you’re trying to get rid of.
To mitigate this problem, I found a short piece of pipe the same inner diameter of the inlet of the muffler, placed it flush against the end of the muffler, held it there with duct tape, and positioned the pipe stretcher so that the far end was against the ridge I was trying to remove, and the near end was inside the short piece of pipe, which effectively prevented the stretcher from causing the slit section to yawn open.

I cranked down on the tool with a ratchet wrench. After a few attempts, it began to have some effect. I repeatedly test-fit the resonator, and could clearly see where the internal ridge was preventing it from going in.

The on-line reviews I read said that, unlike the high-quality Lisle set, you can’t use an impact wrench on these cheap tools without destroying them, but I viewed the $16 tool as a single-use investment weighted against the $100 cost of a new muffler, so I hooked up the air compressor and cranked down on it with an impact wrench. I didn’t break it, but I could see the threads shedding a fine metallic powder.
After several tries, I’d clearly knocked the size of the internal ridge down significantly. I test-fit the muffler onto the new tailpipe, and it slid on farther than it initially did, but not to where it’d need to be for installation. I could still feel the ridge with my finger, so I took a Dremel tool with a metal-cutting bit and smoothed the last of it off.

And with that, the muffler slid easily onto the resonator.

So, it worked. I successfully re-used a muffler with ridges on the input pipe, and the tailpipe expander helped me to get rid of the ridges. But because the process took several hours and required intervention with a Dremel tool, I’d give the tool a C+. Maybe a B-. On paper, spending $16 on the tool rather than $100 on the muffler, I saved $84, and on a car that needs nearly everything and, once it’s running, will be lightly used, it was in keeping with the budget resurrection I’m trying to perform.
But, in most cases, the better advice is still this: Replace it all. I probably should’ve just spent the hundred bucks on a new muffler. If, in a few years, the re-used muffler fails, and I can’t get it off the new resonator because of the clamping ridges and the rust welding, and it ruins the resonator, I’m going to feel like an idiot.
***
Rob Siegel has been writing the column The Hack Mechanic™ for BMW CCA Roundel magazine for 30 years. His new book, Just Needs a Recharge: The Hack Mechanic™ Guide to Vintage Air Conditioning, is now available on Amazon. You can order a personally inscribed copy here.

