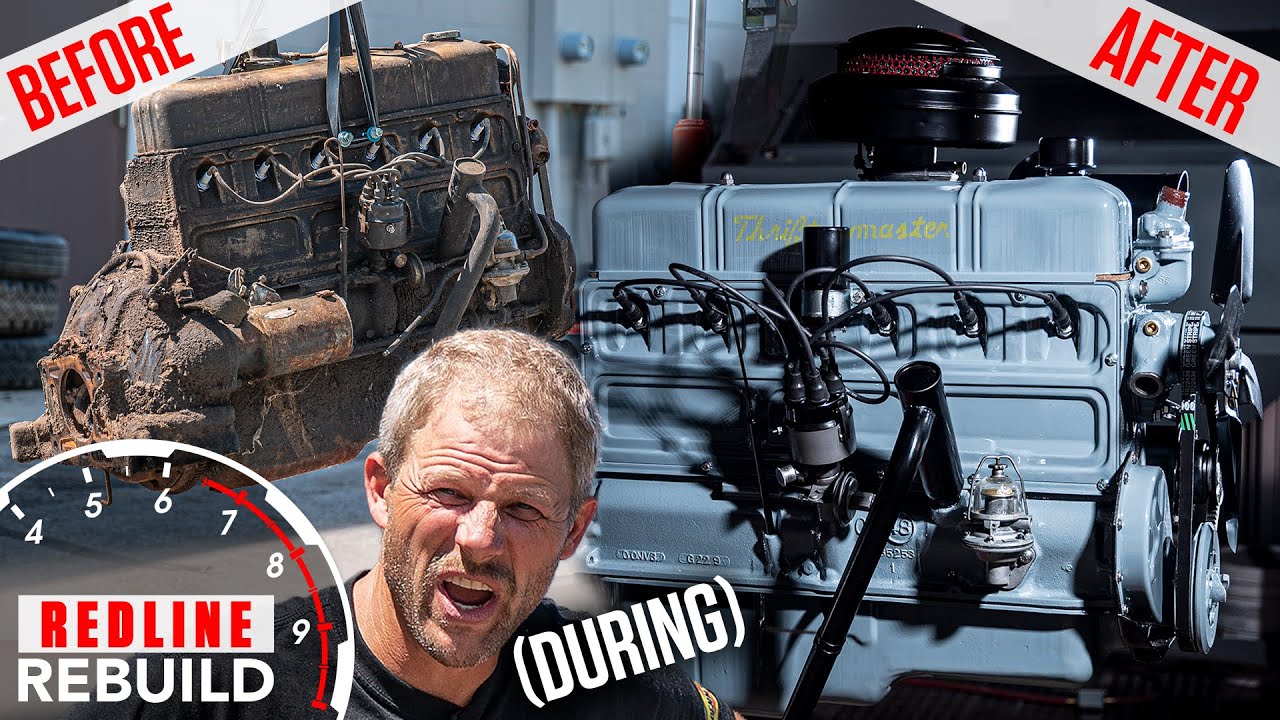
The Redline Rebuild Buick Nailhead has come a long way. It spent much of its race to final assembly under the proverbial yellow flag, as Davin proceeded with caution once he cracked the engine open and it turned out to be a wreck. Yanked from a field, showing signs of having never been properly stored in its life, this 401-cubic-inch Nailhead was nothing if not hard to look at. Yet Davin was intent on turning this V-8’s life around.

The engine didn’t seem to like that plan though; each and every part from step one put up a fight. The torque converter was cut off, along with the flexplate. Let’s not revisit the fiasco that ensued when removing the pistons. Like a superhero in a blockbuster summer movie, Davin was willing to exercise some violence for the greater good.

“I hate to have to destroy parts taking an engine apart, even if I’m not going to re-use them. It just feels a bit wrong to break engine parts,” said Davin, sliding a bin of scrap aluminum piston underneath a workbench.

The fight to get the engine torn down was only part of the battle, though. The second round of action was the block and cylinder heads taking a trip to Thirlby Machine Shop for cleaning and inspection. Davin knew that just based on how things came apart and how they looked, it likely wasn’t going to be a fun trip full of good news.

The block, it turned out, was very tired, with ridges left from the piston rings rusting to the cylinder walls. Seven of the eight holes were so bad that they’d need sleeves installed before going back to stock bore size. The cylinder heads were an even worse story. The valve seats had craters that the Apollo missions would have avoided. When we found out the heads could not be saved, Davin began his search for good core parts that would put this engine build back on track.

“There just wasn’t enough meat cast into the cylinder heads to machine out the seat and press in new ones,” said Davin. “The new seats would have just fallen right out. The block is more of a situation where the amount of machine shop work didn’t make sense when we could still source a better block. We did keep the original block and tuck it in a corner—just in case.”

During the process of saving this engine, a Camaro with a tired big-block 396 rolled into the shop, derailing progress yet again. During that big-block rebuild, a good used block and heads arrived and were sent off to be cleaned at the machine shop. Experiencing déjà vu, Davin walked through the door again with Buick Nailhead parts. This trip was much more positive, though, as he was able to carry the parts right from the machine shop to the paint shop.

To call it a thorough cleaning would be an understatement, but after scrubbing places that would make an engine designer blush, Davin masked off the important bits and let an expert spray some color. That color? Buick Green or Buick Blue, depending on who you talk to. Then it was back to the Redline Rebuild Garage for final assembly.

The tape came off, Davin’s torque wrench started clicking, and oil started flowing. Before too long, a V-8 took shape on the engine stand and was ready for break-in.

“Unlike the last few engines we built for this series, this is a flat tappet camshaft. I had to do a bit more break-in,” David said. “It wasn’t too bad, but it was a warm day and the lack of airflow in the garage really brought the coolant temp up a lot. Luckily it stayed cool enough to make it through the break-in and ensure the cam is set for a good long life.”

So what is next for this Nailhead? It is headed for the engine compartment of a Buick, of course. And when that happens, our cameras will be rolling. Be sure to subscribe to the Hagerty YouTube channel to get updates when each new video posts so you don’t miss out on any of the fun.

  • 1
  • /
  • 3

Enjoy Season 3 stories, opinion, and features from across the car world - Hagerty Media

The Redline Rebuild Buick Nailhead has finally reached the assembly phase and Davin has decided it is a great time to share a few tips on how to prepare a short block. From proper oil clearance measurement to making sure the valvetrain is serviceable after assembly, the details matter and Davin makes sure to get it right for this turquoise Buick.

The cylinder heads were prepped, leaving the bare block on a stand as the last bit that needed assembly attention. As the small parts move from a table into the block, Davin talks through small tips that ensure this engine will live a long and happy life.

For starters, the bearings and main caps get installed and torqued before the crankshaft is even in the same zip code. It is important, as the inside diameter of the bearings needs to be two thousandths of an inch larger than the outside diameter of the crankshaft. This minute amount of space allows for critical oil flow. If the crank and bearings were perfectly matched, there would be no space for oil, and if the clearance was too large, the oil would not provide the proper protection and the crankshaft could hammer the bearings due to low oil pressure. Either way, it would be a disaster.

The camshaft is inserted, and the pistons are up next. In the process of laying out the piston rings, Davin finds one that is obviously wrong with its gigantic end gap. Even the Redline Rebuild master is not immune to odd delays and setbacks. He also learned that, unlike so many other engines that share pistons rings with other engines, the 401 Nailhead is unique.

With all the proper rings installed correctly and the connecting rod bearing oil clearance checked, the pistons find their snug cast iron homes. Only then can the cylinder heads get installed and torqued down, allowing the cam to be degreed to the specs from the camshaft manufacturer.

The parts seem to speed off the table and onto the engine, with the final result ready for transplant from the engine stand to the run stand. With fuel, electrical, and cooling connections successfully completed, it’s time for Davin to press the starter button and break in the cam. You’ll have to stay tuned for that, since this update doesn’t include the sound of this Nailhead’s exhaust note.

If you want to be the first to hear it and see the artistry of the Redline Rebuild time-lapse, be sure to subscribe to the Hagerty YouTube channel to receive notifications when each new video goes live. It won’t be long now before this Buick is headed for a new home under a hood, but that is for another time.

  • 1
  • /
  • 3

Next episodes

You may also like

Enjoy Season 3 stories, opinion, and features from across the car world - Hagerty Media

The paint is dry, which means that assembly of the Buick 401 Nailhead can finally begin. It’ll be easy—just put it back together, right? Not so fast. There’s a proper way to assemble a set of Buick cylinder heads and Davin is here to talk us through the details.

The Buick Nailhead has odd cylinder heads when compared to a small-block Chevrolet or Ford. The quirks of the Buick Nailhead lie mainly in the angle of the valvetrain. Contrary to other cylinder heads that get the spring seats cut at the machine shop, the Buick’s heads would end up in the scrap heap if its seats were skimmed by a cutter. Because the seat is so close to the hole for the pushrods to travel though, removing any material would shrink the seat and create an uneven surface.

So, with this engine, it’s extra important to check spring heights during assembly. Davin outlines the process in the latest episode of Redline Update, leading up to the final Redline Rebuild of the Nailhead coming up soon. Using the valves, retainers, and keepers that will be used in the final assembly, Davin replaces the spring with a special micrometer that can measure the size of shim required to achieve appropriate spring height and pressure. Only once the shims are determined for each valve—and yes, it is important to measure each valve and not just one—the final assembly can begin.

With a set of complete cylinder heads sitting on the table, Davin now has to turn his attention to getting a short-block ready to receive them. Once installed, the rocker shafts will be placed and, finally, adjusted. Though he makes it look easy, this attention to detail is painstaking, a degree of obsession essential to a machine as finely-tuned as an engine. It’s just a few more days until we get to hear the engine fire up and witness the payoff of all this hard work.

  • 1
  • /
  • 3

Next episodes

You may also like

Enjoy Season 3 stories, opinion, and features from across the car world - Hagerty Media

Engines don’t need paint, but they sure look better when they have it. After the last Redline Rebuild update, in which the Buick 401 Nailhead visited the machine shop, the parts are ready for a thorough—and we mean thorough—cleaning and a coat of paint. Davin heads over to the paint shop to get it done in our latest episode.

The first thing you might think is the block was cleaned at the machine shop—so it’s good to go, right? Slow your roll.

“I have always been told to never assemble an engine with parts fresh from the machine shop,” Davin says as he holds a hose nozzle to the oil passages. “With the amount of debris I always end up cleaning out of each passage in the block and heads, I can see why.”

Fine particulate is the bane of a finely-assembled engine. Even small grit can get trapped against moving parts and act as a cutter, wearing down critical parts to the point of failure. A thorough cleaning is cheap insurance and gives peace of mind knowing that all your hard work isn’t going to go to waste just after the break-in process (or even during it).

The key, Davin says, is to use Dawn dish soap, which removes oily residue, together with a wide assortment of brushes. These brushes range from a bore brush to clean the cylinders to a long rifle-style variant that can run through the oil passages in the block to break up and flush out all the fine particles the oil would otherwise pick up and carry to the bearings.

After the water runs clear out of each passage, Davin uses compressed air to blow away the water and any remaining grit. Wax and grease remover take care of the residue from handling the parts and creates a surface to which paint can easily adhere. With masking in place, the paint booth closes and the engine is sprayed.

Davin gets to take a quick break while the paint dries, but then it is wide-open throttle on assembly. If you want to see how the color came out and what other tricks Davin is using to warm over this Buick V-8, subscribe to the Hagerty YouTube channel to receive a notification when each new video goes live.

  • 1
  • /
  • 3

Next episodes

You may also like

Enjoy Season 3 stories, opinion, and features from across the car world - Hagerty Media

The Buick Nailhead has really been a connecting rod in the oil pan for Davin. At each turn in the Redline Rebuild process the Nailhead demands one task after another which turns into something more involved than expected. Finally, the process is shifting for the better, as we learned after some good news at the machine shop.

After sourcing a new engine engine block and heads, the question remains if they are usable. Our first trip to the machine shop told Davin that the original block and heads were either fit for scrap or in need of extensive work to be returned to duty. Now taking this second set in, the first step was taking measurements to determine a starting point, and forutantly, the numbers all came back within a machinable range.

“The last set of heads had valve seats that looked fit for the lunar rover, rather than sealing a valve,” said Davin. “Now that we have a set of usable heads and block that doesn’t need seven sleeves, the machine shop can actually work these over and we can get to assembly.”

And get to assembling he shall. These Redline Updates will be popping up daily over the next week as Davin finely assembles this engine and gets it ready for the Buick engine compart it will call home. There are just a few steps between now and that majestic moment, but we have confidence this engine is finally on the right track. Follow along with us until the hard-fought combustive moment of victory.

  • 1
  • /
  • 3

Next episodes

You may also like

Enjoy Season 3 stories, opinion, and features from across the car world - Hagerty Media

If Tom Cross hadn’t found me a can of rubbing compound and a shop rag 18 months ago, I wouldn’t be writing this now.

But he did. And it triggered an unexpected journey.

It was February 2018, and I had been foraging through a few dozen old cars behind Cross’ shop in Midland, Texas. Why was I in Midland? Because I’ve always wanted to visit the birthplace of Jim Hall’s Chaparral Cars, producer of some of the most innovative cars in racing history. Plus I thought there might be some rust-free old cars to be found.

Midland is a gritty little town measuring 7-miles-by-7-miles, complete with pot-holed roads and lots of dust. Yet my friend John Mecom, a successful oil man from Houston, claims, “It’s a place where a person can make a billion dollars, lose it, and stand a good chance to make it back again.”

This was the town where I decided to drive my Woody wagon around. Maybe I’d strike gold of my own.

1962 Ford Country Sedan
Jordan Lewis

Driving down one bumpy, dirty road after another, I came across a yard of old cars, mostly Fords, behind a steel building in an industrial area. The business that occupied the building is Holiday Pools, which is run by Cross and his wife, Diane. The cars were leftover parts cars and future projects that would likely never see the light of day.

“Sure, go back there and take a look,” Cross said. (Most guys with old cars are not so accommodating.) So I walked the couple of acres, not sure if I should be nervous about rattlesnakes—I’m an East Coaster, mind you.

Cross had an interesting collection of vintage tin, most that he dragged in 20 or 30 years ago, mostly full-size Fords from the 1960s. I made a beeline toward a two-door 1960 Ford Ranch Wagon, a very rare beast but in rough condition. There was a 1962 Ford Galaxie here and a 1963 Fairlane there. I was attracted to a dusty red 1962 Ford Country Sedan, a baseline wagon.

1962 Ford Country Sedan Barn Find Hunter
Jordan Lewis
1962 Ford Country Sedan missing engine
Jordan Lewis

After an hour or so, I asked Cross for a rag and some compound. I had seen a TV commercial as a kid for Simonize or J-Wax Kit, or some product like that. The person in the ad walked up to a dingy car in a junkyard and rubbed out the fender to a brilliant luster, bringing dead paint back to life.

I’ve always wanted to do that. So this was my chance. With the rag and compound, I rubbed out a small section of the fender and brought the 57-year-old paint to a brilliant luster.

“Tom, you wouldn’t happen to have a buffer in your shop, would you,” I asked. He said that he did, but not enough extension cord to reach out to the yard. But that wasn’t a problem. He fired up his forklift and began to reorganize his yard, making room to relocate the red wagon next to his building. Now with buffer in hand, I began to burn away decades of sun-bleached, oxidized red paint. The result? A fender that “Shined like a million dollars, Tommy boy,” as my Uncle Bob used to say when I waxed his Mustang as a kid.

1962 Ford Country Sedan
Jordan Lewis
1962 Ford Country Sedan
Jordan Lewis

I had a flight to catch, but our Midland adventures became one of the most popular Barn Find Hunter episodes. I couldn’t get that car out of my head.

“That wagon doesn’t want to die,” I told Cross when I called a few days later.

I spoke with my colleagues at Hagerty, and we decided to purchase the car from Cross for a very reasonable price. “If you buy the car, I’ll give you all the parts you’ll need to fix it, plus my friends and I will work on it,” he said. Such a deal!

We decided that we’d refurbish the car and donate it to McPherson College in McPherson, Kansas, the only college to offer a four-year degree in Automotive Restoration. I sit on the advisory board for the program and know their old Chevy Luv parts chaser was running on only three cylinders.

We set a time table of 14 months to get the car from junkyard to driver condition and deliver it to McPherson for the annual student car show in May. It only needed… everything. There was no engine, no transmission, no front crossmember. Other than that, it was complete. However, it was filled with decades of desert red dust as fine as talc, and it was in every crack and crevice.  Cross used a yard blower to get rid of as much dust as possible, producing a toxic red cloud in the process.

1962 Ford Country Sedan interior
Tom Cross
1962 Ford Country Sedan seat
Tom Cross

Tom Cotter working on the 1962 Ford Country Sedan
Brad Phillips

Had I bitten off more than I could chew, having fallen in love with a shiny paint job but refusing to see a multitude of mechanical issues?

In the ensuing months, Cross and his Midland friends got after the car. A thorough cleaning was followed by a thorough cleaning. Then is was cleaned again. The original floorpan was rusty, so Cross cut a solid floor pan out of a 1964 Ford wagon and had it welded into the ’62. And he replaced the missing cross member.

I arranged for a small crew of students from McPherson College to work on the car during the winter semester break 2019. Hagerty’s Brad Phillips also rolled up his sleeves, installing new wiring harnesses under the dash and in the engine compartment. Students Dalton Whitfield and Austin Heibert jumped under the car and installed new tie-rod ends, ball joints, and shocks in the front. They also installed a front disc brake kit that was donated by the local street rod club, West Texas Cruisers. In the rear, new axle bearings and seals were fitted, in addition to all new brake components.

To finish the job that I had started a year earlier, I manned the buffer and a bottle of liquid compound and polished the rest of the car. I admit I’m not a professional car detailer, but the wagon’s original paint came back with a brilliance not seen on that car since it was new. I did burn through the paint here and there, but it just added to the car’s wonderful patina.

This was beginning to take shape.

1962 Ford Country Sedan restoration
Brad Phillips

The original plan was to paint the roof its original white, but when the students sanded off the surface rust, they came to a conclusion: the top should be clear coated, not painted. Cross, Phillips, and I looked at each other and concluded, what the heck, it’s not a restoration—it’s a car to be used by college students, not old farts like us. Let’s clear coat it!

Dalton said standard clear coat would be too shiny over the thin rusty surface that remained on the roof, so using an old customizer’s trick from the 1950s, he mixed in a few tablespoons of cornstarch. And he began to spray.

The result was beautiful. The roof had an almost leather-like finish, with just the right amount of shine. Perfect for our Midland hot rod.

The engine rebuild was not going quite as well. A friend of Cross’ owns a machine shop and offered to rebuild one of the 390-cubic-inch engines that Cross had lying around his shop. But after it was cleaned and checked, they discovered it had a cracked block, as did the second 390… and the third. Finally, the fourth engine was crack-free. A full rebuild commenced, and the dyno numbers showed the engine produced a hefty 375 horsepower. Cross volunteered a Ford-O-Matic transmission that had already been rebuilt.

1962 Ford Country Sedan tail light
Brad Phillips
1962 Ford Country Sedan badge
Brad Phillips

It had been an amazing four days of hard work, arriving at Cross’ shop before sunrise and leaving for the hotel well after dark. But we got an amazing amount of work accomplished.

The time had come for all of us to return to our regular lives. The remainder of the work would be finished by Cross, his son Jacob, and a handful of volunteers.

When we returned four weeks later, the car was finished. Cross went overboard, rebuilding the dashboard and installing a new wiring harness. All the gauges and switches worked! He also had a dual exhaust system installed, which ran through a pair of glass-pack mufflers. It sounded sweet.

1962 Ford Country Sedan McPherson restoration
Brad Phillips

I took the wagon for a ride around town and could not believe it was the same hulk that had resided in Cross’ storage yard. He admitted that just before we came knocking in 2018, he was getting ready to crush all his derelict cars and sell the property. Timing is everything.

After an amazing beef brisket dinner with a room full of volunteers, and a few dozen of Diane’s amazing cookies, we hit the road. Destination? McPherson, Kansas, about 1000 miles away.

It would be an interesting test drive…

  • 1
  • /
  • 3

Next episodes

You may also like

Enjoy Season 3 stories, opinion, and features from across the car world - Hagerty Media

The Buick Nailhead has been a thorn in Davin’s foot for months now, causing him pain with every step in the Redline Rebuild process. The crew’s last trip to the machine shop was the most painful, where we learned that the cylinder heads were unusable, and the block required extensive repair work to save. The most economical solution—sourcing parts, in the form of a used block and head—meant now Davin had to take a few steps back to ultimately move ahead.

When Davin started this teardown, the Nailhead resembled something more akin to a greasy boat anchor than a 401-cubic-inch V-8. Almost every part that came off the engine put up a fight, from the torque converter to the pistons, which meant big hammers and torches proved the most used tools in the toolbox for what seemed like weeks.

When the replacement 401 long block arrived, Davin figured disassembly would be a quick and easy process. After all, this new purchase turned over by hand, and nothing was gunked up or stuck to get in his way. Unfortunately he made the mistake of expressing that thought out loud, which of course meant the teardown ended up hitting a big roadblock: When he tapped the pistons to coax them out of their bores, they didn’t want to leave.

“It was a ridge at the top of the cylinder. Not uncommon to see on high-mile engines,” Davin says while staring at the oily mess. “The piston rings wore the cylinder wall, but since the travel of the piston is not all the way to the top edge of the cylinder, it leaves a ridge of material that makes it tough to remove pistons sometimes.”

Thankfully, the process proved still significantly less of a nightmare than last time, and the sledgehammer and air chisel stayed in the toolbox. With the crank, pistons, and camshaft pulled, this block is now ready for a bath in the hot tank at the machine shop. With any luck, what comes out on the other side will be one big step closer to a beautifully rebuilt Nailhead.

  • 1
  • /
  • 3

Next episodes

You may also like

Enjoy Season 3 stories, opinion, and features from across the car world - Hagerty Media

Our latest Redline Rebuild is a rapid-fire restoration of a 1969 Chevrolet big-block 396, and there is more to the greasy-to-shiny story of this V-8 than the time-lapse process shows. For an engine that was freshened up just five years ago, this poor workhorse was tired and in need of some love. Fortunately, Davin Reckow was on the case to nurse it back to health.

To explain all the hows and whys of every step of this build Davin sat down with Ben Woodworth and talked through the oily details behind returning this 396 to its muscle car heritage. The process Davin went through to bring this engine back provides a great opportunity to talk details, and there are lessons even the most seasoned engine builder will appreciate.

Looking back at the months of work on our big-block gives Davin a chance to reflect on plenty of fun facts. For example, he goes over why this block was not subject to the boring bar, but rather an aggressive hone to prep the cylinder wall. A previous rebuild machined the cylinders to 40-thousandths of an inch overbore, and the next step would be 60-thousandths. Due to the wear on the cylinder walls, getting to the proper bore diameter didn’t require much material to be removed.

Removing cylinder wall material precisely involved using a torque plate. Commonly implemented when machining an engine that is setup for high performance, a torque plate replicates the cylinder distortion the block will experience when the head is tightened down during assembly. By distorting the block this way during machining, the cylinders will be perfectly round when the engine is assembled.

A few of my favorite tips come from the assembly phase, as Davin divulges why he chose reliability over originality for the valvetrain. Dual springs, a roller camshaft, and roller tipped rocker arms all add up to a slight bump in horsepower, but also reduce the need for any type of special oil or zinc additives that flat tappet camshaft would call for. This engine (and car) is destined to return to regular duty in Ride & Drive events, and we’d rather not do another rebuild five years from now.

Redline Rebuild Explained It is a long watch, but grab your favorite cold beverage and a snack or two, and settle in for a fun time talking about the greatest gearhead passion—engine building. Was there something you learned from this video? Something you are surprised Davin didn’t do? Tell us about it in the comments below.

  • 1
  • /
  • 3

Next episodes

You may also like

Enjoy Season 3 stories, opinion, and features from across the car world - Hagerty Media

There is no sound quite like a tuned-up big-block. Sadly, when our 1969 Chevrolet Camaro SS396 rolled in the shop it had more of a wheeze than a growl. This engine got a refresh just five years ago, but in that time the car’s duties included teaching hundreds of young drivers how to use a manual transmission, driving road trips, tours, and general use. Given the oil in the ‘Maro’s tailpipes, Hagerty’s Davin Reckow knew there was something wrong but wasn’t sure just how far he’d have to dig to figure things out.

The diagnosis once we got the orange big-block on the engine stand wasn’t good—Hammered valve stems and leaking piston rings meant we had one choice—a Redline Rebuild.

“This engine just didn’t have the character a muscle car should.” Davin said. “Even after the last refresh it wasn’t quite right. Now it sounds and feels like it should. It got its personality back.”

It was a quick turnaround on the project, too. From when the car came in for diagnosis to when it rolled back out was just over nine weeks. While that seems like an eternity in the world of one-week-restoration television, the reality is the camera setup and time-lapse documentation we do for each Redline Rebuild is quite time consuming, and we needed to squeeze in on short notice for time slots at the machine shop. (Davin and the production crew probably owe a few favors to the Thirlby Automotive team for their quick turnaround on the machine work for this one.)

Was the end result worth the effort? We’ll let the exhaust note speak for itself as the car rolls out of the garage—and lays rubber like a big-block Camaro should.

  • 1
  • /
  • 3

Next episodes

You may also like

Enjoy Season 3 stories, opinion, and features from across the car world - Hagerty Media

We are getting oh-so-close to the point where we can shove our Redline Rebuild big-block 396 back into its home—our Hugger Orange 1969 Camaro. The V-8’s time on the engine stand is coming to a close, hopefully, so it’s all about making the finishing touches just right.

A common problem when it comes to the hardware on engines, is that if you paint the bolts beforehand, they are bound to chip during assembly. Paint after, and you will spend an entire afternoon dabbing on paint that won’t look much better than the chipped option. Necessity being the mother of invention, Davin shared with us a new method for finishing exhaust manifold bolts.

It’s called manifold dressing, a process in which the coating sprays on just like you would for engine enamel paint. The key difference is that the manifold dressing needs to be baked at 600 degrees to cure properly and will change color when the process is complete. Davin’s wife was, shockingly, against the idea of cranking up their kitchen stove for a casserole of baked bolts, so Davin began to look around the shop for ways to create the oven he needed.

Enter the Mini-Ducter, which uses inductive heat to help free stuck hardware in places a flame simply cannot go. It also easily and safely heats the manifold bolts to cure the dressing. It is certainly overkill to buy one just for something like curing manifold dressing, but Davin has to pull apart some rough engines for the Redline Rebuild series and the Mini-Ducter has proved itself a great tool for our needs. A perfect solution.

With the exhaust manifolds on, the front accessories and other ancillary items get bolted up and the whole package gets settled onto the run stand to fire it for the first time and check for leaks. Don’t get too excited, though; you won’t hear it in this video. That rumbling exhaust note will be reserved for the final cut of the time-lapse Redline Rebuild hitting the Internet tomorrow. If you want to be the first to hear it, be sure to subscribe to the Hagerty YouTube page to get a notification when it goes live.

  • 1
  • /
  • 3

Next episodes

You may also like