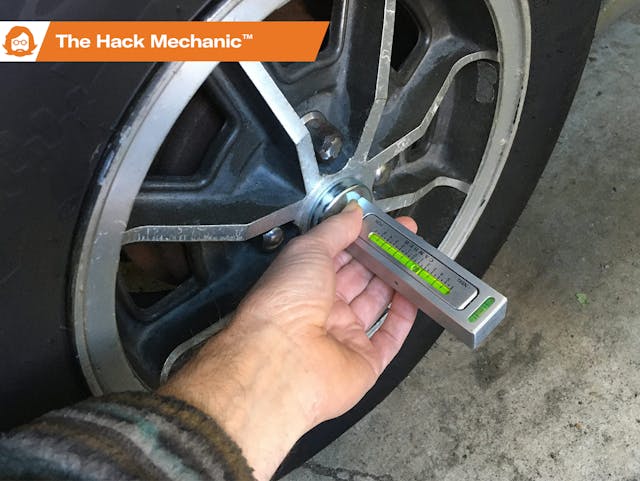
Using a do-it-yourself camber gauge
After a lot of tweaking the suspension and steering of my ’74 Lotus Europa Twin Cam Special, the handling still isn’t quite right. When I change lanes at highway speeds, it feels like it’s executing one maneuver for the front, and a second one for the rear.
As I wrote about last spring, the car uses a primitive method of rear toe adjustment involving the insertion of shims—washers really—on the bolts affixing the end of the rear trailing arms to the body. I’ve been performing my own alignments, using a pointer bar (often called a “trammel bar”), and did so on the Lotus, dialing in its front toe-in and altering its rear toe between its minimum and maximum specs. At zero rear toe, the lane-changing lag seemed better but wasn’t gone. When you’re aligning cars yourself, at some point you may need to pay to put the car up on a real alignment rack and take an accurate set of measurements, but this kind of do-it-yourself alignment makes a lot of sense on a car like the Lotus. Why? Because no generic alignment shop is going to have a clue about shimming the rear trailing arm bolts, and the bill for the iterative procedure at the handful of specialty shops that can do it is going to be pricey.
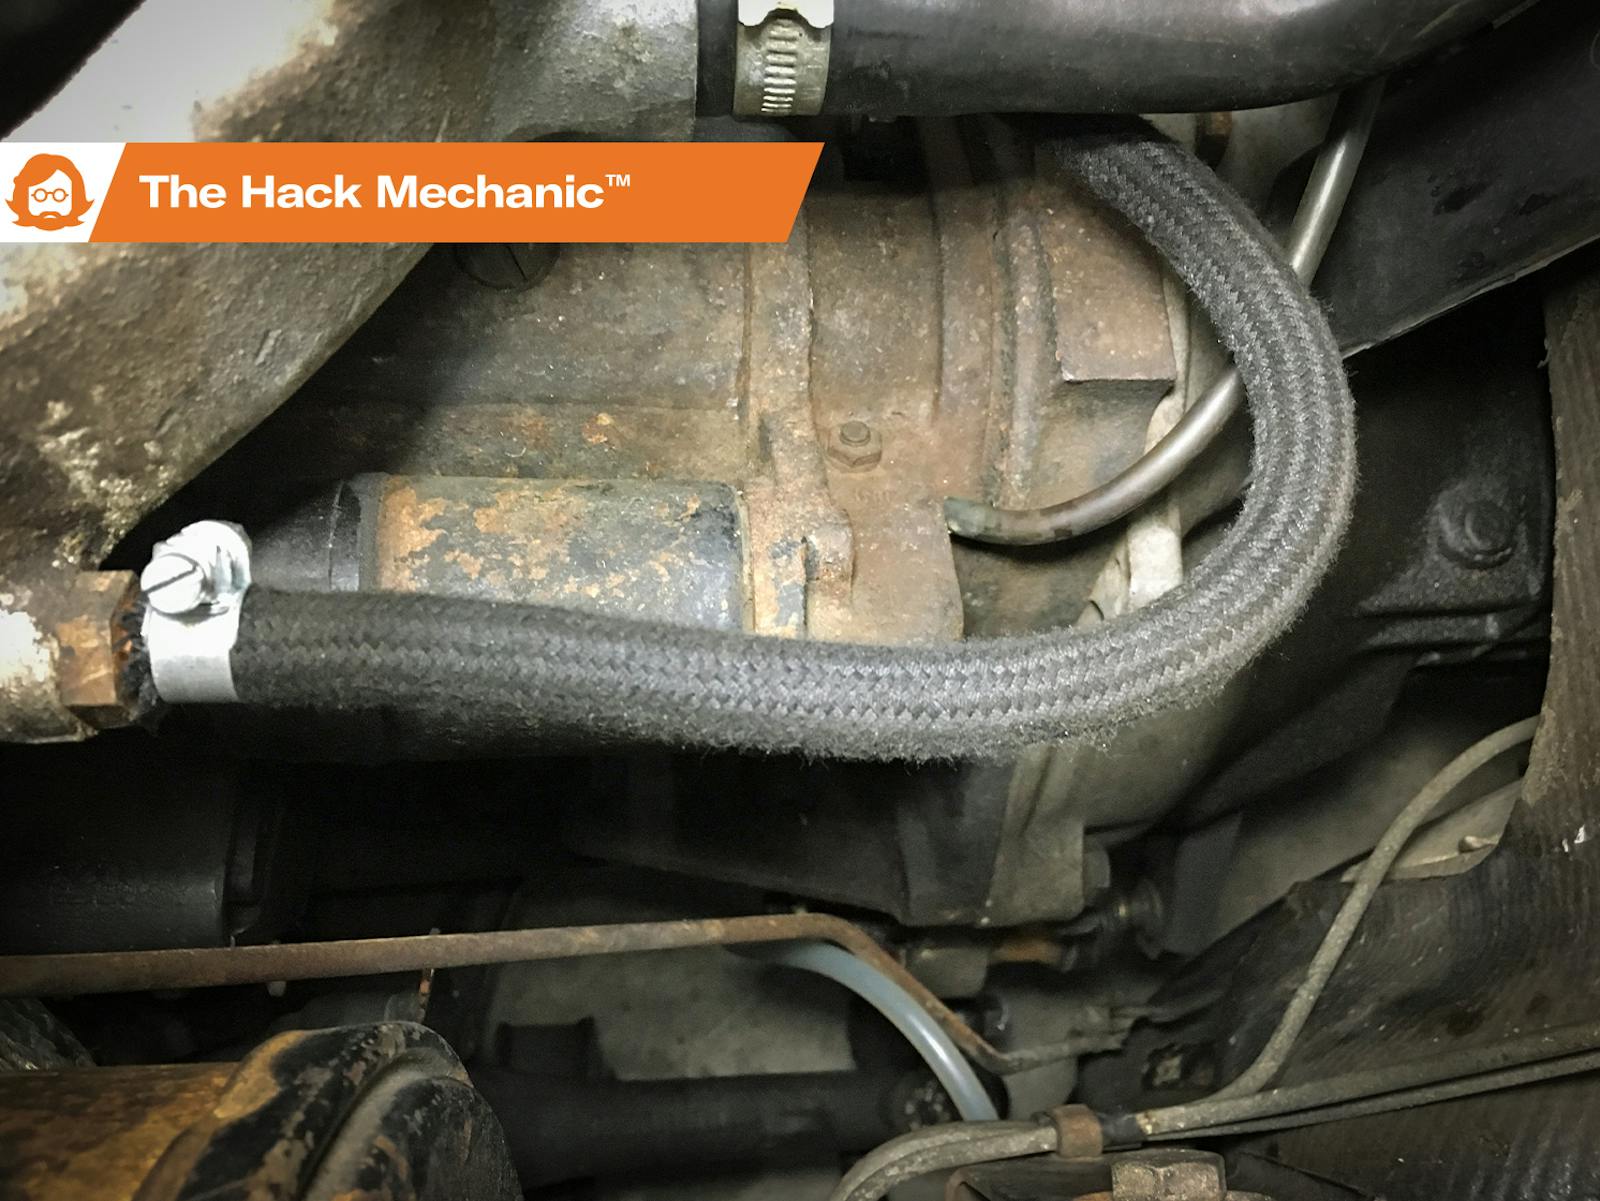
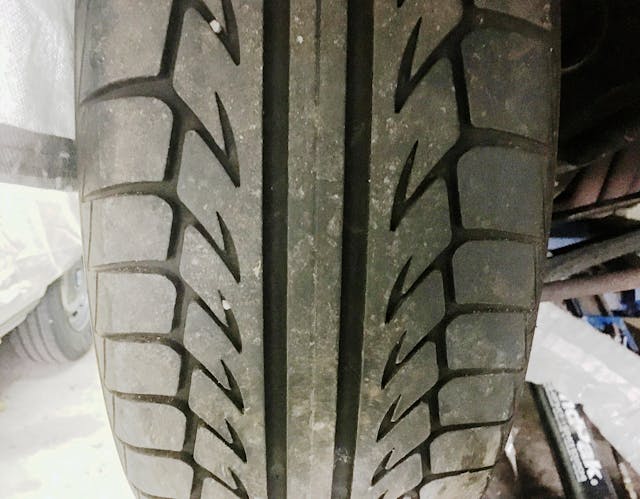
In addition to the Lotus, I have a handling issue on another car, my precious 1973 BMW E9 3.0CSi. The steering on this car has never felt completely right for the 35 years I’ve owned it. It’s particularly noticeable on steeply crowned roads, where the car feels wander-y and requires a lot of steering correction. I aligned it with my trammel bar, but that didn’t solve the problem. I next thought that it might be a power steering-related issue but removing the belt from the power steering pump and driving it with unassisted steering had no effect. Then I noticed that the inside edge of the right front tire is more worn than the outer edge. In contrast, the tire on the right side looks evenly worn. This directed me to look at the other major alignment issue—camber.
Camber is the tilt of the wheels on their vertical axis. Cars that are heavily “stanced,” with the tops of the wheels visibly tilted in toward the center of the car, exhibit a comically large amount of negative camber. However, a small amount of negative camber, like in the neighborhood of 0.5 to 1.5 degrees, can be a good thing on sports cars, as it maximizes the tire surface in contact with the road during cornering.
On modern cars with multi-link suspensions, the suspension does a good job of keeping the camber fairly constant as the wheel goes up and down, but on vintage cars with single-point-connection control arms and trailing arms, when the wheel moves up and down, it’s actually moving in an arc. Thus, if a car is lowered via the installation of shorter springs, it settles down further on its suspension, which causes the wheels to tilt inward at the top, increasing negative camber.
My mind didn’t naturally go to camber as a likely source of the problems in both cars, but, in fact, both the Lotus and the BMW E9 have lowered suspensions. On the Lotus, two winters ago I installed shorter front springs to settle the nose down to European standards instead of the comically high boat-on-plane level required for U.S. federal headlight-height standards. The rear springs of the Lotus are stock. Ten years ago, I cut a coil off the stock springs on the E9 to settle the car down slightly on its suspension and not show as much wheel well.
Unfortunately, if too much negative camber is the source of the cars’ handling quirks, the solution isn’t trivial. Vintage cars typically don’t have camber adjustment in the front or the rear. To make camber adjustable in the front, if the car has MacPherson-style struts, their strut tower bushings must be replaced with slotted adjustable bushings that can be angled slightly side to side. If, like the Lotus, the car doesn’t have MacPhersons but instead has a double-wishbone suspension with fixed camber, the wishbones themselves have to be replaced with aftermarket adjustable wishbones. In the rear, some sort of adjustable link needs to be added. Fortunately, on the Lotus, this part is easy, as its rear suspension is so primitive that links with Heim joints at both ends can easily be fabricated and installed.
But in all these cases, once new parts are installed, the camber will need to be dialed in. So, as was the case with the utility of the trammel bar for home setting of toe-in, I became interested in what’s necessary to measure and set the camber myself.
There are basically three types of do-it-yourself camber gauges—inexpensive bubble gauges, inexpensive digital inclinometers, and track-targeted castor/camber devices. The proper use of all of these is predicated on two things:
- Being able to attach the gauge to a machined-flat mounting surface that’s exactly parallel to the rotating axis of the wheel, and
- Having a garage floor that’s level enough to take the measurement.
Note that, when you take a car in for a professional alignment, they presumably have a level floor, and they fix the measuring equipment properly to the wheels. In contrast, both of these present challenges to you in your garage as a do-it-yourselfer.
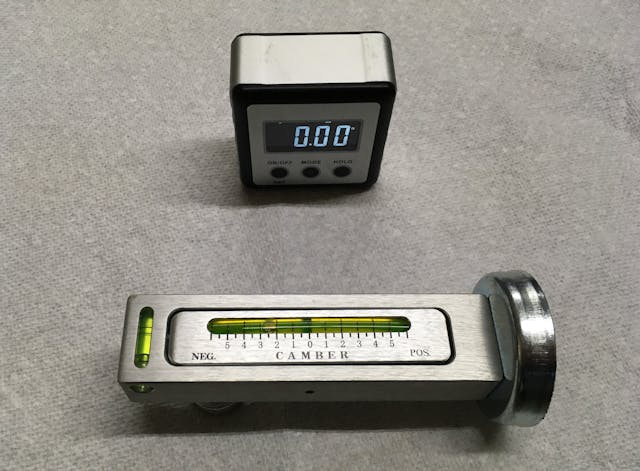
The camber bubble gauge
Let’s start with the camber bubble gauge that costs less than $20 on Amazon. It’s basically just a little bubble level with a 2-inch round magnetic base at a right angle to the level. There’s a small secondary bubble level in it to let you level the gauge on its rotational axis.
The first thing you need to know is that these gauges don’t automatically provide an absolute camber measurement. Instead, their intent appears to be, as this gauge’s Amazon description says, “Allows you to return the strut to the original camber position after dismantling and re-assembling.” The bubble level in the gauge is part of a little zeroing mechanism in the gauge housing. You’re supposed to magnetically stick the gauge on the brake rotor or other repeatable leveling surface, turn the adjustment knob on the rocker to zero the gauge, remove the gauge, do your front-end work, then put the gauge back on and adjust the strut’s camber until the gauge reads zero. You can get around this lack-of-absolute-zero problem by taking a good old-fashioned carpenter’s bubble level, finding a wall or a beam in your house that’s as vertical as the level will measure, holding the camber gauge against the side of the level, adjusting it so it reads zero, and not disturbing that setting.
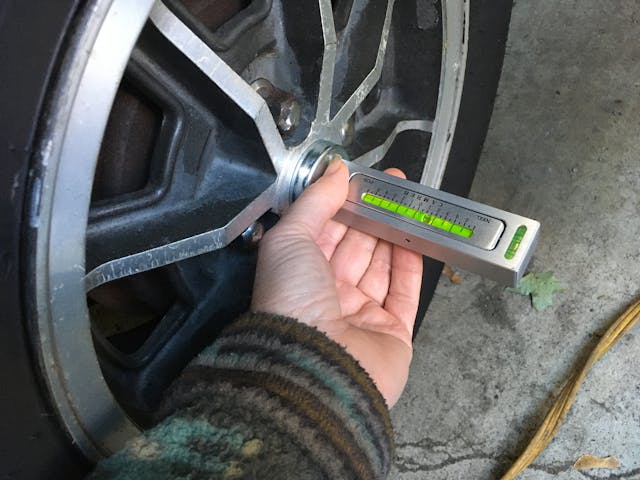
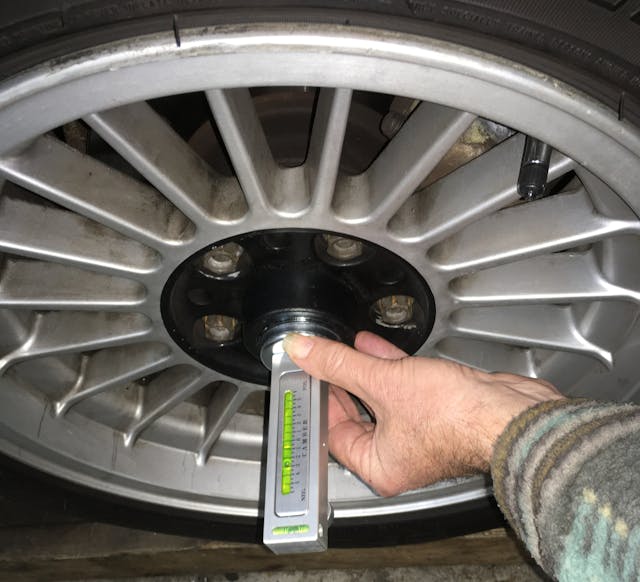
The easiest way to use the camber bubble gauge, if you can, is to pass it through an opening in the wheels and stick it to the flat part of brake rotor (that is, the part that doesn’t include the ridge near the edge of the rotor). If you have a car with, say, 19-inch five-spoke alloys where there’s plenty of room to stick the gauge through a gap between the spokes and have the magnet sit on the flat part of the rotor, you’re golden. However, not only couldn’t I do that on the two cars whose camber I needed to check—the wheels on my Lotus and my E9 don’t have gaps anywhere near big enough—I found that, on the two cars in my driveway where I could pass the gauge through the wheel, the brake rotors were too small to allow the gauge’s magnet to sit flat on them.

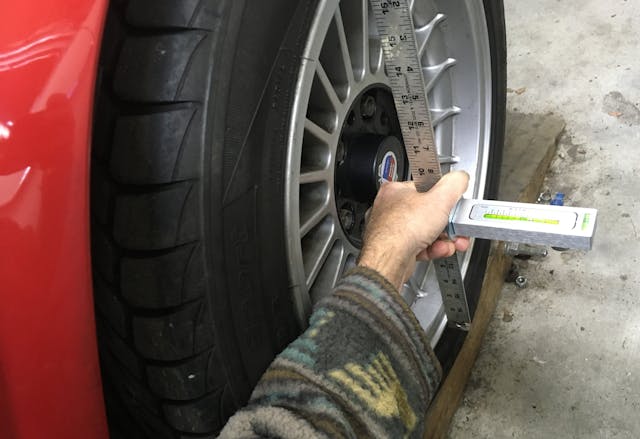
The instructions that come with the gauge say that, if you can’t use the brake rotor, “Having removed any wheel trims [hubcaps or center caps], place a straight bar across two flats of the wheel trying to keep as close to the 6 o’clock position as possible. Ensure the wheel has no dents where you are placing the bar. Place the gauge in the center of the bar and note the reading on the camber gauge bubble.” This is a bit more challenging than it sounds. To be accurate, you need a dead-flat dead-straight piece of metal that’s exactly the right length to lay on the outer lip of the wheel. If it’s too long, it’ll sit on the tire instead of the wheel, and if it’s too short, it won’t reach. So, if you’re trying to measure camber on two cars, as I was, you need to different straightedges. For my E9 with its 16-inch wheels, I had an 18-inch metal ruler that sawed off about 3/8-inch so that it would clear the tires and fit between the wheel lips. The flat part of the ruler proved to be too bendy for an accurate measurement, so I had to place it perpendicular to the wheel face, which made holding the gauge against the thin axis challenging.
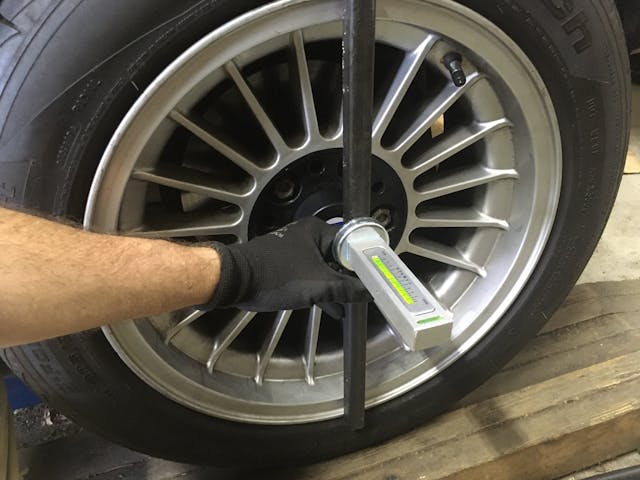
Fortunately, Home Depot has 1/2 x 1/2-inch square bar stock, so an hour and a jigsaw cut later, I had a good flat surface that I could stick the camber gauge’s magnet to.
The instructions go on to say, “It is preferable to place the gauge directly on the hub if you have a flat even surface that will provide a good fit for the gauge.” This is also more difficult than it sounds. On the Lotus, the dust caps are recessed, and the center bore of the wheel is flat, so the gauge can be put right across the center bore, but on the E9, the dust caps over the wheel bearings protrude. If the wheel bearings use dust caps with flat tops, you can try affixing the magnet to those, but it certainly isn’t a machined-flat surface, and it can vary significantly with wheel rotation. The same is true with a center wheel cap. To use the machined face of the hub itself, you have to pull the wheel off.
And that brings us to the last bit of instructions—how to measure camber with the wheels off: “Having got the vehicle to a position where the wheels have been removed and the sills are at the same height that they would be with the wheels on, use a jack to carefully raise the wishbone to the same height as it was with the wheels on. When the wishbones are at the correct height, simply use the magnetic base on the camber gauge to attach it to the brake disc [or hub face].” Obviously, this is a tedious process. Even accurately measuring the wishbone height on a low car with the wheels on the ground is not an easy thing to do. I did not even attempt to do this.
Lastly, the camber bubble gauge has hash marks every half a degree. If you’re looking straight down on it, you can sort of interpolate with your eyeball to read the bubble’s location to maybe every quarter (0.25) of a degree. But it’s certainly not a tenth-of-a-degree-accurate device to finely set camber.
The digital inclinometer

A digital inclinometer is not a dedicated automotive camber gauge, but the price is low enough that I thought I’d buy both it and the camber bubble gauge. All of the cube-shaped, sub-$35 digital inclinometers on Amazon had the same specs (0.1 degrees accuracy measuring at 0 degrees, 0.2 degrees accuracy otherwise), so I simply bought the cheapest one (also less than $20 on Amazon).
It works pretty well, but with its 2.25- x 1.25-inch size, it has the same issue as the bubble gauge of not fitting through the wheel slots on any of my cars to reach the brake rotor. It naturally reads referenced to the horizonal, in which case you need to subtract its reading from 90 degrees to get the actual camber. Like the bubble gauge, you can set it against a vertically oriented bubble level and use that to define zero, enabling you to read camber directly off it.
On paper, the 0.2-degree accuracy of the digital inclinometer is greater than the maybe-you-can-eyeball-0.25-degree accuracy of the bubble gauge, but these are small angles we’re talking about, and I wasn’t certain whether I was seeing repeatability errors in the digital inclinometer or whether they were coming from small differences in placement of the instrument on the surfaces I was trying to measure. Still, on the Lotus, where the center bore of the wheel is flat and smaller than the base of the inclinometer, I could just put it flat across the center bore and quickly read the camber.
One advantage of the digital inclinometer is that you can use it to take an actual direct measurement of the garage floor. I brought my carpenter’s bubble level inside my house, found a floor that was as close to dead level as possible, used it to zero the inclinometer, brought both into the garage, swept the floor, put the inclinometer on top of the bubble level to verify that they were seeing the same thing, and found a 0.3-degree left-to-right slant. Then you can correct for it by subtracting it from both left and right camber measurements, once you’re absolutely certain you’re recording both numbers correct as positive or negative.
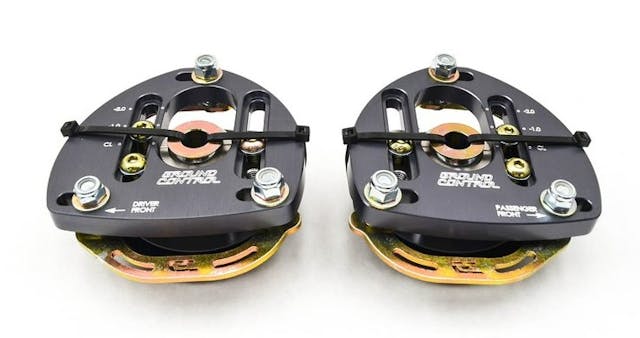
The commercial grade caster-camber gauge
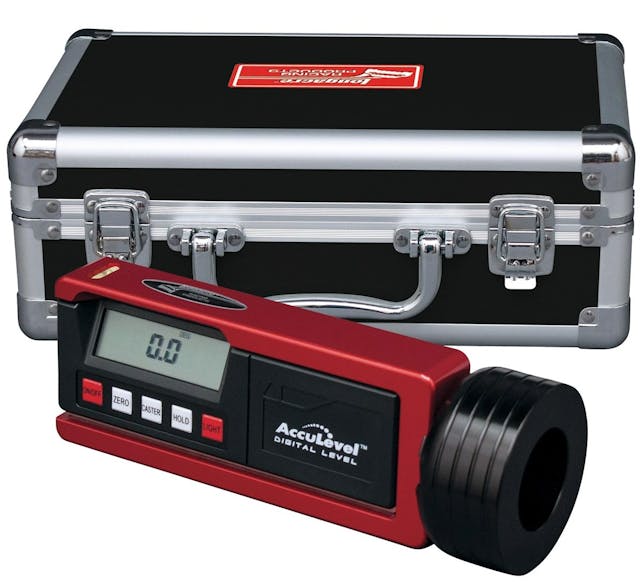
Longacre sells a commercial-grade digital caster-camber gauge that’s marketed for at-the-racetrack use where an accurate, correctly set camber directly translates into performance. If you have a set of turntables (rotation plates) to set the wheels on, the gauge can also be used to measure caster, which is like rake on a motorcycle. It retails for about $250. Unlike the inexpensive gauges, its accuracy is a tenth of a degree (0.1 degrees).
However, the caster-camber gauge has the same issue as the inexpensive units, which is that it needs to be mounted on a machined surface that’s parallel to the wheel axis. As pictured, the gauge has a big magnetic mount to stick to a hub, but that only works if the hub has an exposed ferromagnetic face that protrudes through the wheel. If it doesn’t, Longacre sells a variety of adapters that spin onto the threads at the end of the spindle for about $50 each. Used Longacre gauges do show up on eBay in the $150 range, but needing different adapters for the different cars stymied me. I didn’t buy one.
Alright already! Were either of these camber gauges useful?
I took a variety of measurements with both gauges on both cars.
On the Lotus, both the bubble gauge and the inclinometer showed that, on the rear of the car, the left camber was about -1.5 degrees, and the right was about 3 degrees, clearly indicating a presence of a side-to-side camber mismatch that could be contributing to the “lag” in lane changing. The fact that I could put either gauge directly over the flat opening of the center bore made these measurements easy. It showed that I likely do need to make or buy adjustable rear control arms.
On the BMW E9, though, the protrusion of the dust cap through the center bore and the fact that the dust cap isn’t a machined surface made repeatable consistent measurements difficult. Here, the straightedge made from the 1/2-inch square bar stock was essential. In fact, the best method was to stick both the bubble gauge and the digital inclinometer onto the bar and take simultaneous confirming measurements with both.
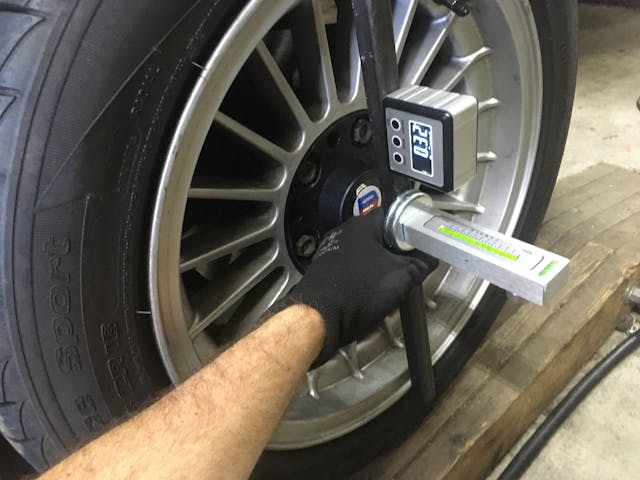
But the most valuable measurement was the one that came as a complete surprise. For grins, I measured the front camber on the Lotus. Both the bubble gauge and the inclinometer showed the camber to be about -2.2 degrees on both wheels. That’s a lot of camber. Once I looked, I could see the wheels cambered out, “stance”-like, with my own eyes. I then realized: Of course, the negative camber in the front increased. I installed lowering springs and dropped the nose nearly two inches. What this means is that, in addition to making or buying adjustable rear control arms to correct unequal rear camber, I’m going to need to buy adjustable front wishbones to correct this excessive but roughly equal front camber. If I don’t, it’s going to quickly wear the inside edges of both front tires.
In conclusion, either inexpensive gauge is adequate for identifying the presence of a gross problem. Either will probably be adequate for, once a solution is installed, getting the camber in the ballpark. I’ve identified that there are issues with the Lotus; as for the BMW E9, I’m still not certain. I’ll probably revisit this issue when I buy and install parts on the cars. And I’ll still likely need to haul them in for a professional alignment to get a final camber adjustment to the tenth-of-a-degree level.
***
Rob Siegel’s new book, The Best of the Hack MechanicTM: 35 years of hacks, kluges, and assorted automotive mayhem, is available on Amazon. His other seven books are available here, or you can order personally-inscribed copies through his website, www.robsiegel.com.