The joy of silencing a metallic rattle by replacing the compressor pulley bearing
Since my daily driver repeatedly lost power and nearly stranded me recently, I thought this week would be devoted to fixing it. However, it appears likely that the root cause of the problem is in the transfer pump that moves fuel from the left partition of the tank to the right one where the main fuel pump is located. As long as I don’t run the tank low (it was nearly empty when the problem occurred), it doesn’t appear to be an acute issue. I’ll get to it, but in the rhythm of repairing the cars in the driveway, it got bumped.
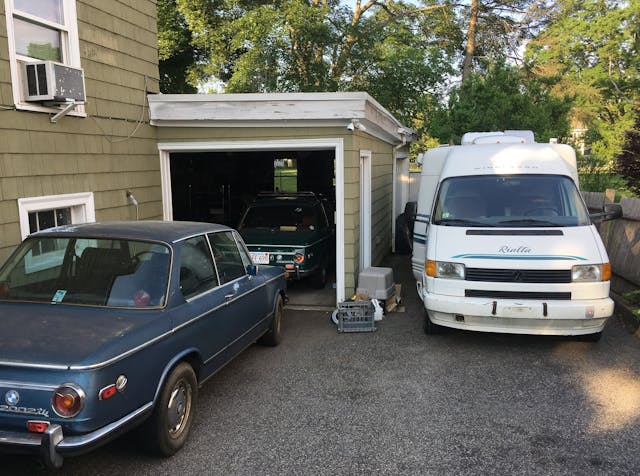
I own a 1996 Winnebago Rialta, which is a Volkswagen Eurovan with a Winnebago camper body on the back. It looks like a cross between a delivery van and a blowfish. It’s a cool vehicle, sort of a larger version of the Westfalia camper, using the extra room to host a little bathroom and a real bed, but it’s still only 21 feet long (just 18 inches longer than a full-sized Suburban) so you can drive it and park it anywhere. Mine is an early one with the five-cylinder, 100-horsepower Audi engine, making it as underpowered as the VW campers of yore. Due to its lack of power, I’m afraid to take it on a big western road trip; we use it mainly for long weekends at campgrounds near the beach. And now that summer’s here, we’re starting to schedule those on the calendar.
Like many RVs, this one sits at the end of the driveway seven months of the year, although I do start it regularly. I re-registered it and took it for its inaugural spin, and I was immediately reminded of a problem that it’s had ever since I bought it four years ago—something in the engine compartment was making a metallic ringing sound characteristic of a bearing going bad.
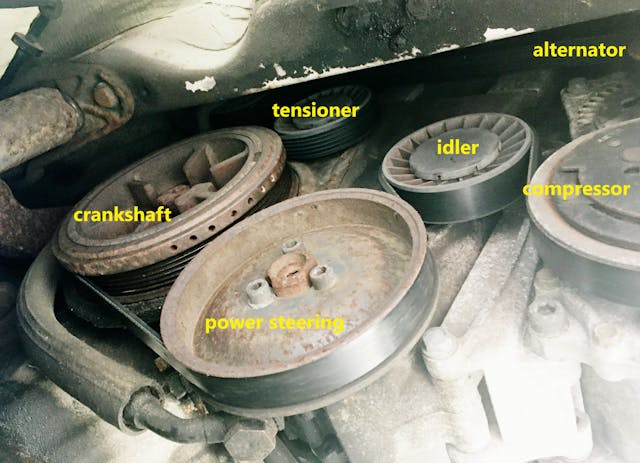
Like many if not most modern vehicles, the Rialta and the Eurovan on which it’s based use a single grooved-serpentine belt to run nearly everything (I say “nearly” because the water pump runs off the toothed timing belt). As per its name, the serpentine belt snakes around the crankshaft pulley, alternator, power steering pump, and A/C compressor, with a pulley on the belt tensioner and another idler pulley to allow the belt to make a tight turn. All of these have bearings in them, so it can sometimes be challenging to isolate where a metallic ringing sound like this is coming from. Generally, the thing to do is release the tension on the serpentine belt so you can spin each of the pulleys individually and check them for play and noise, but the belt tensioner on this vehicle is maddeningly difficult to access. You can’t seem to get to it from the top of the engine compartment without removing a lot of stuff, the nose of the Rialta is low so it’s difficult to skooch under it, the rig is parked on my asphalt driveway so I’m hesitant to jack it up and put it on stands, and it’s a too tall to get into my garage and set it on concrete.
I used my mechanic’s stethoscope and was pretty sure I’d isolated the source of the metallic ringing to the A/C compressor. The noise was apparent when the A/C wasn’t running and went away when the A/C was on, which meant that it was almost certainly coming from the bearing inside the compressor pulley. Note that if the opposite was true—if a rumbling or rattling noise only came on when the A/C was running—it would likely be due instead to the bearings inside the compressor itself.
Having localized and diagnosed it, I basically had four choices: I could continue to live with the noise, but I was concerned that if the bearing either seized or came apart, it would strand us, as that would kill everything else on the serpentine belt. I could, and nearly did, order a serpentine belt for the non-A/C version of the Eurovan, so I could either install it now or have it in the rig as a backup. But if I had to replace it, I’d need to know how to move the belt tensioner, and I still hadn’t figured that out. Or I could replace the A/C compressor. Or I could try replacing only the pulley bearing.
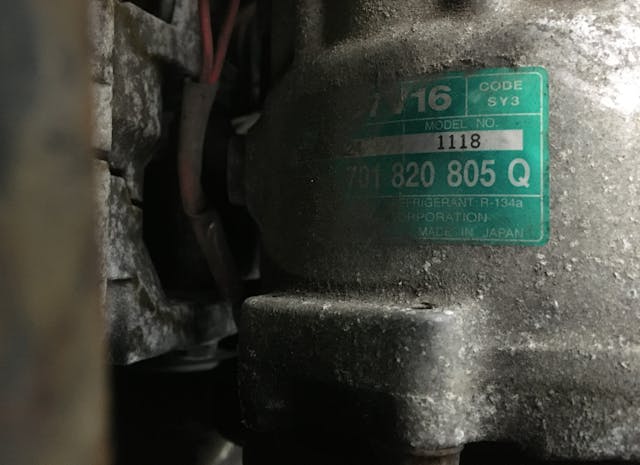
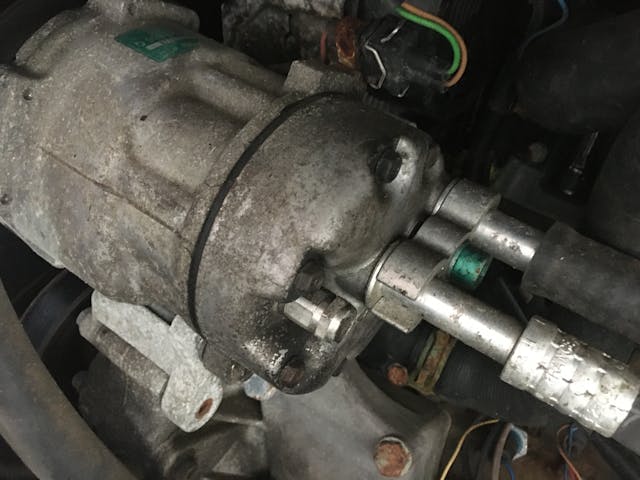
My go-to was replacing the A/C compressor. As per my recent article on retrofitting air conditioning, I do a lot of A/C work. Compressors are easy to replace, rebuilt compressors are usually inexpensive, and new Chinese-made clones of Sanden compressors are usually under $100. Plus, every spring, I find that the A/C doesn’t work on the Rialta, so I put a gauge set on it, find that the refrigerant has leaked out, put a nitrogen tank on it, pressurize it to 120 psi, let it sit overnight, and in the morning find that it hasn’t moved by a single psi. In other words, it’s got a very small leak somewhere that’s hard to find, maybe on the compressor shaft seal. Why not just spend the hundred bucks and remove the compressor as a suspect? I skooched under the Rialta, looked at the label on the compressor, and was delighted to find that it was a Sanden SD7V16, a compressor used on many cars.
I then did a little reading on Riala forums and saw posts saying that only the configuration of the SD7V16 compressor that was originally in the Eurovan will fit. After a bit of research, I learned that the compressor’s back head (the plate that bolts onto the rear of the compressor that has the fittings for the hoses) doesn’t take universal #10 and #8 hose fittings, but instead uses a block fitting for both hoses, and thus that I’d either have to find a replacement compressor that used this same back head, or swap heads.
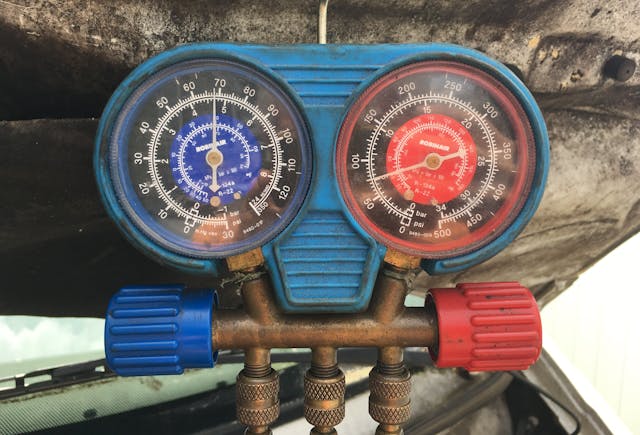
I decided that if all the refrigerant had already leaked out of the system, I’d replace the compressor, swapping heads if I had to, but if the system still had refrigerant in it, I’d try replacing the bearing with the compressor in place. I hooked up the gauge set and was surprised to see 70 psi of static refrigerant pressure. I laughed, as this means that, for the July 4th weekend, it just needs a recharge. (The title of my A/C book, Just Needs a Recharge, is supposed to be a joke. A/C systems NEVER “just need a recharge,” any more than a fender-bender will ever “buff right out.”)
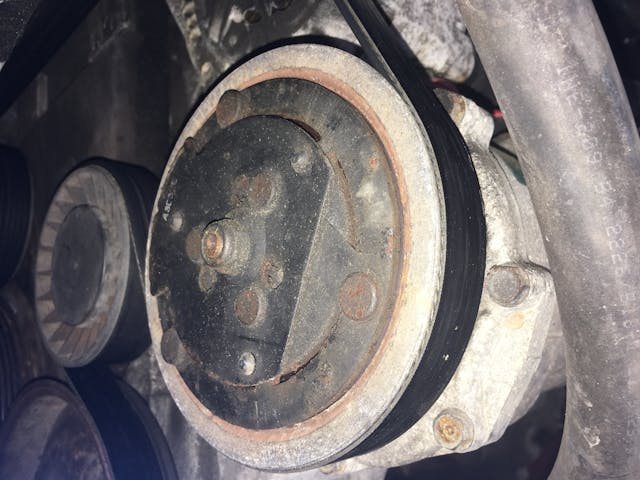
All A/C compressors use a magnetic clutch. It’s analogous to the clutch on a manual transmission, except that there’s no sacrificial lining, just two metal plates. The face of the pulley on the front of the compressor is one of the plates. The pulley normally freewheels on its bearing that’s pressed onto the nose of the compressor. That is, the serpentine belt spins the compressor pulley, but the pulley isn’t spinning the compressor. A set of coiled windings sit behind the pulley. When the windings are energized, it turns the pulley into an electromagnet. The magnetic attraction pulls a sliding part of the other clutch plate, which is sitting on the front of the pulley and mounted to the front of the compressor shaft, into the face of the pulley. This is the sharp metallic “clang” sound you hear when the compressor switches on. Once the two plates are in magnetic contact, the pulley stops freewheeling and is directly coupled to the compressor shaft.
I’d long read about replacing the pulley bearing and, if necessary, the clutch winding without evacuating the refrigerant and removing the compressor. The takeaway is that you can, as long as you have clearance to put a puller on the pulley and use a set of snap ring pliers.
The steps I give below are specific to the Sanden compressor on the Eurovan, but looking at other videos online, all compressors with magnetic clutches seem to be similar.
First, the nut holding the outer clutch plate on needs to come off. Cracking the key to ignition and turning the A/C on should engage the clutch, which will use the tension of the serpentine belt to hold the pulley still to undo the nut. If the A/C system is empty of refrigerant, the low-pressure switch may prevent the compressor from switching on, in which case you could temporarily feed it 12V from the battery.
Then the serpentine belt has to be slipped off the compressor pulley. I watched a video of a pro working on a Eurovan and using a homemade tool with a thin crow foot wrench welded, at a right angle, to the end of a flat piece of metal and using it to grab the nut on the back of the tensioner pulley to release the belt tension. I couldn’t do that, but I figured out that I could simply take a big adjustable wrench, open up the jaws so the right-angle jab of the tensioner arm could slide into it, and de-tension the belt and slide it off the pulley. It was probably the only thing I’ve used the big adjustable for in over a decade.

Then the clutch plate needs to be pulled off the front of the shaft. There’s usually a Woodruff key on the shaft, so it can stick. DO NOT LEVER THE PLATE OFF WITH TWO SCREWDRIVERS! You’ll bend it. It’s a clutch plate. It needs to be flat. On this compressor, there were three holes for M6 bolts that can be used as extractors, as you sometimes find on brake drums. I was able to use them to push the plate off, though they gouged the aluminum nose of the compressor underneath.
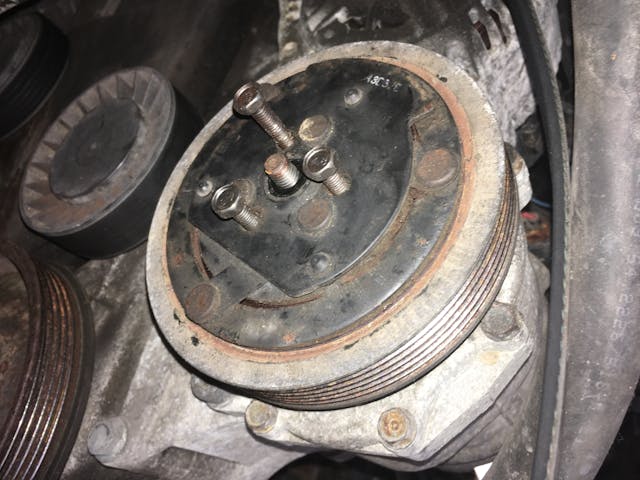
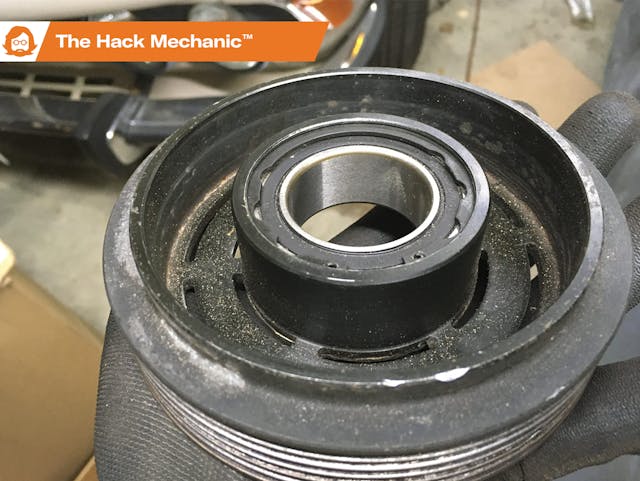
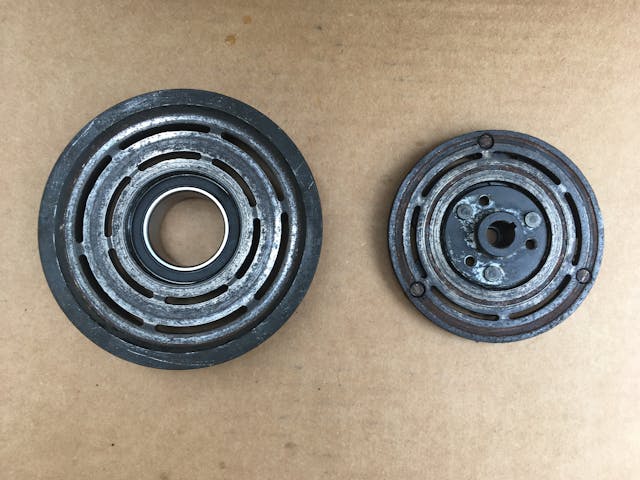
With the plate off, you can see that the front face of the pulley itself is in fact the other plate of the clutch. The bearing is in the center. A circlip (snap ring) holds it to the nose of the compressor. In this vehicle, I had plenty of clearance to remove it, but I can imagine how it would be challenging or impossible if the pulley is right up against the radiator or other part.
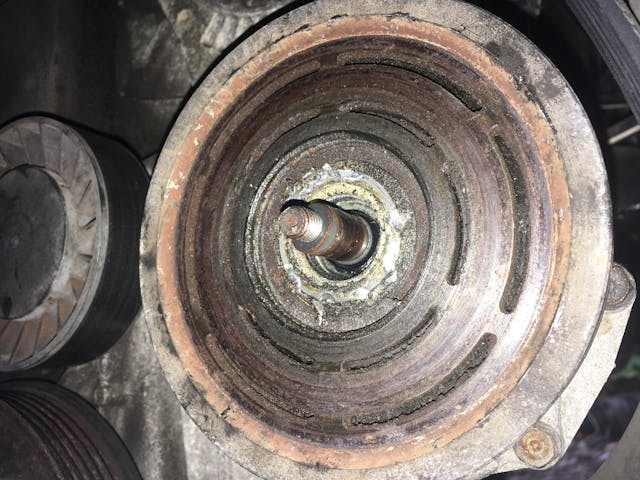
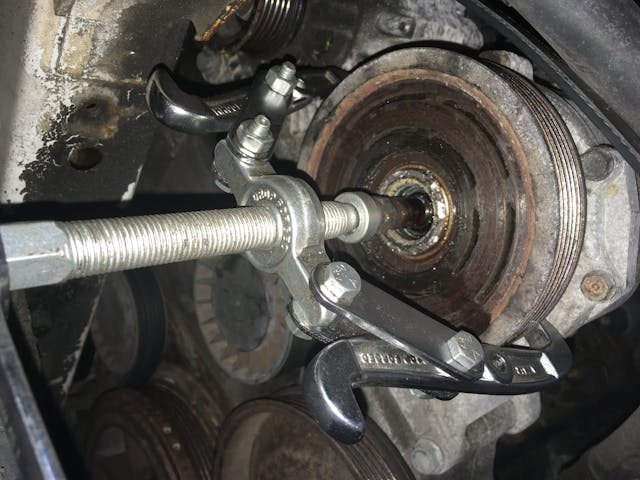
You then need to use a puller to yank the pulley and bearing over the nose of the compressor. As with the snap ring, I had ample clearance, but I could easily imagine it being otherwise. A three-armed puller is best as it distributes the load better than a two-armed one, but I didn’t have one that would fit, so I figured I’d try the two-armed one I had in the garage and quit if the bearing put up a fight. Fortunately, it slid easily over the nose of the compressor, cleaning off some of the damage the extractor bolts made in the aluminum nose along the way.
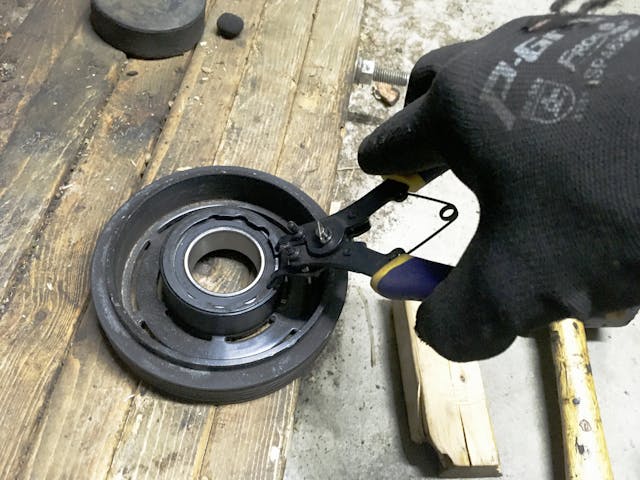
Before I destroyed the bearing by pounding it out, I wanted to be certain I could replace it. I read the part number off it, googled it, and was alarmed that it was only available at high cost from sources in eastern Europe, but that turned out to be the Japanese part number from Sanden. Dimensionally, the bearing was a standard 35x50x20mm A/C clutch pulley bearing, available from Amazon for $14 with one-day shipping. With it on order, I flipped over the pulley, removed the snap ring holding in the bearing from the back, and pounded out the bearing with a right-sized socket just like any other bearing.
When the bearing arrived, I verified the size was correct for both the pulley and the compressor nose, carefully banged it into the pulley, cleaned everything up, and reassembled.
Although pulling the old bearing off the compressor nose largely cleaned off the damage that the extractor bolts had caused, I wanted to make sure the bearing didn’t get hung up on a burr or anything, so I used a file to carefully bevel the edge of the nose and clean up any rough edges. There was just enough room under the car to gently tap the pulley/bearing onto the nose with a rubber mallet. Circlip, outer plate, serpentine belt, nut, and done.
The real joy, of course, was in starting the engine and no longer hearing that snotty metallic rattle. And knowing that I’d fixed it for 14 bucks.
***
Rob Siegel’s new book, The Best Of The Hack MechanicTM: 35 years of hacks, kluges, and assorted automotive mayhem is available on Amazon here. His other seven books are available here on Amazon, or you can order personally-inscribed copies from Rob’s website, www.robsiegel.com.

