Rejuvenating your vintage air conditioning can be a cool project
With the start of summer around the corner, a gearhead’s fancy turns to thoughts of… air conditioning—so you’re not sweating like a pig in your favorite vintage car.
OK, maybe that’s just me.
Granted, my home in Boston doesn’t hold a blowtorch to Phoenix or Brownsville or Orlando, and some would argue that, for a guy from the temperate Northeast, I’ve gone to insane lengths to have cold cars, but when you have real winters as we do, the driving season is already short enough, and I find that while owning other air-conditioned cars, the ones without A/C tend to sit most of the summer.
A few years back, when I was attending a vintage BMW event, I bought a full-up A/C system from a guy who’d removed it from his BMW 2002. The system had been sitting in my basement, but when Boston had its first 90-degree day a few weeks ago, I decided it was time to pull it off the shelf and install it in my ’72 BMW 2002tii. I’m up to my hips in the installation right now. So, while it’s all fresh in my mind, I thought I’d outline what’s involved.
Overview
Why is A/C different in old cars? When I say “vintage air conditioning,” I mean a system where the A/C and heat are separate (that is, no climate control), it originally used R12 refrigerant (“Freon”), and it probably had flare fittings on some or all of the components. At the end of this article there’s a link to my book, which goes into all of the issues in excruciating detail.
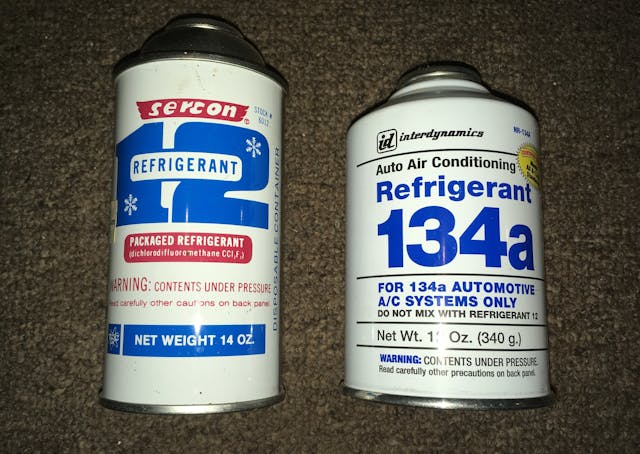
Refrigerant: Understand that, whether you’re resurrecting an existing system or installing one from scratch, you need to deal with the issue of changing refrigerant. Before the early 1990s, automotive A/C systems used R12 (“Freon”). Due to its effect on the Earth’s ozone layer, the use of R12 in cars stopped in 1994, and automotive refrigerant switched over to R134a, which doesn’t cool as well as R12. Production of R12 was banned in 1996, but individual cans of old stock are still available on eBay. It’s widely stated that buying or using R12 is illegal, but that’s simply not true. It is true that, legally, you’re supposed to have an EPA 609 certificate to buy R12, but sellers on Craigslist and Facebook Marketplace, and at yard sales, never check. When R12 was discontinued, prices spiked to $100 a can, but these days, demand is so low that you can usually find cans for about $25.
If you have a tight, leak-free system that originally used R12, there’s no question that the quickest path to getting it cold is to recharge it with R12, but the issue is that if the system was tight and leak-free, it would still have R12 in it, so if it doesn’t, it’s got a leak that first has to be found and fixed (a car never “just needs a recharge”). There are huge fines if you’re caught venting R12 or any refrigerant into the atmosphere. Capturing R12 requires R12-specific recycling equipment, and so few cars use R12 these days that fewer and fewer shops have the recycling equipment anymore. Yes, there are “alternative refrigerants” (things like Hot Shot), but you run into the same issue as R12 in that very few shops have recycling equipment for them, so you back yourself into a corner where you’re the only person who can service it. And if you’re a hobbyist, you almost certainly don’t have the recycling equipment either.
For all these reasons, these days I’m less and less sanguine about using R12; I only use it in one car whose evaporator assembly and console were so fragile that I didn’t want to take it out to flush it (because R12 and R134a use different lubricating oils, all traces of the old R12-specific mineral oil must be flushed out before the R134a-specific PAG oil is introduced). For most people resurrecting an old A/C system, it makes sense to convert to R134a as part of the retrofit or resurrection process. But since R134a doesn’t cool as well as R12, it’s wise that A/C rejuvenation include upgrades to the system in the form of a new rotary-style compressor and a large parallel-flow condenser and fan to make it perform better.
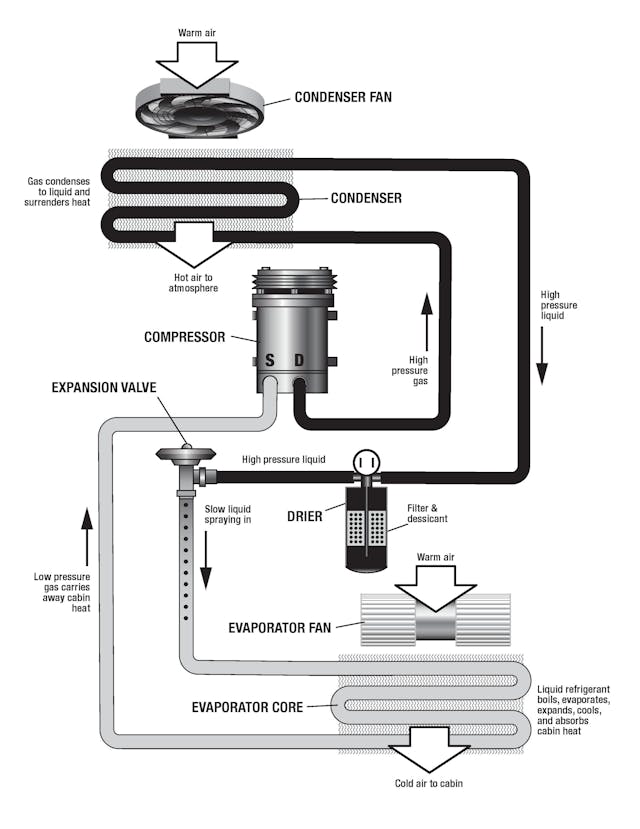
One Paragraph of Theory and Layout: Just like your fridge or freezer or window A/C unit, automotive air conditioning works on the principle that gas cools when it expands. You experience this phenomenon when you spray paint from a can or feel the cannister of propane on the barbecue grill getting cold. The compressor compresses the gas so it can expand and do its cold-creation thing. The evaporator assembly (evaporator core, expansion valve, and blower fan) is the unit that sits under the dashboard, capturing that expansion-created cold and blowing it at your face. The condenser sits in front of the radiator, dissipating the heat. A receiver-drier has a desiccant pack in it to remove moisture from the refrigerant. The only material difference between automotive A/C and a window A/C unit or refrigerator is that in the home application, the components are all inside the same rectangular box, but in the automotive application, the components are distributed throughout the car. The compressor is bolted to the engine block and driven off the crankshaft with a belt, the evaporator is in the passenger compartment, the condenser is in front of the radiator, and the components are interconnected with hoses.
From-Scratch Installation
In some ways, retrofitting an A/C system from scratch is more straightforward than rejuvenating an existing system because if everything is new, you don’t need to troubleshoot or assess the health of the existing system. While A/C retrofit is a substantial job for which a specialty shop may charge $4000–$6000 in materials and labor, if you’re already a DIY mechanic accustomed to other repair work, installing A/C yourself is totally doable, the parts bill can be in the $800–$1500 range, and it breaks up nicely into sub-tasks, between which the car remains drivable. The major steps are:
- Check if there are any showstoppers unique to your car.
- Procure and install the evaporator assembly that lives under the dash and a console to surround it.
- Procure and install a compressor and the bracket that holds it to the engine block.
- Procure and install the condenser and fan that fit in front of the radiator.
- Procure and install a receiver-drier.
- Punch two holes in the firewall for the evaporator hoses.
- Make custom hoses that interconnect these four components.
- Connect the electrical components.
- Leak-test.
- Evacuate and charge.
Below, I touch on the major issues you need to know for each.
Unique showstoppers: Every once in a while, something bites you. This can include having an engine block that isn’t drilled to receive a compressor bracket, or your crankshaft pulley not having the extra groove needed for the compressor belt. The latter was the case with my 1972 BMW 2002tii, and because the car is mechanically fuel-injected, the crankshaft hub had to be changed to one that had both the cog for the toothed injection belt and the compressor pulley, a very rare part.

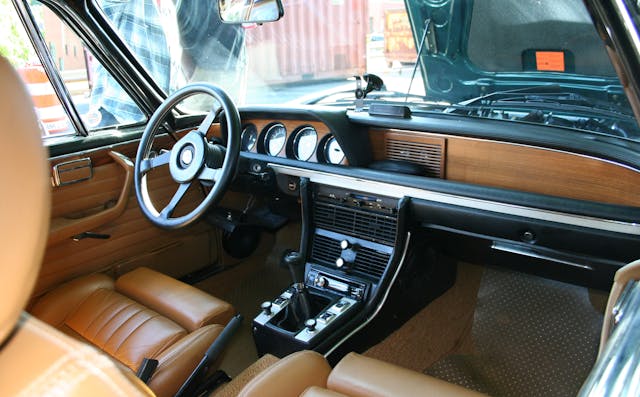
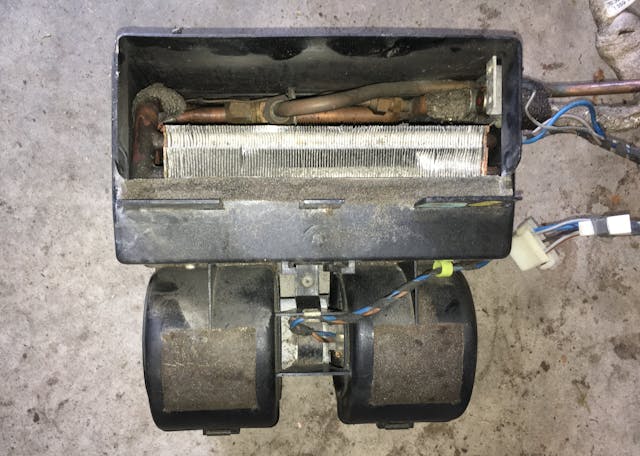
Evaporator Assembly: If the car originally was available with A/C as a factory or dealer option, buying an original evaporator assembly and console will give the interior the most original/factory look. On the other hand, modern aftermarket options, if they exist for your car, may work better—they may have a fan that blows harder than the original, and an evaporator core and expansion valve that are optimized for R134a. Suppliers such as Vintage Air, Old Air Products, Nostalgic Air, and others offer modern evaporator assemblies in a variety of sizes and configurations, but whether they’ll fit between your car’s transmission hump and dashboard, or whether a console is available to surround them and looks at home in your car, is another matter. For a common car like a vintage Mustang, there are probably multiple options, but for an obscure car, you’re often largely on your own. You might start off thinking that you’d install any evaporator assembly if it’s inexpensive and gets the car cold, and back off when it’s best to consult an enthusiast forum for your car. Be aware that if you’re buying a used original evaporator assembly, it’ll need to be disassembled so the expansion valve can be removed and the condenser flushed to remove any particulate matter and traces of old oil.
Compressor and bracket: Before the 1980s, most original A/C compressors were large, heavy, noisy, upright piston units that looked like lawnmower engines. For a from-scratch installation, buy a modern compact rotary-style compressor such as the Sanden 508, or one of its Chinese-made clones, and a bracket to hold it to the engine block. The bracket is usually more difficult to procure than the compressor. As with the evaporator assembly, reading on an enthusiast forum for your car is usually necessary. Universal bracket adapters (bracket-on-a-bracket) should only be considered as a last resort, as they add weight, can be sources of rattles and buzzes, and can cause belt misalignment.

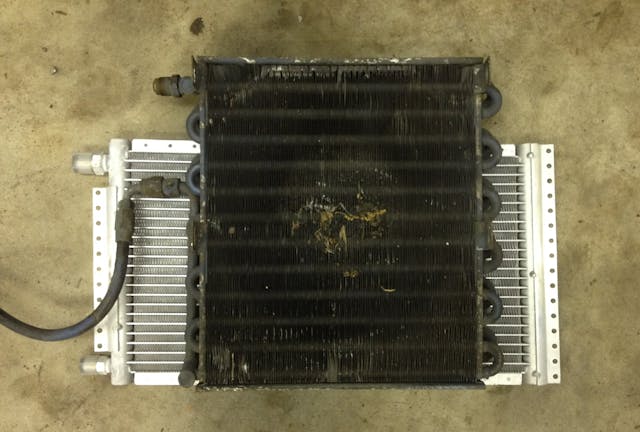
Condenser and fan: Prior to about the year 2000, automotive A/C condensers were “serpentine” style, meaning a single thick tube snaked back and forth through the cooling fins. Modern condensers, however, are of a parallel-flow design, allowing refrigerant to flow through many small tubes simultaneously, increasing the amount of heat transferred. As such, if refrigerant is being changed from R12 to R134a, it’s strongly advised that you buy and install the largest parallel-flow condenser that’ll fit in the nose, and the largest fan that’ll mount on the condenser. Again, a good user’s forum is your friend, as you’ll probably find someone else who has already determined those maximum dimensions. Universal-fit parallel-flow condensers are inexpensive (often under $80) but require you to cobble together your own mounting brackets. Drop-in parallel-flow condensers with mounting brackets in the original locations are only available for a small handful of cars. Brand-name fans such as Spal are recommended over generic low-priced fans both for reasons of longevity and the ability to actually deliver the quoted cubic-feet-per-minute (CFM) specifications.
Receiver-drier: Any generic universal-fit receiver-drier can be used, mounted using a bracket wherever it’s convenient in the engine compartment.
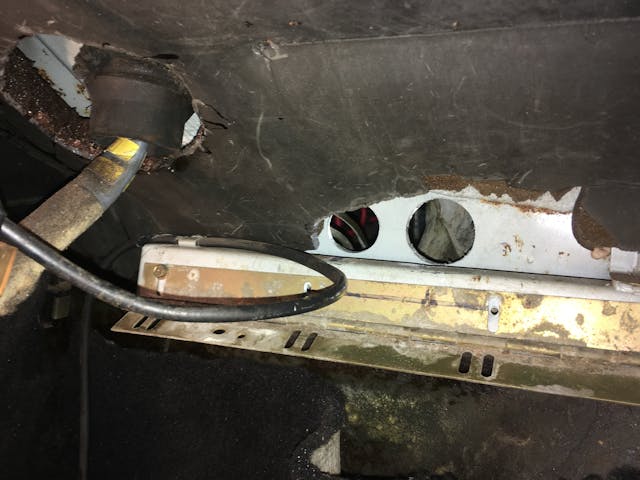
Holes in the firewall: Folks focus on the need to drill holes in the firewall as a stressful or difficult part of A/C installation, but hole saws do the job just fine. Rubber grommets to seal between the hole and the hose are available in standard A/C hose sizes. Or, bulkhead fittings can be used instead. You still need to drill the holes, but the lock nuts take the place of the rubber grommets.
Hoses: Even if original A/C hoses are available for a vintage car, the odds that they’ll fit updated components are slim, since the component locations, mounting angles, and fittings are probably all different. In addition, both retrofit and rejuvenation are opportunities to upgrade the original leak-prone flare fittings to modern o-ring fittings wherever possible. This means custom hoses will be necessary. By far the best way to do this is to find an A/C shop that will make them at the car by determining the most appropriate angle for each fitting (straight, 45 degrees, or 90 degrees), crimping it onto one end of a long hose, snaking the other end through to where it needs to go, cutting it to length, and crimping the other end on right there at the car. You can instead try to measure with rope or an old garden hose and order custom hoses from a vendor, such as coldhose.com, but due to the stiffness of A/C hoses, it’s really difficult to get it right (longer isn’t always better). The expensive crimping tool needed to install the beadlock A/C hose fittings used to only be available from high-quality vendors like Mastercool, but Chinese-made knockoffs have made the tool more affordable for the do-it-yourselfer.


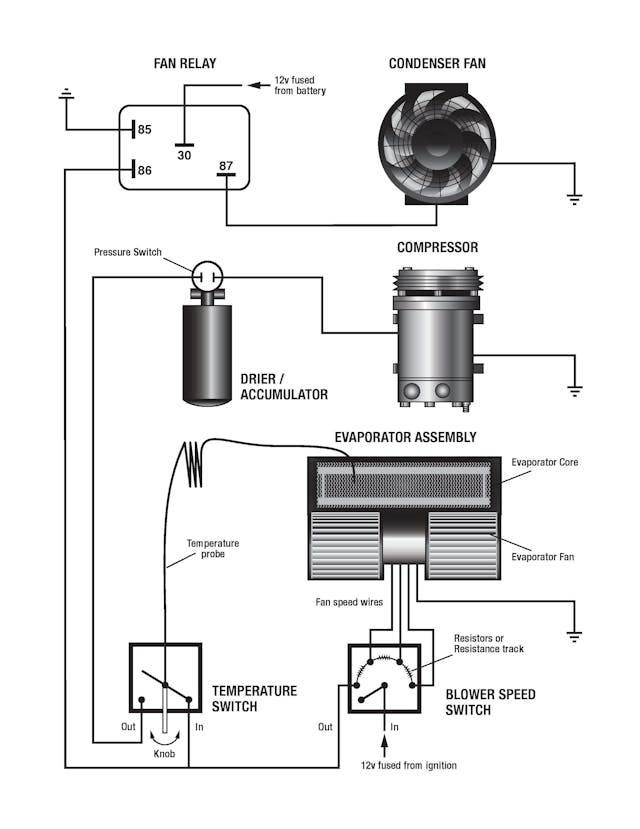
Electrical connections: Electrically, vintage A/C systems are very simple. A multi-speed blower fan switch typically powers the blower and temperature switch and sends power to a relay that turns on the condenser fan. When the evaporator temperature is below a threshold value, the temperature switch turns on the compressor. If system pressure becomes too high, a switch cuts power to the compressor.
Leak test: The more work you do upfront to ensure a leak-free system, the better. I assemble the system, then pressure-test it with nitrogen. If it doesn’t hold pressure, leaks must be found. Engineered soap solution such as Big Blu works well; spray it on all fittings and look for bubbles.


Evacuate and recharge: Once the system is tight, you evacuate it (put a vacuum pump on it for 90 minutes to boil off any moisture inside), then charge it with refrigerant. If you don’t have the equipment to do this yourself, that’s fine; just pay someone else to do it. You’ve already saved thousands of dollars by installing the A/C components yourself. But make sure you take it to an A/C specialty shop that knows how to charge a custom system, not just one that shoots in the amount of refrigerant on the sticker under the hood.
Rejuvenating an Old System
Evaluate: The steps in rejuvenating an old system overlap substantially with a from-scratch installation, but they begin with an evaluation of the existing system. Is it complete? Was it working until recently, but the refrigerant leaked out, or were the hoses cut and the compressor thrown in the garbage sometime during the Carter administration? Sometimes, the only components remaining are the evaporator assembly under the dash and the console around it, which on the one hand is okay because that’s usually the only component you’d want to reuse anyway, but if hoses were cut or you’re changing to R134a, the evaporator will need to be removed and flushed, and depending on the car, getting it out without damaging old fragile vinyl, particle board, and plastic can be the most challenging part of the repair.

Decide if you’re converting to R134a: If the system is intact, you need to decide if your basic approach is a) Get it leak-free and recharge it with the original R12 refrigerant, or b) Convert it to R134a and perform the recommended compressor and condenser upgrades. Many ’60s and ’70s American cars had some of the most overbuilt A/C systems ever installed. Charge them back up with R12 and they’ll freeze a side of beef. Flush them and charge them back up with R134a and they may still work fine. But in contrast, it doesn’t get as hot in most of Europe (at least it didn’t in the 1960s and ’70s), and so European cars tended to have anemic A/C systems that, even when charged with Freon, performed adequately at best, so converting them to R134a without also upgrading the compressor and condenser is often a recipe for disappointment. Remember that the choice of refrigerant carries with it the choice of oil—mineral oil for R12, PAG oil for R134a. Ester oil will work for both, but for some reason, it’s not widely used.
Leak testing: One major distinction between rejuvenating and retrofitting is the nature of leak-testing. With retrofitting, you’re starting off with all new hoses, so unless you screwed something up, the system should be leak-free, and if there is a leak, it’s usually at an incorrectly crimped fitting. In contrast, on an old system, leaks can be anywhere and everywhere—in the middle of hoses, from the compressor seal, from inside the evaporator assembly … anywhere.
If an A/C system had been working until recently, and if the compressor turns freely (isn’t seized) and all the blower fans work, then the odds are strong that the refrigerant leaked out. This can be verified by connecting a set of manifold vacuum gauges. If you’re lucky, dye was added to the refrigerant during a prior A/C service, in which case a U/V light and yellow glasses can be used to look for where the dye is leaking out. If not, pressurizing with nitrogen and watching the pressure gauge is extremely useful. If the gauge immediately drops, you can usually hear the nitrogen hissing out, and simply listening with a piece of hose to your ear, or feeling with your hands, may be all it takes to find the leak. Then you pressurize it again to see if it holds and repeat the process until it’s tight.

Whether you’re retrofitting or rejuvenating, be certain to be compliant with EPA 609 guidelines and use the correct charging fittings (screw-on Schrader-valve-style for R12, push-down quick-connect-style for R134a) and have an under-hood sticker that clearly states the type of refrigerant and oil in the system. You may know what you did, but this prevents the next owner or technician who services the system from contaminating their equipment.
This all may sound intimidating, but it’s really quite manageable. This 2002tii project is my third from-scratch installation, and I’ve rejuvenated old, dead A/C systems in eight other cars. The way I look at it, with all the work we do just to maintain cars at a base level of functionality, A/C rejuvenation or retrofit is a project that, in the end, gives you something absolutely wonderful that the car didn’t have before, something that both increases your enjoyment of the car and makes you more comfortable while driving it. What could be more satisfying than that?
***
Rob Siegel’s A/C book, Just Needs a Recharge: The Hack MechanicTM Guide to Vintage Air Conditioning, is available on Amazon. His new book, The Best Of The Hack MechanicTM: 35 years of hacks, kluges, and assorted automotive mayhem is available here. His other seven books are also available on Amazon, or you can order personally-inscribed copies from Rob’s website, www.robsiegel.com.

