The Fuel Pump Follies (Part 1)
One of my recurring sermons in the “Church of Hack” isn’t about the seven deadly sins—it’s the list of the “Big Seven” things that cause a car, particularly an older one, to be in the breakdown lane with the hood up. Once more for those in the cheap seats, that list includes issues with ignition, fuel delivery, cooling system, charging system, belts, clutch hydraulics on a manual transmission car, and ball joints. I preach over and over that addressing these things in a preventive fashion is an effective vaccine against the virus of roadside failure.
However, as I wrote a couple of years ago, the quality of replacement parts these days, even “genuine” Original Equipment (OE) dealer parts, is often poor, as the quality control applied to parts for our old cars (which exist in the thousands) simply isn’t the same as it is for new cars (which are pumped out in the hundreds of thousands). This has come to affect how I deal with “Big Seven” preventive maintenance. Prophylactically replacing an inexpensive normal-wear-and-tear item—like a set of points, or a larger item like a fuel pump, water pump, or an alternator—before a big trip used to be a slam-dunk for me if I didn’t know how old the part was. Not anymore. These days I generally need a reason to replace these items, since the part in the car may be of better quality than the one you’d be buying. Make no mistake—if something is exhibiting a problem, you shouldn’t ignore it. But I don’t spend the amount of time and money that I used to spend while replacing working parts. If this sounds like me discovering the well-known “If it ain’t broke, don’t fix it” paradigm, yeah, OK, there’s a hint of that in it. But I think of it more as somewhere between a Beatles-ish automotive “Let It Be” and a kind of informed laziness.
Last year, I highlighted this issue when I discussed performing another round of preventive maintenance on my little ’96 Winnebago Rialta (a Volkswagen Eurovan with a Winnebago camper body on it). Shortly before a summer jaunt to the Cape, the car died, fortunately in my driveway. The cause turned out to be a crack in the case of the ignition coil pack—as soon as it got wet, you could see it arcing to ground instead of to the distributor.
Even though I found the culprit, the search led me down the rabbit hole of reading about “sudden death syndrome” on the Rialta forums. Some posts laid the blame on the overload sensor on the in-tank fuel pump; others implicated the ignition pulse module that lives inside the distributor. My solution at the time was to spend $56 on a new OE coil pack, $167 on a new OEM fuel pump, and $65 on an aftermarket pulse module, but then install only the coil pack, as that was the component that was visibly failing and was trivial to replace. In contrast, there was no evidence that either the fuel pump or the pulse module was bad, and both are a pain to replace—the fuel pump is inside the gas tank, and replacing the pulse module requires yanking the distributor. Still, having those parts in one of the RV’s cabinets made me feel better, as a) if one of them failed while on a road trip, I thought that, if push came to shove, I could probably replace them roadside, and b) even if I couldn’t, having the parts might save two days if I had to have the car towed somewhere for repair.
As summer arrived and we began planning to use the little RV to drive to the Cape again, I was fine with those decisions. Let it be and all that.
And then, a surprising thing happened. My friend Keith Martin, publisher of Sports Car Marketplace (SCM) magazine, reported that on the “SCM 1000” enthusiast tour, his well-sorted ’72 Mercedes 250C died. The cause turned out to be a failed fuel pump. My knee-jerk reaction was, “Who doesn’t replace the fuel pump as part of sorting out a car prior to a thousand-mile trip?” But then I thought about both my revised way of looking at preventive maintenance and the Rialta with its fuel pump of unknown age sitting in the driveway, and I thought “Oh. Right. Me.”
And just like that, “If I had to, I could replace the Rialta’s fuel pump by the side of the road if it died” morphed into “And if you have to, you’re going to feel like an idiot that you didn’t just nut up and do it in your driveway instead.”
The Fuel Pump Follies had begun.
First, let me say that I dislike in-tank fuel pumps even though they make sense on paper, and I get why nearly all cars now have them. Putting the pump directly where the fuel is means it doesn’t have to suck fuel out of the tank; it can just push it forward. Plus, submerging the pump in fuel keeps it cool. And you don’t have the pump exposed underneath the car where a stone can get it.
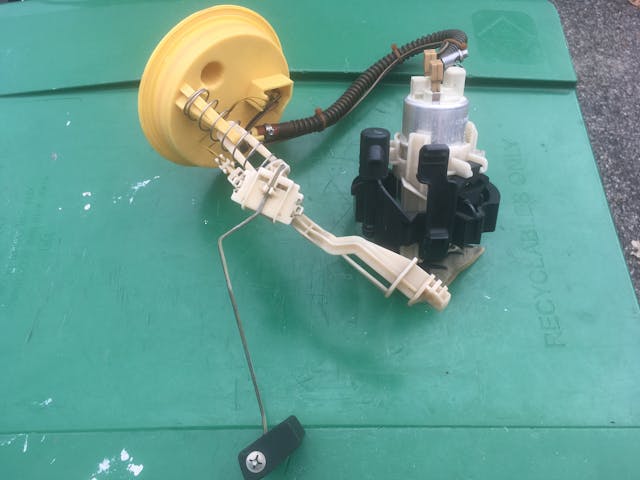
But, as with many things, the apparent simplification of putting it out of sight makes the actual piece of equipment more complicated. On a vintage car, the fuel pump, the level sensor, and the pick-up tube (the thing that reaches down to the bottom of the tank and attaches to a fuel hose at the top) are three different things. On a modern in-tank pump, they’re all part of the same assembly. The fuel pump often twists or snaps into a holder on the bottom of the tank. The level sensor is usually a float on the end of a coat-hanger-like arm attached to the side of the pump. The bottom of the pick-up tube is actually the bottom of the pump itself, which is connected via in-tank hoses to the flange at the top of the tank to which the rubber fuel send and return lines attach. These three parts have to be withdrawn together. It’s like pulling a squid with rigor mortis out of an opening the size of a soup bowl.
I replaced the in-tank fuel pump on my 2003 BMW E39 530i last year, and it wasn’t too bad. The top of the fuel tank was easily accessible under the back seat. Removing the Byzantine pump-float-flange-hose assembly required watching a few videos. To save money, I purchased only the pump “insert” as opposed to the entire assembly, so I needed to cut off the crimped-on hose clamps (I hate those things), and disassemble the “cradle” that contained the pump. It was tedious but straightforward. It made me think that, if necessary, I could do the same repair roadside in the Rialta.
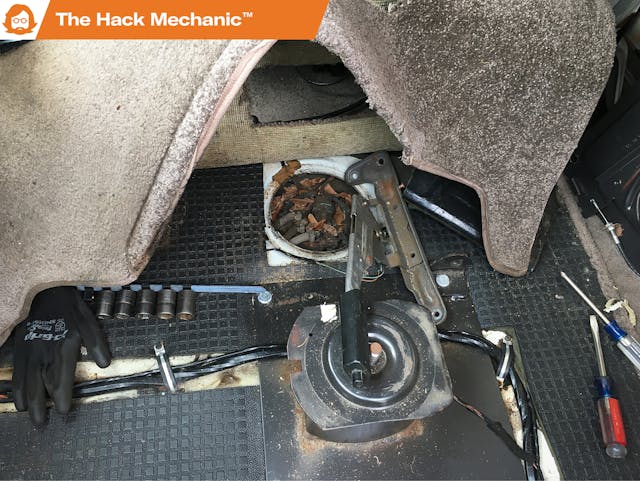
However, on the Rialta, accessing the top of the gas tank requires removing one or both front seats and pulling up the carpet, and doing that requires removing the bases of the gearshift lever and the handbrake. None of this is rocket science, but bear-hugging seats and yanking up rugs are exactly the sort of things that are likely to anger up my cranky back. I read on Eurovan forums that it’s possible to expose the access panel over the fuel pump by cutting the rug, but you need to be careful not to slice the wires running beneath it. I entertained that approach, but someone posted “Sheesh, you’d need to be a real hack to do that. I mean how hard is it to remove seats and a bit of shifter and e-brake trim?”
Point taken, perhaps more personally than most, uh, hacks.
So in I went, taking mental notes on whether I was indeed saving myself from a difficult or impossible roadside repair, or whether, like on a carbureted car with a mechanical fuel pump, it was more a matter of taking five minutes to loosen two nuts and two hose clamps.
The seat removal was surprisingly easy. My Rialta has captain’s chair-style seats that swivel on a six-inch-high pedestal, so there was easy access to the bolts holding the driver’s seat. And rather than having to bear-hug the far-from-featherweight seat out of the car, I was able to simply tip it backward into the coach section of the RV.
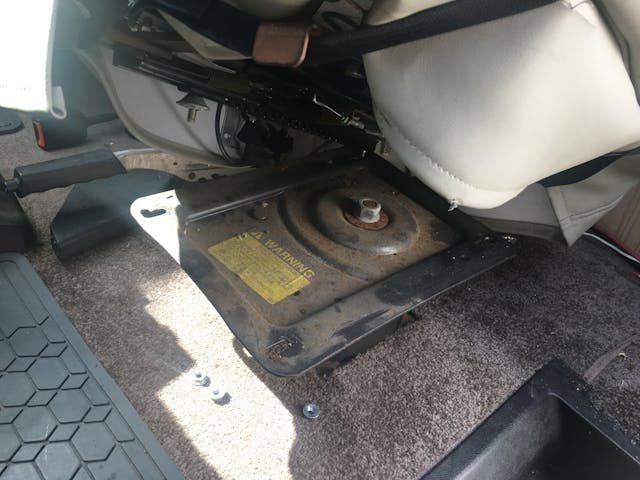
Removing the gearshift and handbrake bases was trivial. Lifting up the carpet had one hitch: The hole in it was clearly too small to lift over the big swiveling plate that the seat bolted to, and that plate was held to the pedestal with a very tight 24mm nut. I zipped it off with the impact wrench. Had I been roadside, I could’ve cut a clearance slot in the carpet instead. The carpet came up easily (I was concerned because one video showed a mechanic fighting against adhesive; mine had none). With a bit of finagling, it lifted over the seat pedestal, shifter, and handbrake. As I peeled the carpet back and flopped it over the passenger seat, I realized that the fact that I needed to remove only the driver’s seat and not both of them was probably due to the fact that mine were the pedestal-mounted style and thus had a much smaller footprint on the carpet than they would’ve had if they were floor-mounted. The handbrake lever was bolted to the floor with three stout nuts. They came off without a fight, giving full access to the fuel tank cover panel.
So far, the idea that I might have been able to do this as a roadside repair wasn’t at all far-fetched.
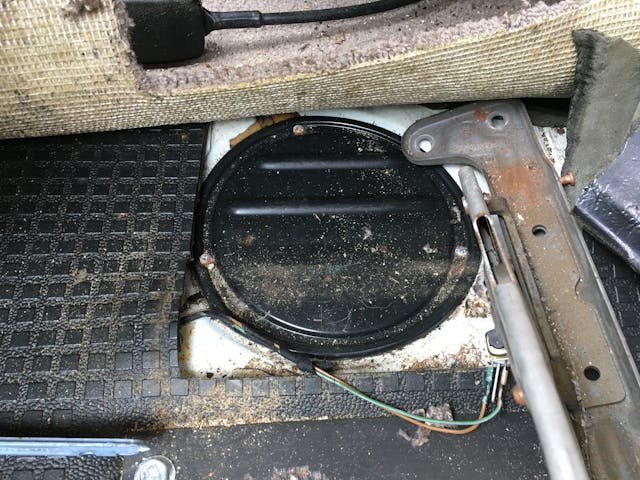
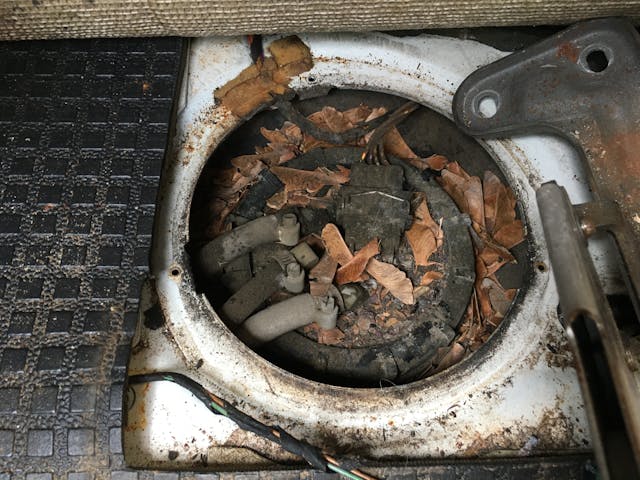
Then I unscrewed the access panel to the tank. The top of the flange where the hoses attach—the thing that you lift up to pull the pump out—was covered with leaves, acorns, seeds, and mouse detritus, stuff that you definitely don’t want falling into the tank. I grabbed the shop vac and sucked it all out, wiped anything loose off the plastic face, and vacuumed again. Yeah, I thought, this would’ve slowed me down roadside.
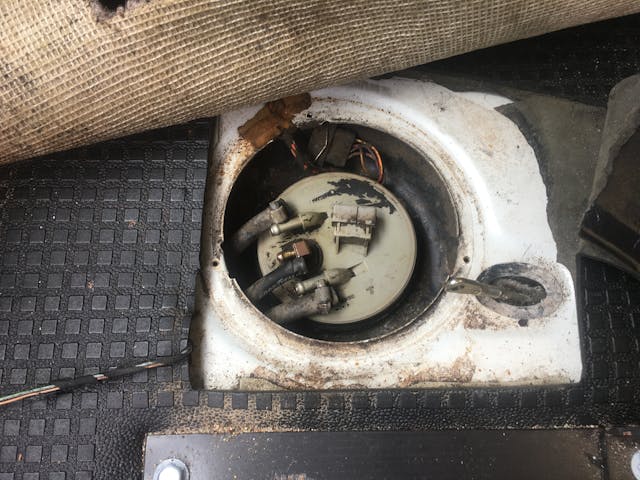
Next, I disconnected the three hoses (fuel send, fuel return, and the line to the gas generator) on the flange. The hoses were old and stiff, and getting them off required a fair amount of careful pushing, tugging, and twisting. I was keenly aware that I needed to re-use the flange, so if I broke the plastic nipples, I’d be in trouble. While it wasn’t strictly necessary to disconnect the cable from the handbrake lever, doing so got it out of my way. Working slowly and carefully, I got the hoses off.
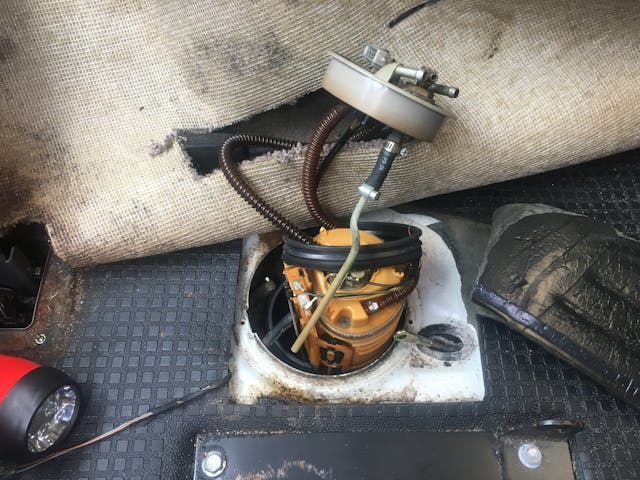
I then undid the big plastic lock ring holding the flange to the top of the tank, allowing me to carefully draw it upward and look into the tank. I could see the plastic corrugated hoses connecting the underside of the flange to the fuel pump. To get a better understanding of the layout, I unboxed the new fuel pump I’d bought last summer. I could see the slots on the bottom where it locked into the flange on the bottom of the tank. I gleaned from their configuration that the pump must lock in by twisting it to the right, and unlock to the left. I watched a video to be certain.
Then I donned gas-resistant rubber gloves, reached in with my right hand, and tried to twist the pump free.
It wouldn’t budge.
I watched another video where a mechanic said that the thing to do was get both hands through the hole and on the pump. I scraped the back of one of my hands doing so, and still couldn’t get the pump loose.
I rooted around in the garage looking for an oil filter strap wrench to get some leverage on the pump, but all of mine were too small. I entertained using a large pair of slip-joint pliers, but there wasn’t an obvious way to get them in and orient them. Plus, I really didn’t want to damage the level sensor, which I could feel but couldn’t see.
I probably tried eight times to twist the damned pump free. Finally, keenly aware that I’d feel stupid as all get-out if I reinjured my back trying to remove a fuel pump that had absolutely no symptoms of being troublesome whatsoever, I went for it, grabbing the pump and twisting it to the left as hard as I could. Mercifully, it gave up before my back did, and I pulled it out.
Yeah, I would’ve totally hated trying to do this by the side of the road in the hot sun.
[Next week, I finish this it-wasn’t-broke-but-you-fixed-it-anyway repair and reveal whether the swap and the installation went easier than the removal.]
***
Rob’s latest book, The Best of the Hack Mechanic™: 35 years of Hacks, Kluges, and Assorted Automotive Mayhem, is available on Amazon here. His other seven books are available here on Amazon, or you can order personally inscribed copies from Rob’s website, www.robsiegel.com.
Check out the Hagerty Media homepage so you don’t miss a single story, or better yet, bookmark it. To get our best stories delivered right to your inbox, subscribe to our newsletters.


Dear Hack
I, too, have generally changed over to the “if-it-ain’t-broke-don’t-fix-it” way of thinking – for much the same reasons as you. Coincidentally, I recently had to swap out a fuel pump, and experienced one of those dreaded reasons you mentioned for leaving things alone unless they force you into action: the OEM branded replacement pump was pure junk. As was its replacement. In fact, it took three brand-new pumps (from a previously highly respected manufacturer) to land on one that fit and worked properly. This is a side-of-block, American V-8 mechanical pump – two bolts, a gasket and some hose clamps – a slam-dunk roadside repair job. However. Now my dilemma is to worry whether that brand-new OM pump will fail me on the road, and if it does, will I even be able to find one that I can trust to “slam-dunk swap” into its place?
I know. It’s maddening.
You guys sure know how to talk someone out of owning an older car! 😆💀
I tend to trust “experienced” parts more than new ones. With “experienced” parts you KNOW they have worked at least once – which with new parts (particularly coming out of China) is a leap of faith.
Ouch, I have flashbacks to swapping the pump in my 2002 F150 which was broken (the sending unit not the pump) This involved using a transmission jack to lower the tank after dismissing the idea of cutting a hatch in the truck bed. Then we had an epic battle with the ‘quick connect” fittings during which I discovered the plastic tools won;t cut it so buy the anodized aluminum ones. After that pulling the pump was easy since Ford doesn’t go in for Rococo engineering like ze Germans.
I had a 99 Mustang that the fuel pump conked out on as I was getting ready to leave work. I did exactly what you didn’t and cut an access hole in the rear hatch over the pump. Including cutting the hole, the pump was in and out in 45 minutes andI was down the road. I covered the hole with some aluminum duct tape and you would never have known anything was out of the ordinary. I got the idea from my 77 Celica which had one from the factory. Never figured out why everyone doesn’t do that
Sometimes GM got it right. Twice changed the fuel pump on a 82 corvette. Take the filler door off and remove 12 small bolts, pull it out carefully. 1st replacement pump went bad just sitting, hardly any miles. Sad situation about replacement parts.
That pump must have been replaced previously, judging by the non-factory hose clamps.
My fuel pump is easy to get to except for the special tool you need to remove the ring/cap on it. What a pain in the rear end.
I’ve learned over the years of frustration and minor injury that the careful application of some heat softens the ends of old rubber tubing and makes getting them off the nipples easier. If they are really stuck a careful probe of the cut end with an L shaped pick from my trusty HF pick set, and then a drop of WD40 while the pick is still in the end helps, too. That helps getting all sorts of plastic things loose, and really helps with motorcycle grips as well. On those you shove the straw of the WD40 can in alongside the long straight pick and then give it a squirt.
I had the same thoughts about a fuel pump i a 1993 E350 Motorhome that I took out west about 10 years ago. The fuel pump sounded a little loud, so I bought a replacement before the trip, but a re-routed exhaust made dropping the tank look very painful, so I just packed the pump and a lot of tools and hit the road, figuring that at least having the part would help even if I couldn’t do it.
Sure enough, with six kids and a thousand or two miles from home the engine sputtered and stopped, and I actually coasted to a ramp and came to rest near the end of a ramp in a desert area next to a rotting large animal corpse. After messing with it a little and calling my friends at work together in a scene that could have been from Apollo 13, I got it running again by pinching off the return fuel line to bump up the pressure. The kids had a contest in the camper seeing who could kill the most flies that filled the camper.
Long story not as long, the fuel pump would die when the temp went up enough in the tank or the altitude was high enough, or both (making crossing the western mountain range in August a challenge). Stopping at a relative’s house in Colorado, I ended up getting the reciprocating saw (I was loaded for bear) and cutting a hole in the floor and replacing the pump. It was held in by six large fine-threaded studs coming out of the tank with light rust on the threads. Too much torque and whatever sheet-metal retention for the stud would tear and I would be up a creek without a paddle because that was not the place for a cutoff wheel. WD-40 and lots of going back and forth and I was back on the road. All ended well and it was a crazy but memorable trip.
I hear ya. I bought a Toyota dually that didn’t run good. After fixing the wiring that the previous owner hacked to make the electric pump run all the time (there is a FP check connector to bypass the auto shut off that he didn’t know about), I took the pump out of the tank. The intake boot was ripped and repaired with window screen. Swapped it out with a new chinese pump and boot I had lying around. Truck ran great for 2 weeks then the same problem. Yeah, I dropped it before putting it in. Took the pump out of an old Celica tank and swapped it in. Ran great ever since.
Several times, with in-tank pumps when they quit, merely pounding against the tank with a rubber mallet has tricked them into working again…if only briefly, but enough to get to a better location for repair.
Kudos to BMW & others who make access easy; others, where you have to drop the fuel tank…a pox on their engineers & bean-counters.
In-tank pumps are the #1 reason you shouldn’t run a vehicle so-equipped with less than 1/4 tank of fuel.
BTW, I can vouch for the occasional junk new replacement part; few things are worse than having to repair something a 2nd time because the replacement is certifiable crap, even if you paid an arm & leg for it at NAPA…
I had the same problem with a Toyota Hilux dual cab. Not only did we have to drop the tank, but the retaining ring was hugely stubborn and we could not afford to break it. Ended up tapping it off with a hammer and a piece of softwood. Then had to modify the threads with a Dremel to get it back on. I wonder whether a temporary fix could be had by plumbing an extra electric pump in the line.
“like pulling a squid with rigor mortis out of an opening the size of a soup bowl” Loved that line. Working on a G.M. fuel tank is like pulling the squid thru the opening of a coffee cup. Good to know that the 90’s vettes (take note hyperv6) can remove the pumps from the top., the rest of the gm’s not so much. If it’s not a collector car, I’m cutting an access hole, but for safety not covering with duct tape as would not be safe. Use metal!