The Daily Driver Needs Tie Rods

Snow-wise, it was an exceedingly mild winter here in Boston. A few weeks ago, I put away the snow blower and rid myself of the winter wheels and rubber. Doing so on both my and my wife’s daily drivers (my 2003 BMW E39 530i manual and her 2013 Honda Fit manual, respectively) is always a joy because the winter rubber just kills the handling on both cars. The BMW, in particular, is wearing a set of used brand X snows that make it feel like it’s cornering on water balloons. Once the three-season rubber is on, it feels like we’re both driving slot cars again.
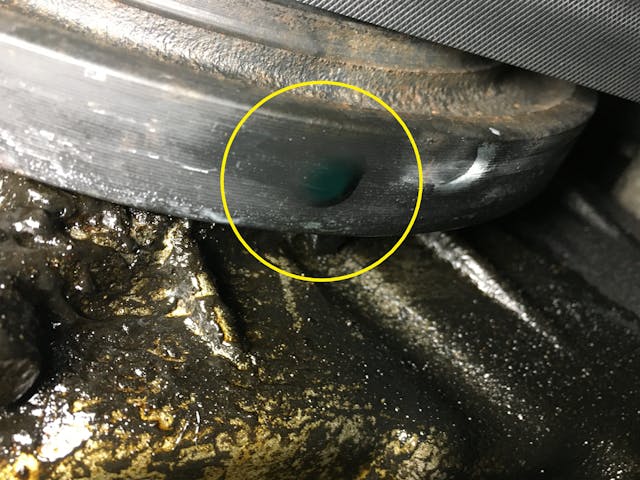
As I’ve said before, a side benefit to the seasonal wheel swap is that you can give the car a well checkup, particularly under the engine. After all, with the nose in the air, you can skooch under and see what fluids are amassing. In particular, I always look for the tell-tale drips of antifreeze doing the canary-in-a-coal-mine thing, before a water pump or a thermostat grenades.
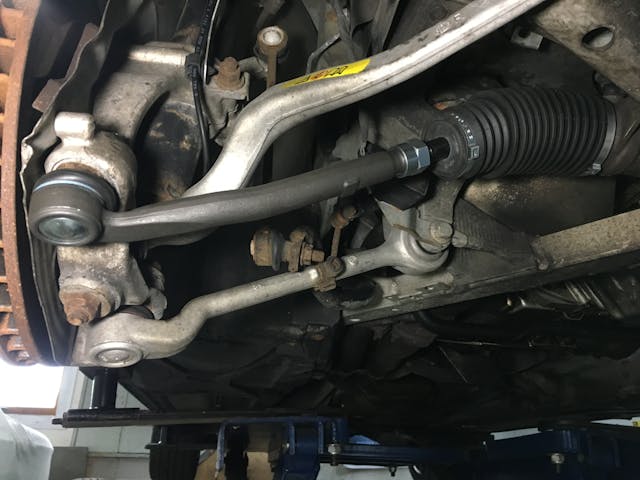
The other big part of the front-end checkup is to look for play in the steering and wheel bearings. Sit in front of the wheel and grab the tire at 6 and 12 o’clock and pull with one hand while you push with the other. Any play pretty much has to be coming from the wheel bearings. Then do the same at 3 and 9 o’clock. If there was no wheel bearing play, then play here is from the steering, which includes the outer and inner tie rods and whatever other steering components there are. On a car with a steering rack, the play can be internal. On an older car with a steering box, play can be coming from the box, from the center link, or from the idler.
Having said that, it’s rare I find steering or suspension issues during one of these checkups that I wasn’t already aware of by driving the car. I’m usually pretty attuned to wandering steering or thunks and clunks. Of course, as the guy who found two broken springs in the front end of his Armada, I may not have my credibility jar topped off.
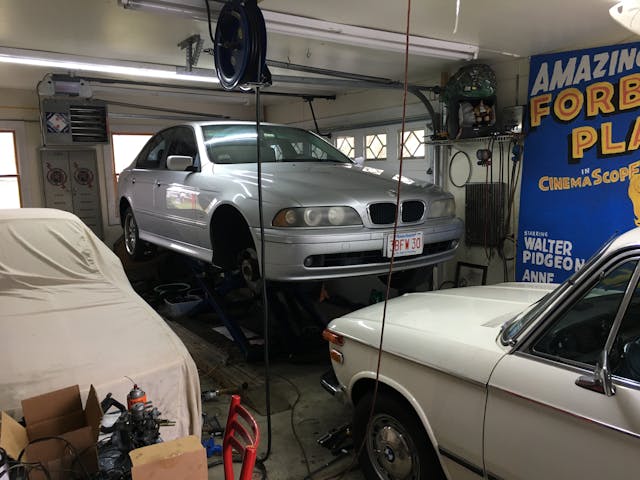
Enter the steering check of the 2003 E39 530i, where the 3-and-9-o’clock test revealed substantial play that was easily isolated to the right outer tie rod. When I found it, I recalled that the car did have a bit of a mild clunking sound from the front end, but whether I’d been in denial or whether it was a case of the frog in the slowly heating water pot, it just hadn’t crept onto my radar. I’ve long made a distinction between ball joints and tie rods in terms of urgency of repair, because ball joints sit at the bottom of the struts or wishbone assemblies and thus take all the pothole pounding, whereas tie rods are steering components rather than suspension components and thus are spared much of the violence. On modern cars with camber-maintaining front suspensions, however, the line between the two is blurred. Nonetheless, having found a clearly worn-out tie rod, the thing to do was change it posthaste. I put the E39 up on the mid-rise lift so I wouldn’t be tempted to drive it.
Next, I went inside, sat at the laptop, searched for parts, and put a pair of Lemforder tie-rod assemblies on order. Why Lemforder? I’m virtually certain they’re the manufacturer of most of the original equipment (OE) steering and suspension components in the car, and thus buying the original equipment manufacturer (OEM) Lemforder-branded parts rather than the “genuine” BMW parts saves money while, in theory, preserving quality.
Actually, let me expound on this. As with many repairs, you can allow a job like this to mushroom or contract in both scope and expense. From the scope end, if you so desire, you can take this opportunity to rebuild the entire front end—struts, top bearings, upper and lower control arms, tie rods, sway bar links. Or you can go as minimal as possible and replace only the bad component, which was the right-side outer tie rod. On my previous E39, I took the systemic approach, only to have the car continually break and bleed me, so on this car I’ve been more circumspect about fixing things that aren’t broken. I will replace suspension and steering components in pairs, but I won’t necessarily mission-creep my way into other components. To that end, I replaced the lower control arms years back when one was obviously worn, and I left the upper ones alone until they showed wear three years later.
And expense-wise, how deep are your pockets? Replacing all normal-wear-and-tear suspension and steering components with genuine BMW parts might set you back two or three grand. A Lemforder steering-only kit is about a thousand bucks. Two OE BMW tie-rod assemblies cost about $300. The Lemforder kit with tie rods boots and clamps was $90; that was the right scope and the right amount of scratch to throw at it. But I could’ve gone even cheaper—a single unbranded outer tie rod on eBay is about $17. This is another advantage of finding something like a loose tie rod in your own garage during a well checkup—you can make the choice of which approach to take and not get goaded, guilted, or arm-twisted into a choice you don’t want by a dealer or repair shop.
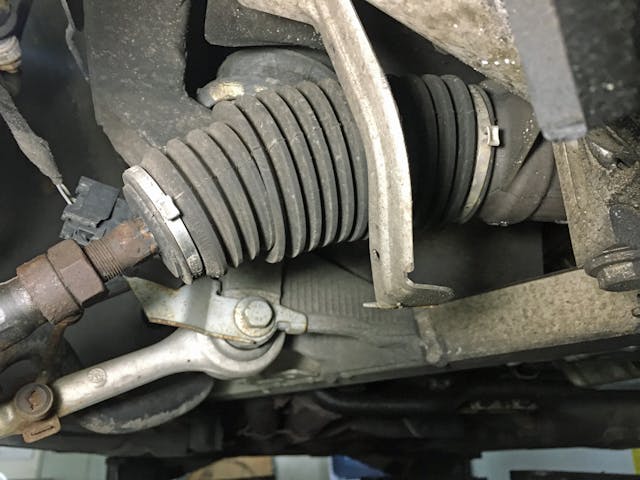
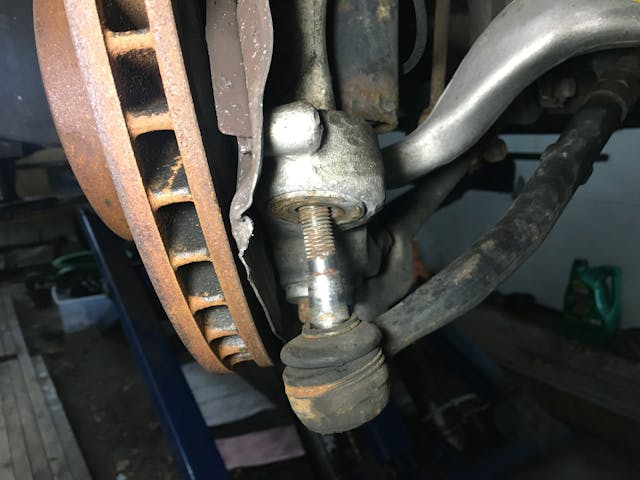
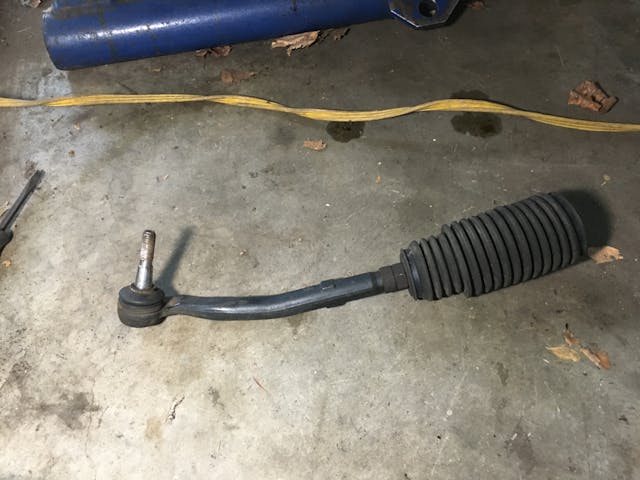
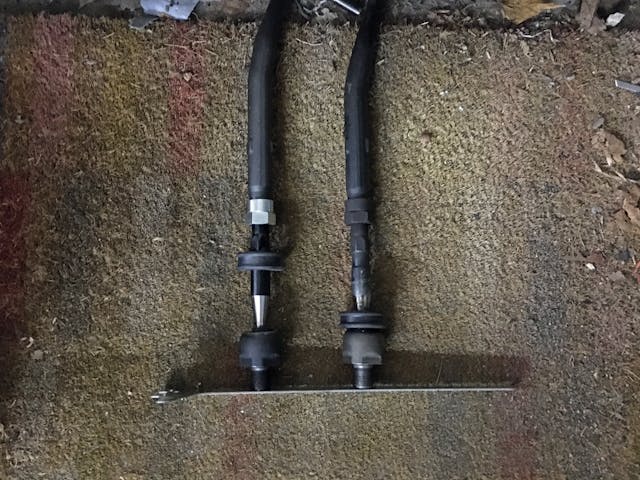
With the new parts’ arrival slated for the next day, I began removing the old parts. Surprisingly, I’d never replaced tie rods on a car with a steering rack; I’d only done it on old-school steering-box cars where the tie-rod assembly consists of inner and outer tie rods that are identical or nearly so, connected with a threaded metal tube. On cars with steering racks, the outer tie rod may be a conventional one just like on a vintage car with a tapered end that passes through the steering knuckle and a nut threaded onto it, but the inner tie rod lives inside the rubber boot at the end of the steering rack. It has a ball, but there’s no taper—it threads directly into the reciprocating steering rack instead.

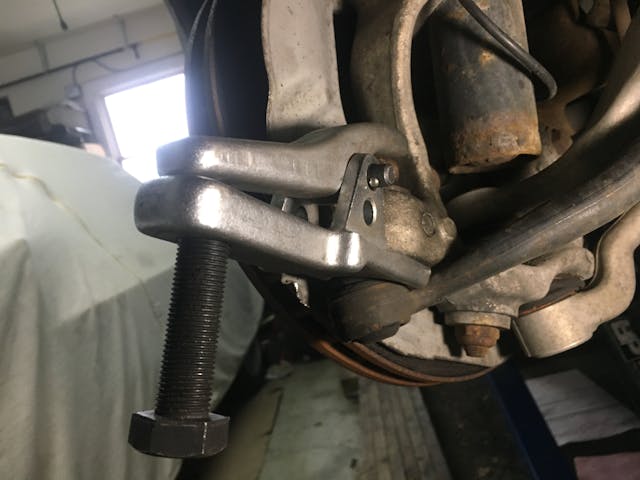
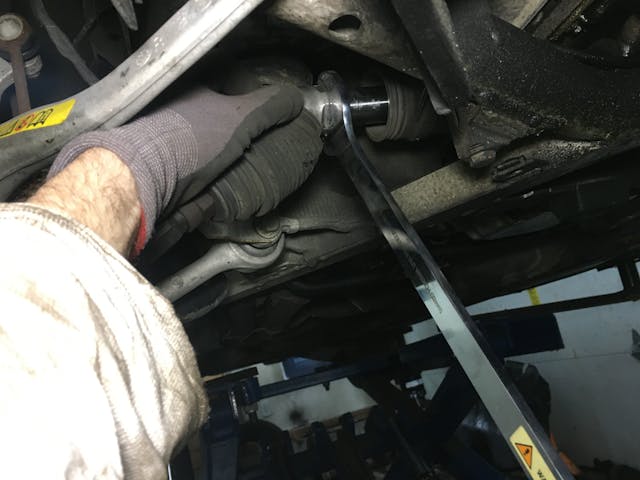
OK, outer one first. The impact wrench made short work out of the nut pulling the tapered shaft into the knuckle, so on to the extraction. One of the nice things about working on cars for 45 years and buying tools rather than renting them is that you eventually accumulate a milk crate full of assorted pullers. I found one that fit around E39’s outer tie rods, figured out that I needed to crank the steering all the way to one side to optimally orient things for the puller, tightened it down, and waited for the BANG! when the tapered end released its 21-year grip in the hole.
The inner tie rod came off even easier. I cut off the crimped-on clamps securing the boot, pulled it back, and figured out that I needed to nudge the steering wheel so the inner tie rod’s attachment nut was just clear of the rack housing. Initially I thought that I was seeing both a nut and a lock nut, like there is on the toe adjuster, but it’s just a place to grab it with a thin 32-mm wrench, which fortunately is the same size as the viscous fan clutch on these cars, so I had the exact tool needed.
On a 220K-mile lifelong New England car like this one, the whole “you’re always one broken bolt away from a five-minute repair being a three-day ordeal” thing is particularly true. Fortunately, the fact that the inner tie rod is shielded from the elements by the rubber boot made the 32-mm nut give it up without incident.
As is often the case, having done one side, the other side went a little quicker. The next day, when the parts arrived, I set about the installation. One also similarly expects installation to go quicker than removal (no rusted fasteners and all that). That, however, proved not to be the case.
The problem was threading the inner tie rods into the steering rack. In this situation, getting new threads started during installation was far more difficult than unscrewing old threads during removal. The reason is a combination of angle and tightness.
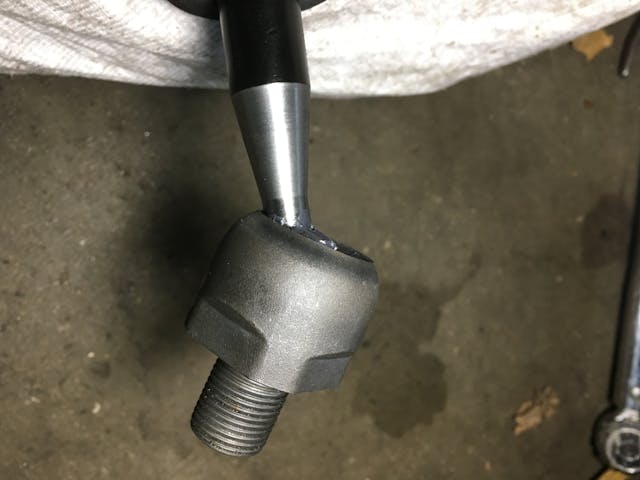
The movable part of the inner tie rod is the cup of the ball-and-cup assembly with a threaded tip. When the components are well-used, the inner tie rod cup moves on the ball easily. But new components are very stiff, you can barely move them with your hands. You’d think the thing to do is orient everything so the inner end sticks straight out and then use the whole assembly like the handle of a screwdriver to thread the inner end into the steering rack, but you can’t, because the other end (the outer tie rod) hits the strut assembly. So instead, you need to do it sort of like a ratchet wrench, at a 45° angle. However, the inner tie rod is so stiff on the ball that it won’t stay with its threads facing those it needs to mate with in the rack. Oh, and while you’re doing this, you need to hold the rubber boot back from the inner tie rod. As you can imagine, it was maddening.

First, I twisted and rotated the inner tie rod with the wrench until it loosened up enough to be able to move it for installation. Then I used two techniques: On the right side, I employed the wrench to orient the inner tie rod and turn it and get the threads started, but on the right side, I used the turn-the-whole-assembly method. I think it was the difference in strength between my right and left arms that made them different.
Lastly, alignment. If you’re replacing only the outer tie rods, people talk about counting threads, or the number of turns until the old outer one comes off, to install the new one in the same location as the old one. But even a quarter of a turn makes a significant difference in toe-in, so there’s really no question that after tie rod replacement the car needs an alignment. Nonetheless, to get it in the ball park, I tried to get the new assemblies as close as possible to the same length as the old ones by putting them side-by-side, with one end against a wall and the other against a convenient straightedge (what’s shown is actually a shelf bracket), then measuring both sides with a tape measure.
I’ve been doing my own alignment for years, but mostly on vintage cars with skinnier tires. I’d never tried it on a car like this with wide meat. But it worked well enough that I could drive the car, feel that it was toed slightly out, and tweak it until the darty feeling went away. The steering is now tight as a drum, and thunk-and-clunk free.
And, as far as finding that well-checkup coolant drip, funny story …
***
Rob’s latest book, The Best Of The Hack Mechanic™: 35 years of hacks, kluges, and assorted automotive mayhem is available on Amazon here. His other seven books are available here on Amazon, or you can order personally-inscribed copies from Rob’s website, www.robsiegel.com.
Check out the Hagerty Media homepage so you don’t miss a single story, or better yet, bookmark it. To get our best stories delivered right to your inbox, subscribe to our newsletters.


Moo? …g. ( pickup today)
Paul, I sometimes use Moog, but for BMW parts, if the price is comparable, I tend to default to Lemforder.
It’s a bimmer. I yield the floor to my esteemed colleague and the voice of experience in such matters.
Last repair, I used genuine BMW from the dealer. Not sure what I’ll do next time, now that I no longer have a spare kidney to sell.
You survived and it is fixed so it’s a double win. On to the coolant…
Years ago I bought a used mercury tracer wagon for a daily driver. I drove it home and the following day I jacked it up to change the oil and grease it. I was checking for slop in the front end when I grabbed one of the outer tie rods and with a very slight tug it came apart in my hand. Glad i decided to do a little preventative maintenance
Long ago, a friend of mine had a tie-rod end in a ’55 Chevy come apart at speed. The car went into the concrete abutment of an overpass on I-75/40. Phil came out without a scratch. My father picked him up hitching back to his workplace and dropped him off there.
Back then, the tri-fives were just cheap ten-year-old cars.
For me, the prospect of changing fluids and swapping seasonal tires always instills a vague sense of dread as to what I might find when I’m under the car(s). Perhaps because as they get older (the daily is a ’92), more parts are made of unobtainium.
I just redid the front end on a 72 F350 not too long ago. Getting my hands on the parts wasn’t exactly easy, but I was able to get them all… and all cheaper than one of those BMW tie rods. Of course I can’t laugh with a 1 Series parked not too far from the Ford…