How I survived catalytic converter theft (Part 2)
Last week I wrote about having to deal with the Thanksgiving Surprise—the theft of the catalytic converter off my 2008 Chevy 3500HD Duramax diesel. Since my insurance on the truck carries a $2000 deductible, I resolved to replace it myself.
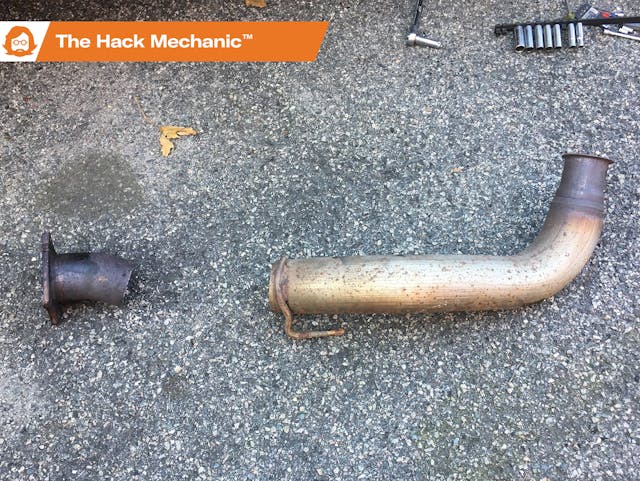
Even the legality of procuring and installing a used cat notwithstanding, I couldn’t find one, so I ponied up $725 for a legal recertified cat from a vendor on eBay. While waiting for it to arrive, I set about removing the pipes from which the old cat was Sawzalled. In the front, this was just a heavy-duty band clamp holding the downpipe to a flange coming down from the turbo. In the back, it was a four-bolt flange affixing the cut-off four-inch-diameter section of pipe to the front of the Diesel Particulate Filter. One clamp and four nuts. How hard could it be?
Well. You know that meme about how every 20-minute job is just one broken bolt away from becoming a three-day ordeal? Funny story …
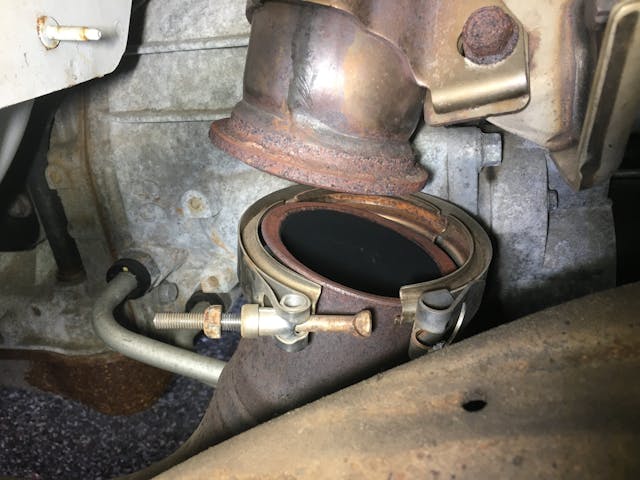
The front attachment of the cat pipe was trivial to remove. The heavy-duty band clamp was best accessed by removing the right inner fender liner, a procedure that takes perhaps two minutes, and something I was well-acquainted with anyway as it needs to come out to access the fuel filter. With it out, an 11-mm deep socket loosens the nut on the clamp. I assumed that there would be some sort of a sealing ring inside, but there isn’t. I made a note to, prior to reassembly, clean both flanges with a Scotch-Brite pad and give both sides a little coating of muffler paste.
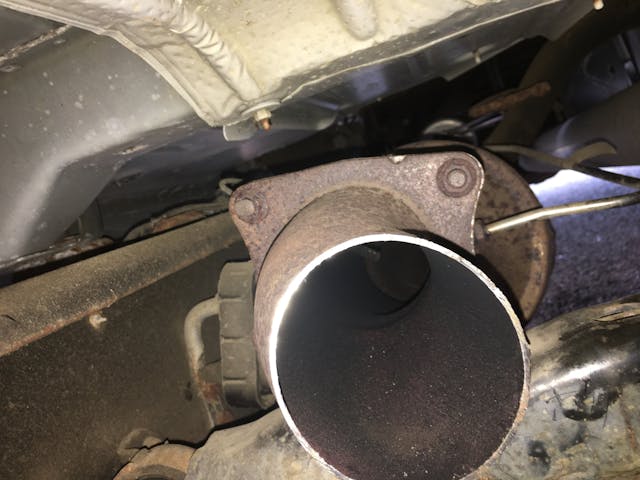
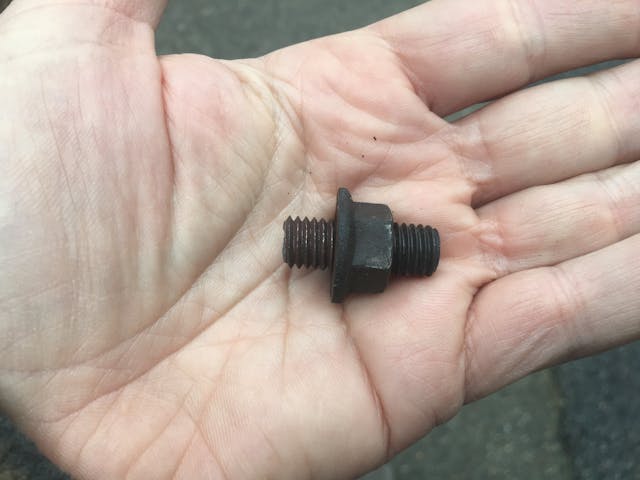
It was the nuts on the four-bolt flange on the back that mates to the DPF that caused problems. The nuts thread onto M10 (about 3/8-inch) splined studs that are pressed into the back of the flange.
Thirteen years ago, when I was removing the exhaust from my 1999 BMW M Coupe (a.k.a. “the clownshoe”) in preparation to replace the clutch, the exhaust manifolds had these same splined studs, and when I tried to drop the center resonator, I snapped four of the six of them. It was the event that caused me to buy an oxyacetylene torch and learn how to use it.
To be clear, there are three distinct ways to use a torch to help remove a fastener, and which you use depends on whether it’s tight, snapped and stuck, or hopelessly impacted. A MAPP gas torch that you can buy at any hardware store is usually quite effective at heating a nut on a bolt or stud hot enough to loosen it. Get the nut red hot, and the heat performs two tricks—the differential rate of expansion between the nut and the bolt makes the nut slightly larger, plus the heat helps to break of the bond of corrosion between nut and bolt. I combine that with letting the nut cool slightly and then touching the threads with beeswax. Wait a minute and the nut often spins right off with an impact wrench.
However, in the case of a snapped-off splined stud, you want to heat the remaining portion beyond red hot to the point where it has the consistency of taffy, and then give it a sharp hit with a punch and a hammer, a process I refer to in my first book as “heat and beat” (or, if you prefer, “smelt and pelt”). MAPP gas isn’t hot enough to do that. You need oxyacetylene. The idea is that by heating it to the point of malleability, the splines on the fastener release their death-grip on the inside circumference of the flange, allowing the snapped-off piece to pop out when smacked, ejected like a carrot by a Heimlich maneuver.
The third technique is to use a cutting attachment to the oxyacetylene torch (what’s commonly called a blowtorch), set in motion the “can’t be tight if it’s a liquid” thing, and reduce the stuck fastener to a runny lava-like puddle. This really is a method of last resort, as that much heat usually deforms the flange in which the fastener was stuck.
One thing to keep in mind is that a MAPP gas torch is smaller, lighter, and more easily maneuverable than even a small oxyacetylene setup, so I’ll typically try the former for nut loosening, and only resort to the latter if it’s absolutely necessary. Also, the tongue of flame shot out by the oxyacetylene is about nine inches long, so you need to be very careful around wires and rubber components. I hoard disposable aluminum roasting pans in the garage so I can cut them up and use them to shield adjoining areas from the heat.
Given all that, when I looked at the flange on the DPF and saw that the studs were splined and pressed in from the back and recalled the experience on the M Coupe’s manifold studs, I thought, “I really don’t want to snap these off.” So even before attempting to loosen the four nuts, I heated them all with the MAPP gas torch and wicked beeswax into the threads. I then put the impact wrench on the nuts.
Over the years, I’ve said something that many folks are surprised at: For the most part, an impact wrench isn’t for taking off incredibly tight fasteners—it’s for taking off normally-tight fasteners incredibly quickly. You can usually generate a lot more torque by putting a pipe on the end of a breaker bar than you can with an impact wrench running on a compressor at a nominal 100psi, and that’s not always a good thing, because what you DON’T want to do is apply so much torque that you snap the fastener. The impact wrench usually has the advantage of chugging away doing its whacketa-whacketa thing at a decreasing amount of torque as the pressure in the compressor tank bleeds down (at least until the compressor cycles and re-pressurizes the tank), so as long as the bolt or stud is of a stout diameter, you’re less likely to snap it than if you push with a dying strain on a pipe on a breaker bar. If you see the impact socket turn or hear whacketa-WHIRR-whacketa-WHIRR as the nut begins to spin, you know it’s slowly loosening the nut. If not, you apply more heat and try again.
So, having heated the nuts and waxed the threads, I put the 15mm socket on the impact wrench, squeezed the trigger, and held it for two seconds on all four nuts. None of them budged. I repeated the process—more heat, more wax. Lying beneath the truck, I tried to get my eyes on the impact socket so I could tell whether or not the nut was spinning. This was challenging, as the cut-off cat pipe and the DPF flange were just behind a frame cross-member. But when I looked, sure enough, I could see that the whacketa-whacketa was slowly turning first nut. I gave each set of threads a blast of SiliKroil, and the first nut spun off with the whacketa-whacketa-WHIRR-whacketa-WHEEEE that’s music to a mechanic’s ears. I did the same with the second and third nuts—watching them, verifying that the nuts were responding to the impact wrench’s torque, then holding in the trigger and going for it. Off they spun.
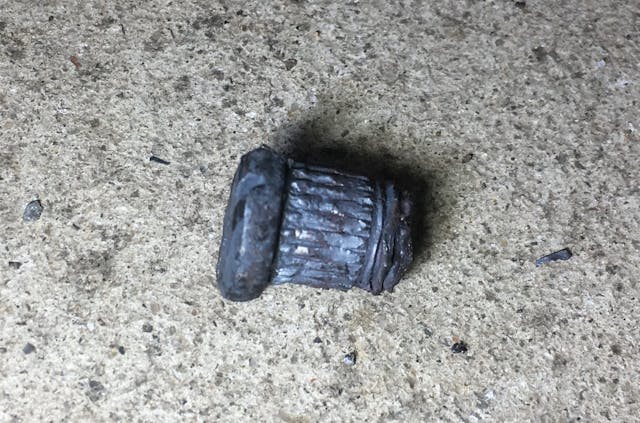
It was on the last nut and stud that I made the mistake. This nut was more difficult to lay eyes on than the other three, and I just assumed it would behave the same way as the others. Instead, I heard the whacketa-whacketa transition abruptly to WHEEEE without passing through WHIRR and knew I’d screwed up—despite two applications of heat and wax, the impact wrench had snapped off the stud.
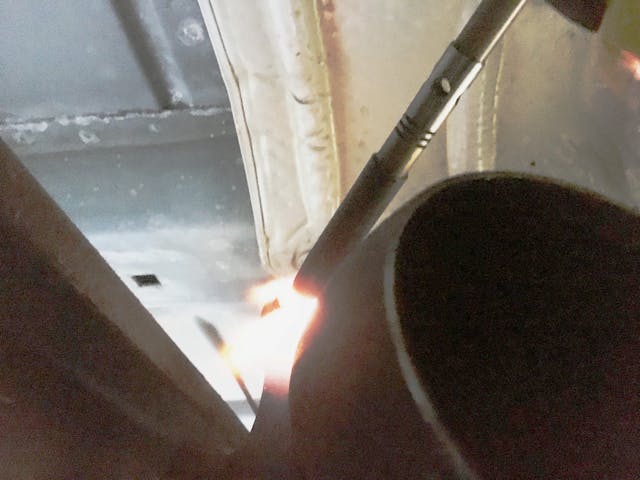
On the one hand, yes, I had that living-the-meme 20-minutes-will-now-become-three-days feeling. Or that feeling that you get when you slip and gash yourself and, while it’s nowhere near life-threatening, you know everything will come to a screeching halt while you wait for four hours in an emergency room to get stitched up. But on the other hand, I not only had an oxyacetylene torch 40 feet away in the garage, and I’d used it to solve exactly this problem 13 years ago. So, I knew what to do and how to do it.
First, I cut up an aluminum roasting pan and packed it in around the rubber exhaust hanger to the left of the flange so the tongue of flame wouldn’t melt it. Then I pulled my small oxyacetylene setup out from the back of the garage, struck the igniter to get the ragged smokey acetylene flame, began to dial in the oxygen, and realized that the tank was empty. Damn. OK, undo the hoses, pull out the oxygen tank, drive it down to Igo’s Welding Supply in Watertown, Massachusetts, and an hour and $20.19 later I was in business.
Except that, due to the position of the frame cross-member, it was challenging getting the flame trained directly on the snapped-off portion of the stud, and even more challenging to position the punch on the offending stud fragment and smack it with the small sledge while it was still soft and cherry red. Ten times I tried doing the “heat and beat” thing, and 10 times it had no effect. When I looked closely at the stud, I could see that all I’d done was flare the end of it and mash it into the flange, which made it even more difficult to punch it out.
And then I ran out of acetylene. Idiot! I should’ve checked the pressure in both tanks when I went in for oxygen. Another trip to Igo’s and $35.07 later and I was back at it, and again the snapped-off stud wasn’t going anywhere.
When something like this happens, you need to ask yourself whether you should just keep at it, or whether you should try something different. I had no doubt that I could get better accuracy both with the torch and with the hammer and punch if the frame cross-member wasn’t blocking access. I undid the front of the DPF from its rubber hanger to try to tip it down, but the strain on the lines plumbing the DPF made me stop. I also thought about using the cutting attachment (“the blowtorch”), but the idea of applying that much flame made me nervous. Plus, I really didn’t want to damage the DPF.
So, I kept at it, applying as much heat with the torch to both the front and the back of the snapped-off stud as I could, and hitting the punch as hard as I could without risking slipping and hitting my wrist with the sledgehammer (I did that once while separating a ball joint with a pickle fork 30 years ago and never forgot it). Slowly I began to see the splines emerging from the back of the flange. After smacking the punch as hard as I dared, the red-hot little bugger finally let go.
For reasons unknown, I’m not finding the splined stud listed in the GM parts catalog for a 2008 3500HD; it shows them as integral parts of the DPF. For now, I’ll replace it with a M10 x 1.5 bolt. If I find the proper part number for the stud on a Duramax forum, I can install it later.
The important thing is that, with both pieces of the cat pipe and the broken stud removed, I’m now ready to install the new cat assembly when it arrives, which should be any day. I’d ask, “How hard could it be?” … but, well, you know.
***
Rob Siegel’s latest book, The Best of the Hack MechanicTM: 35 years of hacks, kluges, and assorted automotive mayhem, is available on Amazon. His other seven books are available here, or you can order personally inscribed copies through his website, www.robsiegel.com.
I always learn something new and useful from you, Rob, even after half a century turning wrenches. This time it was the aluminum pans trick. I, like a few others, was wondering why you didn’t use an air-hammer with a punch-style head to drive put the offending part. I’ve had good luck with that.
Best to you and your over this holiday season. I forward to more of your writing into the New Year.
I DO have an inexpensive air hammer with a punch attachment. I’ve never found it to deliver more impact than an actual hammer. It just does it more quickly. It’s never done diddly with working out snapped-off knurled studs. Maybe it’s just the one I have.
Great article. Always a joy to read. Had a smilies problem on my 2011 Porsche 911. Snapped a splined bolt on the muffler but I easily got it out with a air hammer and chisel. Literally 5 seconds and it was out. As far as a new splined bolt, Porsche doesn’t sell them either. They just use a regular kit and bolt if it happens to them. B
Read both articles… this happened to my 2008 Honda Element, IN FRONT OF MY OFFICE! My experience was different the local police department said, sorry, it happens a lot and we wont file a report. The insurance company estimate was over $2,000 and wanted to total the car. Unwinding the claim was a crazy complicated.
I didn’t want to pay two-grand for a factory cat so I jumped on the Element forums… lots of stolen cats, even some for sale! My interim fix was flexible exhaust pipe and a couple of u-clamps. Against the advice of every professional and backyard mechanic, I bought a complete exhaust system including the cat online for $300 made by Walker. The pundits said it will have fault codes, wont last a year blah blah blah… it works fine. It has passed emission inspections twice!
Sometimes replacing the whole system is the easiest solution. And after the cost of tools for fixing; a new system is a wash.
Just to let you know, MAPP gas (Methylacetylene-propadiene gas) is no longer available. The last plant that made it closed in 2008. Anything called MAPP today is a poor substitute. https://en.wikipedia.org/wiki/MAPP_gas
my father’s solution to these problems with stuck bolts: carefully center punch the bolt, very small drill bit, work your way up and if bolt wouldn’t come out, he’d pick the ‘curls’ of bolt out of thread. Takes more patience than I’ve usually got but I never have seen it fail.
I’ve certainly done that. It’s the method of last resort as it’s very time consuming. Plus, this wasn’t a threaded hole; it was splined/knurled. Thus the punching.
I’ve been an amateur wrench for 50 years. What the heck is Muffler Paste?
Google it, you’ll get many links to “muffler and tailpipe putty” from various manufacturers. It’s a kind of cement to seal up less-than-perfectly-mating exhaust joints. There’s reportedly more of it in vintage Ferraris than you want to know.
Great article, learned something on the various techniques. Made some notes for the next time I encounter some stuck bolts. Thank you and like others have said, I would leave that bolt in the one hole and not worry about getting a stud for it.
I carry 0 deductible comprehensive on all my trucks, which would have saved me from being forced to perform that pain in the ass repair myself – Also nice for glass damage and if you hit a deer or some such, that is covered by comprehensive not collision – The 0 deductible only costs a little over $100/year extra a bargain at twice the price
William, I haven’t priced it, but I’d be stunned if the cost difference is that low here in Massachusetts.
why press in a new stud? these are merely for 1 handed factory workers to quickly attach fasteners.
i always replace exhaust studs/bolts with stainless steel fasteners. the second time i do the job, goes much smoother.
John McNally: “i always replace exhaust studs/bolts with stainless steel fasteners. the second time i do the job, goes much smoother.”
Quoted for truth.
I’ve been known to dismantle exhaust fasteners on relatively new cars and replace with Stainless and Nickel-based anti-seize, or if I can’t replace the fastener, make damn sure there’s anti-seize on the threads. 50 years of automotive wrenching has taught me a few tricks, tho some may think that taking apart new cars is anal-retentive. Ever had a 60,000 mile spark plug seize in an Aluminum head engine? I pull out new spark plugs and anti-seize those threads as well.
Makes me want the induction heater even more now.
when I was a rookie mechanic at an oldsmobile dealer in 1975, the “Old front end man”, Peter was kind of like my mentor. (Be sure to call him Pete!) About a 68 Olds cutlass 350 came in for exhaust work and being the rookie “water pump man” and “losing flat rate jobs” I got the task. Of course, every damned stud broke off on the exhaust manifolds!
I was not an expert on the “gas axe” and Pete says, go get the torch kid and I’ll show you a trick. He burned all six studs out and left the threads behind. All I had to do was chase the threads out with a tap.
He was a FUN guy too.
I found a penetrating oil that really works on these type of situations. It is called simply FREE. Just spray it on the nuts & wait 10 – 15 min. then hit it with impact / breaker bar. On the smoky torch, introduce some oxygen with the acy. & then light it. It does away with the spiders all over everything.
Anyone hear how effective painting the cat with bright colored stove pipe paint ( saw that you can buy red for example), and after painting it, scribe, or paint on your towns PD name and a few random numbers on it? I have heard this method will deter thieves enough for them to move on to your neighbors car, or at the very least, cause metal recycle yards to reject paying the thief for it. Any comments or ideas?