How I survived catalytic converter theft (Part 2)
Last week I wrote about having to deal with the Thanksgiving Surprise—the theft of the catalytic converter off my 2008 Chevy 3500HD Duramax diesel. Since my insurance on the truck carries a $2000 deductible, I resolved to replace it myself.
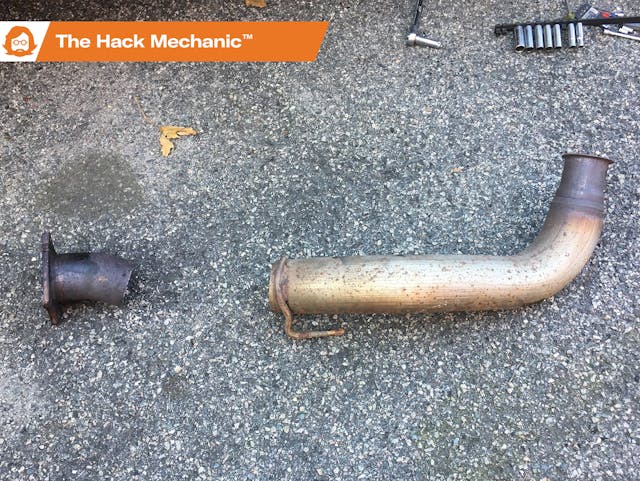
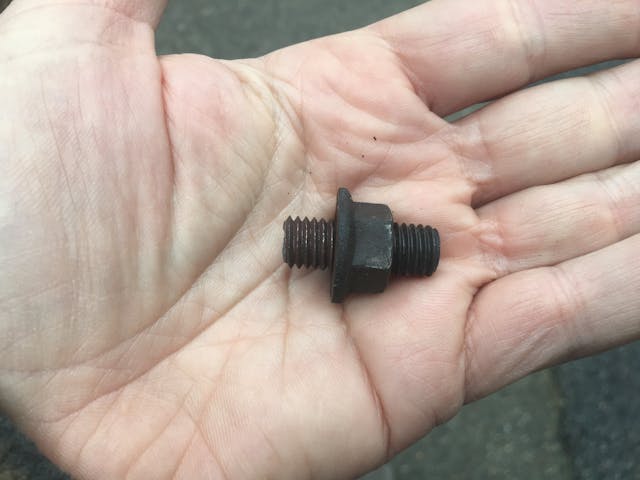
Even the legality of procuring and installing a used cat notwithstanding, I couldn’t find one, so I ponied up $725 for a legal recertified cat from a vendor on eBay. While waiting for it to arrive, I set about removing the pipes from which the old cat was Sawzalled. In the front, this was just a heavy-duty band clamp holding the downpipe to a flange coming down from the turbo. In the back, it was a four-bolt flange affixing the cut-off four-inch-diameter section of pipe to the front of the Diesel Particulate Filter. One clamp and four nuts. How hard could it be?
Well. You know that meme about how every 20-minute job is just one broken bolt away from becoming a three-day ordeal? Funny story …
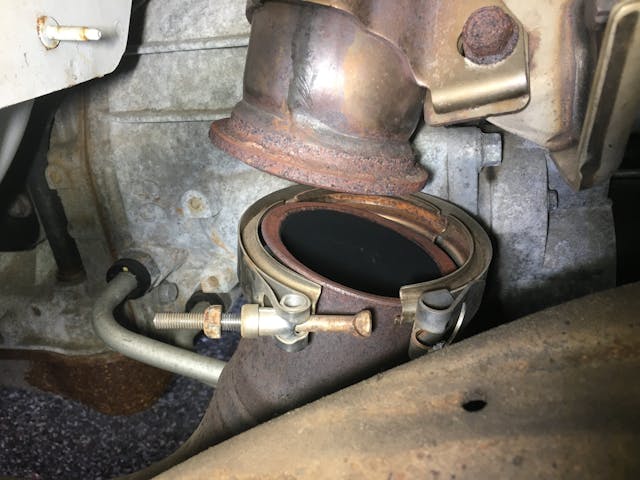
The front attachment of the cat pipe was trivial to remove. The heavy-duty band clamp was best accessed by removing the right inner fender liner, a procedure that takes perhaps two minutes, and something I was well-acquainted with anyway as it needs to come out to access the fuel filter. With it out, an 11-mm deep socket loosens the nut on the clamp. I assumed that there would be some sort of a sealing ring inside, but there isn’t. I made a note to, prior to reassembly, clean both flanges with a Scotch-Brite pad and give both sides a little coating of muffler paste.
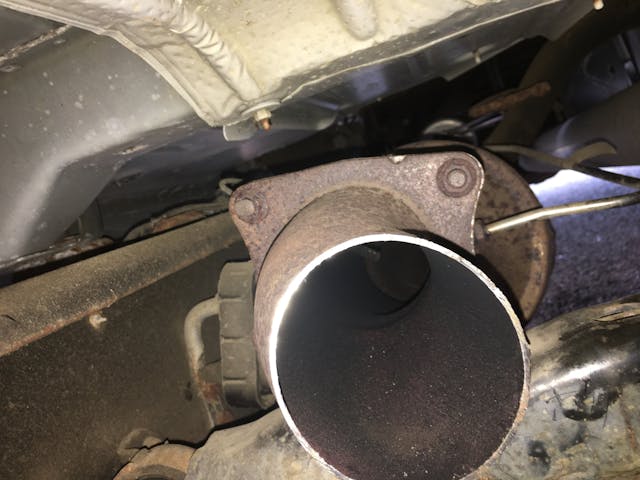
It was the nuts on the four-bolt flange on the back that mates to the DPF that caused problems. The nuts thread onto M10 (about 3/8-inch) splined studs that are pressed into the back of the flange.
Thirteen years ago, when I was removing the exhaust from my 1999 BMW M Coupe (a.k.a. “the clownshoe”) in preparation to replace the clutch, the exhaust manifolds had these same splined studs, and when I tried to drop the center resonator, I snapped four of the six of them. It was the event that caused me to buy an oxyacetylene torch and learn how to use it.
To be clear, there are three distinct ways to use a torch to help remove a fastener, and which you use depends on whether it’s tight, snapped and stuck, or hopelessly impacted. A MAPP gas torch that you can buy at any hardware store is usually quite effective at heating a nut on a bolt or stud hot enough to loosen it. Get the nut red hot, and the heat performs two tricks—the differential rate of expansion between the nut and the bolt makes the nut slightly larger, plus the heat helps to break of the bond of corrosion between nut and bolt. I combine that with letting the nut cool slightly and then touching the threads with beeswax. Wait a minute and the nut often spins right off with an impact wrench.
However, in the case of a snapped-off splined stud, you want to heat the remaining portion beyond red hot to the point where it has the consistency of taffy, and then give it a sharp hit with a punch and a hammer, a process I refer to in my first book as “heat and beat” (or, if you prefer, “smelt and pelt”). MAPP gas isn’t hot enough to do that. You need oxyacetylene. The idea is that by heating it to the point of malleability, the splines on the fastener release their death-grip on the inside circumference of the flange, allowing the snapped-off piece to pop out when smacked, ejected like a carrot by a Heimlich maneuver.
The third technique is to use a cutting attachment to the oxyacetylene torch (what’s commonly called a blowtorch), set in motion the “can’t be tight if it’s a liquid” thing, and reduce the stuck fastener to a runny lava-like puddle. This really is a method of last resort, as that much heat usually deforms the flange in which the fastener was stuck.
One thing to keep in mind is that a MAPP gas torch is smaller, lighter, and more easily maneuverable than even a small oxyacetylene setup, so I’ll typically try the former for nut loosening, and only resort to the latter if it’s absolutely necessary. Also, the tongue of flame shot out by the oxyacetylene is about nine inches long, so you need to be very careful around wires and rubber components. I hoard disposable aluminum roasting pans in the garage so I can cut them up and use them to shield adjoining areas from the heat.
Given all that, when I looked at the flange on the DPF and saw that the studs were splined and pressed in from the back and recalled the experience on the M Coupe’s manifold studs, I thought, “I really don’t want to snap these off.” So even before attempting to loosen the four nuts, I heated them all with the MAPP gas torch and wicked beeswax into the threads. I then put the impact wrench on the nuts.
Over the years, I’ve said something that many folks are surprised at: For the most part, an impact wrench isn’t for taking off incredibly tight fasteners—it’s for taking off normally-tight fasteners incredibly quickly. You can usually generate a lot more torque by putting a pipe on the end of a breaker bar than you can with an impact wrench running on a compressor at a nominal 100psi, and that’s not always a good thing, because what you DON’T want to do is apply so much torque that you snap the fastener. The impact wrench usually has the advantage of chugging away doing its whacketa-whacketa thing at a decreasing amount of torque as the pressure in the compressor tank bleeds down (at least until the compressor cycles and re-pressurizes the tank), so as long as the bolt or stud is of a stout diameter, you’re less likely to snap it than if you push with a dying strain on a pipe on a breaker bar. If you see the impact socket turn or hear whacketa-WHIRR-whacketa-WHIRR as the nut begins to spin, you know it’s slowly loosening the nut. If not, you apply more heat and try again.
So, having heated the nuts and waxed the threads, I put the 15mm socket on the impact wrench, squeezed the trigger, and held it for two seconds on all four nuts. None of them budged. I repeated the process—more heat, more wax. Lying beneath the truck, I tried to get my eyes on the impact socket so I could tell whether or not the nut was spinning. This was challenging, as the cut-off cat pipe and the DPF flange were just behind a frame cross-member. But when I looked, sure enough, I could see that the whacketa-whacketa was slowly turning first nut. I gave each set of threads a blast of SiliKroil, and the first nut spun off with the whacketa-whacketa-WHIRR-whacketa-WHEEEE that’s music to a mechanic’s ears. I did the same with the second and third nuts—watching them, verifying that the nuts were responding to the impact wrench’s torque, then holding in the trigger and going for it. Off they spun.
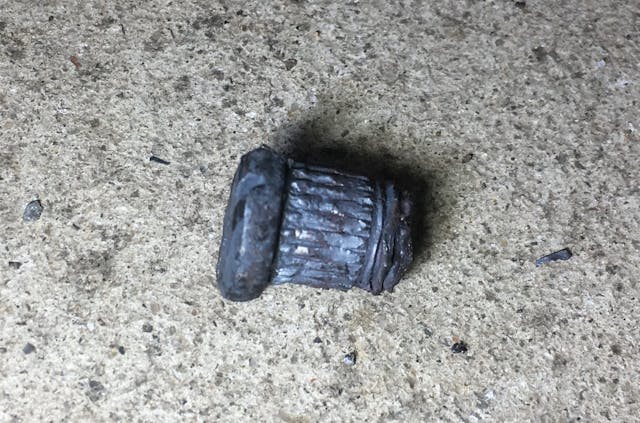
It was on the last nut and stud that I made the mistake. This nut was more difficult to lay eyes on than the other three, and I just assumed it would behave the same way as the others. Instead, I heard the whacketa-whacketa transition abruptly to WHEEEE without passing through WHIRR and knew I’d screwed up—despite two applications of heat and wax, the impact wrench had snapped off the stud.
On the one hand, yes, I had that living-the-meme 20-minutes-will-now-become-three-days feeling. Or that feeling that you get when you slip and gash yourself and, while it’s nowhere near life-threatening, you know everything will come to a screeching halt while you wait for four hours in an emergency room to get stitched up. But on the other hand, I not only had an oxyacetylene torch 40 feet away in the garage, and I’d used it to solve exactly this problem 13 years ago. So, I knew what to do and how to do it.
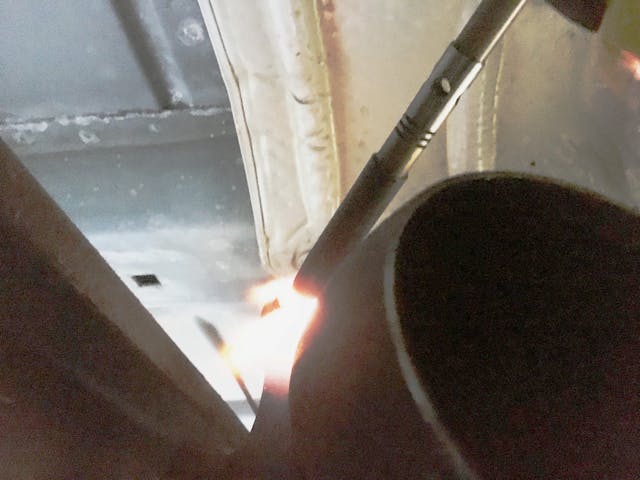
First, I cut up an aluminum roasting pan and packed it in around the rubber exhaust hanger to the left of the flange so the tongue of flame wouldn’t melt it. Then I pulled my small oxyacetylene setup out from the back of the garage, struck the igniter to get the ragged smokey acetylene flame, began to dial in the oxygen, and realized that the tank was empty. Damn. OK, undo the hoses, pull out the oxygen tank, drive it down to Igo’s Welding Supply in Watertown, Massachusetts, and an hour and $20.19 later I was in business.
Except that, due to the position of the frame cross-member, it was challenging getting the flame trained directly on the snapped-off portion of the stud, and even more challenging to position the punch on the offending stud fragment and smack it with the small sledge while it was still soft and cherry red. Ten times I tried doing the “heat and beat” thing, and 10 times it had no effect. When I looked closely at the stud, I could see that all I’d done was flare the end of it and mash it into the flange, which made it even more difficult to punch it out.
And then I ran out of acetylene. Idiot! I should’ve checked the pressure in both tanks when I went in for oxygen. Another trip to Igo’s and $35.07 later and I was back at it, and again the snapped-off stud wasn’t going anywhere.
When something like this happens, you need to ask yourself whether you should just keep at it, or whether you should try something different. I had no doubt that I could get better accuracy both with the torch and with the hammer and punch if the frame cross-member wasn’t blocking access. I undid the front of the DPF from its rubber hanger to try to tip it down, but the strain on the lines plumbing the DPF made me stop. I also thought about using the cutting attachment (“the blowtorch”), but the idea of applying that much flame made me nervous. Plus, I really didn’t want to damage the DPF.
So, I kept at it, applying as much heat with the torch to both the front and the back of the snapped-off stud as I could, and hitting the punch as hard as I could without risking slipping and hitting my wrist with the sledgehammer (I did that once while separating a ball joint with a pickle fork 30 years ago and never forgot it). Slowly I began to see the splines emerging from the back of the flange. After smacking the punch as hard as I dared, the red-hot little bugger finally let go.
For reasons unknown, I’m not finding the splined stud listed in the GM parts catalog for a 2008 3500HD; it shows them as integral parts of the DPF. For now, I’ll replace it with a M10 x 1.5 bolt. If I find the proper part number for the stud on a Duramax forum, I can install it later.
The important thing is that, with both pieces of the cat pipe and the broken stud removed, I’m now ready to install the new cat assembly when it arrives, which should be any day. I’d ask, “How hard could it be?” … but, well, you know.
***
Rob Siegel’s latest book, The Best of the Hack MechanicTM: 35 years of hacks, kluges, and assorted automotive mayhem, is available on Amazon. His other seven books are available here, or you can order personally inscribed copies through his website, www.robsiegel.com.


Rob, your persistence is something to behold!
About that impact socket, and being able to see if it’s turning…
Why not paint a couple of small longitudinal stripes on the socket?
Best of luck with the installation!
Have to do like a friend did after the second converter was stolen off his son’s Hino. He welded up a cage of re-bar and fastened it to the frame, totally surrounding the cat and making it FAR less attractive to steal!!!
Love the REBAR idea, you need to Patent the fix and start selling them.
We arent far off MAD MAX days……..
I agree with audiobycarmine about the determination showing. By about the second paragraph, I was already imagining in my mind what kinds of terrible actions my impatience might have wrought. But beyond that, I’m sure that there are readers who won’t have known some of the tricks utilized here, so the piece is informative and inspiring at the same time.
[And frankly, I’m going to admit that if I’d just put that M10 bolt in the flange, it’d be there for as long as the truck lives – no way would I ever even think about searching for and replacing a splined stud in that fourth hole 😉…]
….a punch in an air hammer will drive that bugger out in a flash. Tip from the rust belt..
Minor point: it’s not a spline but a knurl.
Next point: splurge on an inductive heater. You think it’s expensive but the first time you liquify a frozen fastener without flame or consuming gases you won’t remember what it cost.
Lastly: does the recertified cat look like it was cut off someone else’s Duramax??
Tinkerah, the recertified cat is a full assembly with both pipes attached, not a cut-off cat. And yes, I’ve been looking at the inductive heaters. With the price now down under $200, it’s only a matter of time.
I was (mostly) being cynical with the cut off cat crack but $200 is less than half what I paid for my inductor some five years ago so jeepers guys treat yourselves this Christmas!
Nice idea to use cheap pans as heat shields. I’ll have to remember that one.
And all of this trouble and expense so that some thieving meth-head freak can get a few bucks to get high…
When these kinds of things happen to me, or my brother-from-another-mother buddy 1500 miles away, the phone call always opens with “Nothing is ever easy”…
I’ll assume dropping the exhaust for better & safer access was out of the question ? And I interpret “muffler paste” to mean Anti-Sieze compound, which I recommend for every fastener & slip joint on an exhaust system.
Those nuts are always the worst. I remember the bolts holding the catalytic convertor pipe to the turbos on my Supra only moved when heat was applied.
We all have plenty of stuck bolt stories, so I will throw this one in. Removing a rear axle assembly from a 70’s full sized Ford in a junkyard. Large bolt and nut, 15/16 I think. Put a socket on the bolt head and we really leaned on that puppy with all we had until we heard a pop. It was the socket breaking. Finally figured out that we should have started on the nut first, because the bolt had a D-shaped shank in a corresponding hole, never meant to turn. Nut came off easily and the bolt slid right out.
It’s unfortunate that there are laws concerning the use of deadly or semi-deadly force against cat thieves caught in the act.
You feel like letting the jack drop down and then calling the police, “I heard him yelling out here and called you…”
The laws in Mass are definitely different than places in fly-over country.
Out here, if they are holding a tool, a tool = a weapon.
One famous local case a citizen caught a perp popping an ignition with a dent puller. He drew low-ready, perp came at him with the dent puller, citizen double-tapped the perp in the chest. Perp est mort.
No charges against the citizen.
Converter thieves should always be in season.
I recently had to change four O2 sensors on my ’04 Ram 2500 rust bucket. Having changed O2 sensors many times on other vehicles, I thought it would be relatively easy, especially since the truck has lots of ground clearance (no jacking necessary). Well, after several days soaking with penetrating oil, and heating with MAPP gas torch, I managed to break the O2 sensor socket wrench. I kept at it with two different newer sockets, and a hose clamp to keep the socket from splaying out and breaking. After repeated attempts with MAPP gas, I got one of the four sensors out. The others would not let go. I don’t have an oxyacetylene torch (cost & space restraints), but I had heard of oxygen/Mapp gas torches. BernzOmatic used to make them, and there are others making them now. So I ordered one. It came without cylinders, so I went to the Home Centers, and found that the small disposable oxygen cylinders are hard to come by. I finally found some. I tried using this tool, and kept at it for a few more days, without success. So after weeks working on this, I finally gave in and brought the truck to a local garage that I have used before, and trust. The owner (who thinks shade tree mechanics are OK) was confident they could do it, and agreed to use the sensors I already bought. They succeeded and charged a reasonable amount. Lesson learned? I also changed the 16 spark plugs and wires, since the plugs were badly fouled from the defective sensors. The truck now runs great.
Rob: I had to laugh at your two trips for oxy/gas! I can remember doing the same sort of thing on a concrete extension project. I bought six, 60 lb. bags of concrete mix, only to discover that it wasn’t enough. Making a mad dash to the hardware store “thinking too much is better than not enough”, I bought 6 more 80lb. bags, after mixing only to discover that I was still short! Too embarrassed to return to the hardware store, I found two partial bags of sand mix in the garage which got the job done. Later, I discovered that I’d made a “minor” mistake in my calculations of need, LOL!!! 🙂
Rob,
I always enjoy reading your stories. Even those about subjects I have no interest it. You’re very entertaining and that makes a good writer. Sometimes the storytelling is more important than the story.
Rob, I seldom read one of your “adventures” without learning something. Today I learned that I could reduce my insurance comp deductible to $200. Cost about the same as your two trips to the welding supply co.
Rob, you clearly are not a professional.
A PRO would use his teeth. 😁