Monitoring the air/fuel mixture with a UEGO sensor
Back in the day, if you were setting up a car with non-stock carburetors or a modified fuel injection system and needed to dial it in, you used old-school methods. If it made your eyes water, it was too rich. If it backfired, it was too lean. You could also check the spark plug and tail pipe color for indications of rich and lean running, but these were averages over time, not instant snapshots of a particular throttle setting.
Race shops had dynamometers and exhaust gas analyzers that could directly measure the richness of the mixture under certain load conditions, but a do-it-yourselfer didn’t have access to such tools. Then, in the mid-1970s, Heathkit came out with the CI-1080, a portable exhaust gas analyzer marketed to DIY-ers. It was a revelation. Suddenly, the backyard mechanic had access to a tool that could be used to directly measure the percentage of carbon monoxide in the exhaust, which is closely related to the air/fuel mixture.
Use of the Heathkit was a little awkward, however, as the display had to sit where it could be seen while driving, the power cables had to be connected to the battery under the hood, and the exhaust probe needed to be snaked out the window and inserted into the tailpipe. But once you cajoled the pieces into hanging there, it gave you what you needed, which was a real-time measurement of the exhaust mixture as displayed by a big analog swing needle. You could see what the CO percentage was at idle, while cruising, under partial load, and at wide-open throttle, and re-jet your carburetor or tweak your injection accordingly.

The Heathkit and other similar vintage portable exhaust gas analyzers still trade on eBay because they still have a niche if you need a minimally-invasive tool to perform a one-time measurement. However, if you think that your tweaking and tuning may require more than just a few drives, and you want something with a permanent and clean installation, these days there’s a much better approach—an ultra-wideband oxygen sensor coupled to a dash-mounted air/fuel gauge.
Oxygen sensors were first used in the mid-to-late 1970s as part of electronic fuel injection systems on cars equipped with catalytic converters. The early sensors were of the Zirconia type, producing a voltage output in the 0.1 to 1.0 volt range, with 0.45 volts being fairly close to the ideal stoichiometric air/fuel ratio of 14.7 (in this context, “ideal” means “efficient and clean-burning”). However, as the mixture moves away from the stoichiometric 0.45 volts, Zirconia sensors become highly nonlinear, essentially telling the car’s ECU that the exhaust mixture is “rich” or “lean,” but not how rich or lean. This setup worked well for early electronic fuel injection, but isn’t adequate if you are trying to, for example, properly jet a pair of side-draft Webers.
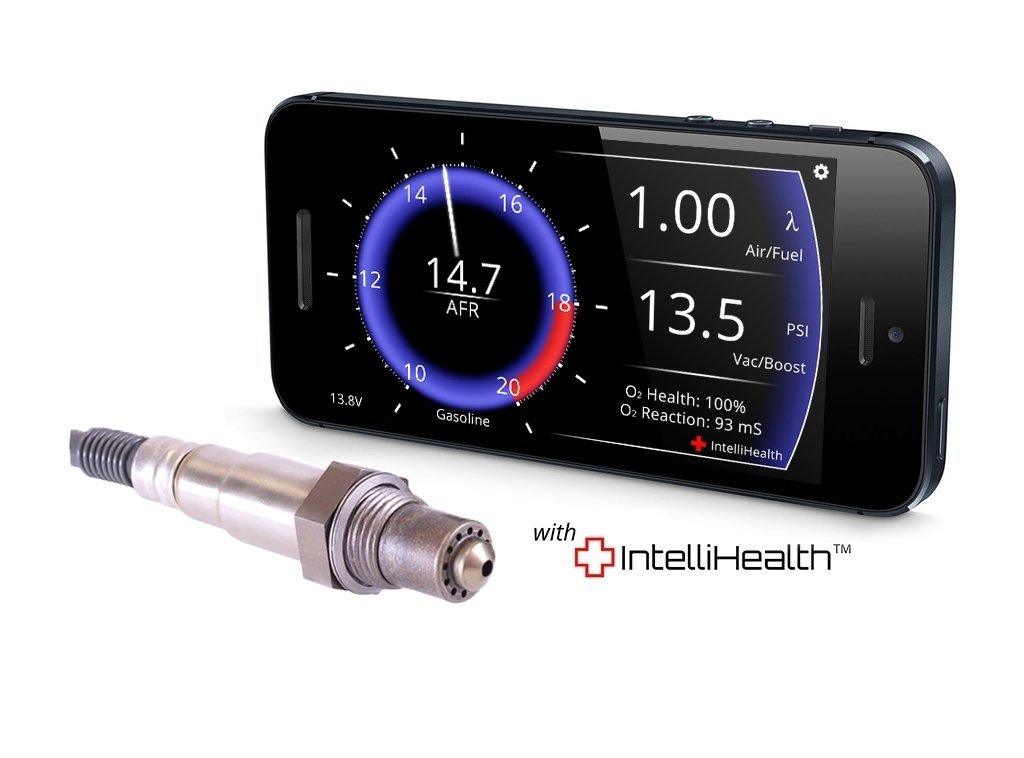
In response to increasingly stringent fuel economy and emission control standards in the 1990s, wide-band oxygen sensors (also called “ultra wide band” or UWB sensors) began to be employed. These have a linear output from 0 to 5 volts, making them ideal for tuning. When sold along with an air/fuel gauge for tuning applications, you may see the sensors referred to as Universal Exhaust Gas Oxygen (UEGO) sensors.
A UEGO setup typically has three main pieces—the UWB oxygen sensor itself, the dash-mounted air/fuel ratio gauge (also referred to as an air/fuel meter, or AFM), and the cable connecting the two.
However, the sensor has to be mounted in the exhaust, and for that, you need to install an exhaust bung, which is the threaded port into which the sensor screws. The sensor should be mounted at the first convenient point where the exhaust gases from the cylinders have been collected into a single pipe, so it’s usually installed in the headpipe, before the resonator or catalytic converter. It’s important that the sensor is angled above the horizontal so moisture doesn’t collect on the tip. When I’ve installed them, I’ve typically marked the desired location on the headpipe, removed it, and taken the pipe and the bung to an exhaust shop to have them drill the hole and weld on the bung. You’d think it would be possible to have an exhaust shop do this without having to first disassemble the exhaust, but the upward-tilting orientation of the sensor combined with lack of clearance from other components often makes it difficult if not impossible to get a drill at the proper angle.

There are many choices for the AFM gauge. Since we live in a digital world, and since most folks want to know the numerical value of the air/fuel ratio, many AFM gauges give a digital readout. Some have a circular ring of lights, simulating a swing needle, in addition to the digital readout. Personally, I’m very sensitive to mounting anything on the dashboard of my old BMWs that looks like it teleported in from the wrong decade, much less the wrong century, so I prefer a good old-fashioned-looking swing-needle air/fuel meter. I like the blackface analog model from the company AEM, as it looks very similar to the old-school VDO gauges that I sometimes already have in the cars. AEM’s kit, with the gauge, sensor, and cable, is part number 30-5130 and costs about $200.

In addition to installing the bung, the other challenging part of the installation is running the cable from the sensor to the gauge. Both ends of the cable have good-sized multi-prong connectors. When running a single wire, one can usually pass it easily through an existing grommet in the firewall, but the physical size of these connectors are large enough that this may be difficult. The connector that plugs into the back of the gauge is smaller than the one that plugs into the oxygen sensor, and with some care, I was able to get it through the firewall via a grommet for one of my A/C hoses. If you can’t do this, you’d probably need to pass the connector up through the hole for the shifter.
Lastly, there is the mounting of the gauge. I initially tried using a universal gauge-mounting pod from Auto Meter, but in the end I simply balanced my gauge in the small change cup that’s to the left of the instrument cluster in my BMW 2002tii. With it mounted there, I can see it while I’m driving, yet the eye isn’t drawn to it as a piece of non-original instrumentation.

Of course, the real value in having the air/fuel meter installed is using it to tune and tweak the car. My BMW 2002tii is mechanically fuel injected and has what enthusiasts have come to call the “verboten screw”—the enrichment screw on the injection pump that the factory manual tells you never to touch. Using the air/fuel meter, you can adjust it (keeping careful track of how many quarter turns from the stock setting you’ve changed it) so that at wide-open throttle, the car is slightly rich, say an air/fuel ratio of about 13.5. Adjusting that screw changes the fuel mixture throughout the range, so you then use other adjustments to create a compromise that makes the car run acceptably at other throttle positions and engine RPMs. On a recent trip to BMW CCA Oktoberfest in Pittsburgh, I found that, on the long hill climbs through Pennsylvania, the AFM was reporting readings as high as 15.5—uncomfortably lean considering how much load the engine was under. I stopped, made an adjustment, and verified that, under load, the readings stayed below 15.
And therein lies part of the problem of having the UEGO sensor and AFM gauge—you can’t stop looking at it and wanting to make adjustments based on it’s readings. Some folks argue that, past a certain point, tweaking becomes counterproductive because you’re trying to tune to a standard that was not available when the car was new. One approach to this is to, instead of installing a gauge on the dashboard, buy one of the kits that utilizes a Bluetooth link to your phone. That way, you can adjust what you need to adjust, and then take out the phone and enable the display if you feel there’s some need to check in on it.
If you have a non-stock intake setup you are trying to tune for performance, or if you suspect your car is running crazy lean or stupid rich and want data to get to the bottom of it (but are concerned that the Rube Goldberg-like configuration of the old portable exhaust gas analyzers may damage your car’s paint), the combination of the AFM and the UEGO sensor will probably be just your speed.
***
Rob Siegel has been writing the column The Hack Mechanic™ for BMW CCA Roundel magazine for 30 years. His new book, Just Needs a Recharge: The Hack Mechanic™ Guide to Vintage Air Conditioning, is now available on Amazon. You can order a personally inscribed copy here.

