How to Re-Form Damaged Threads
“I think I cross-threaded it.”
The voice on the other end of the phone was sullen. It belonged to a friend who had just emerged from under the hood of his 1999 Chevrolet pickup. As he was putting the #4 spark plug back into the aluminum cylinder head after performing some maintenance, the plug had bit and started threading at a slightly wrong angle.
Nobody wants to deal with damaged threads, but with a little prep and know-how you can save the thread, the part, and your sanity.
Threads are a critical part of the assembly of pieces we call automobiles. The spiral-incline plane that creates a bolt, nut, or threaded hole allows for easy disassembly and generates a strong, durable clamping force. The effectiveness of threads relies on a smooth and well-fitting assembly which means any bit of corrosion or damage can be a big problem.
When—not if—some damaged threads appear on your project, there is a lot going through your head: Everything from horror stories of drills and threaded inserts to tales in which the hero was a wire brush. In the middle of the chart of options is chasing the threads to clean them and remove damage. You might be tempted to reach for your tap and die kit … but that might not be the best idea.
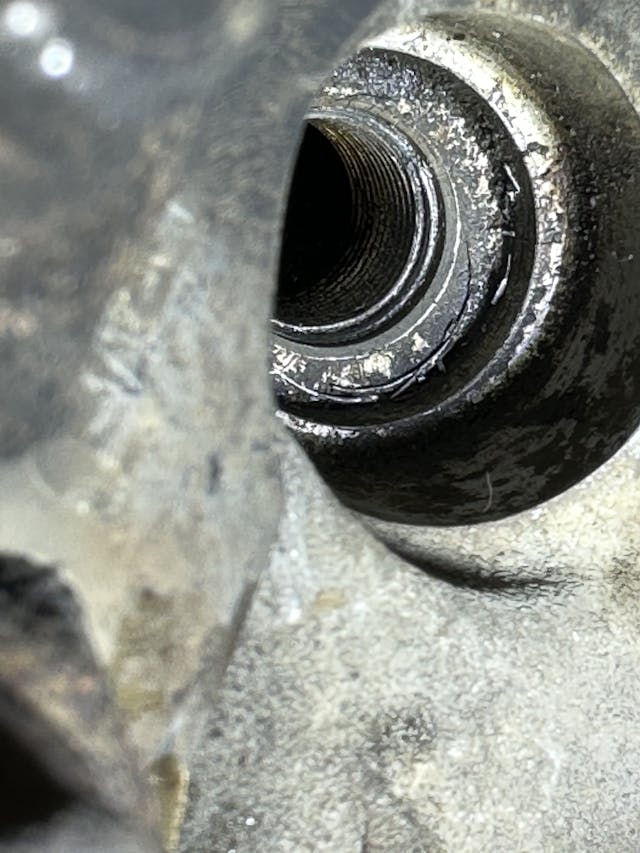
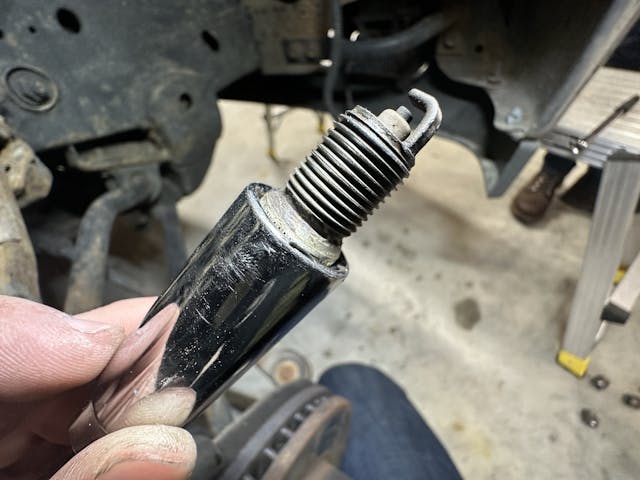
When I dropped by my friend’s driveway for moral support, we pulled the inner fender and got a decent look at the reality of the problem. Luckily, my friend has a good feel for how spark plugs start, and the thread was only barely miffed. However, the idea of getting the plug started correctly and powering through to make it fit again was just not on the table. We needed to chase the threads.
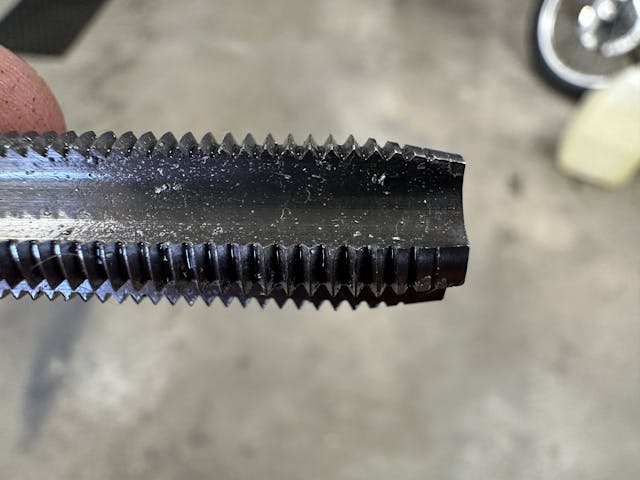
Method #1: Use a Tap
I had an appropriate M14-1.25 tap that would theoretically match the aluminum heads on his engine—a 5.3 LM7—but there is always the chance that whatever tap you have is slightly different than the one that originally cut those threads. Any differences between the two would be settled by force, and in our case the hardened tap would easily bite a chunk out of the aluminum cylinder head to declare victory. We were not interested in that.
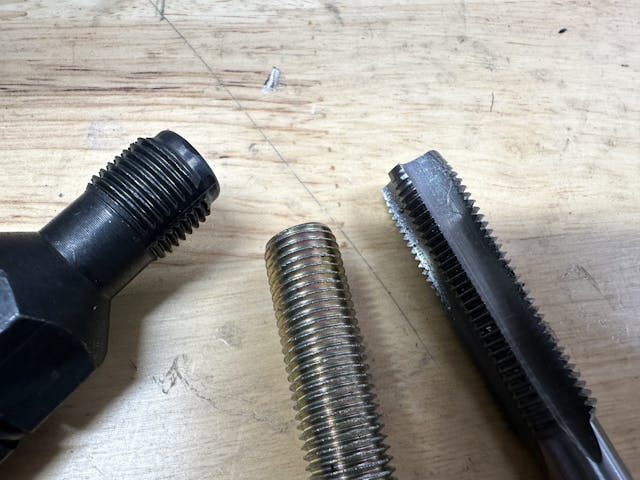
Method #2: Buy a Thread Chaser
If you’re looking at that thread chaser and thinking, “Kyle, that looks an awful lot like a tap,” you’re correct. It does, but a couple key features are hiding in plain view that make a chaser different than a tap—and better for this situation. The first is right on the nose: A pilot section, which helps align the tool into the thread bore. Taps lead with a cutting edge in most cases, which means if the tap starts slightly crooked, you’ll have a harder time feeling the misalignment. If you try multiple times, you will start to remove material. Remove enough, and the chance of stripping the thread increases significantly.
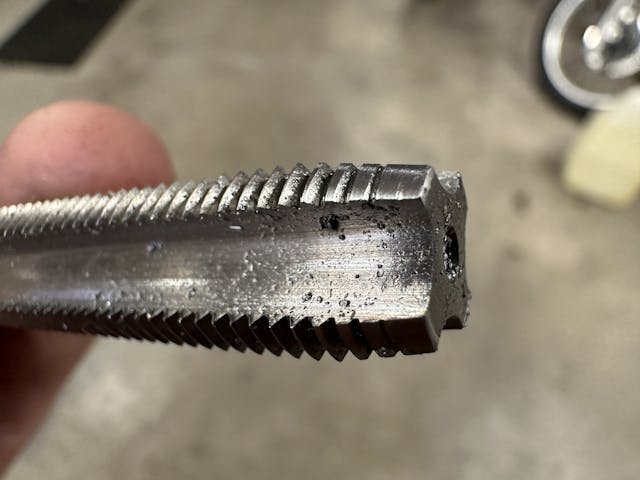
Notice that, behind the pilot, the threads do not have the same lead-in as a cutting tap. Again, since a chaser is only meant to restore damaged threads, the design is just less aggressive overall. Using a chaser means less chance of swarf falling into your project, too, and we certainly didn’t want any aluminum in the combustion chamber of my friend’s 5.3. Just to be cautious, we coated the chaser with grease to catch any debris it might loosen.
We got real lucky: The threads got reshaped perfectly and the plug threaded in and tightened up nicely, a reminder that using the right tool always makes a job easier. A good quality set of thread chasers is under $100 and covers a variety of pitches.
This is actually the first thread chaser I’ve purchased. It’s a tool that has always been on the shortlist, but it was never in the cart come checkout time. Any time I need a thread chaser, I usually just make one.
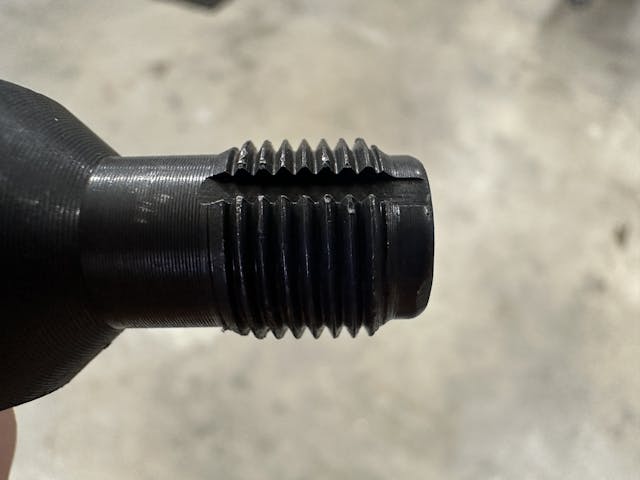
Method #3: Make Your Own

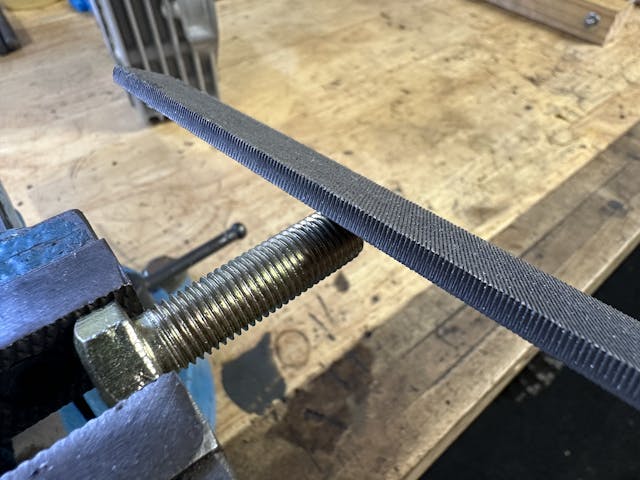

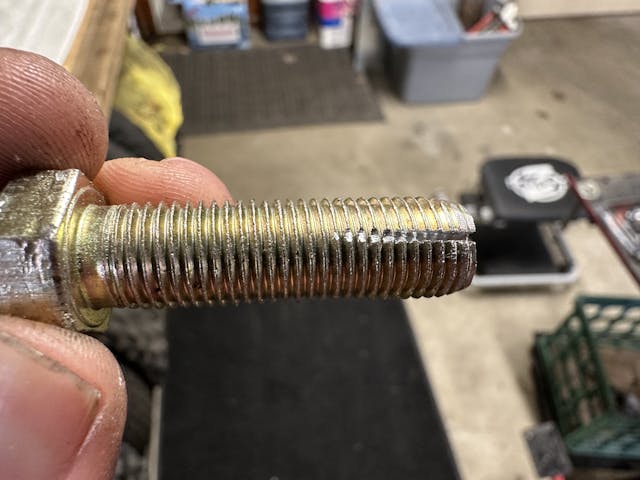
Making a thread chaser is not difficult, and the skill is a nice trick to have up your sleeve. Just take a grade 8 bolt and file down the first few threads to create that pilot and lead-in threads. If you are really motivated, use a hacksaw or small cutoff wheel to create a few reliefs that can collect any debris that will be forced out of the threads as it re-shapes and cleans them.
Next time you are in the middle of that project and miff a set of threads, you are prepared to handle the problem the right way … or at least understand the risks of doing it the other way. Like I said, there is a place and time for each, and having more skills and understanding of what you are doing is always a good thing.
***
Check out the Hagerty Media homepage so you don’t miss a single story, or better yet, bookmark it. To get our best stories delivered right to your inbox, subscribe to our newsletters.


I’m ashamed to admit I didn’t realize a thread chaser was different than a tap. I use a cheap harbor freight tap and die kit for this purpose, and have occasionally caused myself more problems. Thanks for the tip on the DIY version!
I Also use A thread File, It’s. square and divided into A upper and lower, each of the 4 sides are different. For A total of 8 Thread pitches . This is not for hole Threads.
Many mechanics and hobbists do not know about these life saving files! I have a set of 5 different thread files, 1 SAE, 1 UNC, 1 JIS, 1 metric, and one Whitworth or BSF. Over the last 55 years I have used them many times and they have seriously saved my butt particularly on larger threads such as axle and spindle threads. Well worth the money!
I had good luck with a “back tap thread repair tool” when a thread chaser would not work. It’s like an collapsible tap that you insert past the damaged threads, expand until it rests inside the good threads, then back out, straightening the damaged ones.
That sounds like a really neat tool!
It sure does! A quick Google look located only metric spark plug hole sizes, though. In the $30 range. I’d gladly pay $20 each for one or two commonly used SAE sizes just to have in my toolbox. Maybe a couple of metrics, too. Might be I didn’t look deeply enough.
SAE plugs use metric threads, just with a slightly different major and minor specification. Close enough that a thread chaser will work on either.
Well yes, assuming that I only bung up threads in plug holes. But I have buggered threads in all sorts of places (even things that have nothing to do with autos). My point was that having this tool available in the sorts of sizing that chasers and taps come in would be preferable to me.
I know a very old mechanic that turned me on to that tool. It is the best method since it pulls the shavings out of the hole while you are repairing them. Dont forget to coat any of these tricks with a thick coat of axle grease to catch any shavings before they end up in a bad place.
Now before someone forces in a tap and breaks it off. If you run into great resistens use a Helicore.
Too many break off a tap and have a greater mess than they started with.
Great article, Kyle.
Hopefully, we’ll never need to do this, but some expert advice always helps.
On an unrelated note, some of the articles are having the text covered by the images.
This was wonderfully illuminating and helpful- thank you!
The home-made thread chaser is a good quick fix, however I would recommend threading a nut onto the bolt prior to modification. When removing the nut, the threads will be super clean and aligned.
I bought a set of Kastar rethreaders years ago and have saved myself, and some friends, a lot of grief over time. Well worth the money!
I had this same problem with a customer’s 2005 Chevrolet, probably the same LS engine that the author’s friend was working on in his 99. In my case, it was the #8 cylinder, the hardest of all to get to. My customer warned me that the guy who installed this engine had trouble with #8. Fortunately I purchased both 14 & 18mm spark plug thread chasers years ago. Probably used them once or twice in the last 30 years but the 14mm sure saved me on this LS engine. I’m not sure if the 14mm plug threads are the same as a 14 x 1.25 bolt but be prepared, since this tool is so inexpensive, buy it now instead of trying to rig a bolt later. Lisle also makes a 12mm thread chaser for some of the newer Fords and others.
I still have my spark plug thread chaser in my tool box .Probably bought it around 1974 .Retired now but the tools stay!!
A chase is a lot better at fixing threads than a tap. Should never use one when the other is needed. If you think about it, a tap is most likely going to remove some of the old misaligned threads. So in the end you have less meat on the existing, repaired threads. If you are cutting a new thread, you are presumably removing just what needs to be removed to form a correct thread.
Working on a ‘64 F100 I inherited from my father. Found many coffee cans full of nuts and bolt ls from when he disassembled it and another truck. Ran them all through a vibrating rock tumbler to remove the rust, then spent a long, relaxing afternoon with the pile of hardware and a thread chaser set. I will be surprised if I don’t have every fastener I need, clean and ready to go.
On a blind hole a bottoming tap is nice to have. You can clean the threads the entire depth of the hole. Chances are that you may not require the last 3/16″ – 3/” of the hole for the bolt – so a regular tap is OK. Using a bottoming tap makes me feel like I finished the thread cleaning task.
I forget exactly what I was working on, but I needed to get deeper than a regular tap would allow. It was a project I needed to get done soon so after I tapped what I could I ground the end off the tap to get it a bit deeper in the closed hole. Worked out ok and I got a new tap at my leisure
Great article, but also worth mentioning that “an ounce of prevention is worth a pound of cure”. A cross-threaded fastener is often (at least in my case) “operator error”. For example the spark plug. To avoid that I use a small piece of rubber hose on the spark plug and make sure it threads well into the head before putting a wrench on it. Another villan is using power tools, rather than a hand wrench on fasteners. So many times when using a hand wrench I was able to feel trouble before it went too far. Impact wrenches don’t give you that…
I’ve been using a tool to start spark plugs for 35+ years. It has a long, flexible “hose” and a handle.
When I bought it way back when, it was probably less than $10.
Put the plug into the tool, slap on some Never Seize and start the plug.
You will never cross thread.
The Never Seize takes the angst out of plug removal.
Great point on the anti-seize…once again preventing thread problems before they happen!
I worked in a heavy manufacturing environment for many years as the manufacturing manager. It took a while but eventually sort of convinced the maintenance crew that every fastener, upon reassembly, got either never sieze or lock-tite as appropriate. Lots of references suggest a huge percentage of machine failures are caused by loose fasteners. And lots of cussing is caused by frozen nuts and bolts
Just remember, engine and plug manufacturers recommend against using anti seize on plated threads found on plugs for newer cars. Not even ones used for aluminum heads. The only time it is recommended on a plated plug is on the extended tip ONLY on the plugs used in the Ford 3-valve engines built before October 2007. Then make sure it is a nickel based paste.
remember to reduce tightening torque spec to 70-80% of that specified for dry threads.
when starting difficult….if not all…threads, start with light pressure and turn the part counterclockwise until you feel a click and the part moving inward….then go clockwise.
My father taught me that on a peanut butter jar……when it was glass and metal…
I like the DIY thread chaser, seems easy enough to make. I have had to do the rethread thing before. It always seems scary when the bolt snaps.
Be aware that you should NOT repair some threads like on high strength bolts and nuts>>replace the part. You don’t want to cause stress risers that may cause failure. Also some threads like head bolt holes should be fixed by a professional machine shop. You don’t want a blown head gasket from a bolt that didn’t hold torque. If spark plug holes are really butchered in aluminum heads, there are kits made to repair them.
Good advice. Add to it too that threads are typically rolled, not cut. Be very careful if adding thread length with a die – cut threads will indeed create a stress riser. Also use the right shank length and avoid threads in shear. In aircraft we’ll add washers sometimes rather than use a shorter bolt.
Super insight Tony! I’m always amazed when I find a rolled thread when disassembling a part that I feel should be held together with a fastener with cut threads.
One point on taps . . . for each bolt size there are three taps available, Starting tap with a long lead in. Medium tap (this is the one that most of us use) and Bottoming Tap with almost no lead in. Each of these taps will remove slightly/progressively more material from the threads and you may find that if you use a Bottoming tap, the bolt you thread into the tapped hole may be loose. . . . but, as noted above, the Bottoming tap allows you to use a somewhat longer bolt.
This is not really the place for confessions, but. . . When I was doing my apprenticeship in Scotland many years ago we used to play around with tapped holes in components. I remember a transmission that had all the cover holes tapped with a regular tap and one hole tapped with a left handed thread. The assemblers were aware of this and inserted a left hand threaded bolt, but . . . one can imagine the angst of the mechanic removing the cover with a power tool some time in the future . . . brr, brr, brr snap! So, I hate to admit that ther’s truth to things made on Mondays or Fridays. Sorry folks!
Cylinder heads are the absolute worst……be careful! The expanding back-taps are the best way to deal with those……besides not damaging threads in the first place. Using anti-seize compound (carefully) is recommended, and Champion even makes a special version just for plugs. The down side of anti-seize is it makes it really easy to over-torque – again, be careful! It’s not just the threads to look out for – be mindful of the flat or tapered plug seat. It’s a critical part of heat transfer as well as sealing. At one point I was doing plug indexing, too….but that’s another story.
It’s good to have re-threaders, taps and dies, thread files (and a good 60° triangular file), and a wire brush or two in your arsenal for everything you’ll encounter. When all else fails and that threaded hole is wallowed out, there’s threaded inserts (Heli-Coil being the classic brand). I’ve been accumulating sets of these for years. Also, if you work with aluminum making new stuff, you’ll want to use threaded inserts from the beginning.
On some threaded assemblies, keep in mind that someone before you may have used thread locking compound. If you hit resistance getting a threaded fastener out, it could be that – get the heat gun!
This brings us back to anti-seize. Use it liberally*, especially on exhaust or anything you hope to get apart later (especially stainless on stainless) or any steel in contact with aluminum. An ounce of prevention is worth a lot of swear words later…..
As things escalate, there’s the subject of broken bolts, not-so easy-outs, left-hand drills, etc…..Good luck, folks!
*Just try not to get it on you.