5 Things Every Great Workbench Has
There are many staples of a DIY shop or garage, but the workbench stands above the rest. Having a work surface that is not the floor can make working on projects safer, more efficient, and more enjoyable. Sadly, just because benches are ubiquitous does not mean each one is good.
Like so many other things in life, a workbench must balance budget, function, appearance, and specialization. While we can’t help you with the last one on that list, we can get you to a great starting point by calling out some of the attributes that every good workbench will have. Whether you are building a new one or checking up on one that you’ve been using for years, here are five characteristics every great workbench needs.
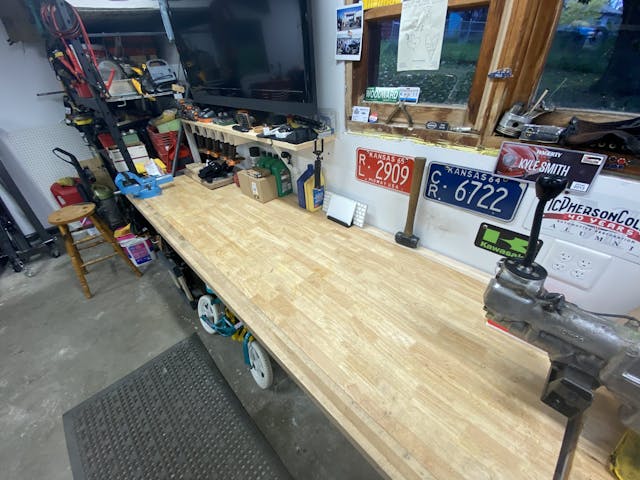
A Flat (ish) Surface
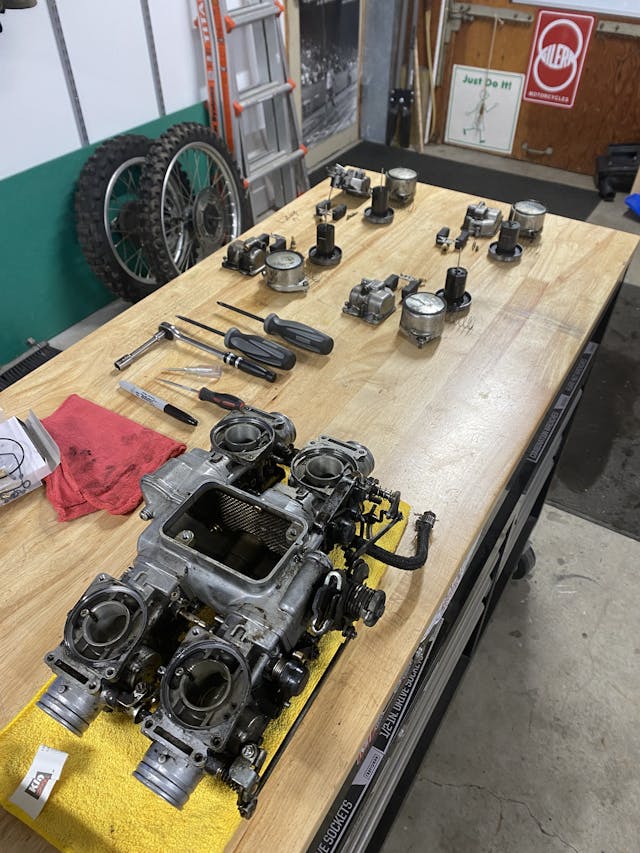
You don’t need to rebuild a carburetor on a certified granite slab, but you do want a surface that can be clean and smooth while not allowing parts to roll away. You’ll often need to level your bench using shims or some other method, because garage floors are not typically very even—occasionally, on purpose.
Dozens of materials can be appropriate for bench tops, so be sure to take a deep look at what kinds of projects you think you’ll tackle and choose a material that can take the amount of weight you need it to and that won’t deform during use. Butcher’s block surfaces have been great to me, though there are a few sections of my bench that have some serious dents from hammer blows or heavy parts.
Height
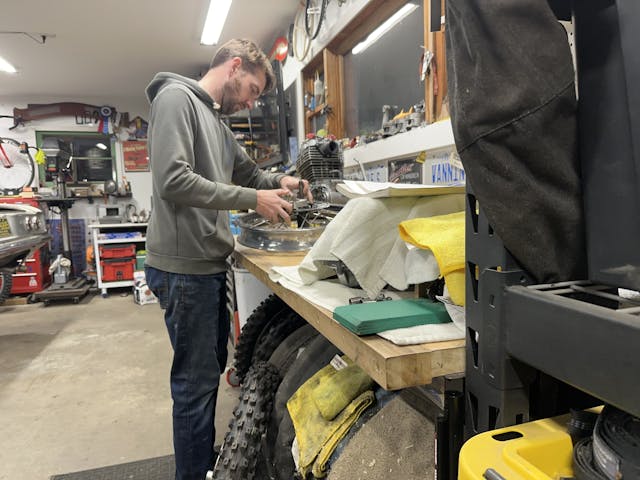
It might be tempting to plan your workbench around the height of a kitchen countertop (36 inches is standard), but be careful: Most kitchen tasks are less precise than most DIY projects, and food prep and cooking don’t require leverage or a large range of movement, like garage work often does. A lower work surface height is more tolerable in a kitchen, the arrangement of which needs to be somewhat standardized. Your workspace has no such constraints. Set your bench at a comfortable height for you and the work you do. That might even mean two benches at two different heights: parts cleaning is best done at a lower bench, while carburetor rebuilding is best done at a higher one, so that it’s easier to see.
Heft
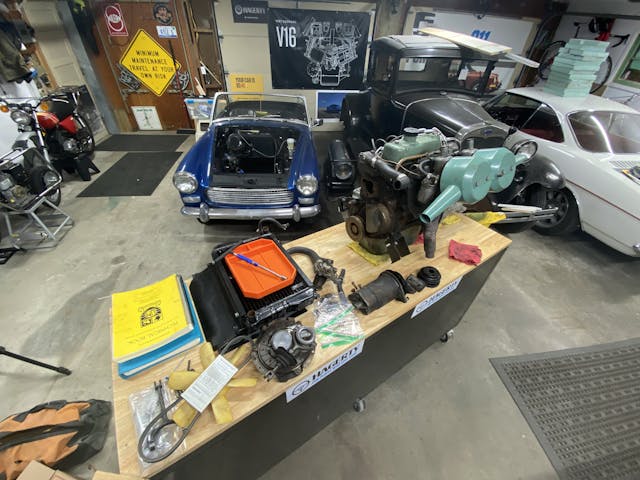
A flimsy bench makes work difficult in a number of ways. If you’ve got a component plopped on top of your workbench and every time you move it or shift something for access, the whole bench moves, you won’t feel confident in the work you’re doing.
Again, be careful: You can have too much of a good thing. Nice and sturdy does not require using 6×6-inch steel tubing for legs and 1/2-inch plate for the top. There’s a place for a bench like that in a welding shop, but in most home shops, it would be more annoying than helpful.
A Solid Vise
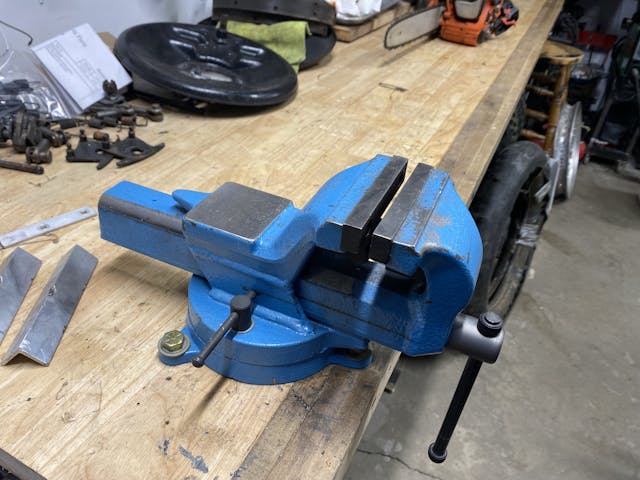
The third hand we always seem to need, a vise is a necessity for any shop for many reasons. It can be a anvil, a press, or an anchor that can help projects big and small in a multitude of ways. Don’t believe me? Try and work without one for a while.
Like the other characteristics listed here, consider your specific needs and choose accordingly. Do we all need Wilton Bullets? No, but most people would be better served with one than with an import vise whose jaws don’t line up evenly and have a ton of slop. If you’re on a budget, consider buying an old vise to restore. It’s a fun project, and we can honestly say that cast metals aren’t what they once used to be.
Sturdiness

When wrenching on something, it’s nice to have a workbench that doesn’t move an inch to the left when trying to loosen something and an inch to the right when tightening something. Especially if you are not planning to bolt the bench to a wall or other structure in your garage, consider using an under-bench shelf for storage: It will add a nice, low weight and improve stability.
Bonus: Wheels
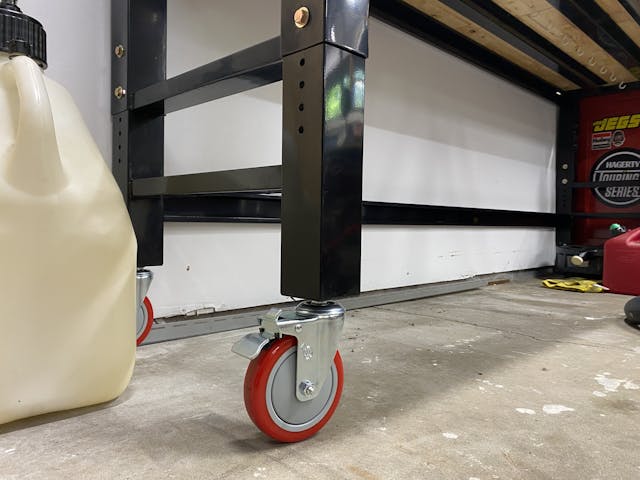
I’ve said it before and will say it again: The ability to bring your tools and workspace to your project is a superpower. Buy a good set of double-locking casters, put them on your bench, and suddendly it is a tool that goes places with you. The other side of the shop? Easy. The driveway? No problem. Putting multiple benches together to create super bench? Also an option! Use this power wisely.
No matter what, having a workbench is better than not having one. If you are looking to maximize your workspace and haven’t assessed whether your workbench is working for or against you, now is the time.
***
Check out the Hagerty Media homepage so you don’t miss a single story, or better yet, bookmark it. To get our best stories delivered right to your inbox, subscribe to our newsletters.


Wheels on a work bench? Uh, no. A small rolling tool cabinet or utility cart is a much better solution if you need some portability.
I’ve got an outside area that my neighbours refer to as a circus tent. It doubles as the top end of the driveway and has a nice slope to the street, so it’s self cleaning. All the washing and detailing is done there as well as most of my conversations with the local by-law officials. I have a couple of service carts with shelves that carry all the paraphernalia required. Tools, sand paper, buffing compounds, and dozens of waxes etc. and the top surface to put all these things. Yes it does have cup holders.
Years ago I put all the tools on peg board. You know where everything is and where it goes when you finish up. Then, with one look you can see what’s missing. All those 10mm sockets! The occasional rachet left in an engine bay, we’ve all done it and ended up with a tool now located 200 miles away.
I do woodworking on a correct height Sears bench 24 x 60 with drawers and a door cabinet for the larger power tools. It sits 4 legs on the floor and 2 casters are attached to the heavy end with the wheels 1/8 inch above the floor. It is movable by lifting it longways with a dolly so the wheels now touch the floor. Building wooden stuff sometimes requires access from all sides…. I move it to a spot under a Carol cord reel hanging from the ceiling which is used for other things as well..
The other bench is the ”repair” bench and has the tools required for taking something apart and working in a vise.
I like to see the benches completely empty and clean. I am a retired Toolmaker and every friday afternoon I straightened up my bench and washed cutters and other tools as well as the steel top. Monday mornings were not so difficult when you don’t start off ina confused mess of junk….
I agree completely with the benefits of starting a project with a clean workbench and also clean tools. Many years ago a mechanic taught this to me. At the end of the day (or a couple of days if the project can’t be finished in a day) I wipe down each tool with a shop rag and put it back in my toolbox box (usually located next to my workbench even though it’s on wheels). Then I clean off my workbench as much as possible. It’s great to start my next project with clean tools right where they are supposed to be in their designated spot in the toolbox drawer and start work on a clean workbench too.
Thanks for another great article. My comments are that I like to mount the vise at the corner of the bench and as close to the edges as possible. That way I can turn the vise at 90 degrees if I have to, and I try to get the jaws to line up at the edge of the bench vertically so I can work on long items that extend beyond the edge of the bench.
My bench is from a Sizzler that closed. 6′ long, 32″ deep, and bolted to the wall both high and low. Yes, I do a LOT of metal work, as well as engine/carb work on my motorcycles. Nice part is all stainless top and shelf, and I’ve reinforced the legs so nothing wiggles.
I’m a tall guy and I was tired of all the 33″ high narrow work benches at our 100 yr old farm shop so I built a wooden 40″ tall, 40″ deep 8′ long workbench for my garage. ( I also do some woodworking ) My Father-in-Law can’t reach the back wall where I have the screwdrivers hanging. HAHA He has to get a step stool to get anything off the back of the bench. What I’m saying is, in my case I’ve alienated my kids and others from using my bench – which might be a good thing also….
It didn’t stop my wife from backing the car out of the garage while one kid still had their door open. That was hard on the door and my bench.
I have found a long solid bench bolted to the back wall of my shop high enough to stand or sit with an old bar stool works well. Part of it has a flip up top hiding a parts washer underneath. I store totes or larger items there as it’s easy to move them aside when the cleaner is needed. I also have an old portable folding workbench that I replaced the cheap top with an old piece of countertop (excellent bench top!) from a home remodel. I added casters so I can wheel it around wherever I need tools/parts/work space and then fold it down and store it underneath the workbench when I’m done. I have holes drilled in it for mounting a table or miter saw if needed. Of course, assuming I ever get done enough to clear it off and store it away. lol.
Awesome idea @Jeff B to hide the parts washer under a flip-up section of your bench! I’m going to try that trick!
I’ve had a variety of them over the years, and the best bench is several. My mainstay one has a 1/4″ steel top, a classic 4″ Wilton swiveling bullet vise, a 6″ high 1/4″ flat bar “backsplash” (that can also be used to anchor it to the wall), a 1-1/2″ angle-iron perimeter frame and legs that are inset so I can go all the way around three edges with clamps if need be. Good lighting is important., as is locating it in a corner (or at least in an “L” pattern) with my main Snap-On box and machinist box (which are moved only for housekeeping) arms-length away to the right. The “90% drawer” with the most common wrenches, screwdrivers and pliers is then right at your fingertips with the open drawer immediately to my right. The bench top measures only 24″ deep x 48″ wide, but that’s perfect for most tasks. The backsplash keeps parts, tools, fluids, etc. from falling behind, and the bench is open underneath. I originally made drawers to go underneath but I don’t like stuff rattling around if I need to hammer or hacksaw something.
I have also had a small vise and a worktop mounted on my first “airport box” (which had wheels and a drawbar but was lower than racetrack-style “pit boxes”. I later had a bigger one. If you need one, make sure you have a treadle lock. My thinking these days is to go smaller – there’s a lot of nice rolling tool carts out there now. I’m planning to make one and put a light vise on it. As another commenter pointed out, you won’t be doing much hammering or sawing on anything with wheels, so a small vise is all you really need on that.
In my old garage I also had an 8-foot steel workbench against the back wall. Sometimes size matters. Wasn’t my main bench, and usually had parts piled on it, but when you need the space…..
Sometimes a temporary bench with a piece of plywood and two sawhorses gets it done. Workmate-type portable benches are also very handy.
Then there’s specialty benches, such as benches to mount power tools like lathes and drill presses. They have their own special needs. And don’t even get me started on the ideal welding table………
I loved the big swiveling vise. But, sadly using it as a press did it in. I was using a 3’ extension handle and stripped the internal threads in the base. Never found an decent swiveling vise, so replaced with an 8” Wilton.
I covered the top of my bench with a piece 1/8” steel plate. I took it to local welding shop that had a large brake. They bent a 6” backsplash on the back, and a 2” downturned lip on the front. Makes a great work surface and a place to put notes from the grandkids with magnets.
Excellent points about lighting!!! Also, I think most of us consider the vise a crucial part of the arrangement! Finally, when I built my bench about twenty years ago, I “temporarily” used two layers of 3/4 plywood as the top surface. I haven’t run into a need to upgrade yet! 🙂
In my previous shop, and this one also, I used old kitchen cabinets for the base and then put 1 1/8″ subfloor plywood on top with 2 layers of Masonite on top of that. Mounted to the wall and good and solid. I put out a request on the Nextdoor app. for kitchen cabinets that were victims of a remodel, and they were free. Also used some of the upper cabinets for books and other small stuff.
I used particle board with 5000 coats of water based poly. If you get solvents on it, it will get eaten into but slop on some more poly. I have a couple of stools, at the right height I got from people’s trash on pick up day. When you got a sit down project, nice to have. And when you are standing, make sure you got some sort of floor pad. My decade old knees didn’t used to care, but now…..well, the inch thick pad and Advil get me through any more than a quick session. One other thing I added is an outlet on each corner at the top of the legs. Then a medium length cord to plug the whole thing in. The multiple plugs are useful when I got the Dremel out, the drill, a hot air gun, the sander……. One other thing I did was for my bench grinder. Not used too often so I did not want it taking up space on the bench all the time. So I got some inch or so long pins, about 1/4-5/16 diameter. Drilled holes in a leg to store them and holes in the table top to secure the grinder when I need to pull it up from its shelf under the bench. Not part of the bench but I got a pack of Q tips that I use all the time when I got a nook to clean out. I use them all the time, if they are too big for a slot to clean, I whack the tip with a hammer to flatten it out. I have gotten to where I always use them to clean out the rim on paint cans before putting the lid back. So much nicer when you go to use the paint next time.
Meant to say…decades old knees………………… first 5 or 6 six decades didn’t seem to complain at all.
I would like to have the room for a bench. I have to make room on the floor for my projects.
I got some stainless steel tables that came from a commercial kitchen, just used the tops and attached to my old workbench. The stainless steel is very easy to clean up. I built one for my friend’s auto shop too.
I got a couple stainless table tops in my backyard shed. Got them from the trash. Someday……………….
One thing I find very helpful is a bench lamp that is easily re-positioned consisting of a 6″ magnifying glass surrounded by a florescent lamp. It works great when you need to look at fine details.
I would sell my soul just to have a garage to put a work bench in! Just not in the cards I guess. Tools are kept in a shed and the cars stay in the driveway. Those of you that have a garage with a proper workbench where you can actually work on a vehicle inside don’t know how lucky you are!
Absolutely brother! I’d live in an apartment, and I rebuilt an M21 Muncie on the coffee table! My girlfriend, now, my wife thought it was funny. Keep at plan ahead and you’ll have a garage and shop someday. Now, for some comments: I have multiple work benches one in the shed with a large vise that my pop had when I was growing up it’s mounted on the corner with an overhang on a nice sturdy bench. That’s where all the plumbing and dirty work gets done. I remodeled the kitchen in the house, and I used all the old cabinets as basis for work benches, and work sites: one that’s dedicated for the drill press, the lower drawers, hold all the press vises drill, bits, sharpeners, etc. another is dedicated to electrical items and electrical parts. The third one contains plumbing parts and plumbing equipment . different height benches are a must. I have a large woodworking bench that can be slid out in the middle of the shop to work on cabinet projects. My next cabinet project is a bar addition for the local lodge. The mechanic area in the main garage has pegboards and hanger tools with a rolling toolbox adjacent to it. I don’t like wheels on my benches. Good light is a must these multi LED screw. Ins are great upgrade and I like the old gooseneck lamps that direct the light where you need it.
All my benches have multiple power outlet strips either attached to the bench or nearby. One thing I don’t have and I’m going to build is a station to charge and store the cordless tools.
Good article, some good ideas here. I added thick stainless-steel cladding, with a bent over front edge, to the busy area of the long main workbench. A robust surface that is easy to clean. On one end is the huge classic Sheffield steel Made-in-England vise, bought second hand. (Never again, a cheaper (cast iron?) version with tons of slop!) Overhead cabinets liberated from a kitchen reno, overhead lighting, plus an articulated lamp that can be pulled in close to what is being worked on. Topped off by adding an auxiliary workbench to one side……a surplus semiconductor cleanroom K-bench, made to hold heavy wafer fab processing equipment. The very strong open design works well, providing legroom and open shelf storage underneath.