The Hack buffs his headlights for Magnus Walker

I’ve had a couple of long articles recently, so you’ll forgive me a short lateral pass.
It won’t surprise you that a guy who goes by the professional nom de guerre “The Hack Mechanic” is, shall we say, less than fastidious about the appearance of his cars. I don’t do concours. Don’t even talk to me about Q-Tips. For me, preparing for a cars and coffee means spitting on the bird poop, wiping it off, and throwing out the empty bottles of 5-Hour Energy. Hey, don’t judge me. I’m told I have other redeeming qualities.
However, in a very surprising twist in my life, Hagerty’s Larry Webster put me in touch with big-time Porsche guy Magnus Walker’s people (I don’t have, you know, people). They were looking for a BMW Z3 M Coupe (a.k.a. “the clown shoe”) to use in an upcoming installment of their video series Magnus Walker’s Next Big Thing, and since a) I own a clown shoe, and b) I have hair almost as good as Magnus, it looks like the car and I are in. A video crew is descending on my humble abode to do some advance work, and then Magnus will be borrowing my ’shoe and smoking the rubber off it somewhere west of Worcester, Massachusetts.
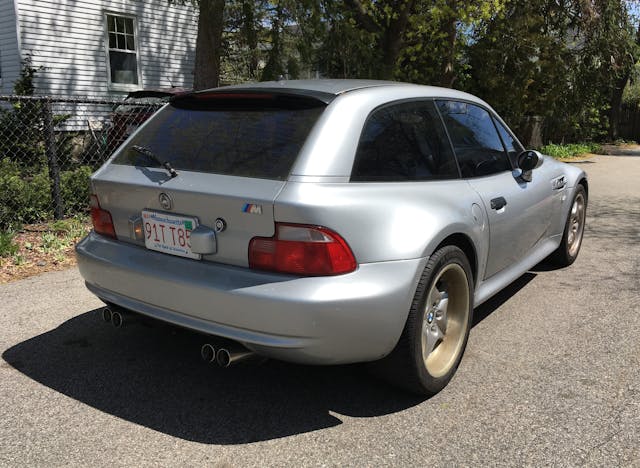
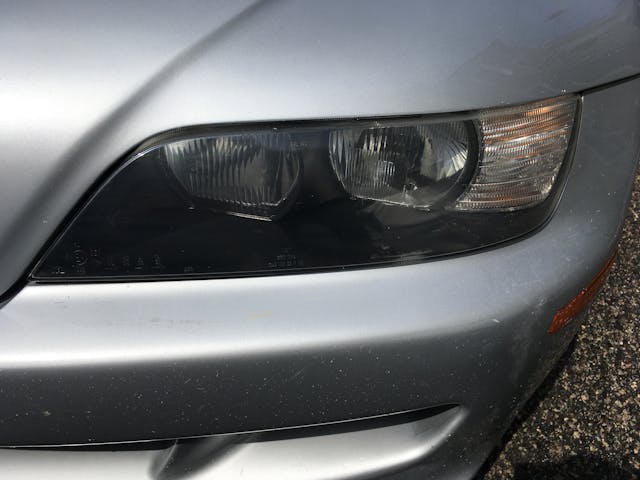
The M Coupe, however, had been in storage for the past six months at my friend Mike’s, the guy for whom I sold a Colorado orange 1973 BMW 2002tii on Bring a Trailer last fall in exchange for two over-winter garage spaces. So, earlier this week I went over there to pick up the car. I mentioned the Magnus Walker thing to Mike, who has owned some pretty high-dollar cars. He pointed at the nose of the M Coupe and said, “Well, if it’s going to be in a video, you’d better clean those.” He was pointing to the hazed headlight covers.
Now, from what I know of Magnus Walker and his whole outlaw take on both fashion and cars, somehow I doubt he’d be off-put by the fact that a car I’ve represented to his people from the get-go as a driver, not a garage queen, has hazed headlight covers. However, they were pretty hazed, and it reminded me that I had actually bought a headlight restoration kit a few years ago, and, what’s more, I knew where it was. (Ha! I just checked my order history in Amazon. I’d bought the kit in 2016. I guess that tells you everything you need to know about how strongly I felt about polishing the ’shoe’s headlight cover.) Rain was forecast for the next few days, but while the car was still outside in the sun, I thought I’d have at it.

The kit is the “3M Headlight Lens Restoration System 39008.” It’s one of the ones that uses a disc pad holder that attaches to a drill. It comes with six coarse discs, four medium, and one fine sanding disc and a polishing sponge that all attach to the pad holder via Velcro. It’s about $12 on Amazon. I didn’t do any exhaustive research before selecting it; I simply clicked and bought on the best-selling headlight restoration kit on Amazon.
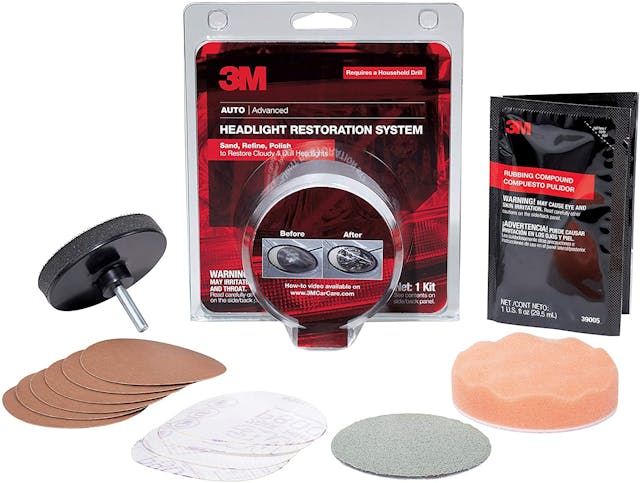
Using the kit isn’t rocket science. You tape around the headlights so you don’t damage the car’s paint (I used painter’s masking tape), mount the pad holder in the chuck of your drill, and work your way through the coarse and medium discs, keeping the drill moving and only applying light pressure. The instructions say to stop and wipe off the plastic dust and check your progress, looking for any abrasions, scratches, or deposits that haven’t been removed yet. Never having done this, my first reaction was “ABRASIONS?? YOU’RE PUTTING BIG CIRCULAR ABRASIONS INTO IT RIGHT NOW,” but of course that what it’s supposed to do as it cuts off the top layer of the plastic, and the successively-finer pads smooth them out.

Let me say that I’m not a person who enjoys doing detailing work. I can count on one hand the number of times I’ve compounded / waxed / polished a car. I don’t really have the patience and I’m not addicted to the result. So, what I wanted out of this was for it to be a) quick, and b) accomplished without any judgment required on my part. The sanding discs visibly throw off plastic as they cut, so it’s pretty obvious when they stop cutting and it’s time to change the pad, but it was instructive to me to look at the number of discs in the kit. There were six coarse discs. That’s up to three for each side. I went through two of them on each side and verified that I only saw circular swirls, not any additional scuffs, so I didn’t use a third one. There were four medium discs, so I went through two on each side without worrying that I needed to apply judgment. The fine Trizact pad is re-usable. Then you switch to the buffing pad with a thumb-sized patch of polish squeezed on it. That’s pretty much it. It took maybe 20 minutes to half an hour per side. The result is quite good.
The main issue I encountered was that, when I pulled the tape away, I was alarmed to see that the sanding discs had cut through it and that, underneath, there were big scuff marks on the bumper. I thought that the kit really should say, in big bold red letters, “This kit is going to laugh at your painter’s masking tape, because that spinning drill with a sanding disc on it is going to cut right through the tape like it’s butter, scuff the paint, and you’re gonna be sorry.” On my car, which has little scuffs like this in many places, it’s not a big deal, but if I had a near-mint car, I’d be pissed. You’d need to mask with Gorilla tape (which, of course, you’d never be able to get off) in order to have it actually prevent a spinning drill with a sanding disc on it from cutting through. I wondered if, before attacking the other side I should pull the headlight covers and sand them off the car.
However, I began to wonder if maybe my eyes and memory were playing tricks on me. I went inside the house, looked at older photos of the car on the computer, and, sure enough, those scuffs had been there for years. Of course, they may well have been put there by the previous headlight cleaning attempt.

Many repairs like this offer instant opportunities to evaluate whether you’d do it again. I once spent weeks refinishing a set of hundred-dollar corroded alloys and came out of it ready to do the “Shut up and take my money!” thing the next time I found a refinished set for $600. I re-bolstered and re-dyed a set of sport seats once for a BMW E30, and while it took a few evenings, the take-away was, “Yeah, I’d totally do this again for the right car.” In comparison with both of those, the headlight restoration was trivial, and the results were excellent. It may not be my bag, but 12 bucks and an hour … yeah, I can stomach doing that again.
And when you see my clown shoe on Magnus Walker’s Next Big Thing, be sure to comment on how clean the headlights look.
***
Rob Siegel has been writing a column (The Hack Mechanic™) for BMW CCA Roundel magazine for 34 years and is the author of seven automotive books. His new book, The Lotus Chronicles: One man’s sordid tale of passion and madness resurrecting a 40-year-dead Lotus Europa Twin Cam Special, is now available on Amazon (as are his other books), or you can order personally-inscribed copies from Rob’s website, robsiegel.com.