The Great Lotus Europa / Datsun F10 Master Cylinder Swap (Part 2)
Last week, I discussed how a soft pedal in my ’74 Lotus Europa Twin Cam Special followed my having driven with the handbrake on. The fact that the softness didn’t respond to bleeding, and that the 50-year-old master cylinder (MC) was the only original brake hydraulic component left, led me to the decision to replace the MC. I would’ve replaced it four years ago when I sorted out the car, but the original Girling component is no longer available, and any replacement requires adaptation.
I decided to do the Datsun F10 master cylinder conversion, as that swap appeared to be well-reviewed on the Europa forums. The part has long been No Longer Available (NLA), but I found a New Old Stock (NOS) one on eBay for $110 and dove in.
Oh, my word. What a colossal pain in the patootie.
What I read in the forums was that you needed to slightly ovalize the mounting holes in the F10 MC to get them to slide over the car’s mounting studs, but that the rest was “straightforward” since the original pushrod assembly could be reused. There was the complication that the fittings on the original MC are English, whereas those on the F10 master are metric, but several articles breezily stated that this could be handled by a trip to the local auto parts store for fittings and adapters.
“Straightforward” my … well, you know. Routing out the mounting holes with a Dremel tool was “straightforward.” Nothing else was.
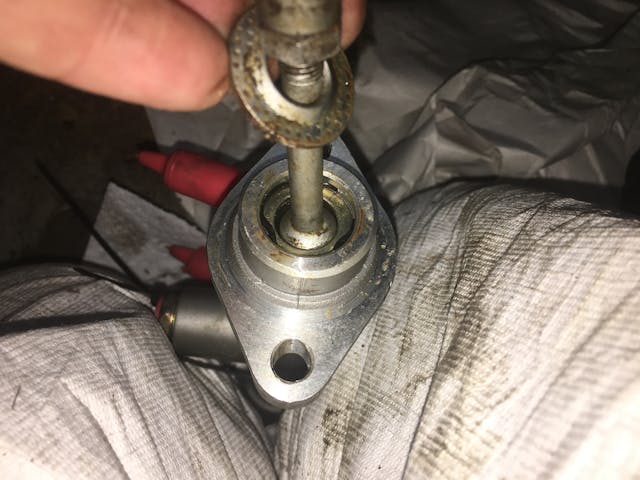
Although the pushrod itself was compatible, there was a non-trivial issue. The end of the pushrod is shaped like a rounded golf tee and is captured behind a washer that’s held in place with a retaining clip. So transferring the pushrod from the old MC to the new one should just involve undoing the clip, then clipping the pushrod and washer onto their new home.
Not so fast, Lotus breath.
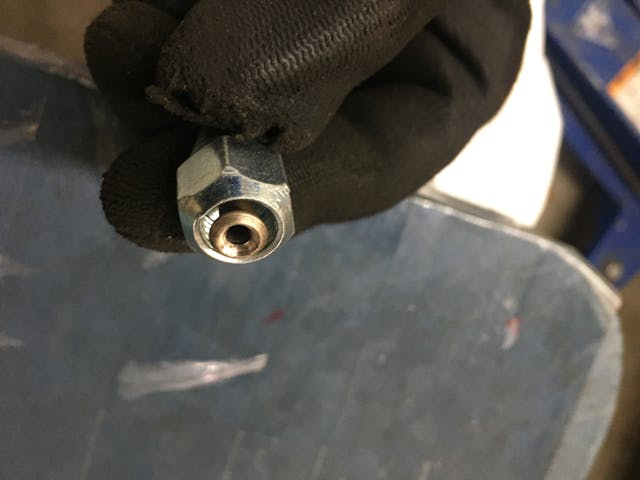
It turns out that the ends of the two master cylinders—the portions that hold these washers and clips—are different diameters. The original one is a shade under an inch, the replacement MC about 0.83 inches (it’s Japanese, so it’s likely a metric 22mm), so the original pushrod washer is too big to fit. The new MC also came with a washer behind its clip, but its center diameter is too large to capture the pushrod. This would’ve created a situation where, if the brake pedal flopped forward, it would allow the pushrod to fall out.
Further, the original washer is “cupped” to accommodate the shape of the end of the pushrod, and even the venerable website McMaster-Carr, on which you can usually find any common industrial part, doesn’t sell cupped washers.

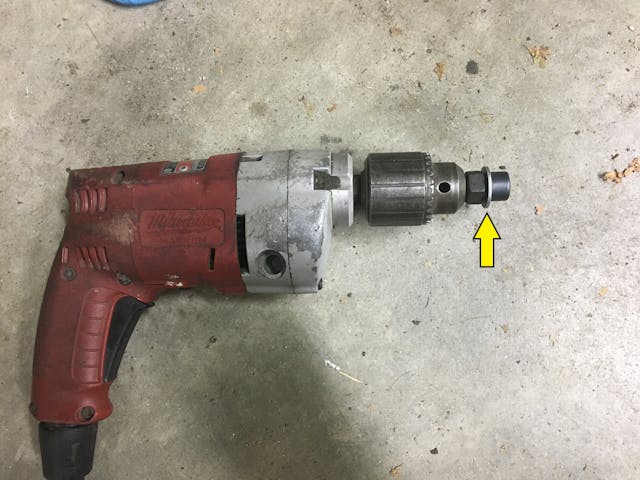
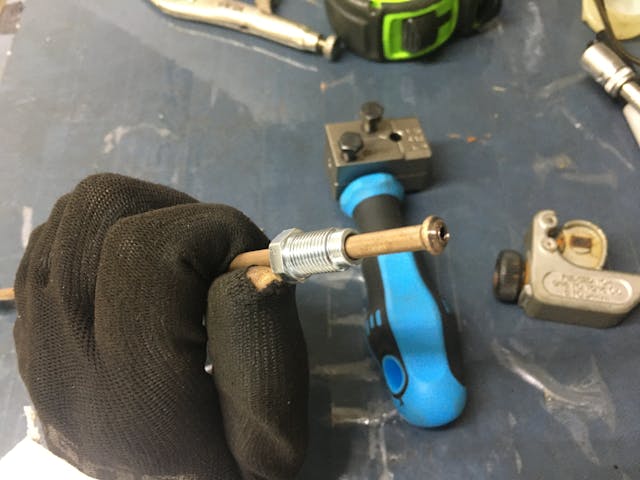
Fortunately, it’s pretty easy to shave the outer diameter of a washer. You put a snug-fitting bolt through the center, tighten it down with a nut, and stick it in the chuck of a drill to spin it around. Then, while it’s spinning, you grind it down by touching it against a file.
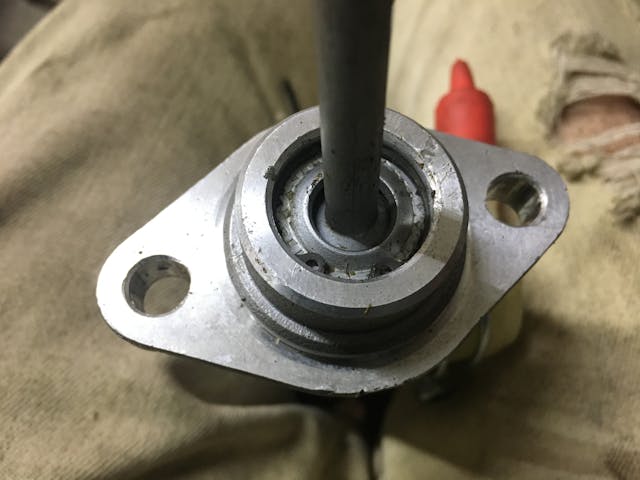
In about 10 minutes, I made the cupped washer the correct size. It was also too thick, but that was handled by shaving it on a belt sander. With that, the original pushrod was installed in the G10 master cylinder.
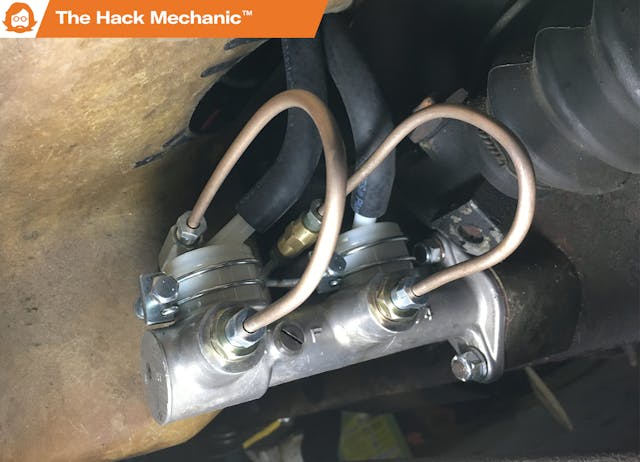
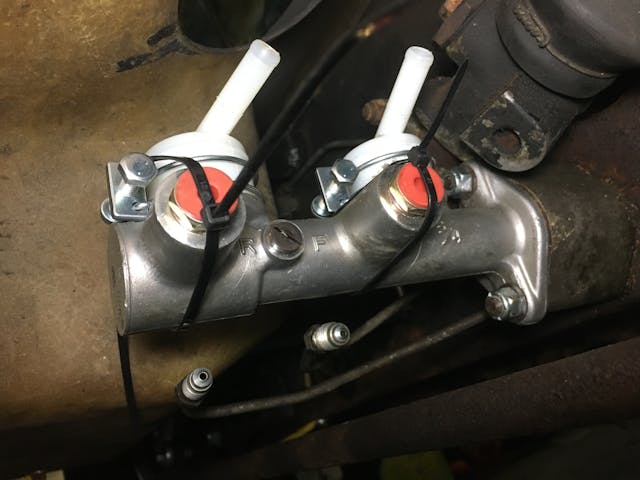
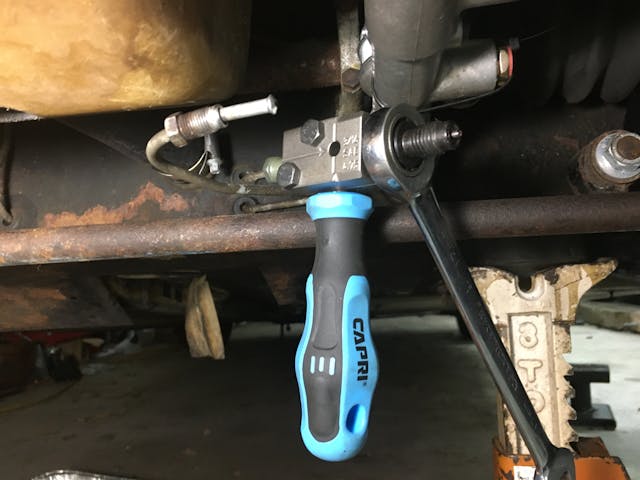
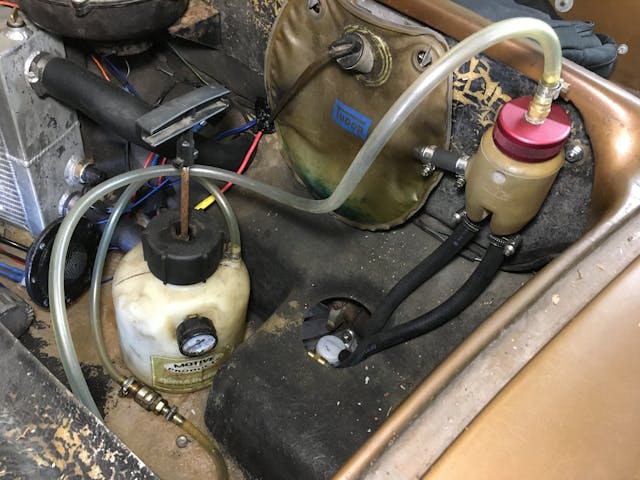
I mounted my newly-adapted prize in the car so I could begin adapting the brake lines. In the photo below, you can see the two lines hanging down next to the new MC. They’re poised to enter on the left side, but the new MC’s fittings are on the right.
I had to dig on the Europa forums to find the information, but the fittings on the original brake lines are 3/8-24 UNC bubble flares, whereas those on the new MC are metric 10mm x 1.0 SAE inverted flares. On paper, I’ll admit that the adaptation doesn’t sound like it’s that big of a deal. I mapped out two ways to approach it. If you want to risk cracking the original brake lines, you simply buy adapters that have a female 3/8-24 UNC input and a male 10mm x 1.0 SAE output, screw them into the new MC, bend the brake lines 180 degrees so they go into the right side of the MC, screw the fittings into the adapters, boom, done.
If you don’t want to bend 50-year-old British steel brake lines and risk breaking them, you fabricate a pair of short adapter lines instead. You use a pair of female-to-female 3/8-24 UNC unions and build two lines with a male 3/8-24 bubble flare at one end and a 10mm x 1.0 male SAE flare at the other. I vastly preferred this second option. I’ve fabricated brake lines before and have a length of easy-to-flare-and-bend Cunifer copper-nickel tubing and two flaring tools in the garage.
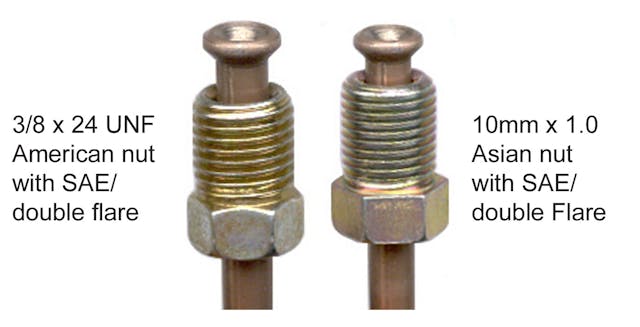
But there were several things that made this job confusing from the get-go. The first one is subtle. There are two primary kinds of flares used in automotive brake lines. For the most part, American and Asian cars use an SAE “double flare” that looks sort of like the horn of a tiny trumpet. It’s referred to as a “double flare” because the flaring tool that makes it folds the metal of the horn onto itself to double its thickness.
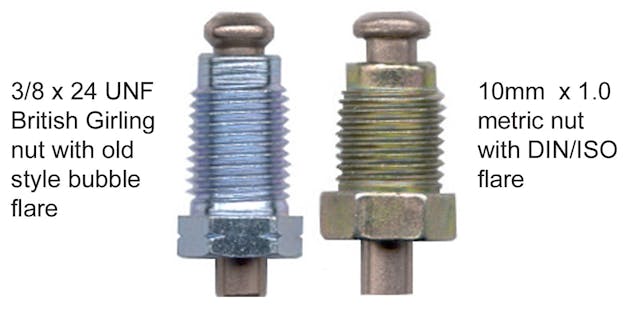
European cars use a DIN/ISO bubble flare that looks like the cap of a mushroom with a flat bottom. The Lotus, however, like other Brits, uses a British bubble flare. It’s similar to the DIN/ISO flare, but has an angled rather than a flat bottom, so in profile it looks more like a flying saucer from a 1950’s film than a mushroom cap.
From a practical standpoint, what this means is that if you’re building adapter lines, as I was about to, you need to be really certain about what you’re buying. I pored over the web and found Federal Hill Trading Company (“FedHill”) in central Massachusetts. Its website contains better information on these different kinds of flares and a larger variety of clearly identified fittings than any other site that I found. Right there on the home page is a menu option labeled “British-Girling Fuel / Hydraulic / Brake Line Tubing, Nuts, and Fittings.” I was in love.
I called FedHill, spoke with the owner, Tim Beachboard, and described my Lotus-F10 master cylinder swap. He pointed me at the parts I needed, including the unions that were not just F-to-F 3/16-24 unions, but F-to-F 3/16-24 British bubble flare unions. He also quizzed me on whether I had a flaring tool capable of making a British bubble flare (I did). I thanked him profusely for his time and expertise, and placed the order.
A day later, everything arrived. Like a kid on Christmas morning, I tore open the package and began test-fitting the pieces. I immediately realized that I had a problem.
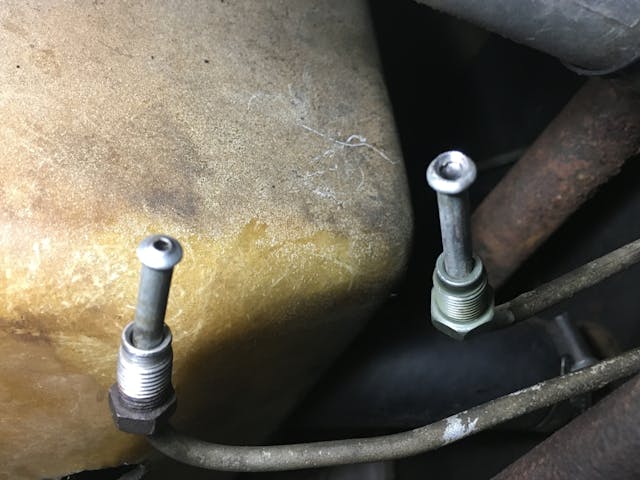
It turns out that the original brake master on my car didn’t have two 3/16-24 fittings. It had a 3/16-24 fitting for the rear brake line, but the front brake line used a larger 7/16-20 fitting. When I searched on the Europa forums, I found a small handful of references (like two) to this. It appears to be unique to the tandem master cylinders in U.S.-spec twin-cam cars like mine.
OK, I thought, no big deal. I’ll go back on FedHill website and order the parts needed to build the front brake’s adapter line.
The problem was that I couldn’t find a 7/16-20 British bubble flare union.
I called Tim at FedHill and explained about the two different-sized brake line fittings. He listened carefully, then said not only didn’t he have a union that size, but I’d be unlikely to find one anywhere online. He advised that I’d probably need to cut the end off the front brake pipe, slide off the 7/16 fitting, slide on something more conventional, and re-flare it, but he cautioned that that might not work on 50-year-old steel pipe. He said that I should be prepared to have to replace the entire line, undoing it from whatever it connects to at the other end. Since this line runs inside the tunnel under the car, that definitely wasn’t something I relished.
To sum it up, he uttered the last words you want to hear from someone with that level of expertise—“Basically, you’re screwed.”
Recalling the famous “Trust, yet verify” quote of an American president in the 1980s, I then spent several hours online looking for a 7/16-20 bubble flare (British or otherwise) brake union. Tim was correct—no such thing is available. Further, while there are a whole variety of adapters to turn 3/16-24 male fittings into something else, there’s nothing remotely like that for a 7/16-20 bubble flare.
I did, however, see a 7/16-20 SAE female brake nut on the FedHill website, and wondered if I could make it work. I ordered it and a corresponding male fitting, and began making some test flares with my $42 flaring tool.

Since copper-nickel brake line is soft, I had a hard time imagining that I wouldn’t be able to build something that would seal. I needed to see a candidate connection with my own eyes. So I slid the 7/16-20 SAE brake nut on a piece of tubing, made an SAE flare, and prepared to tight it against the 7/16-20 fitting at the end of the brake line.
I didn’t need to snug anything down to see how ridiculous this was. It was like watching a pair of sixth graders kissing with their lips barely touching.

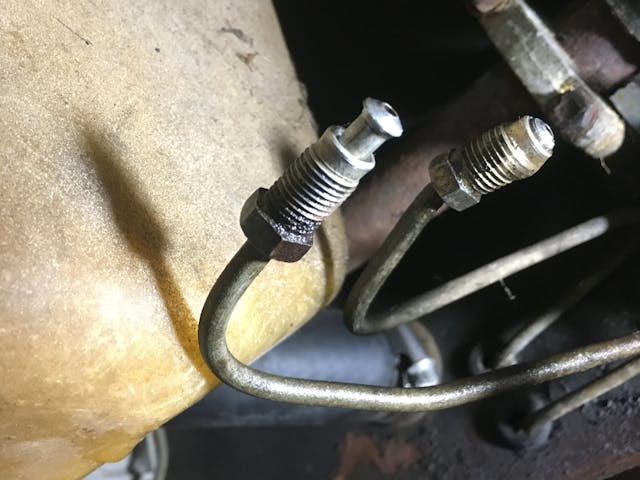
Just to help my understanding of things, I then made a single flare—the kind you’re told you should never ever use on brake lines because the metal is too thin—and screwed the two fittings together. In the photo below, you can see where the female fitting cut a ledge in the copper because neither the nut nor the flare were designed for this.

It took me several hours before I fully understood what the fundamental issue was. It’s this: You never have two flared pieces of tubing mating against each other. Ever. You have one flared piece mating against the inside of some solid fitting, whether it’s the master cylinder itself (as was the case here), or the crimped-on concave steel end of a rubber brake line, or a union. This female nut wasn’t something you use to seal two brake lines together.
Sometimes in a project—or in life—you’re faced with several different options to accomplish some task. You go down one path until you find something that’s a hard “no,” and that makes you choose the other path, even if it’s a rocky one. As much as I didn’t want to cut the flared end off a 50-year-old brake line, I had no choice.
So off it came. And that was challenging, as there was very little room to maneuver the tubing cutter.


I was now committed. And that was scary because there was an immediate problem. The flaring tool needs to grab a few inches of tubing, and there wasn’t a few inches of tubing before the 90-degree bend in the pipe.

So, with everything I’d gone through to avoid having to bend the old brake lines, I very carefully relaxed the 90-degree bend just enough to be able to slide the fitting back enough to clamp on the flaring tool. I found that the metric 10mm x 1.0 fittings were a looser fit on the tubing than the 3/16-24 ones, thus requiring less bending of the line. So, since it was up to me how I fabricated these adapters, I slid on a metric fitting and made an SAE flare.
With this hurdle finally cleared, the fabrication of the two adapter lines took maybe 15 minutes. Because the Lotus is extremely low, I didn’t want to run the adapter lines underneath the master cylinder lest some speed bump or misplaced rock rip them out, so I looped them up above it. However, when I went to tighten down the fittings, I found that there wasn’t sufficient clearance to get a wrench on one of the unions. I own a set of crow-foot wrenches (two actually—one English, one metric) because once a year, you run into something like this. Today was the day.


The only remaining task was installing the remote reservoir. As I mentioned last week, I have a Motive power bleeder that I’ve been unable to use on the Lotus because I could never find or fabricate an adapter to the original Girling reservoir that fit well enough that it didn’t spew brake fluid everywhere. I mounted a spare ATE reservoir from a long-ago-parted-out BMW 2002 and ran the hoses to the master.
With the surprisingly-troublesome Lotus Europa / Datsun F10 brake master cylinder swap finally complete, and my fantasies of ordering a hit on everyone who’d ever called this swap “straightforward” fading, I power-bled the brakes, folded myself into the little car, drove it down the block, and was stunned to find that the problem that made me go to this level of effort in the first place hadn’t changed a whit—the brake pedal still traveled noticeably further than it should, firmed up with a single pump, then repeated the process 10 seconds later.
Most days I love cars. This was not one of them.
[Next week: Find out if I fixed this or rolled the Lotus into a swamp.]
***
Rob’s latest book, The Best of the Hack Mechanic™: 35 years of Hacks, Kluges, and Assorted Automotive Mayhem, is available on Amazon here. His other seven books are available here on Amazon, or you can order personally inscribed copies from Rob’s website, www.robsiegel.com.
Check out the Hagerty Media homepage so you don’t miss a single story, or better yet, bookmark it. To get our best stories delivered right to your inbox, subscribe to our newsletters.


Very interesting tale! I’ve made a few brake lines in my life but never with mismatched fittings and never so complicated. I have the same brake bleeder because my wife REFUSES to sit in the car and pump the pedal. And it works but it’s no miracle machine and you need other tricks to get the last of the air out of your system – like jacking up one side of the car at a time. Some brake cylinders just trap air better than others and getting all the air pockets out of the MC is never straight forward.
You are the hero we need!
You get an ‘A’ for effort, Rob. Projects like this are what will keep me from buying more obscure classic cars in the future. Chasing solutions for NLA parts is interesting and even enjoyable the first few times, but from my own experience it gets tiring quickly. I guess I’m finally in a place where I want to spend more time driving and less time scouring the corners of the internet for solutions to issues that are far more complicated than they should be.
Good discussion of tube flares. This is something not too many people think about.
I have never had to work with a British bubble flare. The only English car I have is a Bentley, which is basically an Audi with a British body. Not a bad way to make the car. leave the mechanical parts to the Germans, and let the English do the paint, leather, wood, and so on.
Many cars, US and foreign, used SAE flares and flare nuts until relatively recently. Some still do. Also, many brake components were in inches, instead of millimeters, until recently. Again, some still are.
This is what keeping a classic on the road is about- the opportunity to learn, analyze, and design replacement systems. Great writing, Rob!
Rob, I think your original MC must have had 3/8-24 fittings, not 3/16-24, right? The tubing itself is probably 3/16″ OD so the fittings have to be bigger than that.
Whoops! My bad. Yes, 3/16 tubing, 3/8-24 fitting.
I also have the Motive power bleeder which I much prefer over the traditional method of convincing the wife to pump the pedal. It’s also much more effective than using a vacuum pump at the bleeder, which in my experience just sucks a lot of air past the bleeder threads as soon as you crack it open. Like your Europa, one of my cars has a reservoir for which there is no Motive adapter available. I tried making one from a spare cap but that didn’t work so well. Then the light went on: I have a 3D printer! A few hours later, I had a custom Motive adapter for my oddball reservoir, and it worked perfectly.
I sell brake line adapters (and counsel people who need them) for a living. FedHill is one of those incredibly valuable resources that I turn to almost daily. BTW, I’m going to use your descriptions of the various flares from now on!
A little late now, but 7/16-20 is the same thread as 4AN. Even with the mismatch of flare angle, a female 4AN fitting should have worked.
Heartbreaking that the issue is still there after all that work. Been there, done (almost) that.
I did not know that. Thanks.
This is the kind of problem that stops 95% of restoration projects in their tracks. Your persistence and ingenuity is educational and inspiring.
So how many times did you say “Give Me a Brake!” :^)
You should have named this series Give Me A Brake (job). I can’t wait for Part 3, the return of the revenge of the master (cylinder).
I’ll see myself out.
Sounds like knock-back of your discs. I have a 2014 Jeep Cherokee (not Grand) that on the first pedal push, the brake is soft, but the second and subsequent are nice and firm. Drive for 5-10 minutes, first push again is soft. After 207,000 miles, original brake pads are only 1/2 worn.
You may want to check your residual valves to see if they are holding the pressure as intended…
I was rapt by the story when I got to the part about having to cut the front line. Then I thought, “Oh God, how in the heck is he going to flare that line?”. Then I saw that $42 flaring tool. Now, I have a flaring kit, but when I saw that, I had to go to Amazon. That thing is sweet and compact.
AND, I have an additional resource for tubing fittings on my next brake line project (adjustable prop. valve install). Thank you!!!
Looking forward to Part 3. Hoping for a happy ending…
Why not just have the original cylinder sleeved? It seems like that would have saved a lot of time and trouble.
As I said in the first piece, the original master had an integrated reservoir that wouldn’t work with the power bleeder, so I thought that a benefit of going with the new master was that I could install the external reservoir of my choice. Had I known what a PITA it was, I might have just had it sleeved anyway.
A mini bench lathe (yes, even the jokey one at Harbor Fright) might’ve helped you out. Ordinary bolts can become any type of flare nut you want in minutes. I think nothing of kluging whatever I have on hand to get something done. Even made up an NLA fuel injection line.
Converted a MC on a 1963 Pontiac Lemans to a dual. After some research used a 1997 S-10, same bore size with the fittings on the right side. Ran into the same problem with the washer and did the exact same thing as you. a year later put on disc brakes and now it stops like a new one.