The Fuel Pump Follies (Part 2)
Last week, I talked about the pros and cons of doing a “prophylactic” replacement of the perfectly-functioning fuel pump in my 1996 Winnebago Rialta (a Volkswagen Eurovan with a Winnebago camper body). The argument for replacing it was that:
- Fuel delivery problems are on my “Big Seven” list of things likely to strand a well-used car;
- Other items on that list had already reared their ugly heads, failed, and nearly stranded me;
- The receipts from the previous owner didn’t show fuel pump replacement; and …
- I’d already bought a new fuel pump to have with me just in case, but because it lives inside the fuel tank, replacing it roadside isn’t trivial. That is, fuel pump replacement in a modern car is the antithesis of an old-school mechanical fuel pump that’s held to the head with a pair of nuts and two hose clamps and can be swapped almost as easily as a fuse.
The cons were a combination of the usual “If it ain’t broke, don’t fix it” argument coupled with the issue of the poor quality of new parts raising the real possibility that I might replace a high-quality working pump with something that could fail sooner. The thing that tipped me toward replacing it was when a friend of mine posted about having the fuel pump fail on his well-sorted car during a thousand-mile enthusiast tour.
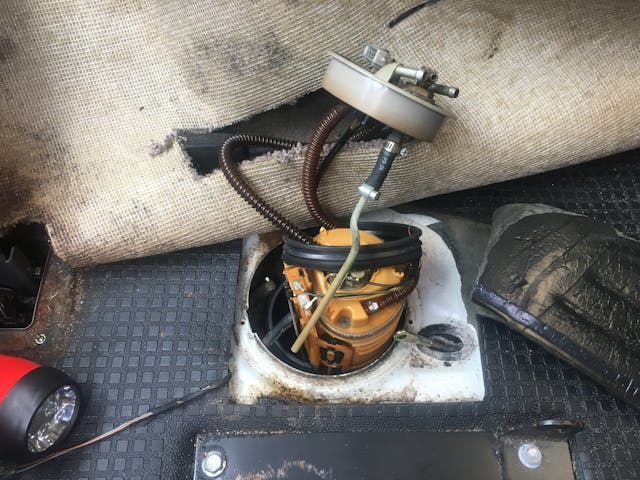
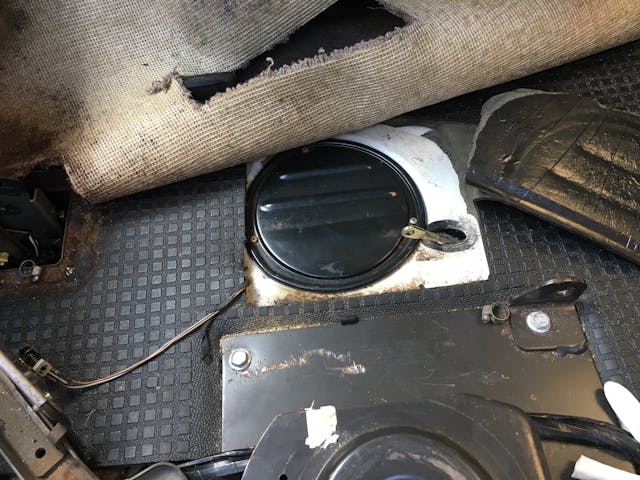
So, a month before a scheduled trip to the Cape with my incredibly supportive wife, I dove in, but I had a special degree of curiosity as to whether I could have easily replaced it roadside had it failed. I did what was necessary to pull up the rug, expose the fuel pump, and remove it. This was more invasive than simply lifting up the back seat, as was required to do this repair in my 2003 BMW a few years back, but it wasn’t as bad as I expected. The surprise was that the plastic twist-lock fitting holding the fuel pump to the bracket on the bottom of the tank appeared to be stuck fast. While old plastic obviously doesn’t rust like steel or corrode like aluminum, with age it can certainly stick and bind. The time and effort it took simply to rotate it 30 degrees was enough that I was glad I was doing it in my driveway instead of on the side of Route 6 on the Cape.
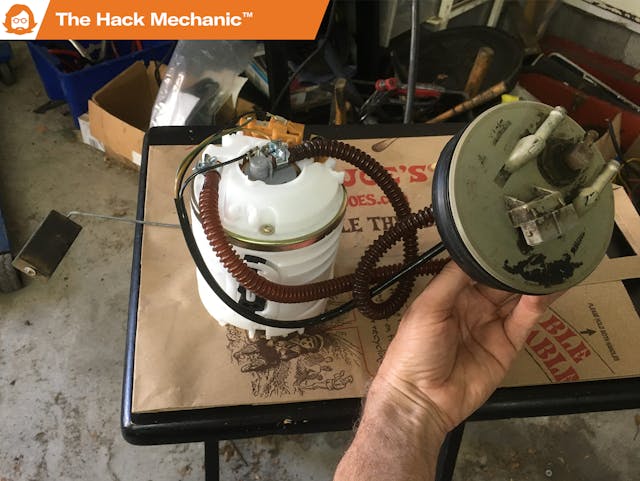
The work that remained was simply transferring the rest of the components—the flexible corrugated plastic hoses connecting the pump to the flange, and the fuel level sensor—over from the old pump to the new. On paper, this is trivial, but the actual mechanics of it were surprisingly challenging.
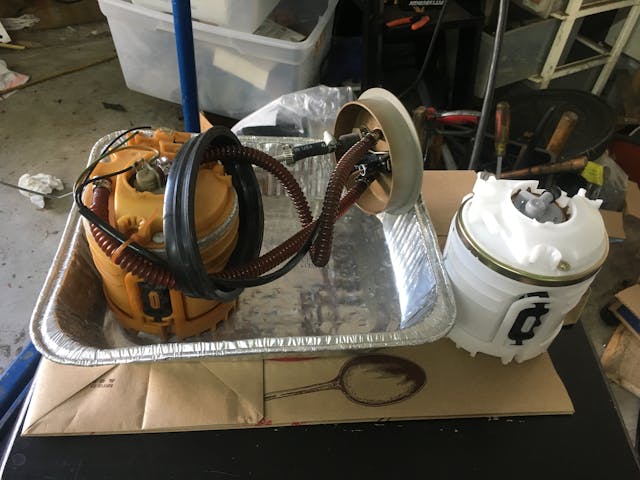
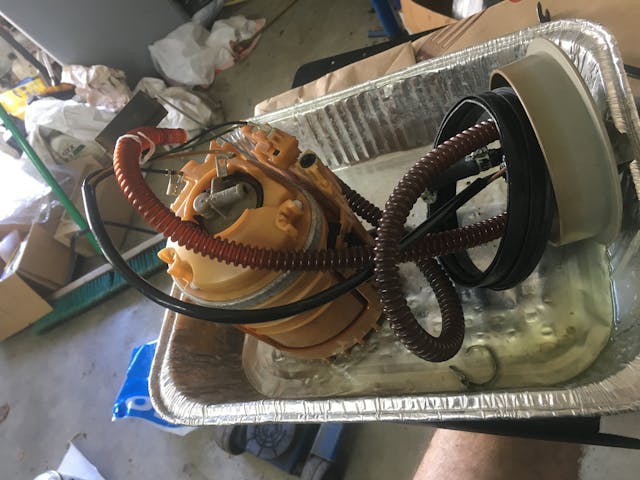
I put the fuel pump assembly in a disposable aluminum roasting pan to catch the dripping fuel and carried it to a table in the garage where I could work on it in the shade.
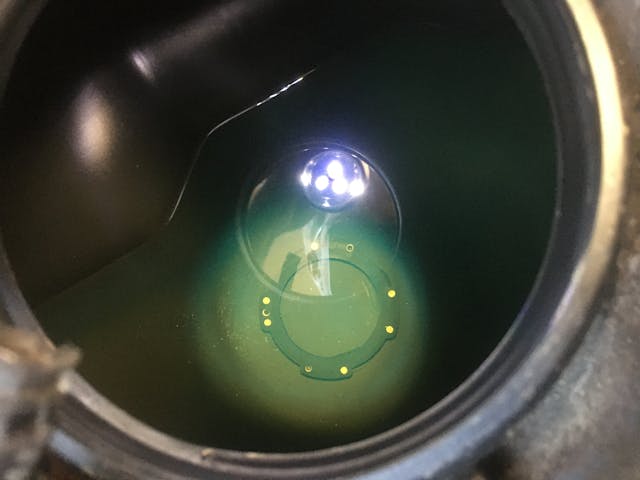
Before I detail the swap-over of the components, I should note that whenever you have reason to open up a fuel tank, it’s an opportunity to look inside and check for contamination. I’ve removed fuel senders from metal tanks in running cars only to be greeted with what looked like a mixture of pot roast and chewing gum. While the plastic tanks in modern cars don’t rust like the old metal ones do, there can be a surprising amount of sediment at the bottom. If it looks like someone emptied a beach pail in there, everything stops while you drain the tank and clean it out. Fortunately, the Rialta’s tank showed only a tiny bit of sediment, small enough that I was confident the screen at the bottom of the pump and the upstream filter would keep it out of the injectors.
Back to the task at hand. The flexible plastic lines are attached to the fuel pump with single-use crimped “pinch clamps.” While I understand that they’re used on in-tank fuel pumps because they’re vibration-resistant, I really dislike dealing with them. I do have a set of “ear” clamp cutters that are supposed to bite through them, but I don’t have the upper body strength that I used to. If there’s no fuel present, I’ll sometimes cut them off with a cutting wheel on a Dremel tool, but the sparks raised makes its use out of the question if there’s fuel present.

I was able to carefully pry the barbed end of the band clamp off with a small screwdriver and unwind it off the hose. Prying it this way puts leverage on the plastic fitting that the hose is attached to and thus risks cracking it, but as I was replacing the pump anyway, I took the risk.
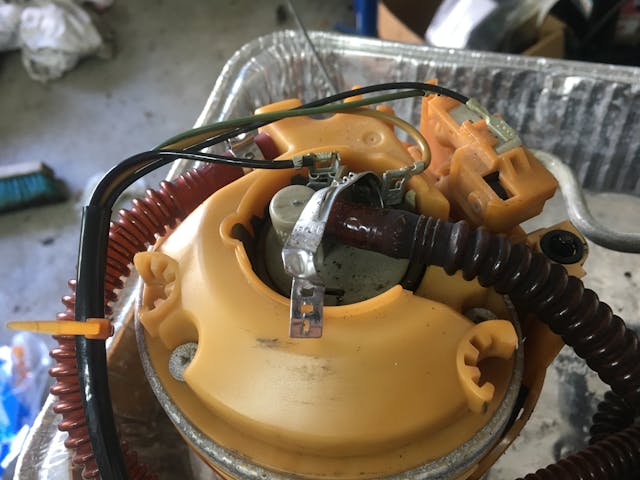
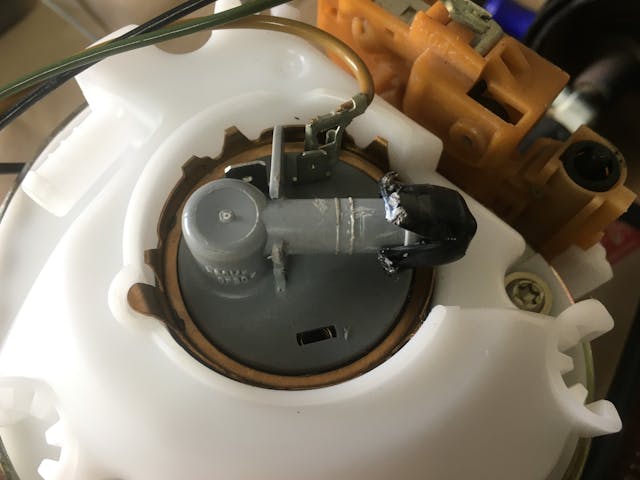
The next step was to pull the plastic hoses off the fittings. As you’ve probably experienced, even with rubber hoses, when the rubber has hardened with age, this can sometimes be surprisingly challenging, but as was the case with the plastic pump on the plastic bracket, these had a death grip.

I really didn’t want to damage the plastic hoses, as that would mean replacing them, which would necessitate removing them from the underside of the send/return flange, and if I broke either of the plastic fittings there, I would’ve been in a world of hurt. I used a number of prying tools to carefully work them off. When the gap between the end of the hose and the base of the fitting became wide enough, I was able to use a 7mm box-end wrench to contact the hose 3/4 of the way around and efficiently pry it off. For the last mile, where the gap was very wide, I used a pair of these wrenches.

Cutting off a couple of crimped-on clamps and pulling plastic hoses off fittings doesn’t sound like much, but the whole episode took several hours. Granted, that was a leisurely pace in my garage with hydration breaks, but the ability to do it while sitting on a chair at a work table rather than hunched over by the side of the road was key. It may seem trivial, but I was struck by the minor detail that I do not routinely travel with two 7mm wrenches in my road tool kit.
To connect the flexible plastic lines to the new pump, I simply needed to remove a little black cap over one of the fittings. However, regarding “simply,” as Inigo Montoya said in The Princess Bride, “You keep using that word. I do not think it means what you think it means.” I assumed the cap was rubber and I could just flick it off with my thumb, but it turned out to be made of vinyl or plastic and had become rock-hard either while the pump was on the shelf in the warehouse or in the RV’s storage bin. It wouldn’t budge. I was being stopped by a little eraser-sized cap. It was like the fuel pump’s guard dog was jumping up and grabbing my ankle as I was climbing the fence to escape. I gently pried the cap forward using the same trick with the two 7-mm box-end wrenches. That is, until I heard a piece of plastic crack. My heart stopped. I thought it was the plastic fuel fitting itself, but it turned out to be a thin little support bracket the fitting was attached to. I stopped prying immediately and carefully cut slots in the cap with a single-edged razor blade instead.
That left transferring over the fuel pump sender. I had to compare the old and new pumps to see where the pump ended and the sender began. I found that the sender was held in place by two plastic tabs that clipped into slots. Anyone who’s dealt with unseating old plastic electrical connectors knows that these are the kind of things that snap if you even look at them. I carefully released them with a pair of screwdrivers and drew the sender upward, then transferred it over to the new pump.

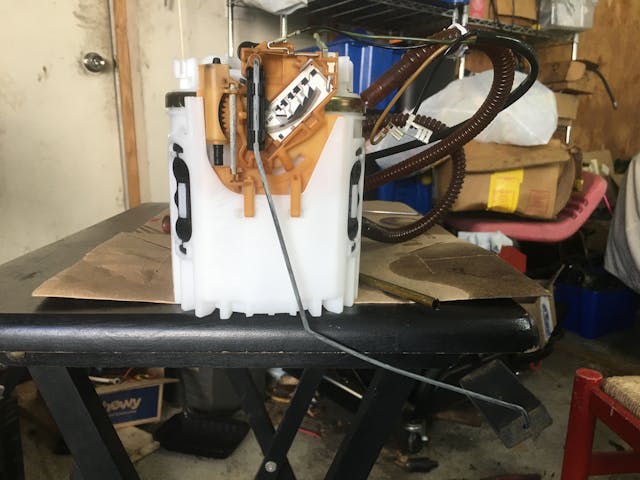
And, with that, I could finally install the Rube Goldberg-like assembly in the fuel tank. I turned the key and cranked the starter, knowing that it might take the system longer to start than normal while the pump pressurized the system, but about five seconds later it fired up. I didn’t see any leaks, so I buttoned things up.
And, with that, the Fuel Pump Follies had finally ended.
So, could I have done this on the road if the fuel pump died? Now that I’ve been through it, yeah … I could have thrown a disposable roasting pan in the cabinet and those two magic 7mm box-end prying tools in the toolbox (and, make no mistake, I’ll stash those items, along with the original pump, in the RV) and bailed myself out of trouble if necessary, but the weight of data falls clearly on the side of prophylactic in-driveway replacement.
Unless the new one dies. In which case I’ll never utter the word “prophylactic” again.
***
Rob’s latest book, The Best of the Hack Mechanic™: 35 years of Hacks, Kluges, and Assorted Automotive Mayhem, is available on Amazon here. His other seven books are available here on Amazon, or you can order personally inscribed copies from Rob’s website, www.robsiegel.com.
Check out the Hagerty Media homepage so you don’t miss a single story, or better yet, bookmark it. To get our best stories delivered right to your inbox, subscribe to our newsletters.
Note to self: NEVER consider buying or borrowing a 1996 Winnebago Rialta unless the fuel pump has just been changed (by someone else).
Rob, these new multiple part episodes are like watching Dallas in that we don’t know until next week if the The Hack Mechanic will fall head first into the fuel tank or find his collection of 2002’s sweep up by a tornado. However each episode leaves your audience wanting to tune in to find out what happens. Now as an aside, my I recommend that you explore getting a Phoenix Cruser when the VW bites the dust. My brother had me RV shopping for him for 4 years and after extensive market research I concluded these are the best you can find based on build quality of the camper unit, and they are built on F35O or F450 American made chassis cabs. That is unless you want to go bigger and by far and away Prevost is at the top of the food chain. Just a recommendation.
Great trick with the 7mm wrenches, Rob. I’ll definitely remember that one!
Just a question, why not use an 8mm box (which I sure you have) behind the 7mm wrench instead of carrying a nearly useless second 7mm wrench?
Um, because you’re smarter than I am? :^)
Another gem of an article, in both instructive information, and the quality of writing.
There is another, cruder word, for a specific type of prophylactic, that may be more fitting, should a second visit here occur.
“As easy to change as a fuse”? Speaking from recent experience, that certainly does not apply to a 63 corvette as access to the two bolts is not easy from above or below.
Kevin, yeah, I was talking about the overhead cam cars I own, where the fuel pump is driven by a pushrod off the cam in the head. On my Lotus Europa with the fuel pump driven off the “jackshaft” in the Ford block, it’s not easy to get at.
But to me, here is the kicker: Unless your new part is NOS, how do you with any certainty that it won’t fail much much quicker than the old one? You might be reducing versus improving reliability, given the quality of some third party replacement parts. I would vote for having the part in the car only. For a specialized part like this one, my opinion is that if you are on the road and worse case need to hit a garage due to an on-road failure, so be it. Better than being on the side of the road because your replacement part failed prematurely.
Therein lies the problem. I’ve been building a fresh, upgraded engine for my ’66 Beetle. I don’t buy new mechanical pumps anymore, as they’re questionable at best. I found a kit from a European manufacturer so I can rebuild a particular pump that is a bolt-together design, so that’s what I do.
There are too many bad parts out there now. Some of the new stuff is great, but some of it is not worth taking home even if it’s free. If you don’t have a good handle on parts quality the old car hobby could lose all of its fun, and that’s a shame when we’re trying to pass the legacy on.
I agree. If I had the jitters of if-and-when the original pump was going to fail, I would have done a trial run first. That way you know that everything will come loose, what tools you need, and unseen problems you may encounter. So if you have to change it roadside, you’re prepared and know what to expect. The second time is always easier.
Nothing, even changing spark plugs is easy, on a front engine, RWD GM vehicle.
Great article, keep’em coming. For the prying with the 7mm wrench(es), hard to confirm 100% visually by the photo but did you mean you used an open end, combination or maybe line wrench as opposed to a box end wrench or maybe I’m missing how the box end(s) got between the hose and fitting. Thanks
Good to see it safely replaced. Better to do it at home than in the middle of nowhere.
Kudos to Rob for even attempting to work on plastic thingys left soaking in the modern witch’s brew called ‘gasoline’ for a decade or two. Those little wrenches were once in bags of Ignition Wrenches sold by Sears under the ‘Craftsman’ brand. From back in the days when ignitions could be worked on by non-magicians.
You may have found that gently warming those hoses with a heat gun would have sped things up
I suspect you’re correct, but using a heat gun around gas gives me the heebie geebies.
Buy the entire fuel pump/sender assembly. Replace. The reduction in frustration more than compensates for the added cost.
That’s fair. However,
1) The top flange of the pump for the Rialta has a hole drilled in it and a fitting screwed into it to provide the fuel feed to the gas 120VAC generator in the back, so either this flange has to be transferred over to the new pump, or a hole has to be drilled in the flange of the new pump and the fitting needs to be transferred over.
2) I see that RockAuto sells off-brand Chinese-made fuel pump assemblies (UltraPower, AutoBest, and US Motor Works) with the flange, hoses, and sender, but I don’t know that a decent-quality OEM one is available. I bought the VDO pump from FCP Euro, who has a lifetime warranty on the parts they sell, and thus generally don’t sell known junk with high return rates.
obvious question occurs to me: has anyone researched this oft mentioned issue concerning parts quality (or lack of)? Putting considerations of defamation aside by naming names of the consistent failures, seems to me to be a big issue worthy of further work.
thanks for the fuel pump article – many lessons and well written