The Exhaust Problem (Part 2)
Last week, I wrote about discovering that the exhaust in my just-purchased 182,000-mile 2008 Nissan Armada was leaking in three places—large leaks from a laughably bad weld between the tailpipe and the muffler and from the seam on the top of the muffler, and a small leak at the rear flange of one of the four catalytic converters. I shoveled muffler putty into and around the first two leaks, ignored the third, took it in for inspection, and failed. So now, instead of a useful vehicle, I had a big red “R” sticker on the windshield that could land me a moving violation and add points on my license, and an exhaust whose proper repair was the definition of a slippery slope. Great. Just great.
In addition to the specifics of the vehicle and its exhaust, there’s, well, me. I’ve long said that I have no idea how anyone can afford to own any older high-mileage car, much less a vintage car, if they need to pay someone to fix it. Multiply that by 13 for the number of vehicles I own (shut up), and you can see why none of the cars I own ever gets everything it needs. The day I stop doing all my own work is the day I decide that I need to shed vehicles. Although that day is not today or next week, this is getting more challenging as I get older. I still think of myself as 25 years old, but I turned 65 last summer, have back issues that get triggered by lifting and bending, and have a garage situation where the Armada appeared to be too big to fit without kicking out not one but two of my cars. I do have a mid-rise lift in the garage, but the Armada’s weight is close to the lift’s 6000-pound limit, it’s so wide that I don’t think the swing arms will even reach the jack points on the sills, and the geometry of the truck and the lift make it challenging to get the jack pads somewhere more inboard, like the under frame. For these reasons, any under-truck work likely needs to be done on the garage floor, and even then, figuring out how to get the truck in there so I could close the door and turn the heat on and not freeze my old bones was challenging.
My 38-year-owned ’73 BMW 3.0CSi, 1999 M Coupe, and 49,000-mile ’73 2002 are here in the garage over the winter, with four other vintage BMWs and the Lotus in warehouse storage. The CSi is the definition of a pampered car. With its Karmann-built body, it is never going to sit outside (to repeat the best automotive joke in the world: Karmann invented rust, then licensed the process to the Italians). In contrast, the M Coupe is a modern car that can sit in the driveway for weeks if necessary. The low-mileage 2002 is somewhere between the two. I don’t necessarily think it’s an act of violence to move it outside for a few days, but if the weather turns and it sits in rain or snow while I’ve taken the Armada “down” and rendered it immobile while waiting for parts, I will have made the wrong call.
My garage is 31-feet long, so it easily fits two small cars nose-to-tail. After I bought the mid-rise lift, I discovered that an unintended benefit is that I can put a car on it, lift it, and be able to tuck the nose of another car under it. I didn’t think that would work with the Armada, as its nose is tall enough that I’d need to raise the 2002 so high that I was concerned I’d dent the roof against the ceiling. Plus, a while back I found that one of the lift’s hydraulic cylinders leaks when raising it to the upper position.
I went for it anyway. The cylinder shot out a stream of red fluid, but it got to where I could lower it into the lock-stopped upper position. Hopefully come spring I’ll be able to get the 2002 back down.

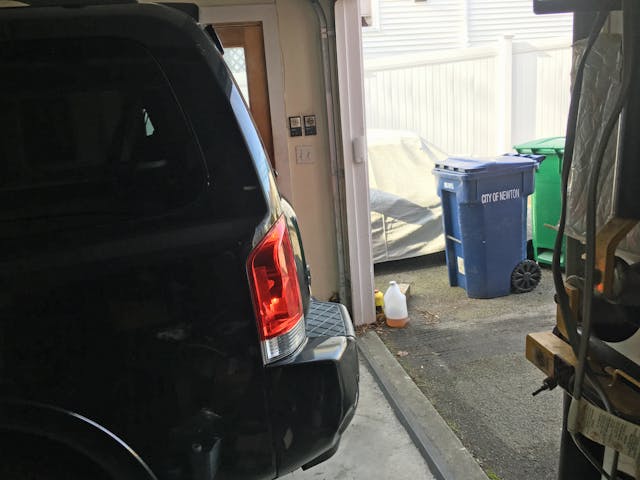
So, I had the truck inside the heated garage. I could lift the back end if I needed to, but I had no room to lift the nose. This meant that I could get to the tailpipe, maybe the muffler, but I wouldn’t be able to access the slightly-leaky flange behind the right-hand secondary cat.
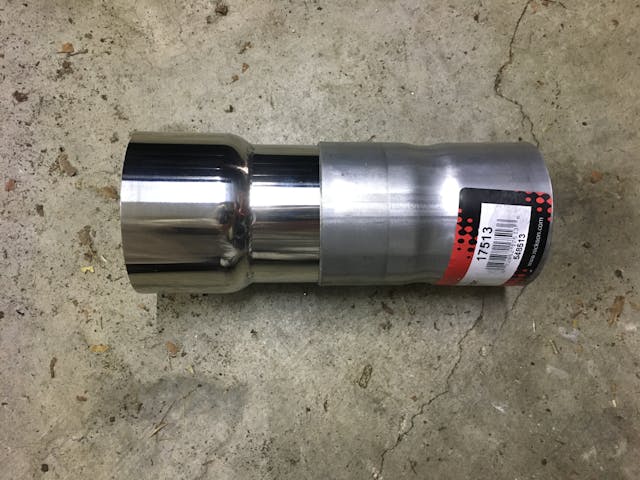
I looked on RockAuto and found that there were three aftermarket cat-back exhausts, each less than $200 delivered. One was an ANSA that had an OEM-style muffler with long inlet tubes, one of which bolted directly to the leaky flange.

The other two exhausts—AP (which apparently now owns ANSA) and Walker—both had a muffler with short inlets that are meant to be clamped or welded to intermediate pipes. The Walker was appealing because it’s stainless, but reviews on Amazon reported that it uses 2-inch pipes rather than the stock 2.25-inch, requiring adapters if you want to try to splice a new muffler into the existing pipes. The AP exhaust appeared to have 2.25-inch muffler inlets, however.
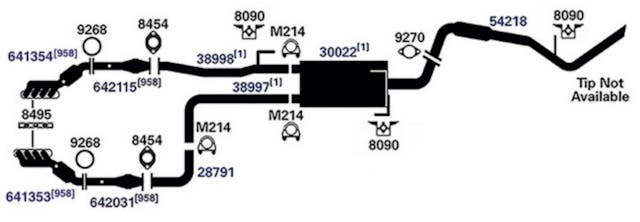
I began to formulate an approach—order an AP muffler and tailpipe, cut the old muffler off with a Sawzall, and splice the new one to the existing pipes with butt-joint-style band clamps. If it worked (meaning if it sealed well enough to pass inspection), done (at least for now), but if it didn’t, I could still order the other pieces of the AP exhaust kit and replace everything behind the cats, and a cost comparison showed that there wasn’t a big discount buying the whole exhaust kit as opposed to ordering the pieces a la carte anyway. If the paper-thin leaky cat flange self-destructed when I tried to take it apart, then I’d need to replace the cat, which was another $125. Hopefully the joint between the primary and secondary cats would cooperate.
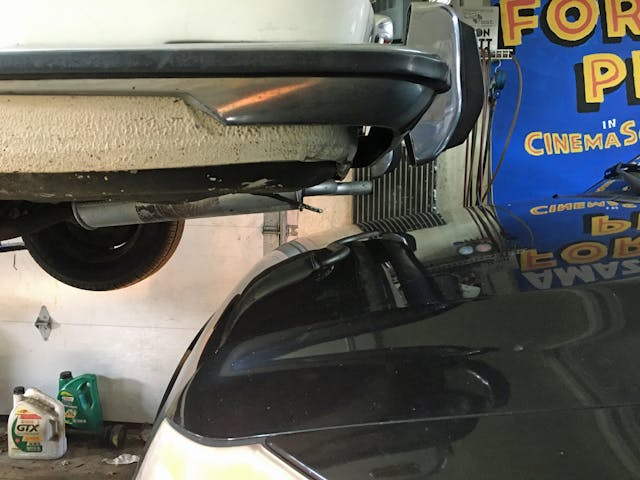
Before I ordered parts, I wanted to see if this repair could be accomplished with the Armada shoehorned in the garage the way it was. I took my Sawzall, shimmied under the back of the truck, tried to get to the front of the muffler where I’d need to cut the pipes, and found that there wasn’t enough clearance to do it. I’d need to raise the front of the Armada, and there was no way to do that with it stuffed under the tail of the 2002 on the lift. I’d either have to take the 2002 down and give the Armada the entire right side of the garage, or do the repair with the Armada’s butt hanging out of the garage, leaving the place open to the elements.
I checked the weather. There was a Nor’easter predicted to drop about 10 inches of snow two days hence.
Dukes.
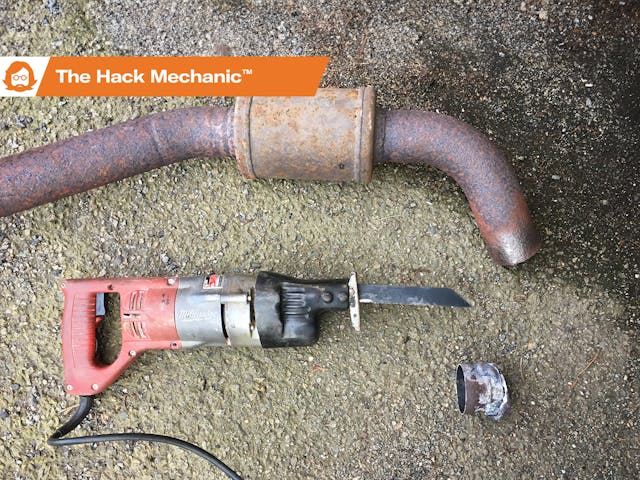
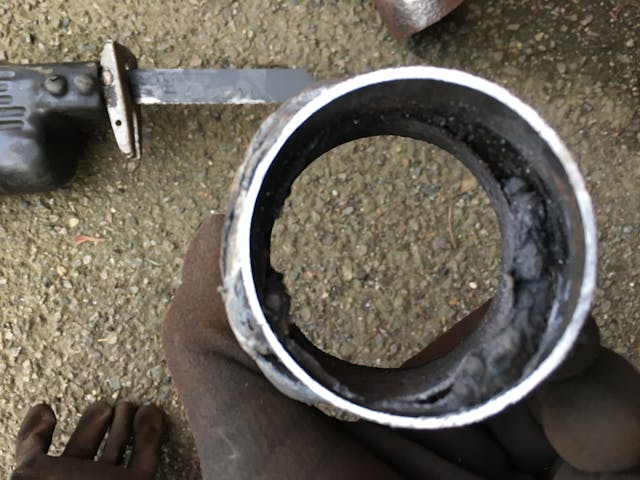
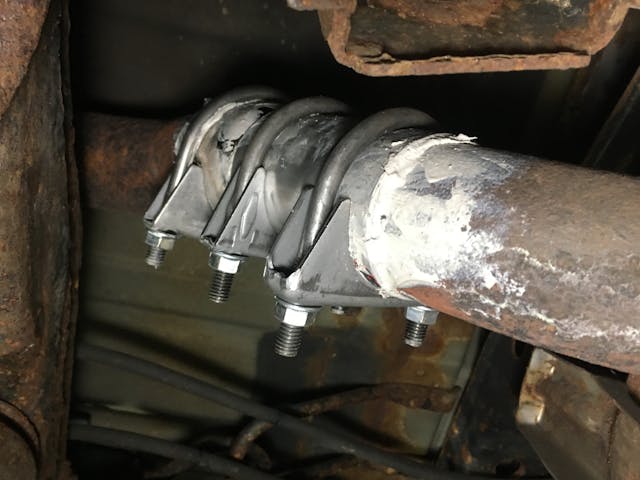
I thought about it carefully, and realized that I hadn’t tried to find the exact reason why the exhaust had failed inspection. I clamped a rubber glove back over the tailpipe, started the truck, and did my best to feel along the exhaust for leaks. To my surprise, my patch along the upper seam of the muffler appeared to be holding. The leak from the cat flange was minor. The motherlode was coming from my unsuccessful attempt to seal up the booged weld attaching the tailpipe to the muffler. I was unable to fix it with the soup-can-and-hose-clamps method because the weld (and my putty) created a gall like a walnut inside a garden hose, around which a clamped can had zero hope of sealing.
I thought “What if I cut the lump out with a Sawzall? Couldn’t I then just mate the two sections with a butt-joint band clamp like I was planning on doing to the muffler?”
Hmmmmn.
I crawled under the rear of the car again with the Sawzall. But this time I found that, unlike the front of the muffler, there was ample space to get the Sawzall positioned on the tailpipe, as it was located up in the recess where the spare tire is.
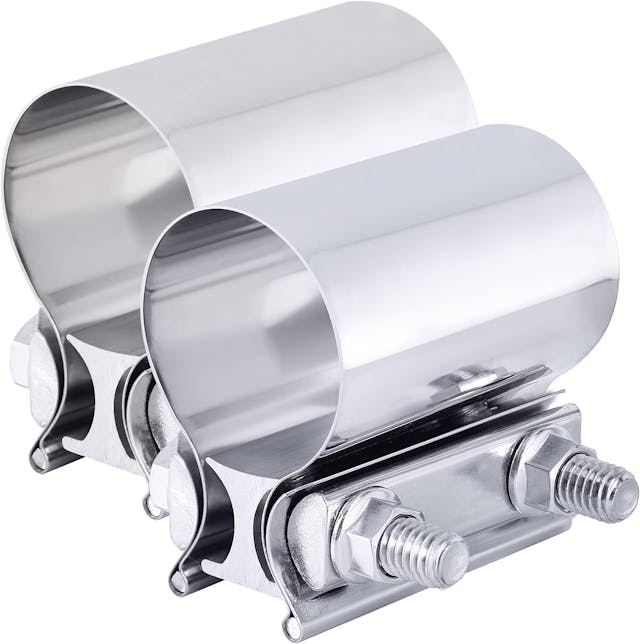
I used my vernier calipers to take some careful measurements of the pipes so I could order the correct band clamp and laughed out loud when I found that the outlet pipe of the muffler was 2.25 inches, but the tailpipe was 2.5. No wonder the thing didn’t seal.
So what I needed wasn’t a butt-joint clamp. I needed a 2.5-to-2.25-inch reducer adapter.
Mindful of the impending Nor’easter and really wanting to get the repair completed before a foot of snow stranded the Armada inside the garage, I drove to five local auto parts stores, but none of them had a 2.5-to-2.25-inch reducer. I looked on Amazon, found one that appeared to fit the bill (2.5-inch inner diameter to 2.25-inch outer diameter) with next-day delivery, clicked, and waited. In the interim, I cut the “walnut” out of the exhaust pipe. It was laughable how misaligned the two different-sized pieces were.
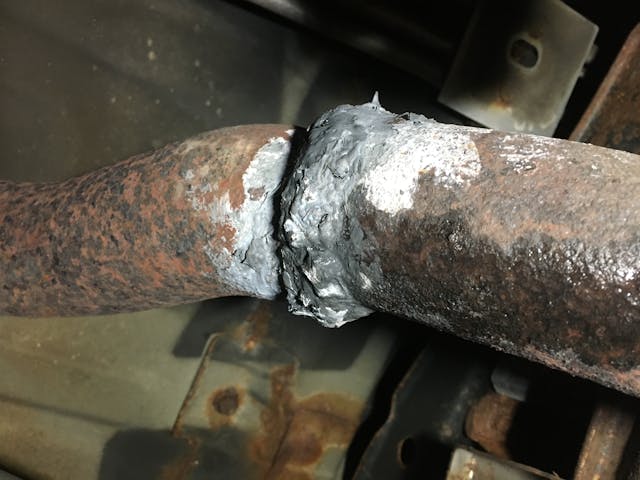
The reducer arrived at about 7 p.m. the night before the snowstorm was predicted to hit. I’d already wire-brushed and sanded the cut ends of the muffler and tailpipe, so I thought all I needed to do was goop up the reducer with muffler cement, slide it on, and clamp it down, but I found that while the 2.5-inch end fit the tailpipe perfectly, the 2.25-inch end was not an inner-diameter fit to the back of the muffler—it was exactly the same size as the back of the muffler. I hightailed it to the O’Reilly Auto Parts a few miles from me before closing time and grabbed a 2.25-to-2.25 adapter and another clamp.
I emptied a good portion of a tube of J-B Weld muffler cement into the three slip-in joints, clamped everything down, backed the truck out of the garage, and drove the M Coupe back in. I had beaten the impending snowstorm, but when I’d be able to get the truck inspected remained to be seen. I also was well aware that between the adapters, the clamps, and the muffler cement, I’d just dropped 50 bucks on a very, um, hacky solution when $200 would’ve bought me something permanent.
In the morning, I was surprised to find that the big Nor’Easter had fizzled. Overnight the meteorologists had massively rolled back the snow prediction. I looked out the window and saw only rain. I started the truck, put a gloved hand over the tailpipe, the exhaust felt tight to me, so I beat it on down to get it re-inspected. As this was a re-test for a failure due to an exhaust leak, I heard them rev it up and down several times as they checked, but it passed.

I have little doubt that I’ll probably need to do a more proper stem-to-stern exhaust replacement sooner rather than later, but damn it’s awfully satisfying to dig the ice axe and the crampons in and say, “Slippery slope? Not today.”
***
Rob’s latest book, The Best Of The Hack Mechanic™: 35 years of hacks, kluges, and assorted automotive mayhem is available on Amazon here. His other seven books are available here on Amazon, or you can order personally-inscribed copies from Rob’s website, www.robsiegel.com.
Check out the Hagerty Media homepage so you don’t miss a single story, or better yet, bookmark it. To get our best stories delivered right to your inbox, subscribe to our newsletters.


Wow.
I will not cover what you have done but due to where you live and what you dealing with to just get this fixed right. The time and money you are spending now are not going to be recovered. If you are going to keep this you need to fix it right.
If you continue with the home repairs make sure they fit the state regs. I know some of the NE states use the CARB regulations and some exhaust are not legal.
Note if this was a GM truck you would have had a several dozen exhaust that would bolt on for reasonable price.
These SUV models are ok new but when they get old you get rid of them. They like Audi and others become money pits with age.
When choosing a older tow vehicle make sure it has parts support like a car you want to restore. It is cheaper in the long run.
“I know some of the NE states use the CARB regulations and some exhaust are not legal.”
Name one.
I know you told your loyal readers to “shut up” but Thirteen cars, really, I fully understand the affliction. I once had a 73 Eldorado Conv, a 78 Eldorado Coupe, threr 76 Sedan deVilles, and two 76 Sedan deVilles, each were 20 feet long (I love full size cars) and I almost forgot a 73 Firebird 400, and a 80 Corvette (everyone needs a small car sometimes), so even though you have the numbers (13) I had the size and weight…. 😋😋😋
You had a larger navy (by tonnage) than most African nations, congratulations
I want to say congrats at the fix and in proving that your title is aptly placed. But I also have this nagging thought that a guy who doesn’t have the funds, facilities, or physical ability to properly maintain older vehicles maybe shouldn’t own 13 of them – jus’ sayin’.
Rob, my 2005 Denali sympathizes with you.
I just acquired a 72 F350 that is too long for my neighbor’s lift and not a very good fit in my garage. I replaced a number of front end parts and performed some structural repairs to the cab front mounts… all on the ground. Sometimes we have to sacrifice for our toys
One of the best investments I ever made was in a 110V Mig welder… something worth considering
What is 14 but one more than 13? I say buy another project and keep the articles coming! haha
100% agree.
I will have to kluge up some exhaust pieces to get a project to the the exhaust shop sometime later this year. So I do appreciate getting some ideas for pieces to use and ways of temporarily getting it quiet for the 20 mile drive. I didn’t even know there was such a thing as exhaust putty. Thank you. And keep the stories coming.
I’ve bought two different brands of exhaust tubing swagers but neither worked using their instructions. However, heating the tube to glowing softens it enough to be formed with these tools. Being able to make slip fit exhaust joints at home is life changing.
OK, let’s do some math… You spent $50 you won’t recover, rather than $200 to do it “right”? So, when you DO do it right (because the fifty bucks was in Band-Aids), the cost will be (at least) $250. Not to mention having to finagle space in your shop a second time, and crawl under that thing again.
Sounds like the old adage “Never time to do it right, always time to do it over”
Now you know why he’s called “The Hack Mechanic” and not “The Do It Right The First Time Mechanic”! 😁
(Rob, good job of “finding your niche and filling it”, pal…)
It was also risky with that bad flange, which would’ve meant both a new catalytic converter plus the time to get it, and he still would’ve been sweating getting the cat off of the manifold. Now he can wait and work at his own pace without the impending doom of the state looking down on him. That’s $50 well spent.
Jeez. A good muffler shop could have had you on your way in 15 minutes for under $100 with a semi-permanent welded fix. Sometimes DIY is not worth time and effort when a pro with the proper equipment can do the job better for around the same money in a whole lot less time.
One thing you didn’t mention was how much would you have paid a shop to do a decent repair, compared to what you spent, and will spend, doing it yourself? I admire you sticking to the self repair approach, but for purposes of comparison it would be interesting to know. You also have to consider the driving cost to at least 5 parts stores, the time factor, and quality of your finished repair.
He mentioned in part 1 that his go to muffler shop wouldn’t do a patch job and quoted him $1200.
I feel your pain. I only have 9 cars/trucks, the newest of which is 2003 model year. I do have the luxury of a large heated shop with a 4-post lift, but jamming 5 vehicles (and 8 old motorcycles) inside does leave little room for movement when it’s buttoned up for the winter. It’s a challenge to get a jack under a car and in running the maze for each tool I need. My priorities are in maintaining 3 daily drivers, but like you I come up with some crude temporary hack jobs on my “occasional” drivers (just for test purposes of course:)) Your articles always make my day – keep ’em coming. I’m 78 – did I mention that I feel your pain?
This reminds me of a repair I had to do on a used car we bought for my son. The previous owner thought a Honda sedan turned into a race car by removing the exhaust resonators and replacing with a straight pipe. Even a 5 mile drive meant a doozy of a headache. The only exhaust available was the OEM part for well over $1000. But like Rob, Rock Auto came to the rescue with an aftermarket resonator. I was able to get under the car, unbolt the exhaust from the cat flange (thanks to Texas for non-rusty exhaust systems…), cut out the straight pipe, clamp in the resonator. Then I found an exhaust shop that could weld it up and they only charged me $20 for the job. It’s not beautiful when you get under the car but it sure was satisfying to spend $100 instead of $1500…
I second the comment about using an exhaust shop for such jobs, even for hack jobs. Their welding is 100% smoother and more practiced than anything most of us hacks can accomplish, never mind working with clamps and goo… though the cost will vary, and will be much higher in a metro like Boston than out in the sticks. But that’s a good medium-term fix under a deadline, a circumstance which other posters seem to have forgot.
I would have had an exhaust shop do the work but the fix got you certified so well done.