The advantage of bilateral repairs
It’s a given that any 30-minute repair is always one broken bolt away from being a two-day ordeal. It’s also a given that, the first time you tackle a repair, you spend 2/3 of the time learning and 1/3 of the time doing. (Actually, in truth, everyone knows that you spend 3/8 of the time learning, 1/8 of the time doing, and 5/8 of the time looking for the 10mm socket).
This is why there’s such appeal to bilateral repairs—jobs that you have to do on both sides of the vehicle … e.g., brakes, suspension, steering, etc. When you have this “two-sided advantage,” it lets you apply what you just learned on the first side so that, hopefully, the job on the other side goes twice as fast.
The classic “two-sided advantage” example is doing drum brakes. Once you’ve spent three hours learning whatever the trick is on your car to putting in that blasted spring that holds in the bottoms of the brake shoes (that is, after you’ve retrieved the spring when it launched itself, almost took off your left ear, and landed clear across the garage), you get it done on the other side in five minutes.
Of course, there’s also the “two-sided terror,” where a repair is so bad on one side that you dread having to immediately do again on the other side. Such was the case with replacing the axles and CV joints on a BMW E46 all-wheel-drive wagon I had a few years back. It was such a pain that I not only sold the car, but swore I’d never own another AWD BMW.
But let’s stick to the two-sided advantage. Last week, I talked about doing the advance work necessary to make sure I could safely jack up my 1996 Winnebago Rialta (a VW Eurovan with a Winnebago camper body on the back) on my asphalt driveway to replace the ball joints. They didn’t appear loose, but their boots were ripped, and it seemed a good place to start giving the little RV some long-delayed love. The upper ball joints require a special tool to press them out, so I haven’t engaged those yet, but the lowers are very conventional, just a tapered rod that goes through the end of the lower control arm, and two bolts that thread into the underside of the steering knuckle. I began with the right lower.
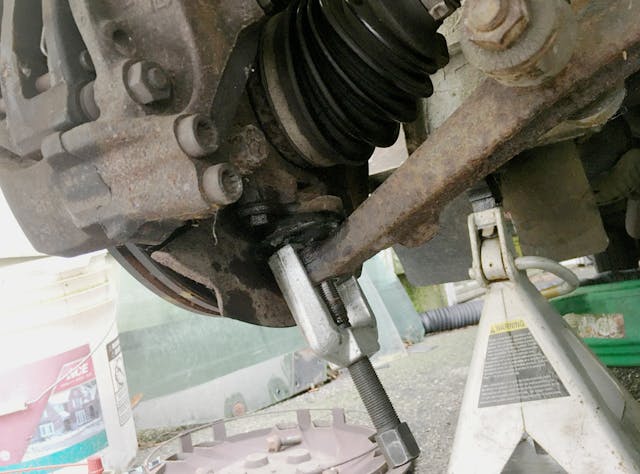
With the Rialta securely double-jacked, and the jack stands and floor jack sitting on metal plates so they wouldn’t sink into the asphalt, I began by separating the tapered shank of the ball joint from the lower control arm. I have accumulated a decent assortment of pullers over the years, and this U-shaped one fit perfectly. Of course, the puller can fit well, but the tapered rod may not easily surrender its grip; this one, however, gave it up before my right bicep got too much of a workout on the ratchet wrench.
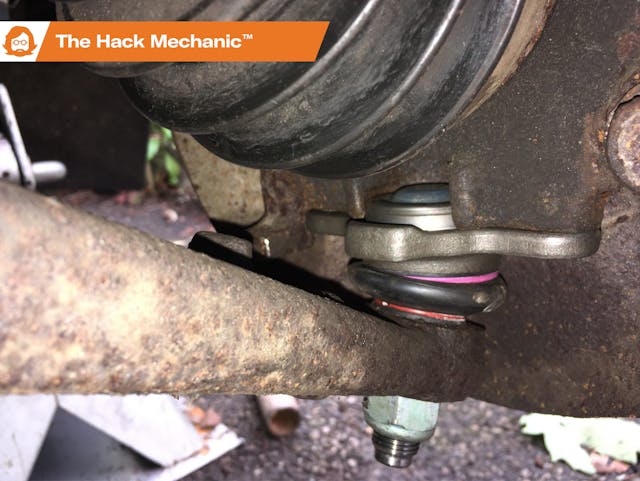
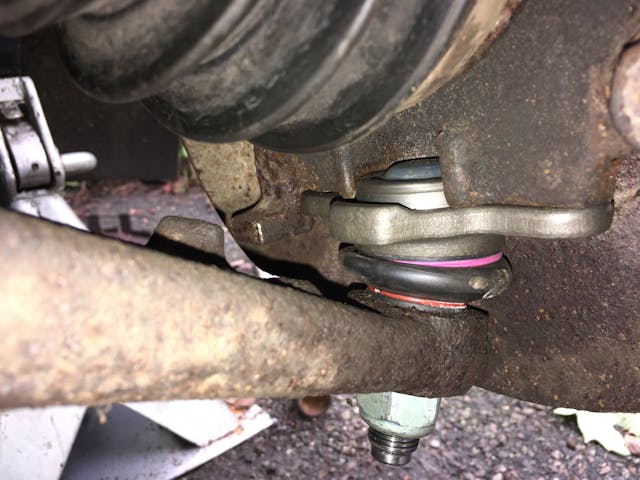
I then undid the two bolts holding the ball joint to the bottom of the steering knuckle. As the angle changed, the torn boot yawned open. Even though the joint didn’t feel loose, once a boot is ripped like this, moisture and grit will find their way in and ruin the joint.

As per the photo above, the ball joint is squeezed between the bottom of the steering knuckle and the top of the lower control arm. To withdraw the loosened tapered rod from the control arm, you need to create some room above it. DIY videos show putting a floor jack beneath the brake rotor to raise the steering knuckle. On most cars, when you do this, you’d be pushing against the coil spring, but the Rialta has a torsion bar front suspension instead. This sort of suspension-jacking is done fairly often when replacing steering or suspension components. Obviously, you use something like a hockey puck so the jack cradle doesn’t damage the brake rotor. You take care to set the jack at a right angle to the rotor so when you raise the jack, its changing angle doesn’t cause the rotor to turn. You lift the minimum amount necessary to do what you need, checking to be certain you’re not unseating the vehicle off its jack stands. And you remove the part you need to remove in a manner that takes into account the fact that the gap created by the compression of the suspension can vanish in an instant if the jack slips, costing you your fingers if they’re in there, so you either do it quickly or use needle-nosed Vice Grips (I did the latter).
The new OEM Lemforder ball joints were very pretty, but what wasn’t apparent when I took the old ones out is that the ball joints have a round base with a ridge that slides into a cupped recess in the underside of the steering knuckle as shown below. The DIY video I was watching recommended it’s a good idea to wire-brush the recess clean.

Unfortunately, the video did the “installation is the reverse of assembly thing,” and I found that that was definitely not the case. I did have to jack the wheel back up to make room to insert the new ball joint tapered rod into the lower control arm, but once it was in, I could not get the circular flange on the top of the ball joint anywhere near the semicircular cup at the bottom of the knuckle.
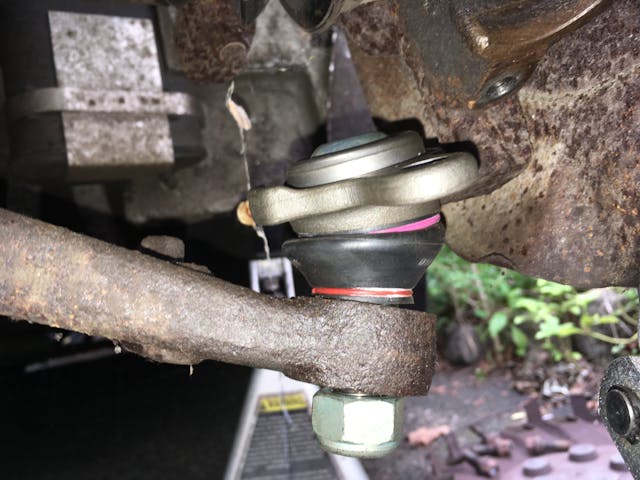
Part of the problem is that, if you look at that semicircular recess in the knuckle, it goes more than 180 degrees around, so you can’t just slide the ball joint in there laterally; you have to raise it up from underneath. I kept trying to jack the wheel up to make room for it, but due to the geometry of the suspension, that not only raised it up but also tilted the bottom of the rotor outward and away from the top of the ball joint. I tried to use thin metal rods placed through the holes in the ball joint and into the threaded holes where the bolts are supposed to go in the knuckle to guide it in, but that dreaded more-than-semicircular cup would not let it pass. Two hours I worked in the hot sun trying to figure it out.
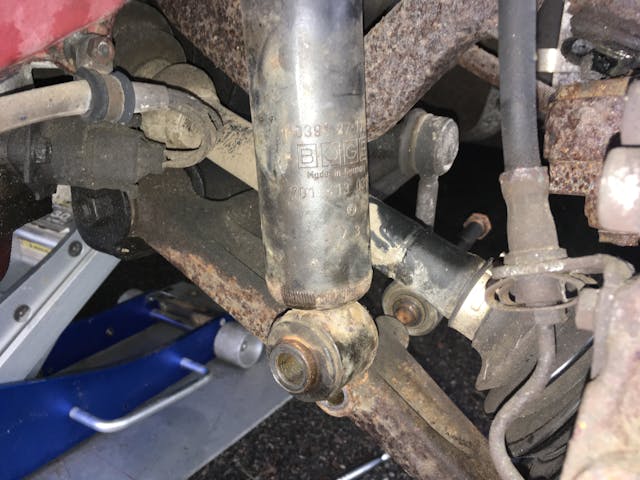
Finally, I thought, well, if jacking the wheel up isn’t working, maybe I can push the lower control arm down. I released the nut on the bolt holding it to the shock absorber and the sway bar end link and banged out the long bolt connecting the three.
Then I employed an additional trick. I had been holding off tightening the big nut on the tapered rod, just in case for some reason I had to pull the ball joint back out, but I realized that, with the nut loose, the joint was riding higher than it should be because the uncompressed rubber boot was preventing the taper from sitting down in its hole. By tightening the nut, compressing the boot, and seating the taper, I probably lowered the profile of the top of the ball joint by 3/8 of an inch.
I then tried to lever the lower control arm down as low as I could, but I eventually realized it wasn’t necessary, as it was already low enough that I could simply pick up the entire assembly with the knuckle, rotor, and caliper on it, tilt it, and basically just place it over the circular ridge on the ball joint. There was a little fiddling to line up the bolt holes, but that was it.
The question was then whether I’d get the benefit of the two-sided advantage, or whether some horror would lay me low. But, true to form, the left ball joint surrendered just as easily as the right, and this time I knew to tighten down the nut on the tapered rod and disconnect the shock and sway bar link before trying to guide the top of the joint in. I had it installed in 15 minutes.
I still have the upper ball joints to do. Here’s hoping I’m on the good side of the two-sided advantage there as well.
***
Rob Siegel’s new book, The Best Of The Hack MechanicTM: 35 years of hacks, kluges, and assorted automotive mayhem, is available on Amazon. His other seven books are available here, or you can order personally-inscribed copies through his website, www.robsiegel.com.

