Spun Bearing: Two words that bring everything to halt
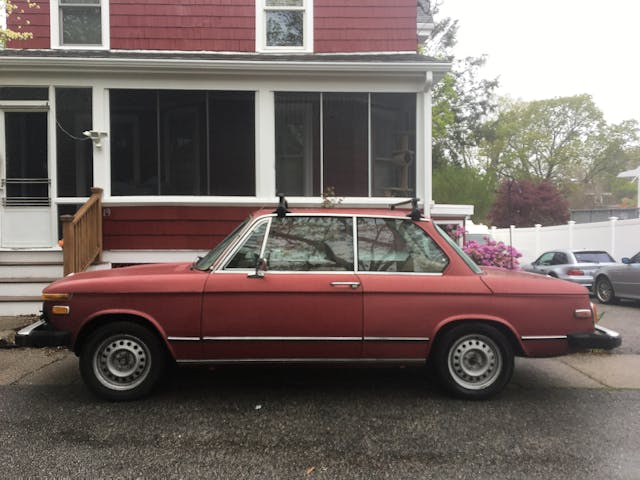
Last month, just before I headed out on the big 3123-mile road trip to MidAmerica 02Fest, a 1976 BMW 2002 fell into my lap. “Carter,” so-named because of the vintage 1976 presidential campaign sticker on its rear bumper, had a waif left-out-in-the-rain look to it, covered with dirt and with water on the back floor from having sat outside for nine months. But it was remarkably solid, started easily with a fresh battery and a blast of starting fluid, and was offered to me for such a good price that I bought it without a test-drive.
When I drove the car the eight miles home, however, a litany of problems announced themselves loudly. There was engine clatter on anything but low-rpm even throttle that was so loud I was worried the car might have a bad rod bearing, and there was banging from both the front and rear suspension. I made it home wondering to what extent my steal of a purchase was about to be a big stinking albatross around my neck, and I spent the next few days wrapping my head and my hands around this unplanned interloper. After all, this was in addition to the 13 other cars and the three other 2002s.
The surprises on the drive home notwithstanding, I really do love this initial “getting to know you” part of vintage car ownership. From the cars-as-members-of-the-opposite-sex standpoint, it’s a period full of mystery and excitement. The relationship is new. It could be anything. You might fall in love for the long term, or just have a brief fling before you part ways. (Wait … “Carter?” Never mind.)
But over and above any anthropomorphization, I’ve long felt that the first few weeks of ownership of a needy car is where you make the biggest strides, and as a backyard mechanic, I find this incredibly satisfying. Think of it like this: Unless you do bodywork and paint, you’re unlikely to easily make gross changes in the external appearance of a car. And if it needs major drivetrain work, you’re unlikely to be able to knock that off quickly or inexpensively. But get it running right, fix a few rattles and clunks, clean it, and make it drivable, and you’ve transformed it into something it wasn’t. A lot of what I do involves trying to let cars be the best possible version of what it is that they want to be, rather than spending tens of thousands of dollars trying to turn them into something they’re not.
I attacked the thunk from Carter’s rear end first. One of the nice things about these post-1974 cars with bridge-abutment bumpers is that you can stand on the bumpers and bounce the car up and down without risking damage to either the bumper or the body panels. I easily isolated the banging to worn-out rubber bushings at the tops of the rear shocks. I had some new unused spares in the garage (they come with new shocks, and I typically don’t bother to change them if there’s nothing wrong with the existing ones). While compressing and expanding the still-installed rear shocks, I could tell that they were ancient, soft, and weak, but both the rear bushing replacement and the rear shock replacement are so easy that I didn’t have an attack of while-you’re-in-there-itis. The goal was simply to make the car bang less on uneven pavement.
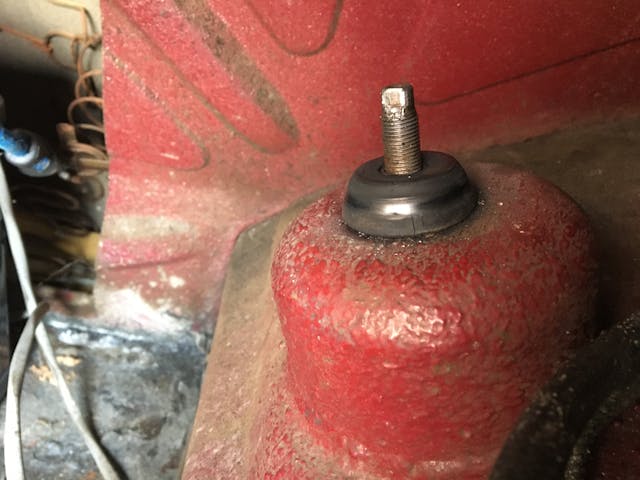
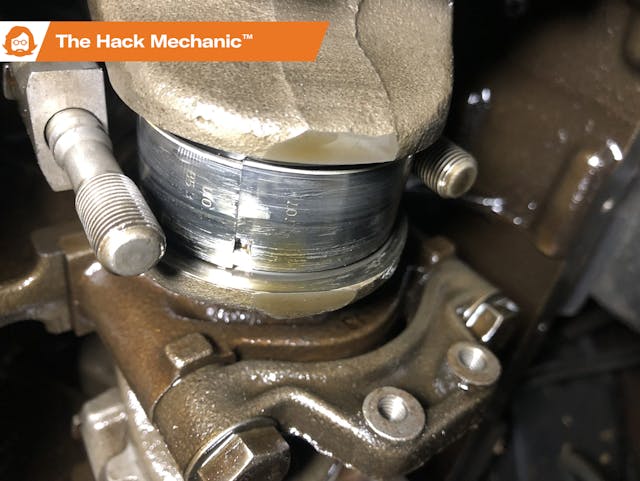
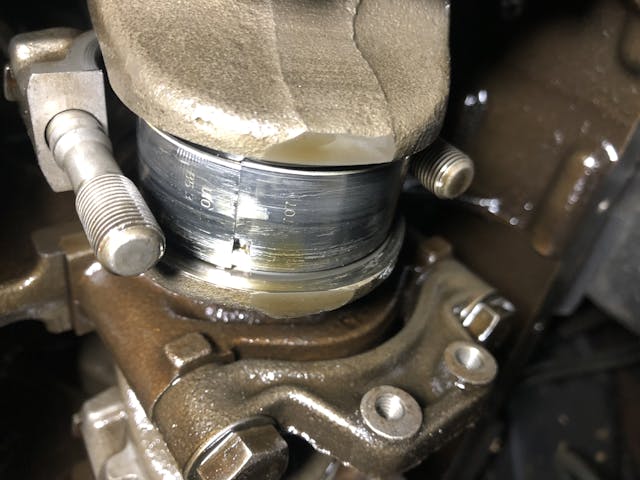
The noise from the front suspension was a bit more challenging. Not to diagnose—it was very clear that the banging was coming from the bushings (often called “hats”) at the tops of the McPherson struts—but to stay on the track of simply quieting the car down without sliding down the slippery slope of a suspension rebuild. To remove the strut tower bushings, the front springs need to be compressed, and to do that, it’s usually necessary to remove the entire strut assembly from the car and lay it on the garage floor. I say “usually” because, with the right spring compressor, you can sometimes squeeze the springs enough in place to get the hats off, and I have the right spring compressor, but on this car, for a number of reasons, it was quicker and easier to pull the strut assemblies. When I pulled the right bushing, I could see a glaring wear groove the top of the spring perch, caused by a missing spacer between it and the underside of the bearing. The right bearing itself was booged up as well. The left one appeared fine, but its strut was noisy as well. Replacing both hats with new parts eliminated the banging.

To drive the car at reasonable speeds, the next thing it needed was tires, as the fate-tempting I did driving it the eight miles to my house on the 12-year-old cracked and dry-rotted rubber was not something I wanted to repeat (in my defense, I limped it home at 25–30 mph). I threw on a spare set of 2002 wheels with fresh rubber on them. A few runs around the block, followed by a few exits on the highway, revealed that, at least suspension noise-wise, I’d peeled off that layer of the onion. The car was almost pleasant to drive.
Except for the clattering from the engine compartment. In the first piece I wrote after I bought the car, I noted that much of the clatter “was traceable to an unsecured battery clamp and a loose smog pump. With those tightened down, hunting with a mechanic’s stethoscope revealed only a bit of timing chain clatter.” That turned out to be a hopeful but incorrect garage diagnosis. When I actually began driving the car, I could unfortunately still hear a deep knocking rasp at a variety of load conditions. I continued to try to localize it in the garage—when stationary, I could only recreate it by revving the engine up and down—but even using the mechanic’s stethoscope, sounds like this can be notoriously difficult to pinpoint. It seemed to be coming from the timing chain case in the front of the engine, but I could also hear it clear as day by placing the stethoscope probe on the valve cover as well as the oil pan.
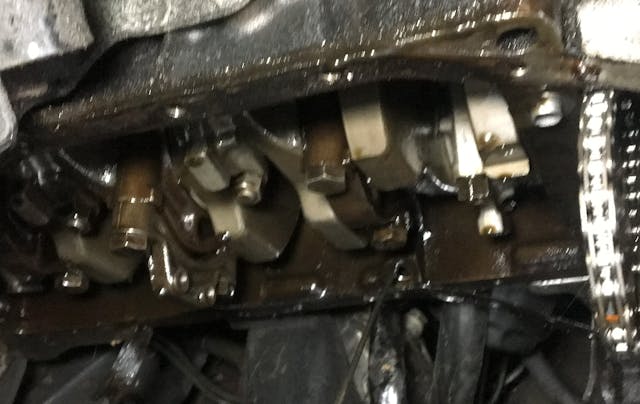
I reasoned that the rasp-knock could be coming from four places—the valve train (meaning a loose pad or sleeve on a rocker arm), the timing chain assembly, the chain that runs the oil pump, or a rod bearing. I inspected the valve train and didn’t find anything amiss. Likewise, I checked the timing chain as thoroughly as I could—I verified that the chain itself wasn’t obviously slack due to wear and that the oil-fed tensioner piston was working, and snaked an inspection camera down to see that the chain guide rail wasn’t obviously cracked or that the tensioner arm didn’t have grooves cut in it—but to really see what’s going on, you need to remove both the upper and lower timing covers, and the lower cover is a pain to get off, requiring removal of the crank pulley.
The other two culprits—the oil pump chain and the rod bearings—are fairly easy to inspect, simply requiring the oil pan to be dropped. There are a lot of little 10mm bolts holding the pan on, but other than that, it’s easy. Folks talk online about having to lift the engine up to get clearance to drop the pan, but I’ve found that you can usually lower the front of the pan enough to access the oil pump, remove it, and then slide the pan out. About 10 years ago, I had a ’72 BMW 2002 whose engine sounded like a chainsaw. When I dropped its pan, I found that the oil pump chain was incredibly slack, and that several of the rod bearings were worn down to the copper. Shimming the oil pump to tighten the chain and replacing the rod bearings quieted that car down.
So, into Carter’s oil pan I went.
The pan slid right out without requiring me to jack up the engine or remove the oil pump first. But I was surprised by the fact that some of the hard-to-reach oil pan bolts were only on finger-tight, and that the oil pan gasket was separated into several pieces that were held in place with a never-drying adhesive. In other words, someone had been in and out of here quickly. Sort of like what I was trying to do now. Danger, Will Robinson!
A quick check of the oil pump chain revealed that it was quite slack (the video can be seen here). I dug around in my box of engine parts and found an envelope of spare pump shims from the last time I had to do this.
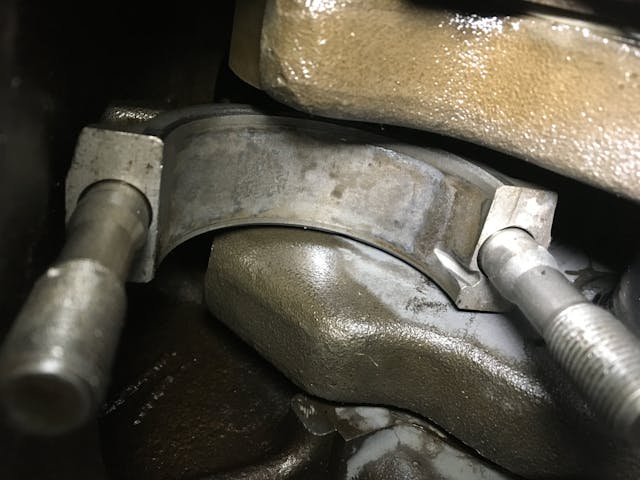
With the pan off and the oil pump removed, it would never be easier to drop the rod end caps and examine the rod bearings. Many 2002 owners report that it’s the #3 rod bearing that shows the most wear, so I dropped #3 end cap. I saw wear but nothing alarming—that is, no wear into the copper or deep scratch marks. I almost left it at that, but out of caution I dropped the others.
Oh boy.
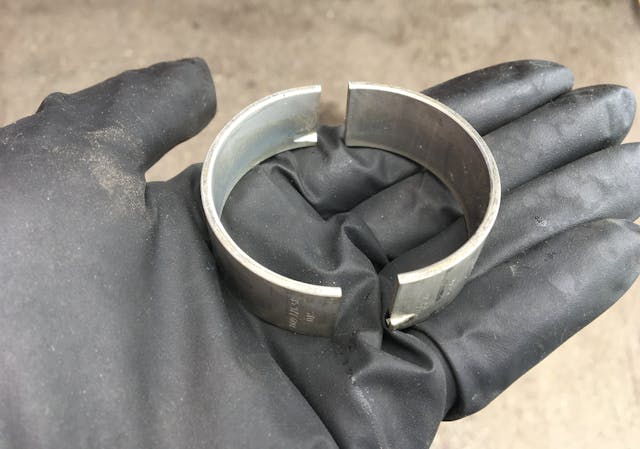
Rod #2 had a partially spun bearing.
Let me back up a step. If you’ve never pulled the bottom end of an engine apart, when you hear “bearing,” you might think of a ball bearing assembly. That’s not what’s used here. On just about every engine, both the rotation of the crankshaft in the block and the rotation of the connecting rods on the crankshaft use a pair of crescent-shaped bearing shells. They’re typically three lays of metal—a steel back, a copper or copper-lead intermediate layer, and a soft “Babbitt” outer layer. The crankshaft’s running surfaces, or “journals,” run inside the bearing shells on a very thin layer of oil that’s fed through the crank. For the connecting rod bearings, one shell is positioned in the curved end of the rod; the other is in the “end cap” that attaches to the rod via nuts on the rod end bolts (it’s the same on the crank main bearings except that the upper half of the shell is in the block itself). The curved rod end, the end cap, and the bearing shells are all sized to fit a crankshaft journal of a certain size with a clearance of a few thousandths of an inch. The bearing shells each have a tab that slides into a notch in either the rod or its end cap to position it in place. It’s a time-tested, inexpensive, reliable way for the crankshaft to spin in the block and move the rods up and down.
That is, until something goes wrong. Dirt and metal particulates carried by the oil can scratch the bearings and the journal surfaces. Excessive heat and crankshaft flex from over-revving the engine can also cause bearing wear. If a rod bearing seizes, it can cause the connecting rod to break, creating a cascade of noisy expensive failure.
With that in mind, when the term “spun rod bearing” is used, it means that the little tabs that are supposed to hold the bearing shells in the rod and the end cap aren’t doing their jobs—they’ve broken and the two bearing shells are instead spinning in place. If this is because the bearing shells have seized on the crankshaft journal, that constitutes a catastrophic failure, requiring the crankshaft to be removed and reground or replaced. So, finding a spun rod bearing is considerably worse than simply finding that the bearing shells are scratched or worn into the copper.

In Carter’s case, there was fortunately no evidence that the bearing shells had seized on the crankshaft. I was able to easily pull them off. Further, even though the tabs had broken off both of the shells, there was no evidence that the shells had been spinning inside the rod end—there were no spin marks on the rod end surfaces or the backs of the bearing shells, or any heat discoloration. So, I guess I’d call it a partially spun bearing.
I actually had an unused set of rod bearings in the garage. The idea of throwing them in, checking clearance with Plastigage (a tiny plastic tube, like very thin spaghetti, that you lay on the bearing surface, squish under torque, and then check its deformed width), and buttoning the thing up was very appealing. After all, part of my purchase of Carter was predicated on the idea that I’d swap the engine for a more powerful one at some point anyway, just not right now.
So, with the car unexpectedly occupying precious garage space (hell, it was on my lift), I installed the new upper bearing shell, laid a piece of Plastigage on the new lower bearing shell in the end cap, torqued it down to the required 41 ft-lbs, took it back off, and examined it.
The Plastigage hadn’t squished a bit.
Ruh-roh.
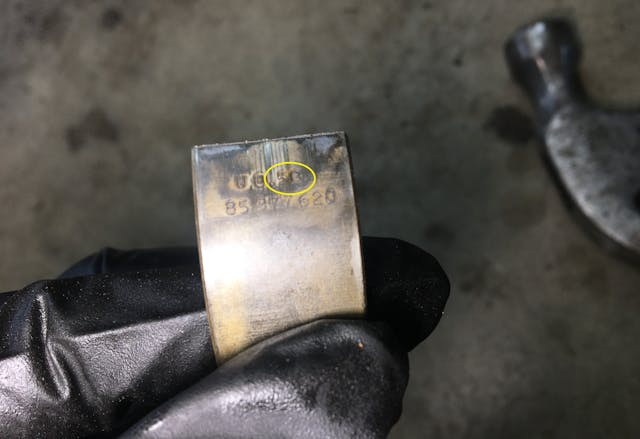
My initial thought was that the partially spun bearing had in fact damaged the rod end and elongated it. But then I looked carefully at the damaged bearing shells that I’d removed and saw that they had the number “0.5” on the back, likely indicating that they were 0.5mm thicker bearings for a reground crank. I measured the rod journal with a caliper, looked up the spec online, and sure enough, it had been reground 0.5mm smaller. I checked a second one to be certain.
Even though the factory manual lists the original rod bearings and three regrind sizes (-.25mm, 0.5mm, and -.75mm), it’s pretty unusual for these cranks to need to be reground, so something bad must’ve happened to this one. Further, since it was clear that this oil pan had been removed and reinstalled, it was possible that this had happened before in the not-too-distant past. Still, I had nothing to lose by sourcing a set of 0.5mm undersized rod bearings, installing them, and hoping for the best.
Unfortunately, when I checked my usual vendors, I found that only one of them carried 0.25mm undersized bearings, and none of them had the 0.5mm bearings. Such things are not unusual with vintage cars—options that are listed in the factory manual are no longer available from the manufacturer or the aftermarket.
Fortunately, eBay saved my bacon—one vendor in Texas had five sets of new old stock (NOS) Glyco 0.5mm rod bearings for the 2002’s M10 engine. Cost: $21, shipped. Click. Buy. Happy dance.
In a perfect world, I’d pull out the #2 connecting rod and have a machinist carefully measure the end for roundness and recondition it if necessary, but that requires pulling the head. Of course, it’s also probably wise to have a machinist carefully examine the crankshaft to see why this is happening. But pulling the rod and piston requires yanking the head, and pulling the crank requires yanking the transmission, so at that point you’re removing the engine and rebuilding it, and for an engine that’s likely going to be replaced anyway, I’m just not going to do that.
I won’t know until next week how well the .5mm bearings fit, or if they eliminate the raspy knocking noise that caused me to pull the oil pan off in the first place. But the result has to be better than running with worn-out rod bearings.
I’ll let you know what happens.
***
Rob Siegel’s latest book, The Best of the Hack MechanicTM: 35 years of hacks, kluges, and assorted automotive mayhem, is available on Amazon. His other seven books are available here, or you can order personally inscribed copies through his website, www.robsiegel.com.


Hi, I’ve read your experience, with the partially spun road bearing. I would be curious about the outcome of the repair
Thanks
Vili
The ‘Tabs’ on the bearing shells are there to locate the shells laterally. It’s the bearing ‘Crush’ that prevents the bearing shells from rotation. I too have lived under this misconception for the last fifty years…
If you think about it, the Tab would be a wholly different design if that was its purpose.
I am currently working on my BMW E36 which has spun a main bearing. Hopefully a DIY polish of the journal and new shells will suffice it to live another 350k miles 🙂
Still on the original head gasket too!
BMW sure know how to build bullet proof four-cylinder motors. Their 1500cc was tuned to give one horse power per cubic centimetre in their 1970s F1 car. Google it if you don’t believe me. Have a great day.
That is their 1500cc F1 engine with a cast iron block from their mass produced BMW saloon carm was used as a basis for their F1 engine. They used blocks from second hand cars. They chose engine blocks which had done at least 100k miles from scrapped vehicles.
The reasoning was that all of the stresses in the cast iron would have been relieved from a high mileage engine after so many hot/cold cycles.
Rob, it has been 2 years….! What happened??
Rob, it has been 2 years! What happened?