Replacing a cylinder head isn’t as hard as you think, but know your limits
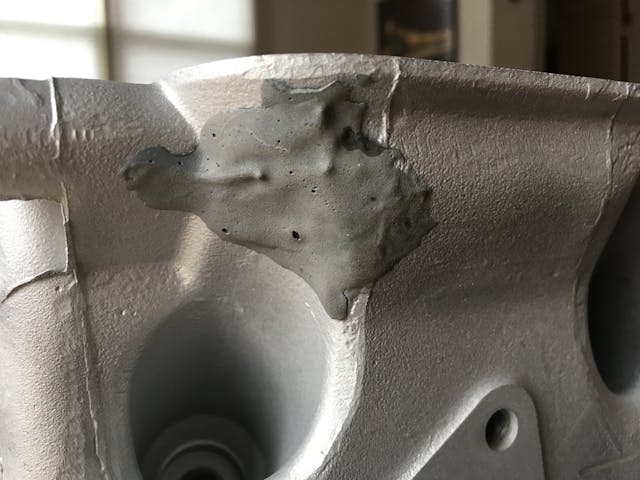
I’m nearly through replacing the cylinder head on Louie, my 1972 BMW 2002tii. This is the car I wrote about in the book Ran When Parked. When I bought it sight-unseen five years ago, I didn’t know the left rear corner of the head was cracked—not through a combustion chamber but through one of the cylindrical bosses into which a valve cover stud is threaded.
This made it so that the valve cover wouldn’t seal, as tightening down the nut on that stud just made the crack yawn open wider. I sealed the valve cover gasket with Permatex “The Right Stuff” and drove the car on three long road trips, but eventually the crack permeated to the outside of the head and oil began dripping onto the exhaust manifold. I wrote a story for Hagerty about having to repair the head with J-B Weld in order to get home.
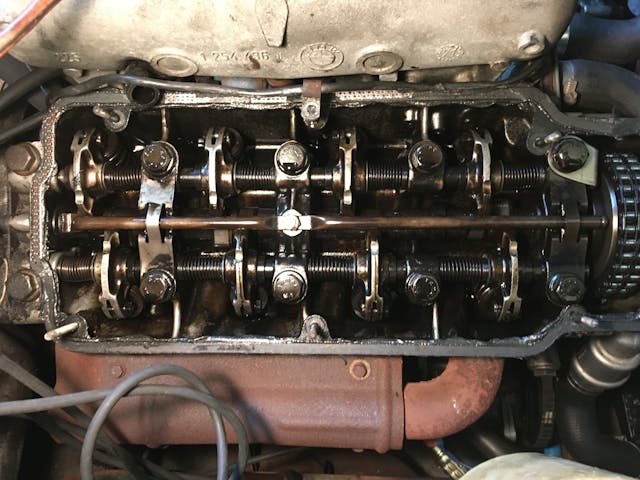
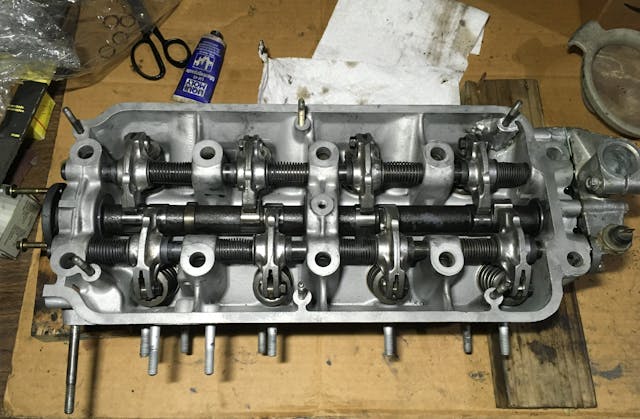
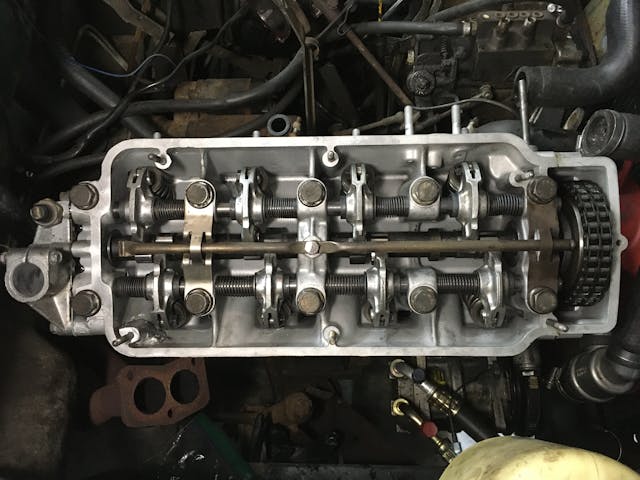
Although the J-B Weld repair appeared to be holding and might well have been semi-permanent, there were two other issues that made me want to pull the head off. First, one of the plugs had popped out of the end of one of the rocker shafts and was a millimeter away from doing a swan dive into the timing chain. I pushed it back in, secured it in place with a bracket, and drove the car that way for another several years, but there are two other rocker shaft plugs, and if they pop out—even if they don’t get caught in rotating machinery—it causes the oil pressure supplied to the valve train to plummet. Second, the amount of black varnish in the head indicated that it was likely that it had never been off the car, and thus the head gasket was now 50 years old.
These three issues made me feel that it would be worth my time and money pulling the head, either replacing it or getting the crack welded, rebuilding the valve train, and installing a fresh head gasket. Especially if I want to road-trip the car this spring; I’m planning on a 3000-mile round-trip MidAmerica 02Fest in Eureka Springs, Arkansas.
Owing to the many varieties of engine design, there’s no one-size-fits-all checklist for head removal and rebuilding, but having pulled many heads over the decades, and having just gone through it (again), here are my observations.
Why is the head coming off?
Very few people do this simply for sport or bragging rights, so there’s generally a good reason why you want to pull a head off. Do you see the classic oil milk shake in the coolant indicating that the head gasket is bad? Is the exhaust white and sweet-smelling, indicative of a cracked head? Is there low compression in one cylinder and a leak-down test that point to a valve not fully sealing? Or is it a vaguer question of oil burning and low performance?
Then there’s the issue of mission creep. As my friend Lindsey Brown, shop foreman at The Little Foreign Car Garage in Waltham, Massachusetts, says, “Never pull the head off a car unless you’re prepared to deal with whatever you find.” When you yank the head and peer into those cylinders, you are looking down what is literally a slippery slope.
It may be that the engine’s problems are truly isolated to the head, but when it’s removed, you may find scored cylinder bores or damaged piston crowns. Or maybe nothing is visually amiss, but the engine is burning a lot of oil, and you think it’s due to worn valve seals because most of it is visible when you take your foot off the gas, and you’re wrong. Or maybe the engine sounds loud and tired due to old worn components. While sometimes a targeted head repair is all an engine needs, there are other times when the engine as a whole is nearing the end of a wear cycle, and the time and money for a head refresh would be better spent replacing or rebuilding the whole engine. If it is an age and performance issue, the more information you can get via compression and leak-down tests before you go in, the better.
But if you know that it’s something targeted to the head—e.g., a blown head gasket putting oil into the coolant—this is something a do-it-yourself mechanic can handle.
Head removal
One of the beautiful things about vintage cars is that, owing to the absence of emission controls and digital engine management systems, their engine compartment is usually very simple, making cylinder head removal comparatively easy. In my BMW 2002tii, these are the required steps. Some of them are specific to four-cylinder overhead cam cars, but most apply to nearly any vintage car.
- If possible, to minimize the chance of dirt falling into the engine during disassembly, soak the engine in Gunk or other non-paint-threatening engine cleaner, then hose it down.
- Drain the coolant. You can also drain the oil, but I usually drain it after the head is reinstalled, as that will carry out any small gasket pieces that fell in and grit that was dislodged during head removal.
- Undo the cooling hoses connected to the front and the back of the head.
- Disconnect the accelerator linkage.
- Remove any electrical connections to things such as temperature and oil pressure sensors.
- Undo the bolts connecting the exhaust manifold to the headpipe.
- Remove the distributor.
- Rotate the engine to top dead center for #1 cylinder, taking care to align any cam or crank marks.
- If it’s a pushrod engine, there’s no cam gear and belt or chain connecting it to the crank, so the head can just lift off. If it’s an overhead cam engine, though, the belt or chain has to be disconnected. If the engine has a timing belt, remove the cover, remove or relax the tensioner, and remove the belt. If it has a timing chain instead, remove or relax the chain tensioner and the upper timing cover, undo the cam gear, and secure the chain in place so it doesn’t fall into the lower cover.
- You can remove the intake and exhaust manifolds, but it’s often easier to pull the head with them still on, especially since the nuts holding on the exhaust manifold are usually corroded from decades of heat, and the bottom row of nuts is much easier to access when the head is off.
- Crack all the head bolts loose in the order specified for tightening them, then remove them.
- Lift the head off. If it’s a bare head, it’s usually pretty easy for one person to do it, but if the manifolds are on, using two people or a come-along suspended from the ceiling is easier and safer. A video of me using my Warn PullzAll can be seen here. Lift slowly, watching carefully for wires or fasteners you’ve missed.

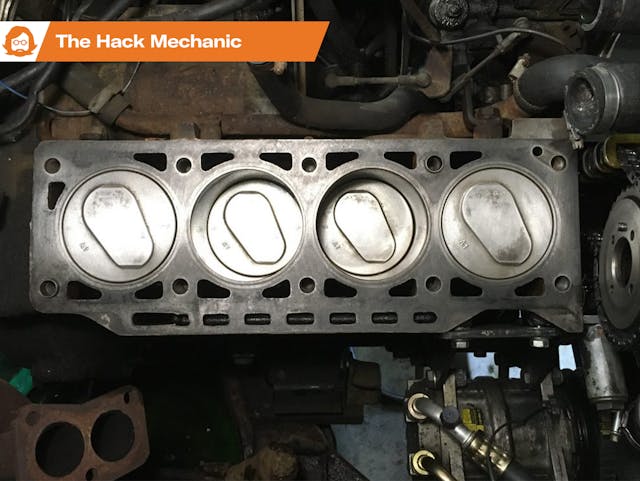
- Once you have the head off, DO NOT LAY THE HEAD ON A HARD FLAT SURFACE! Some of the valves are likely to be at least partially open and extending down below the surface of the head. You can bend them if you set the head down. Have a pair of wooden blocks ready, one for each end of the head.

Examining the head
In the past, if I bought a car that had oil in the coolant indicating a blown head gasket, I used to think nothing of pulling the head, cleaning the surface of both it and the block, installing a fresh head gasket, and dropping the head back on. I’m now much more leery about doing this, as the odds of the head being slightly warped and the valves being a little leaky are high. You can try to check the head for warpage by using a straightedge and feeler gauges, and you can try to get a handle on valve leakage by a) conducting a leak-down test before you pull the head, and b) with the head off, turning it upside down, rotating the valves closed, filling the chambers with solvent such as mineral spirits, and seeing if it leaks past the valve seats, but these days, especially with an old varnish-laden head that may never have been off the car, I just assume that it’s going to the machine shop.
You also can look for cracks, but they’ll be a lot easier to spot once a machine shop has hot-tanked the head (see below).
Preparation for the machine shop
There are three basic approaches to preparing the head for the machine shop.
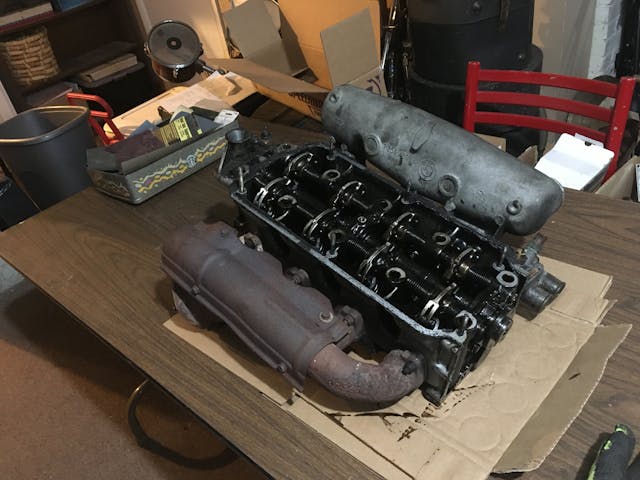
- Do nothing. Wrap it in a plastic bag, put it in a cardboard box so it doesn’t get oil all over your trunk, and drive it down. Pay them to do everything.
- Partially disassemble the head by removing the valve train. The details of the valve train configuration vary depending on whether it’s a pushrod engine, single overhead cam, or double overhead cam.
- Completely disassemble the head. Use a valve spring compressor to remove not only the valve train but the valves and springs as well.
Which of these you do depends on your level of experience and confidence, your desire to save money, and the degree of control you wish to have over decisions regarding reuse of old parts. You’ve already saved a boatload of money pulling the head off yourself, so there’s no shame in just taking the entire head to the machine shop if that’s what you’re comfortable with.
Personally, I usually take the second option—I disassemble the valve train but leave the valves and springs in. On a single overhead-cam vintage BMW engine, this means using a rubber mallet and an aluminum drift to knock out the rocker shafts while rotating the cam to close the valves of the rocker arms being removed. This allows me to be the one making the decisions about reuse of the rocker shafts and arms. (Note that you need to be very careful not to smack the aluminum drift too hard. Even though aluminum is used because it’s sacrificial, if you really wail on it, it can cause the end of the rocker shaft to mushroom, in which case it scores the bushings on the inside of the rocker arms, in which case say bye-bye to reusing them.)
I then take the head, with the valves, springs, seals, and guides still installed, to the machine shop. This allows them to use their experience, which is far greater than mine, to judge which, if any, of the valves and guides need to be replaced (the valve seals are always renewed). They tell me what it needs, and I procure and deliver the parts.

What the machine shop does with the head
Obviously, this can vary depending on the engine and the degree of work needed, but the machine shop usually:
- Removes any components remaining in the head.
- Hot-tanks it to get it spotlessly clean.
- Checks it for cracks.
- Checks it for straightness.
- Resurfaces it to remove corrosion, minor warpage, and produce a clean mating surface. If it’s an overhead cam engine with a metal upper timing cover, the cover should be resurfaced along with the head to ensure uniform mating heights for both the head and the valve cover.
- If necessary, replaces worn valve guides.
- Performs a valve job, cutting fresh surfaces in the valves and their seats as necessary.
- Reassembles whatever you’ve contracted them to reassemble.
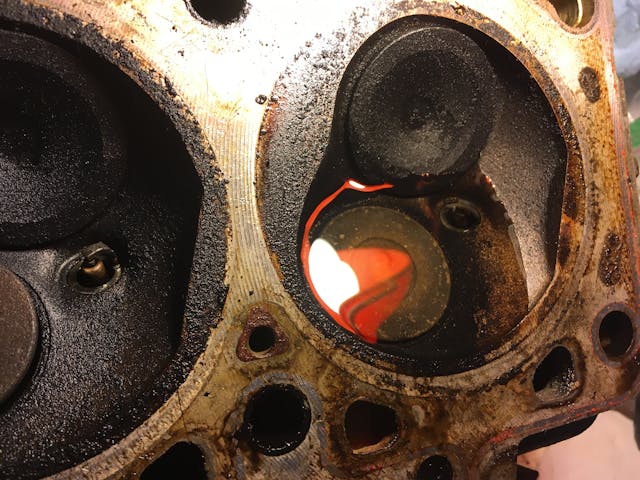
I’m far being from an expert on crack repair. In the past, BMW 2002 heads were common enough and cheap enough that, when they cracked as they often do between the valve seats (see above), I just sourced another used head. However, the head from my ’72 2002tii is an uncommon casting, having both the small early “121” combustion chambers and the big 46mm intake valves. I couldn’t locate a replacement, so I had it welded. My regular local machine shop doesn’t do crack repair, so I brought the head to them for cleaning and examination, then picked it up and drove it to another shop who welded up the crack both inside and out. I opted for the “I don’t really care what it looks like as long as it doesn’t leak” version of the work.

I then brought the crack-repaired head back to my regular shop for the valve job. Assuming the valve guides were good, they used to charge me about $250 for the regular valve job stuff listed above, removing and reinstalling the valves and springs and installing fresh seals. I think they realized how low their price was, because for the 2002tii head, the cost went up to $400. At that price, I start to become circumspect about paying for a valve job if a head doesn’t truly need it, but the handful of times I’ve tried using valve-grinding paste and lapping the valves myself, I still didn’t get it to pass the solvent test. Plus, in order to do the solvent test and lap the valves, you need to completely disassemble the head anyway, so while you may be saving money not taking it to the machine shop, you’re certainly not saving any time. Going forward, if a car I wasn’t holding onto needed a head gasket, and the head passed the straightedge and the solvent tests, maybe I would revert to just dropping the head back on, but for anything I care about, having a machine shop R&R a head that had to come off for some reason is still money well spent.

Reassembling the head
You may have the machine shop perform all the reassembly, but if you’re doing it yourself, take care not to lay it on a flat surface, and to use engine assembly paste on rotating components. And, if you’re knocking in rocker shafts, don’t bang them hard enough that they mushroom.

Pre-assembly block preparation
Thoroughly clean any old oil and dirt out of the cylinder head holes in the block using brake cleaner (non-chlorinated to reduce the risk of damage to the car’s paint) and twisted paper towels.
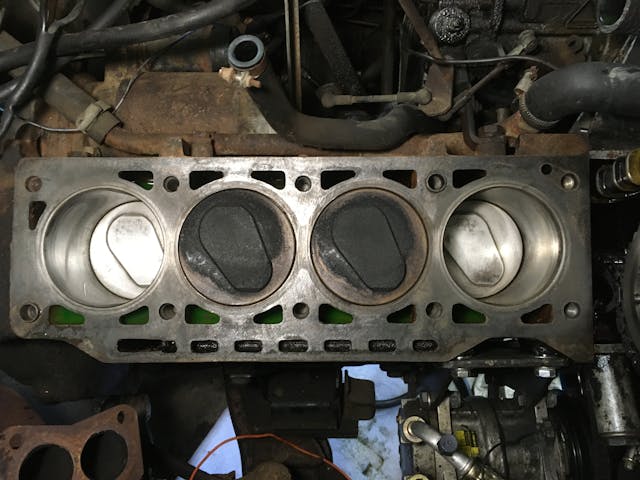
Before you drop the head gasket and the head back on, clean the block surface as thoroughly as possible with brake cleaner, a single-edge razor blade, and a fine Scotch Brite pad (be sure to read up on the pros and cons of the different grades of Scotch Brite). Clean any old carbon off the tops of the pistons. Clean any other gasket mating surfaces, such as those of the upper timing cover if the engine has one.

Reattaching the head
Read and follow the instructions that come with the new head gasket! Head gaskets and the procedures to install them have changed quite a bit over the decades. The factory manuals for the cars I’m familiar with usually called for a three-stage torque-down procedure. In contrast, many new head gaskets require a cold torque, a cold angle-torque (where you use an angle-torque dial indicator instead of a traditional clicks-when-it’s-tight torque wrench), then a run-in time of X minutes followed by a hot angle-torque.
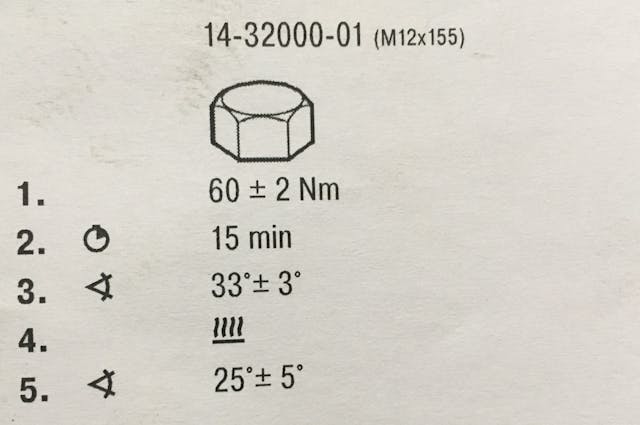

Be aware that, although most of us have been trained that torque wrench specifications apply to dry bolts only, some instructions for modern head gaskets call for the head bolts to be “lightly oiled.” I think that this goes hand-in-hand with what would otherwise seem like an almost eye-poppingly-high amount of torque on the gasket.
Last week, I wrote about not being ashamed to back out of a repair if you feel you’re in over your head, or after completing it, feeling like you never want to do it again. I don’t feel that way about head gaskets or other head-related work at all. Not even close. While it’s certainly quite a bit more than something like a brake job, it’s really not a much different level of effort than, say, replacing a clutch. At least you’re not on your back while doing it. While it’s certainly quite a bit more involved in a modern fuel-injected car with variable valve timing, it’s very straightforward on a vintage car.
So, go and pick up that cheap ’72 TR6, or 240Z—or whatever blows your skirt up—that is being sold below market value because it has a milk shake in the radiator. Of course, when you find score marks on the cylinder walls, my friend Lindsey will be sitting in the corner, quietly chuckling. But then he’ll offer to buy you a drink. Because you’ll be in the club.
***
Rob Siegel’s book, The Best of the Hack MechanicTM: 35 years of hacks, kluges, and assorted automotive mayhem, is available on Amazon. His other seven books are available here, or you can order personally inscribed copies through his website, www.robsiegel.com.

