Getting around to the second half of a bilateral repair
Last fall, I wrote about bilateral repairs on my little Winnebago Rialta (which is a Volkswagen Eurovan with a Winnebago camper body on the back), both of which required special tools.
The first repair was replacement of the upper ball joints in the front suspension. The tool that’s required to remove them is very specific, not something you can rent/buy/return at the local O’Reilly’s. Fortunately, due to the wonders of Chinese manufacturing that we alternately love and hate, I found the tool on Amazon for $80. And, as with many bilateral repairs, the upper ball joints had what I’ve come to call the “two-sided advantage.” That is, I walked up the learning curve doing the repair on the first side, so doing the second side took less than half the time.
This was, however, not the case on the other repair. One of two unforgivable sins on the Rialta is that Winnebago didn’t uprate the rear wheel bearings for the RV’s 7000-pound weight (the other sin, by the way, is the lack of uprating of the transaxle; I’ll get into that next week), so eventually, the rear wheel bearings fail. Such was the case with mine. Last summer, the left one began rumbling, so I bought a pair of the proper German up-rated wheel bearings. The bearing puller set needed for this repair is a rentable item, but the job was so tough on my 63-year-old body that, when I finally got the new wheel bearing pressed in, I felt like the little RV had run me over. And the last thing I wanted to do was to subject my torso to the beating necessary to do the other side, which was not rumbling. So, I didn’t do it. However, knowing that the RV would be sitting in my driveway through the fall, winter, and spring, I backed it in so that the right rear wheel was sitting next to the garage’s side roll-up door, facilitating bringing tools to the repair location whenever I had the stomach to tackle it.
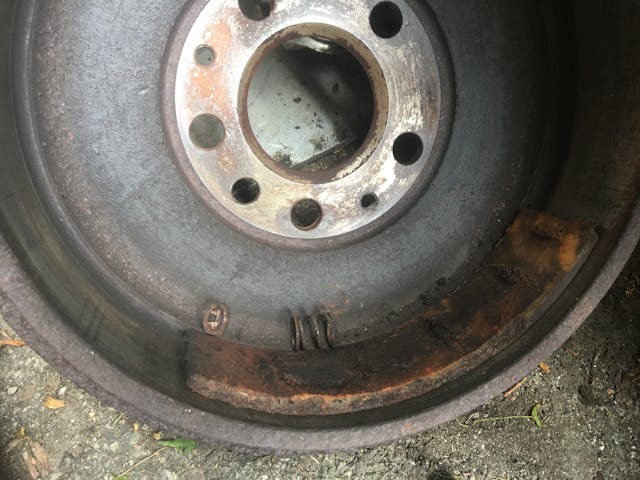
The other thing that intersects with this is the issue of rear brakes. My Rialta is an early one, a ’95, which means that, like the VW Eurovan it’s built from, it still has drums on the rear. I’ve never found the brakes on this rig to be confidence inspiring. I gave it a new set of proper front rotors and pads last summer, but it didn’t change the brake performance much. While I had the rear drum off to do the wheel bearing, I thought about freshening up the rear brakes, but there wasn’t really anything obviously wrong with them—the shoes still had meat on them, and the drums weren’t scored—so I left them alone. Besides, if I did the brakes on one side, I’d need to do them on the other, and to do so in a fashion more timely than whenever I got around to it.
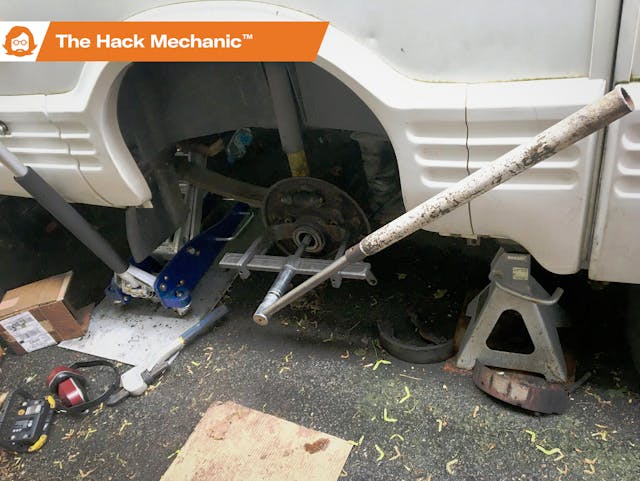
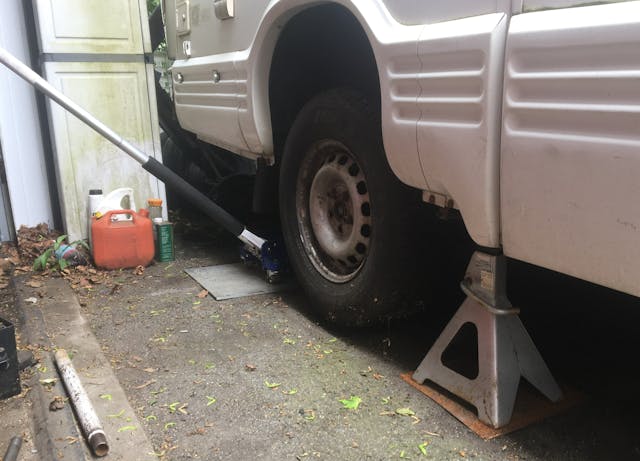
So, with that backstory illuminated, this spring, after I returned from two big road trips, I began to address the Rialta’s right rear wheel bearing. I carefully jacked up the RV, which is something that requires care to do safely on an asphalt driveway. I lifted the right rear corner and set it on a truck jack stand and supported the vehicle redundantly with the floor jack still in place.
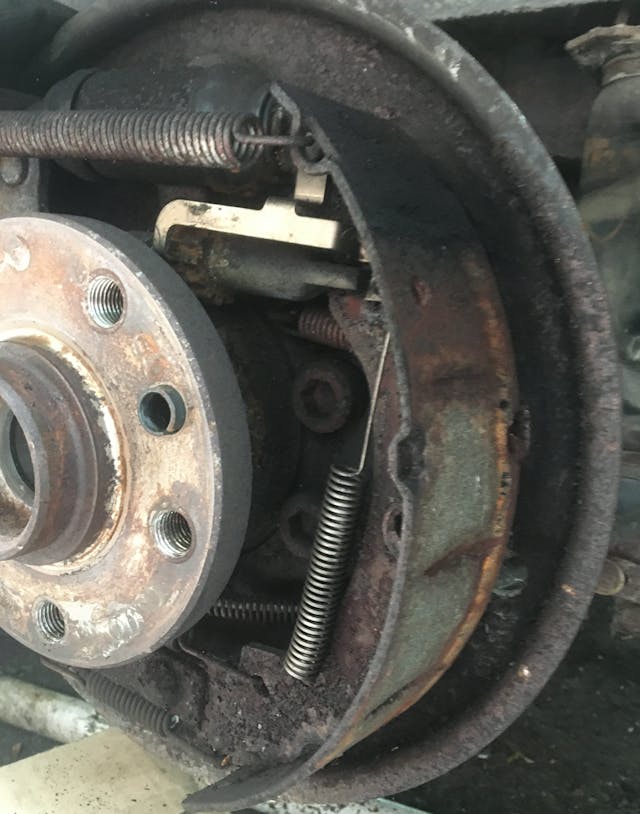
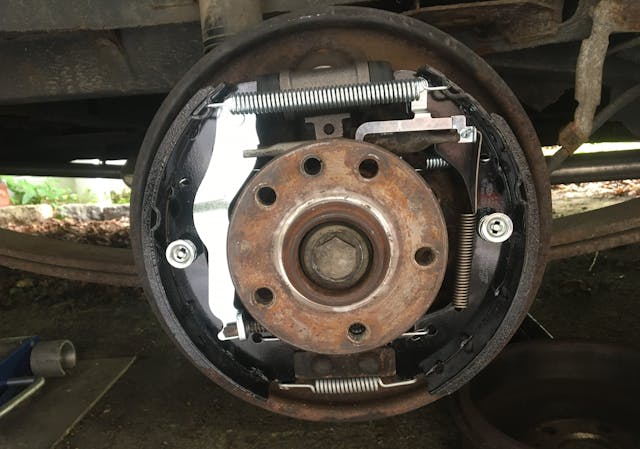
Among the reasons I dislike working on drum brakes is that the drum is often stuck. Sometimes there’s corrosion on the center hub; sometimes there’s a ridge on the edge where the brake shoes get hung up. This drum, fortunately, had threaded holes where you can screw in a pair of bolts and use them to press the drum off, but try as I might, the drum kept snagging the forward shoe, and I couldn’t move the adjuster to back it off. When I finally got the drum off, my elation was short-lived, as I saw that, when it came off, it took the forward brake shoe’s lining with it.
You have to appreciate the irony here. Last fall, when I had the left rear drum off, I elected to not do a while-you’re-in-there and replace the shoes. Now, on the right side, not only did I have no choice, but when I was done putting this side back together, I’d have to revisit the left side. This wasn’t the “two-sided advantage.” It was more like the “three-sided thumb in the eye.” Grrrrr.
I left the garage, went inside, sat at the laptop, and researched rear brake parts. Because, mechanically, most of the Rialta is a VW Eurovan, things like brake parts are plentiful. I triangulated between FCP Euro, Rockauto, and Amazon, ordering everything—drums, shoes, wheel cylinders, even a new set of springs and clips. And, since I’d slid down the slippery slope of while-you’re-in-there, I wandered into Rialta-specific territory and also ordered a new set of rear air springs (air bags), as the ones in the rig never held pressure, and as, with the wheel off, it’d never be easier to replace them (well, at least the right one) than right now.
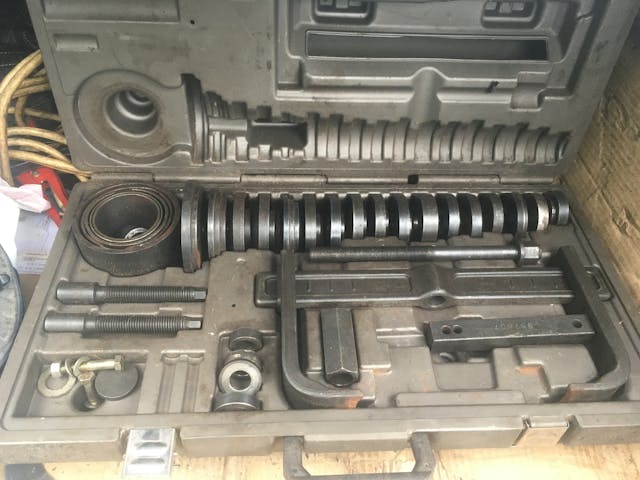
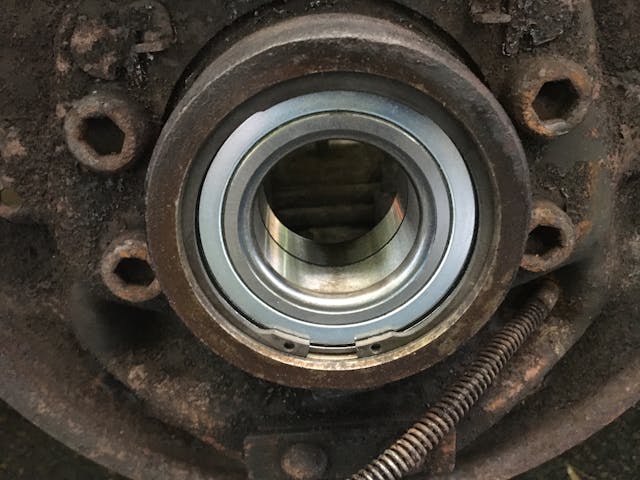
While waiting for the parts, I continued replacing the wheel bearing. This time, I didn’t need to rent a bearing puller set because last winter I had the good fortune of finding an OTC Hub Grappler set for a great price being sold by a gentleman who was closing his home repair shop.
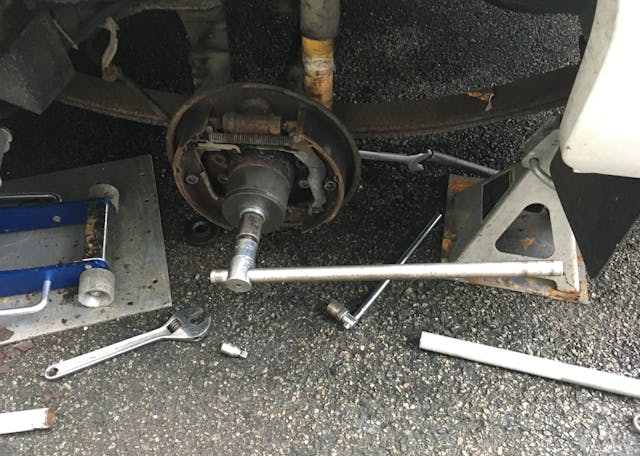
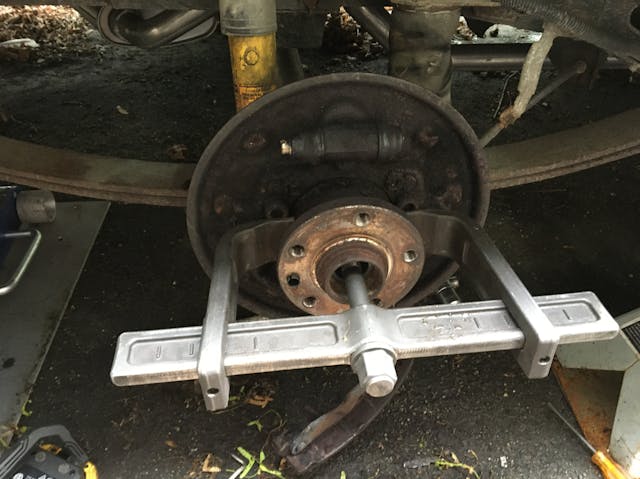
When I replaced the left wheel bearing last fall, I used a slide hammer to pull the hub and stub axle out of the bearing, which nearly caused a repetitive motion injury in my right bicep, but it had the advantage that I didn’t need to pull the brake shoes off. In contrast, the Hub Grappler’s removal jig needs to sit flush against the inside of the rear brake assembly, but since I had to remove the old shoes and springs anyway, it didn’t matter. While disassembling the rear brakes, I noticed that, while most rear drums have one or two springs, these have six, including two that sit behind the shoes, pulling them toward the backing plate. I carefully photographed all of them.
When the new parts came and I began reassembly, the Byzantine collection of springs made things challenging. I relied heavily on the photos I took. The spring which pulled together the bottoms of the shoes was very difficult to reinstall. But when it was done, I could only smile at the collection of new brake parts that I knew I wouldn’t have to look at again for a long time, possibly ever.
But this euphoria abruptly ended, because when I loosened the bleed valve on the newly installed wheel cylinder with a little 7mm wrench, it snapped right off. I think what happened was that while I was installing and tightening the brake line, the edge of the flare-nut wrench I was using leaned against the bleed valve and cracked it.
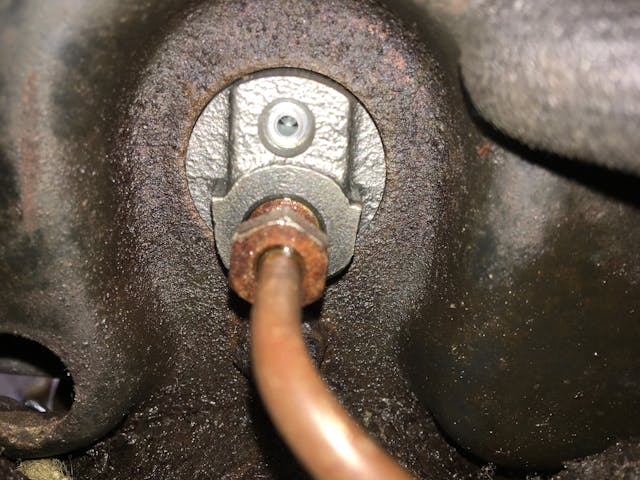
In my books and columns, I’ve written a lot about removing stuck fasteners, and one of the things I say is that if you have a set of EZ Outs—those reverse-threaded drill-bit-like things that can supposedly be used to remove snapped-off or stripped fasteners—just go to the toolbox, fish them out, and throw them in the garbage, because if a bolt was seized hard enough to snap, the odds of you drilling a hole in it and successfully unscrewing it with an EZ Out are indistinguishable from zero. What’s much more likely to happen is that you snap either the drill bit or the EZ Out in the hole, and then you’re genuinely boned. However, this wasn’t a rusty old fastener—this was a brand-new bleed valve on a brand-new wheel cylinder, and it already had a hole in the center. If ever an EZ Out was going to work, it was here. Unfortunately, for reasons unclear, three different EZ Outs could not maintain enough of a bite on the snapped-off bleed valve to unscrew it, despite my tapping one of them securely in place with a hammer.
When you snap off a bleed valve, sometimes you can get by by loosening the brake line where it goes into the wheel cylinder or caliper and bleeding it there. I tried that, but the brake pedal still felt spongy.
I was not happy. I did not want to pull the whole thing back apart to replace the wheel cylinder, nor to take the time waiting for a new one to arrive.
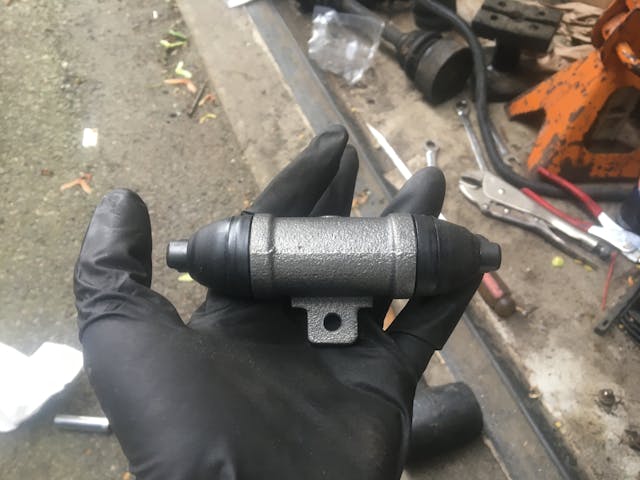
Then I realized two things. First, I already had another new wheel cylinder—the one I’d ordered for the other side. Second, I didn’t know whether it was, in fact, necessary to pull the shoes and all their little attendant springs completely off. I looked at it and thought, “I wonder …”
Sure enough, I found that, by removing only the top spring and pulling the ends of the shoes out of the slots in the wheel cylinder’s pistons, I could remove the damaged one and install the replacement. It took me only about 10 minutes. I put a replacement wheel cylinder for the other side on order.
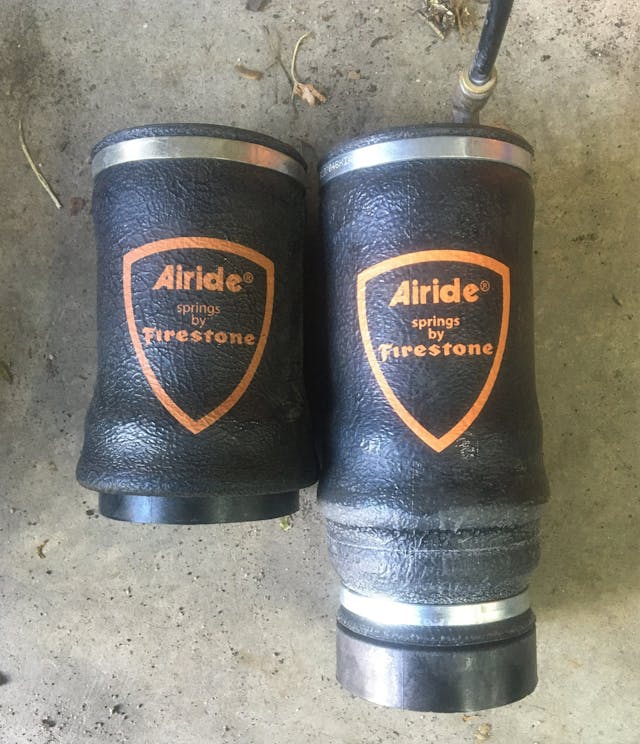
That left only the air spring. These are little rubber bags about the size of a soda can. They attach at the top and bottom, and they have a feed for an air inflation line. The original parts Winnebago used are no longer made, but Rialta forums list a couple of drop-in replacements, including the Firestone W02-358-7046, about $110 a pair. Removal was surprisingly challenging, as there’s almost no clearance to undo the bolt at the top, yet you need to remove it and the bracket at the bottom and then slide the bag with the air line still attached out of the top bracket.
When I opened up the box with the replacement springs, I swore the vendor had sent me the wrong parts, as the bags were far shorter than the one I’d removed. Then I looked at the bags carefully and surmised that the bottom was folded inside. I connected the air line and shot 20psi into it, and sure enough, the bottom popped out and the bag inflated to the anticipated length.
So, the right rear wheel—the side whose bearing was not rumbling—is all buttoned up. I’ve swung the RV around in the driveway to get to the left side—the side that, had I been smarter, I would’ve done all this on last fall when I replaced the rumbling wheel bearing. As soon as rear wheel cylinder #3 arrives, I’ll have at it. Fortunately, I think that, this time, the “two-sided” advantage will work in my favor. As long as I don’t snap anything else off.
***
Rob Siegel’s latest book, The Best of the Hack MechanicTM: 35 years of hacks, kluges, and assorted automotive mayhem, is available on Amazon. His other seven books are available here, or you can order personally inscribed copies through his website, www.robsiegel.com.


Hi I own a VW mini winnebago Rialta and following a blowout on the motorway just short of Milan, Italy the rear side panel was blown off by the impact so I’m looking for anyone able to do body repairs to a Rialta