When trivial maintenance on an RV isn’t so trivial
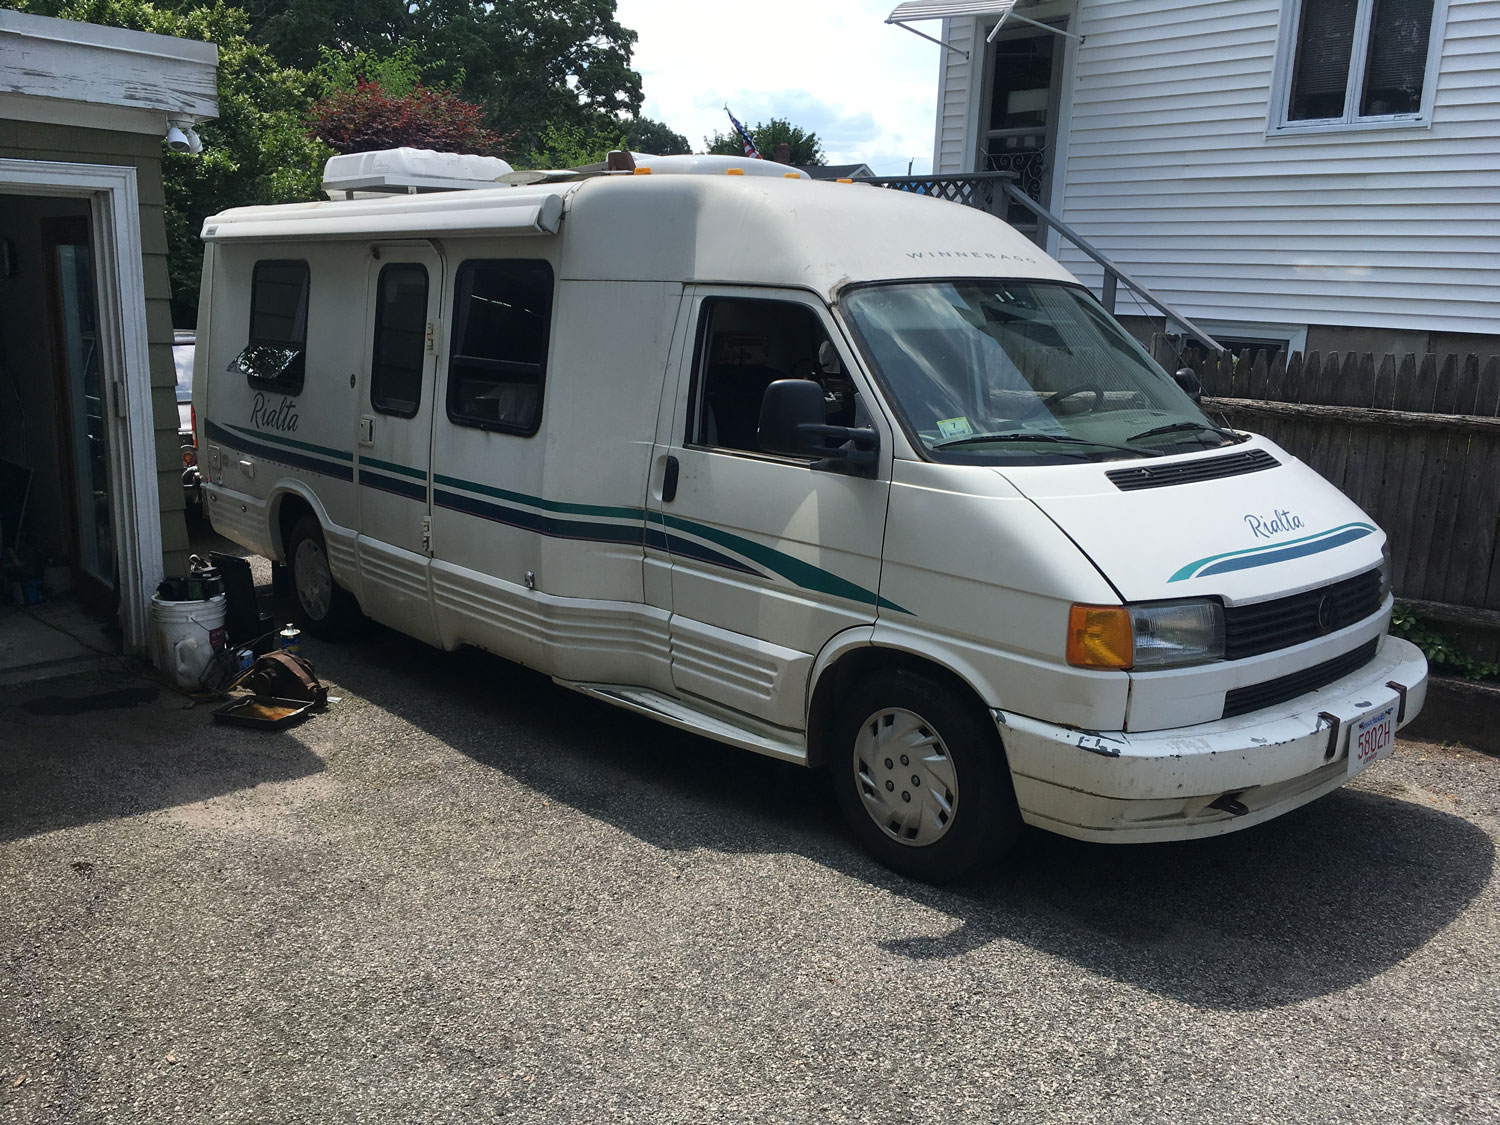
As I mentioned last week, I own a 1996 Winnebago Rialta RV, which is essentially a Volkswagen Eurovan with a Winnebago camper on the back. At just 21 feet long, it’s about as small as an RV can be and still have a full-sized bed, kitchenette, toilet, and shower. It’s a little cramped inside, but the small size makes it maneuverable, easy to park, and relatively fuel efficient. And in theory, the fact that it’s small and based on a Eurovan should make it easy to jack it up and work on it.
Theory and practice are two different things, however, and I’m finding that its size is an impediment to making even simple repairs that I wouldn’t think twice about doing on a passenger car.
The Rialta occupies the space at the end of my driveway where the Suburban used to sit, which is to say that, unlike my pampered Hagerty-insured classic vehicles, it lives outside. This is a far-from-ideal situation, but there’s little alternative. I typically register and insure it in June, then pull it off the road in early fall when we stop using it. The combination of outside storage and sitting for months is not a good one for any motor vehicle. Although my intent is always to drive it around the block every few months, it will typically sit for six months—from fall through spring. At least it lives here at the house, so I can plug in the shore power line and keep the batteries charged.
During one of our trips in the Rialta last summer, it suffered brake failure due to a popped rear metal brake line. But that bit of drama notwithstanding, the brakes on the Rialta have been less than confidence-inspiring. Some of this appears to be just part of the nature of the beast—the brakes are stock VW Eurovan components whose performance doesn’t improve with the addition of the Winnebago body that increases the curb weight to 7000 pounds, and that’s before you add all your road trip necessities. I’ve read that even after spending money on a brake job, poor braking is a common complaint from Rialta owners.
Last week, as I roused the Rialta from its six-month snooze and ran it around the block a few times in preparation for a short trip up to Maine, the braking was so mediocre that it felt uncomfortably close to being unsafe if I had to execute a panic stop. Well, I thought, this vehicle had been sitting for several years before I bought it, and I do leave it sitting outside all winter. Even if it had had a recent brake job before I bought it, sitting outside causes rotors to rust. Frequent use wipes the rust off, but with long dormant spells, the rotors get pockmarked and cratered, and the actual amount of clean braking surface decreases. Clearly the thing to do was give it a brake job, for starters, doing at least the front rotors and pads. After all, it’s basically just a VW Eurovan. How hard could it be?
Well, funny story…
The first issue was identifying which brake configuration mine had. Eurovans have several, and I needed to determine whether mine has Lucas/Girling or ATE calipers and vented or solid rotors. Unlike the Suburbans I used to own, which had so much ground clearance that I could work beneath them without jacking them up, the Rialta is low enough that I couldn’t just crawl under it and look at the back of the calipers. Fortunately, by turning a wheel all the way to the outside, I was able to verify that mine had Lucas/Girling calipers and vented rotors.
The second issue was sourcing the correct parts. The fact that the Rialta is based on a VW Eurovan makes the parts accessible through standard online vendors. I initially went to Rockauto, as I often do for brake parts since Rockauto’s online catalog typically offers more choices than anyone else. However, sometimes too much choice can be confusing. Although Cardone front rotors and semi-metallic pads were only about $72 shipped, Rockauto’s catalog appeared to show a split in which rotors and pads fit a Eurovan before and after 4/1996, and I couldn’t verify the exact build date of my vehicle. I looked on a Rialta forum, and found that some folks ordered brake parts from Europarts-SD. Their website showed a kit with German Meyle front rotors and pads for $119, including two-day shipping from San Diego. I spoke with the vendor, he verified that these fit a 1996 Rialta, and said he sells a lot of them and folks seem to be quite happy with them. Usually I make no bones about squeezing the last ten bucks out of a purchase, and here the price difference wasn’t ten bucks but $47, but both the German-ness of the parts and knowing they’d fit were determining factors.
When the parts arrived, I was confronted with the third issue, which was how to safely jack up the vehicle to replace the front brakes. Although the Rialta is based on a Eurovan, it is an RV, which makes it longer, taller, and heavier than any vehicle than I’ve ever worked on. I’ve had regular cars slip off jacks due to the jack sinking in soft asphalt, and the weekend I slated to work on the Rialta had 100-degree temperatures forecast. I did not want to underestimate the Rialta. I thought that I could, if necessary, put some half-inch plywood beneath the jack and stands, but a cement surface was far preferable. That and shade from the sun made me really want to do the repair in my garage. However, because of the high roof on the Winnebago camper body, the rig won’t fit.
Thanks to my old engineering job, I have access to a warehouse with a high roll-up door. There’s even a truck jack, compressor, and decent set of tools in the warehouse. That all sounds appealing. However, anyone who works on cars knows the value of having all of your own tools at the ready, as well as your own refrigerator stocked with your own food, and other cars in case the repair requires a trip to the parts store.
Taking all this into consideration, I decided that if it was possible to do the repair safely at my house, I would, and if it wasn’t, then I’d move the little RV to the warehouse and do it there.
The night before the high temperatures rolled in, I tried to see if I could position the Rialta with its nose far enough inside my garage to let me work on cement. If I pulled it in too far, jacking it up would cause the roof of the camper to hit the underside of the garage door opening before the wheels were high enough to get the jack stands under. And if I wasn’t far enough inside, the jack and stands wouldn’t be on the cement. Through trial and error, I found that there was about a three-inch window of acceptance. After several tries, I got the Rialta properly positioned and safely ensconced on cement-supported jack stands. I “double-jacked” the rig by leaving the floor jack in place, as I always do.


The next morning, I hit the garage early to beat the heat. Air tools sped the removal of the wheels. I expected that replacing front pads and rotors wouldn’t be too bad. Like most modern cars, the Rialta/Eurovan has single-piston calipers with a sliding bracket. If all you’re doing is replacing the pads, you simply bang out the pins that hold the pads in place, pull out the old pads, squeeze the piston into the caliper to make room for the new thicker pads, then slide them in and bang the pins back in. If you’re also replacing the rotors, depending on the design, you need to first either remove the bracket or unbolt the caliper, then undo the little Allen-head bolt holding the rotor to the hub. But I expected that I’d be in and out in one hour per side, tops.
As the Bible says, pride goeth before destruction, and a haughty spirit before a fall.

I began with the driver’s side, and immediately found that there were problems banging out the pins holding in the pads. I pounded on them with a punch and a small sledgehammer. The top pin came out with some persuasion, but the bottom one just laughed at my attempts to pound it out. I used SiliKroil (penetrating oil), then a MAPP gas torch, and finally the oxy-acetylene torch and a wax stick, but the lower pin was in there with a death grip. And the more I pounded on it, the more I mushroomed the end that would have to fit through the holes in the caliper. At regular intervals, I stopped pounding and trimmed the mushroomed material off with the Dremel tool.

Finally I began to see some small movement of the far end of the pin. I leaned into the sledgehammer and pounded on the punch with a ferocity that I thought I might give myself a repetitive motion injury. The pin began to come free, making 1/32-inch motions with each smack. Then, inexplicably, it stopped moving. I did what seemed to make sense, which was to keep wailing on it. Nothing.
And then I realized why it stopped. The shank on the punch I was using wasn’t quite long enough to reach all the way through the caliper, so rather than banging out the pin, the punch was hung up on where the handle tapers down to the shank. In other words, I’d been embedding the punch into the hole instead of using it to drive out the pin.
Damn! IDIOT! (And, to be clear, this had nothing to do with the vehicle being an RV. It was simply me being a chowderhead.)
I tried to drive it out from the back, but it would not budge. The handle of the punch was hexagonal, so I tried putting a socket on it to twist it. Nothing. I tried heat and wax. It sneered at my stupidity.
In a story about stuck fasteners that I wrote for Hagerty a few years ago, I talked about the role of heat, identifying three different mechanisms in which a torch can be useful. The first is that heat can help break the bond of corrosion. That wasn’t the issue here. The second is that, since metal expands when heated, if you heat the outside of a threaded body, in theory it can slightly loosen the death-grip it has on the threaded bolt running through it. I tried heating the portion of the caliper where the pin went through it, but it didn’t seem to help. The third is that heating a fastener to cherry-red can make it pliable like taffy, which can help you to get it out. In something like a threaded stud, that may be the last thing you want, but with something that’s press-fit into a hole, heating the metal to near-melting can be the golden ticket. So, as a last-ditch effort, I took the oxy-acetylene torch and heated the tapered part of the punch where it went through the caliper until it glowed red (fortunately this was on the part of the caliper facing away from the piston), then smacked the punch from the back. Out it popped. Whew!
With that brain fart finally dispensed with, I pulled out the old pads, unbolted the caliper, swung it out of the way, removed the old rotor, installed the pretty shiny new one, put the caliper back on, unboxed one of the pairs of new pads, and installed them.

I then attacked the passenger side. I had similar issues removing the lower pin, but things were sped along by applying lots of heat and remembering not to bang the punch in past the taper. I pulled the caliper, replaced the rotor, unboxed the second set of two brake pads, and saw a surprising issue—these pads were clearly different than both the original pads and the ones I’d just installed on the driver’s side. All of the other pads had a retaining clip, like a thick bent paper clip, located on the same side as the pad material (as shown below).

This second set of pads, however, had a clip of a different design, and the clip was located on the back side of the pad, away from the pad material.

I thought I had been mistakenly sent the wrong part, but the pads were the same size and bore the same part number on the edges. And when I test-fit the pads, the one in the outer location worked because the spring clip pushed back against the body of the caliper. I couldn’t for the life of me figure out how to make the new spring clip work when the pad was in the inner location, however. And, of course, it was Saturday and the vendor from whom I’d bought these pads was closed, and I could find no reference online to solve the problem.
So what to do?
I could’ve put the old pads back in, which is probably what I would’ve needed to do had I been working in the warehouse of my old job instead of in my own garage. Or I could’ve tried to get another set of pads from a dealer or a parts store.
But because I was at my house, I could exhale, come inside, take a break from the heat, eat second breakfast, and go back out and look at the situation with fresh eyes.
There were two sets of pads, each the same size, but with two different clips. The original style worked on both the inner and outer locations. The new style worked only on the outside. Was it possible that each wheel was supposed to get one of each? That seemed bizarre, since the pads came packaged in matched rather than mismatched sets, but what they hey, right?

In a few minutes, I’d banged the pins back out of the driver’s side caliper, removed the outer pad, and installed one of those with the non-original clip. The “one of each” arrangement appeared to fit perfectly. I buttoned it up, then installed the set on the passenger side. With the wheels still in the air, I bled both calipers. I took the RV down, put away my tools, backed it up the driveway, and drove it around the block.
Unfortunately, the front rotor and pad replacement made virtually no difference. The Rialta’s brakes still felt marginal due to a combination of a mushy-feeling pedal and fair-to-poor stopping performance.
Typically, if someone says the brake pedal feels soft but firms up on repeated pumping, my advice is to bleed the brakes thoroughly to get any air out of the line, but the Rialta’s pedal didn’t pump itself up in this way. When I tried the pedal with the engine off, it felt good and firm. It only felt mushy with the engine running. I wondered if this was a power booster issue. I did some reading on Rialta forums and found that the plastic vacuum line from the intake manifold to the booster is, in fact, prone to cracking. I examined my vacuum line, and was overjoyed when I found this:

I securely taped up the split with electrical tape, put a hose clamp on the fitting, and drove the RV. To my stunned surprise, as was the case with the replaced rotors and pads, there was almost no discernible difference in brake performance.
Two days later, I heard from the guy who sold me the front Meyle rotors and pads, and he said that, yes, you use one pad with each kind of clip on each wheel. At least I got that right.
So, as of this writing, the Rialta still has substandard braking. I think I’ll try freshening up the rear brakes next (shoes and drums) and see if that helps. Unfortunately, the vehicle’s RV-ness is even more of an impediment there, as the long rear overhang and vertical rear window will make it impossible to duplicate my maneuver with the front brakes and shoehorn the back end over the concrete in my garage.
Many of us who own multiple older vehicles (which, by definition, is every Hagerty member) wrestle with this issue—if we don’t fix nearly everything ourselves, we can’t afford to keep all of them. If I can’t easily and safely jack up the Rialta, I wonder how long I can continue to own it. And if I’m resigned to paying someone else to work on it, I might as well move up in size to something not so cramped.
OMG. I think I just figured out why so many people have full-sized RVs parked in their driveway.
***
Rob Siegel has been writing the column The Hack Mechanic™ for BMW CCA Roundel magazine for 33 years and is the author of five automotive books, including Just Needs a Recharge: The Hack Mechanic™ Guide to Vintage Air Conditioning. All of his books are available on Amazon. You can also order personally inscribed copies here. Siegel’s new book, Resurrecting Bertha: Buying Back the Car My Wife and I Drove Off From Our Wedding, will be released later this year.