Troubleshooting my low-beam relay was very enlightening
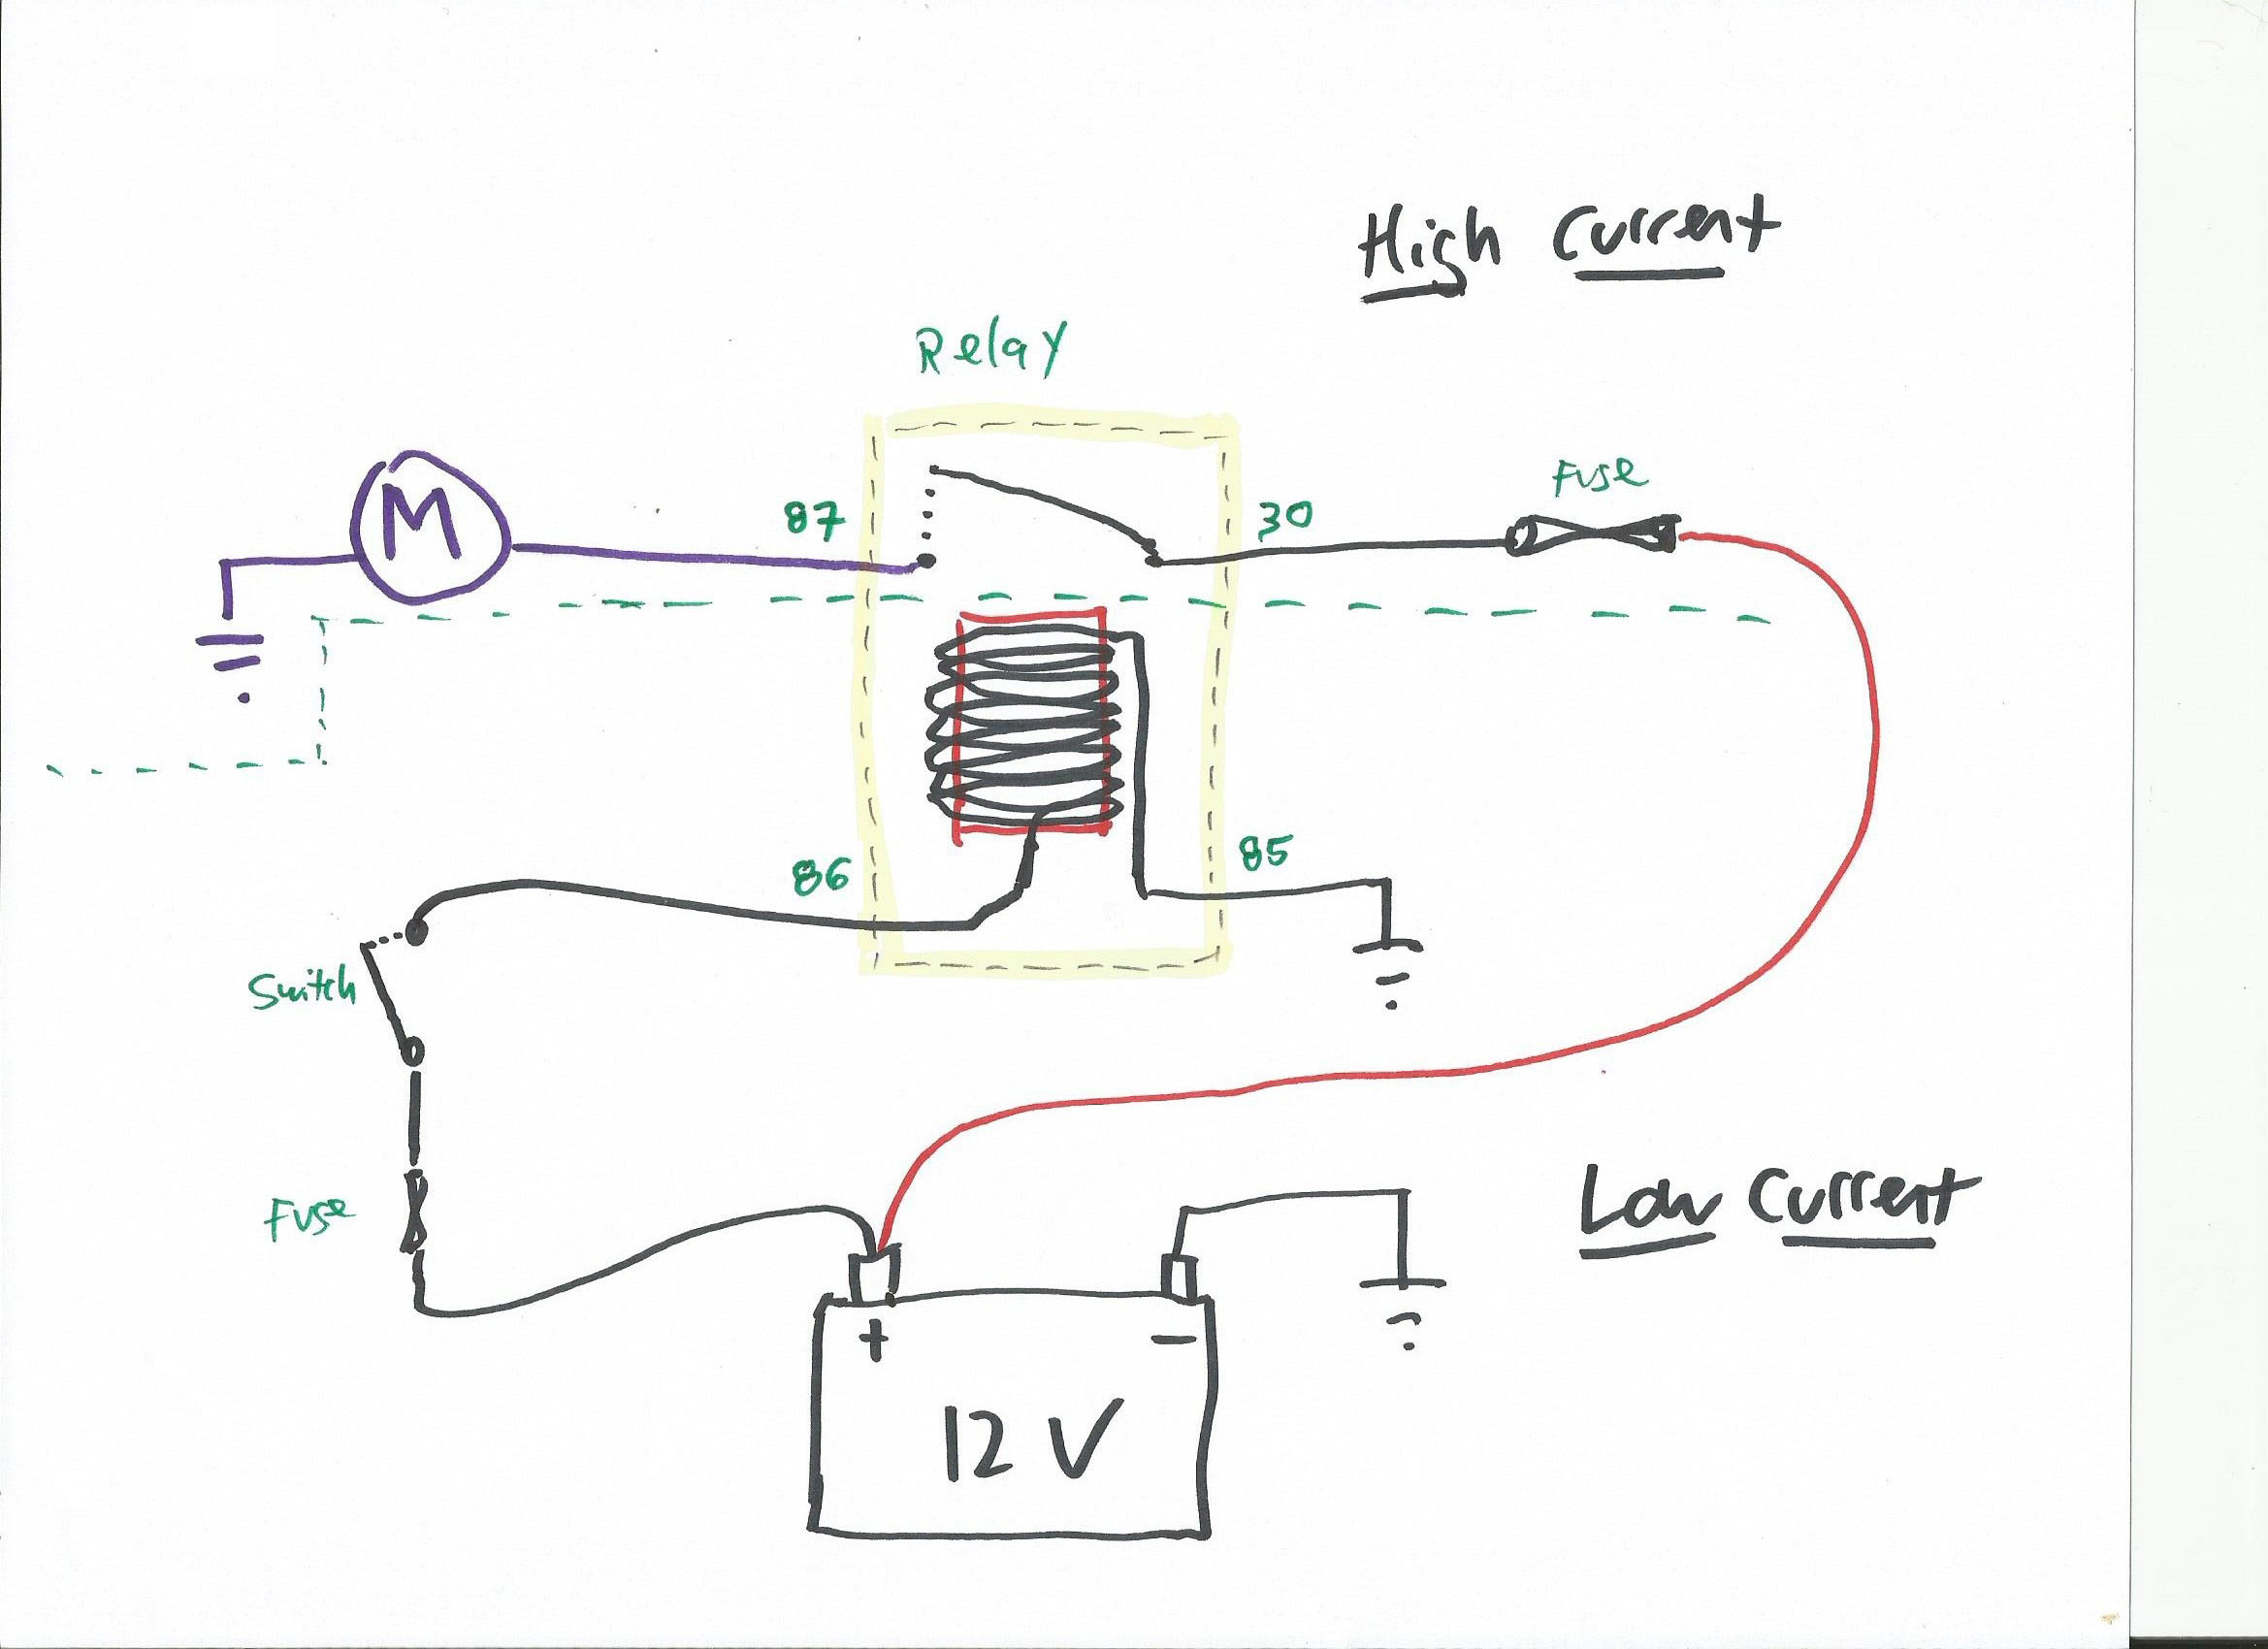
A few years ago, I wrote a detailed four-part series for Hagerty about how relays work (you can review those here: 1, 2, 3, 4). You’ll find other stories that provide more detail, but basically, a relay is a remote-controlled switch that uses low current to turn on high current by employing an electromagnet to pull together a pair of switch contacts. The general idea is shown in my primitive sketch below.

In part 2 of the series, I talked about the so-called DIN-standard numbering of relays used by most cars, in which:
- Terminal 30 (high current) is 12V coming from the battery.
- Terminal 87 (high current) is 12V going to the device you want to turn on.
- Terminal 86 (low current) is 12V coming from the switch or sensor turning on the relay.
- Terminal 85 (low current) goes to ground.
As per the sketch below, for a fan motor labeled as “M,” when you apply 12V to terminal 86, it goes to ground through 85 and energizes the electromagnet, which pulls the relay’s internal contacts together. That connects 30 to 87, allowing 12V to flow to the fan motor. Since the other leg of the fan motor is grounded, that turns on the fan. While there are other, more complicated relays that turn on one device while they switch another one off, this example contains 95 percent of what you need to know about relays. They are simple, elegant, and actually quite beautiful things.
Last month, as I was preparing to drive my recently-resurrected 1975 BMW 2002 “Bertha” on a 2000-mile round trip to The Vintage, an annual gathering of vintage BMWs and their owners in Asheville, North Carolina, I found that the car’s headlights were barely working. Bertha had no low beams and only one high beam. This was odd, as the car was fine when I put it away last December.
First, let me say that even though I wrote an automotive electrical book, I hate looking at wiring diagrams just as much as everyone else does. In addition to it being just plain hard and causing your brain to hurt, with old cars the problem is compounded by the fact that the diagrams were originally on paper, and even if you find them online, blowing them up bigger doesn’t help the clarity. So, most of the time when I do troubleshoot electrical problems on vintage cars, I try ignoring the diagrams and instead do four things. First, I wire the device directly to the battery and see if it turns on; second, I test whether power is present at the device; third, I verify the integrity of the grounds; and fourth, I test the relays if they’re present in the circuit.
To fix the headlights, I needed to do all of those things. The right bulb was the one with no high beam. After verifying that no fuses were blown, I used a multimeter set to measure voltage and verified on the working left bulb which of the three terminals on the connector was the high beam. I then tested this terminal on the connector for the right bulb and found that it did, in fact, have voltage on it, indicating that the bulb was bad. Just to be certain, I broke out a pair of test wires with alligator clips at one end and spade connectors at the other. I stretched them between the battery and the right headlight, connected them to ground and to the high beam terminal, and determined beyond a shadow of a doubt that the high beam filament in this bulb was indeed dead. I swapped in another bulb, and voilà, working high beams.
Next was the low beams. I tested them the same way. The bulbs worked when wired directly to the battery, but there was no voltage on the connector. It was time to check the relays.
As I mentioned above, relays use low current to switch on high current. The advantage of this is that it makes it so the manufacturer (or you) only needs to run thick heavy-gauge wire between the device and the battery, not all the way to the switch turning the device on. Vintage cars initially used relays for ultra-high current devices like the starter and other beefy electric motors, but at some point in the 1970s, when lighting in cars became better and thus drew more current, more and more cars began incorporating headlight relays. Without relays, if the car had high-watt headlights and a stalk-mounted low/high beam switch, thick wires would have to run all the way up the steering column, to the inside of that switch, and back down to the lights. Instead, thin wire can run to the 86 and 85 terminals of the relay, and thick wire can run only from the battery to 30 and then from 87 to the headlights. My 1975 BMW 2002 was, I believe, the first model that had both a high beam and a low beam relay. Since I’d determined that the low beams in the headlights themselves worked, the fact that they didn’t turn on could be in the low/high beam stalk, the relay, or the wiring.
One of the advantages of having had many of the same model car is that you accumulate parts. I pulled a spare stalk off the shelf, swapped it for the one in the car, and tested the low/high flasher. It still didn’t work. Of course, it was possible the spare one was bad as well, but if that was the case, I’d find out soon enough.
Next was the relay. In this car, there are three identical relays sitting next to each other (high beam, low beam, and horn). I swapped the low and high beam relays. There was no change, indicating that the problem was not in the relay.

Still, to be certain, I tested the relay. You do this by running a wire from battery positive to terminal 86, touching a ground wire on and off from battery negative to 85, and listening for the relay clicking as the electromagnet energizes. If it clicks, you then use a multimeter set to measure resistance between 87 and 30 to confirm that the electromagnet pulling the relay contacts is closed. When the relay clicks, the resistance should drop to near zero (less than an ohm). Note that if the internal contacts are corroded—so they touch but can’t support a large amperage load across them—it is possible for a relay to pass this test yet still not function correctly. Because I’d also swapped relays, however, I thought this was unlikely.

Damn. Well, it’s not one of the trivial things. Next, I had to roll up my sleeves.
Part of the beauty of the standardization of relays is that you can do a lot of testing without knowing the details of the wiring. Typically, the relay numbers are printed on the underside of the relay but not on the socket, so it pays to take a piece of paper and draw the relay pins on it and label them, making sure to flip the labels around since you’re looking at the socket from the top and at the relay from the bottom.

Terminal 30 on the relay socket has to be hot. I checked it with the multimeter, and it was. Since all that a relay does is connect 30 to 87, you can do that yourself with a jumper wire. This is often referred to as “bypassing the relay,” and is useful either if the relay itself is bad, or if the wiring on the low-current side of the relay is bad. I have a short jumper with male spade connectors in the glovebox of most of the cars. I used it to jumper 30 to 87, cracked the key to ignition, turned on the light switch, and the low beams came on. This showed that there were no issues on the high-current side of the circuit (the battery and the lights) and that any problem must be on the low-current side (the stalk and the relay).

Next, I tested 86 for voltage and found it hot, even when I wasn’t flicking the high/low beam switch. What this meant was that the way the circuit was wired, 86 is always powered, and flicking on the low beams completes the ground connections to 85. This isn’t unusual; it’s quite common for relays to be switched on by completing a ground connection instead of toggling power.
I put the relay back in the socket but stood it off far enough that I could still touch a wire to the 85-ground terminal. I touched the other end of the wire to ground, and the low beams switched on. Bingo. Bad ground.
But then when I removed the temporary wire, the low beams stayed on. I played with it, turning the headlights on and off. They worked for several iterations, until they quit.
Dirty ground? Could be.
I looked at the grounding point near the relay and noticed something. I’d recently installed a big set of Cibie driving lights on the car’s bumper. This included wiring them with their own dedicated relay, which requires a ground path. I unscrewed the 10mm bolt securing the grounding rings for many of the circuits in the engine compartment to connect this new ground. Was it possible I hadn’t tightened the bolt? I checked it and found it snug. OK, not that.

I undid the ground connection and inspected the stack of ring terminals. I remembered cleaning the corrosion off them when I installed the driving lights, but when I checked them, they weren’t as shiny as I would’ve liked. I broke out the file, got them and the attachment point on the body nice and bright, and put it all back together. I had some trepidation as I switched on the low beams, because if this didn’t fix it, some actual work would be necessary.
Success.
So, remember: Wiring diagrams are your enemy. Relays, and their DIN-standard numbering, are your friends. Connect 87 to 30 to bypass the relay, then test the relay, the source of power to 86, and the connection to ground on 85. It’s usually one of those things.
***
Rob Siegel has been writing the column The Hack Mechanic™ for BMW CCA Roundel magazine for 30 years. His most recent book, Just Needs a Recharge: The Hack Mechanic™ Guide to Vintage Air Conditioning, is available on Amazon (as are his previous books). You can also order personally inscribed copies here.

