5 tips for avoiding Bondo repair disaster
The miraculous blend of polyester resins and cream hardener known as Bondo can make wavy panels straight and door dings disappear. It can hide a welding seam in seconds; but Bondo in the hands of those with calamitous intentions can result in a restoration nightmare.
Along with Band-Aid and Jell-O, Bondo entered the English lexicon with both positive and negative meanings. A well-placed Band-Aid on a minor wound can help prevent infection; but a Band-Aid solution means a haphazard repair representing a merely temporary fix. Bondo has a similarly two-sided identity. Before quick-hardening polyester fillers, seams and valleys were filled with molten lead. Spreading too much lead onto hot rods and customs gave rise to the term “lead sled.” Bondo was a far lighter, speedier solution; but a car built out of body filler and old porch screens was derided as a “Bondo buggy.”
Decades of trial and error, along with a few years as a card-carrying member of the set painters’ union, place my experience somewhere in the middle. Follow along for a list of my 5 Bondo tips and tricks—a guide which, we can only hope, promotes the use of Bondo for the greater good.
A brief qualification: Bondo is a registered trademark of 3M and just one of the myriad brands and types of polyester body fillers. And as much as we appreciate Evercoat Tiger Hair for its tenacious blend of fiberglass strands and super tough resins, one can of regular weight Bondo and one can of lightweight Bondo Gold were used in this five-part journey from rust to repair.
Tools and supplies
Here’s what you’ll need for your Bondo battle kit:
Bondo or your favorite polyester body filler
Mixing board
Spreaders
Putty Knife
Razorblade scraper
Surform or rasp
Sandpaper
Acetone
Disposable gloves
Dust mask
Eye protection
Mixing sticks
Contour gauge
Metal Prep
Etch Primer
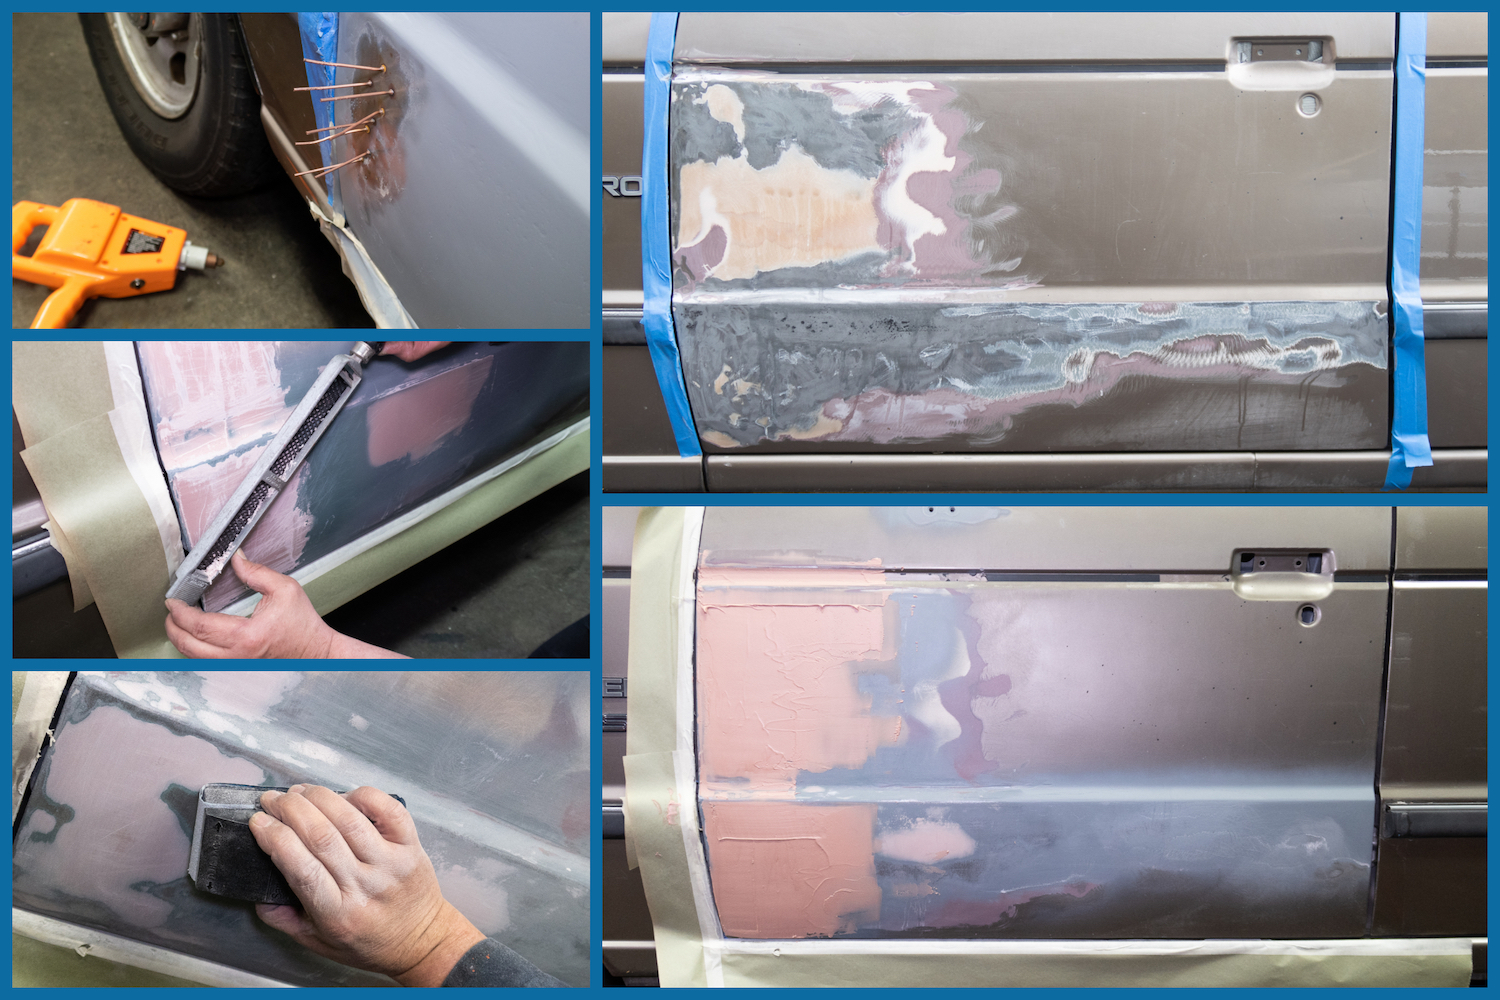
Prepare for the worst


Find out what’s going on under the paint. The Bondo discovery process rarely goes as planned. This door panel looked reasonable but was, not surprisingly, a giant mess. Quick work with a grinder revealed multiple layers of paint, old Bondo, and rust. The goal was to get down to the metal, take a measure, and scuff the repair area back out to 60–80 grit. I found a few low spots with a contour gauge, so out came the pin welder. Anything deeper than 1/4-inch needs fixing, since thick Bondo shrinks over time.
The next question: to prime or not to prime? One school of thought suggests bare metal, then Bondo. The other says primer, then Bondo. Avoid endless forum threads and consult the manufacturer for the definitive answer. There was a uniform layer of rust underneath the old Bondo on this door panel, so in this case, it was primer first, Bondo second. Any bare metal was treated with a phosphoric acid metal prep followed by an etch primer.

Sir Mix-a-lot


Gather up the Bondo, spreaders, putty knife, mixing board, the Surform or rasp, and acetone for clean up. A piece of scrap steel works excellent as a mixing board, but don’t use anything porous or absorbent. Disposable gloves are highly recommended.
Plan ahead. Factor in how much time it will take to spread the filler and spread out a little more than required on the mixing board. Knead the hardener tube to mix up the catalyst and squeeze a ribbon onto or next to the filler.
Hardener and ambient temperature determine cure time. Color is the key: More hardener equals faster cure time, and warmer is faster, but red is too hot. Shoot for that Band-Aid color to prevent a Band-Aid fix.
Fold—but do not stir—the mixture together with the putty knife until the color is uniform. (Stirring introduces unwanted air into the mix.)
Skim and carve


The curing process starts immediately, so load up the spreader and get to work. Multiple thin coats are better than a thick swath. Spread the filler on the repair slightly higher than the depression or contour, and don’t worry about ridges or high spots. First time out? Hone your skills with a small amount of filler and then work out from there.
Stop before the mix hardens. Clean the Bondo off the spreader and mixing board as soon as it gets rubbery and roll it into a ball. Get the rasp or Surform ready and pay attention to the temperature of the ball. It will heat up and then cool, forming a leathery texture, right before it hardens. Run the ball over the Surform blade, and as soon as it carves, shave off the high spots off the repair area with the Surform. This eliminates tons of sanding and giant dust clouds.
Cut and sand

Once the Bondo cures, it’s time to sand. Power sanders are OK to break the surface and knock down any high spots, but hand sanding with the body contour is the best way forward. Cut in with heavier grit sandpaper and work out to about 80 grit to leave a tooth for the following skim coats. Make long sweeps for sanding over the repair. Run your hand over the repair and feel for depressions or high spots; anything you can feel as wavy will translate through the paint. The lightweight Bondo Gold is far easier to sand than the heavier type, so consider using the good stuff on the way out. Use a tack cloth to remove any dust between coats.
Do it all again


Repeat the clean, mix, spread, carve, and sand routine until the repair is flat. Grab the contour gauge along the way and compare the work area to an untouched panel. Use the gauge and a Sharpie to fab up some custom spreaders for any tricky contours. A guide coat can reveal otherwise-hidden low spots. The idea is to spray an extremely light mist of paint on the repair and then block-sand by hand. Any painted areas left behind are low spots. Guide coat paint isn’t super pricey but a can of quick-dry flat black works in a pinch. No spots? Success! Sand off any leftover guide coat, cue The Final Countdown by Europe, and skim in the last coat of Bondo for victory.


Hello, I’ve been having some confusion about when to use guide coat. Should I apply the guide coat after sanding down the first coat of bondo?
The guide coat is “hopefully” your last coat before base coat. When you think you have it right, then you so your guide coat. Spray your coat on then a light, large sweeping sanding motuon. You’re kind of fake sanding here, like carressing you’re favorite partners buttox in a tickilish, send chills up and down there spine and then have them wondering “did that just really happen or did I imagine that”?
That’s how you said your guide coat. After hitting it and a quitting it, if you see any paint on your patch, then you need to apply more Bondo. If you said all the paint away, well….
Carry on my Wayword Son.
There is peace now that you are done.
Let your weary hands rest, and don’t you dare cry no more!