The 4 (actually 5) levels of tool organization
Free time is not free. Free time comes with working efficiently, which minimizes the time needed to get the finished product you so desire. You could ensure your tools are all in the garage, suggesting they are technically all in one place. But nothing is more infuriating than spending five minutes wandering around the garage to find a tool you only need for 30 seconds. And then repeat it again for another misplaced item. It can literally drive a person mad.
On the other hand, there are people who genuinely believe organization is just a waste. Everyone works in their own ways, so we aren’t about to suggest anyone is wrong for keeping their tools how they please. But, with an interest in organization in mind, here are the four levels of tool storage you will likely encounter if you visit enough garages.
Level 0: I have one of those
You are elbow deep in a water pump swap at your friend’s garage when you realize you need a shallow 6-point socket on an 3″ extension. You friend looks at you and says “yeah, I’ve got one of those” and then starts picking up various items and projects on their workbench. Your automotive repair has now turned into a game of “I Spy: Garage Edition.”
We all get caught between projects from time to time, or something of high-importance rolls in and requires pausing something you were actively working on. We how these situations come to life. But if this is your modus operandi, perhaps it’s time to upgrade and quite literally get your poop in a group.
Level 1: It’s in the box somewhere
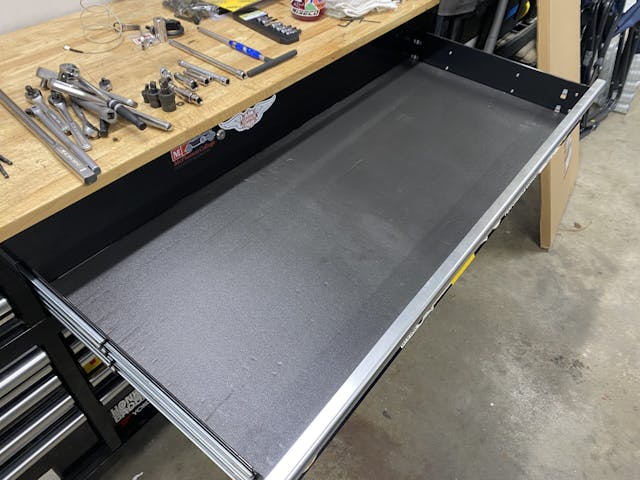
We have now advanced to the most basic level of tool organization: Having everything contained in one place. But the tools are loose and haphazardly mixed. Sockets and wrenches require picking up and turning to see exact sizing, as if denying that the two options of standard and metric exist. You are no longer walking about the garage searching for things, but still pulling drawers like a cabinet maker looking for that jig he knows he made back in 2011.
Not everyone needs to take out a second mortgage to have one of the tool trucks drop off the latest and greatest toolbox, but having one place for your tools is the best course of action if you own tools. Heck, most tool kits these days come in blow-molded packaging that can be downright annoying in some situations, but it undeniably keeps things together and halfway organized. The various ratchets, screwdrivers, saws, and hammers we accumulate with time last longer and work better when properly taken care of and not left in the dirt, or on the floor. (Or in the saltwater marsh that forms underneath anything I park during the winter.) Tools also work best when they are not lost. A tool in the hand is worth… five on the shelf?
Level 2: It’s in that drawer
The chaos in now reduced to a smaller space! The drawers wear a label describing what’s inside, and those items are returned to the same place. You still have to poke around to find exactly what you need, and it might even be a little tougher since everything in the drawer is the same type. Need a half inch box wrench in a drawer full of box wrenches? That’s just annoying.
I suspect this is the level most DIY and at-home mechanics operate on, mostly because it is the easiest to maintain. Clean up only requires wiping a few things down and then tossing handfuls back in the prescribed drawer. The time spent finding something is saved by how easy it is to put back. If you value your time at zero or know your tools extremely well, this is a relatively acceptable way to operate.
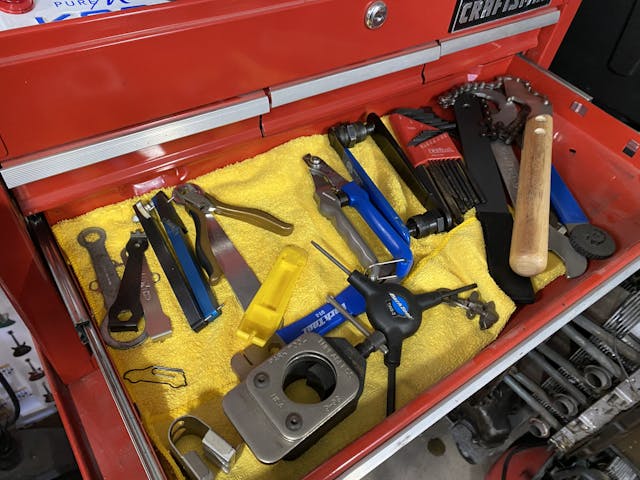
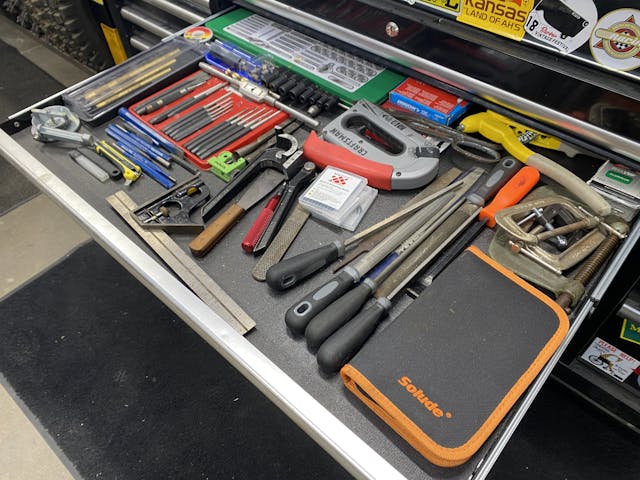
Level 3: It’s on a rail, in an organizer, or otherwise sorted
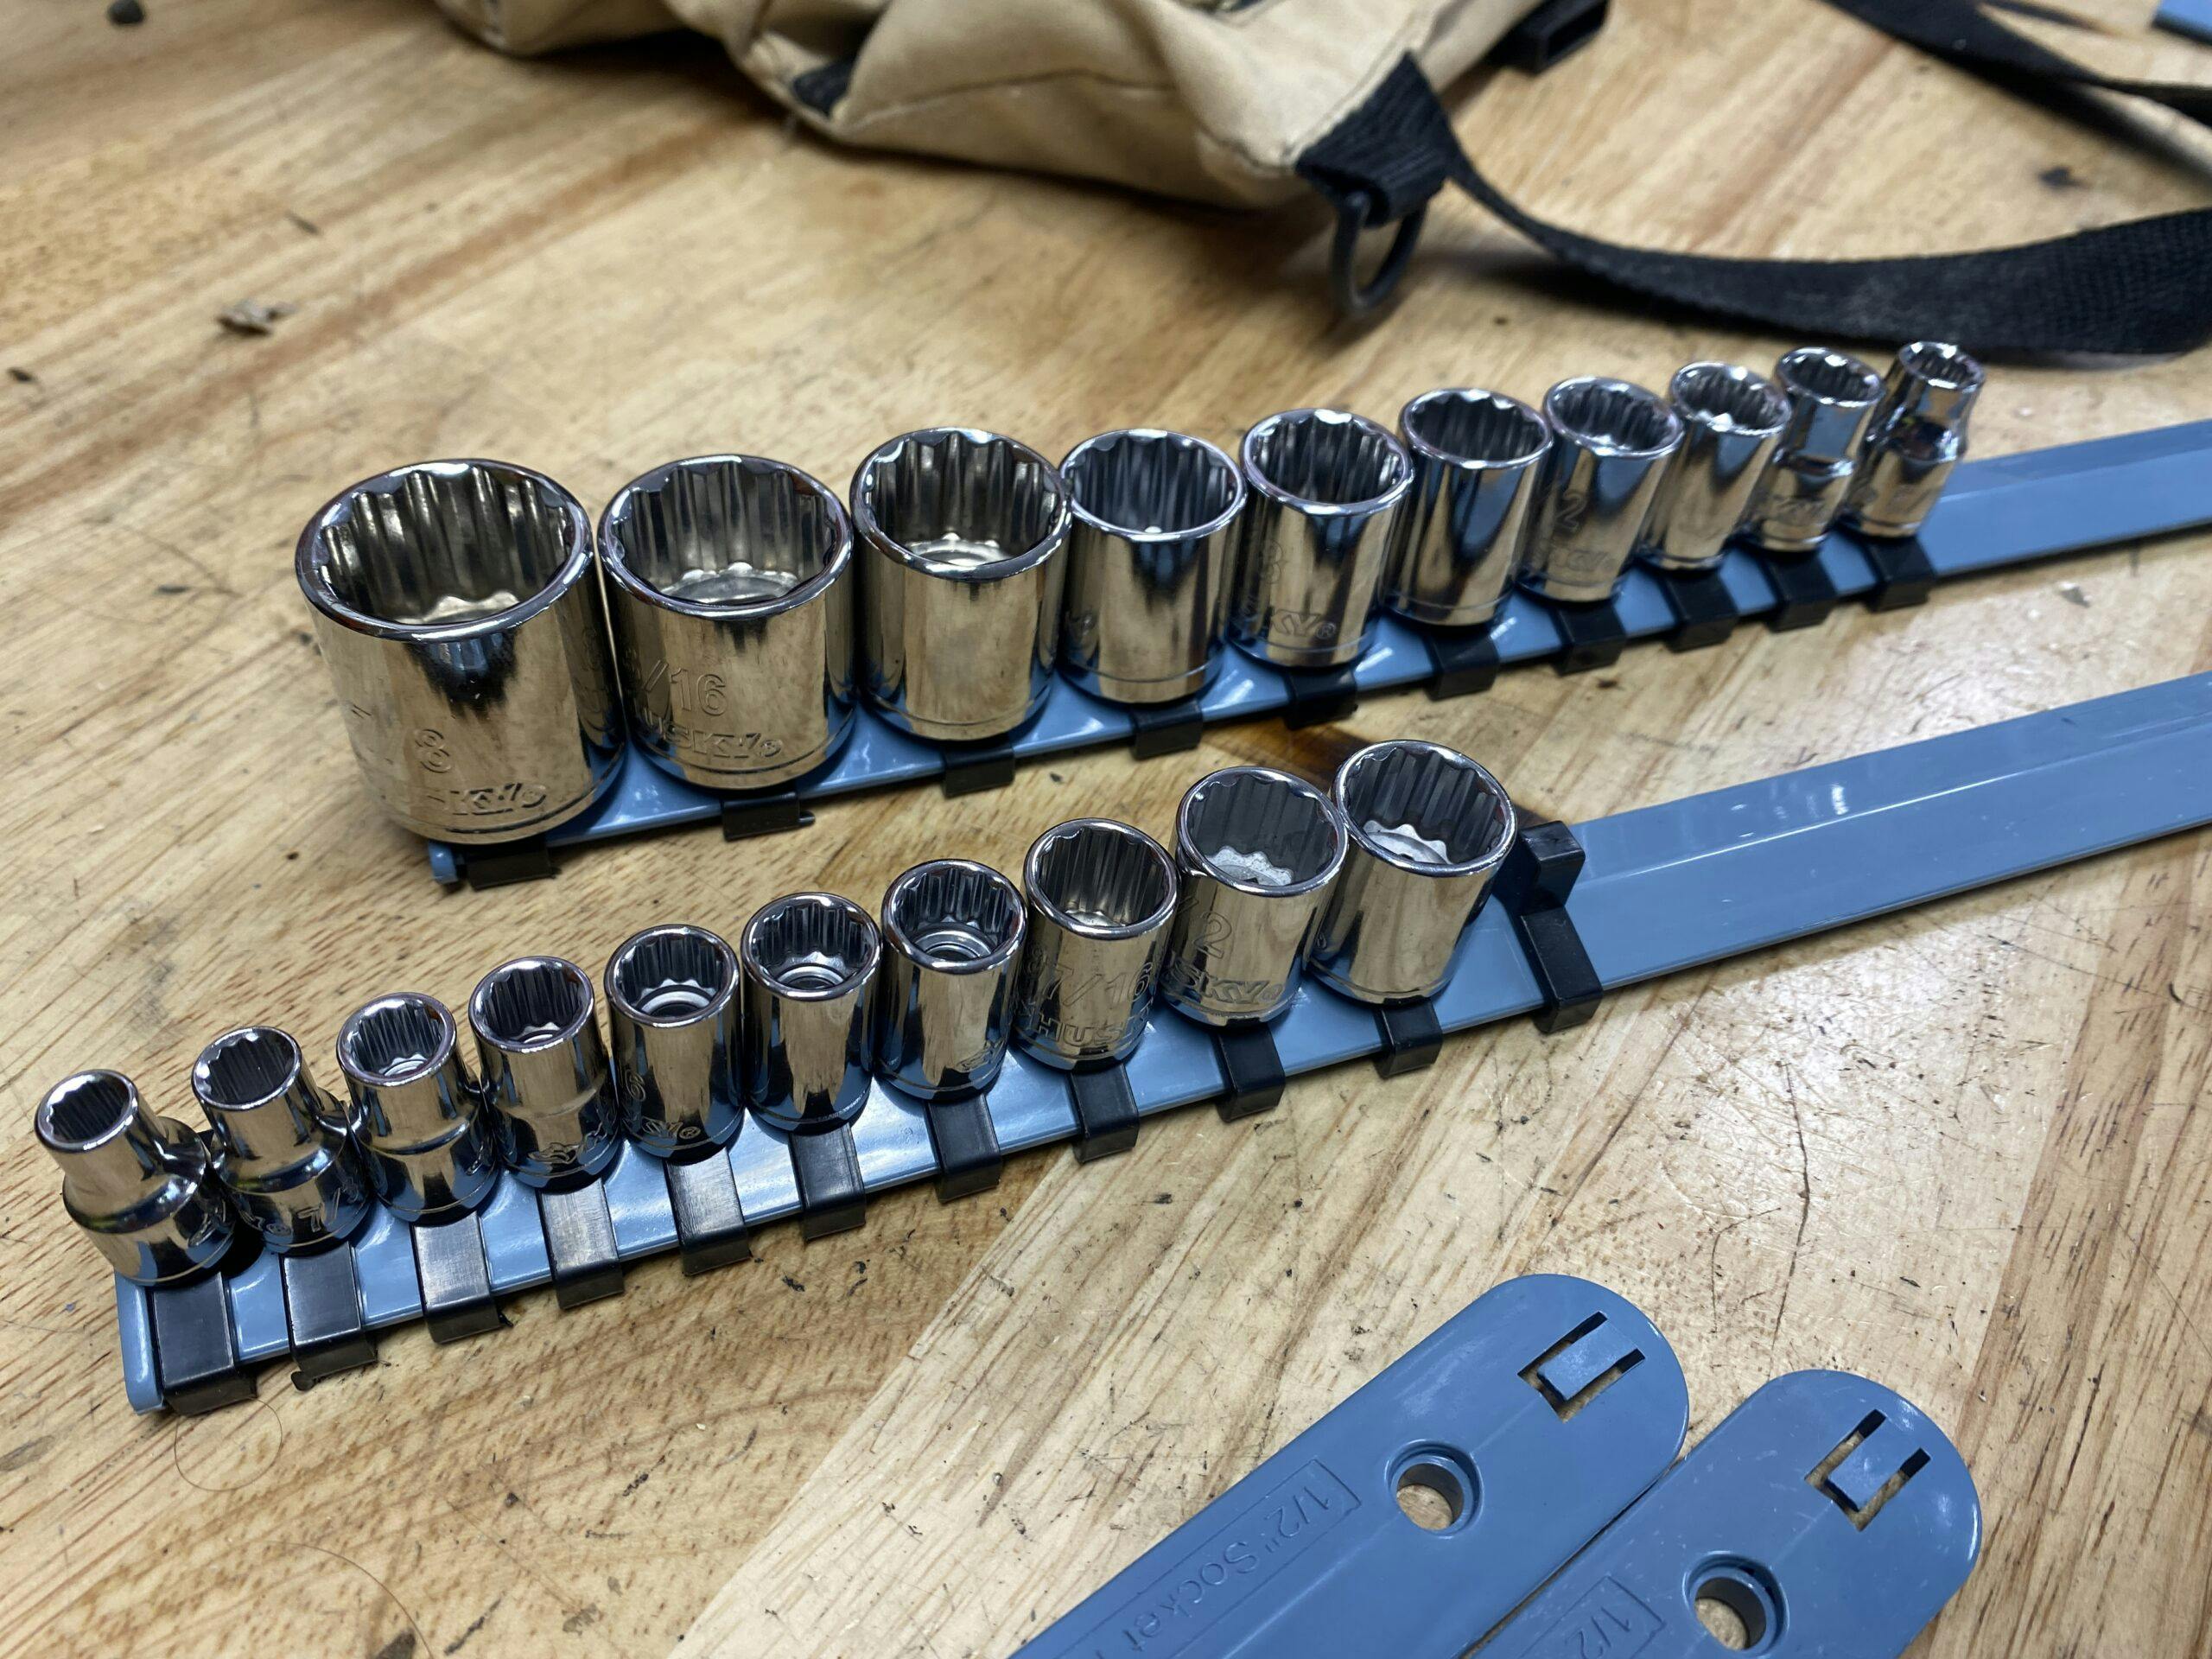
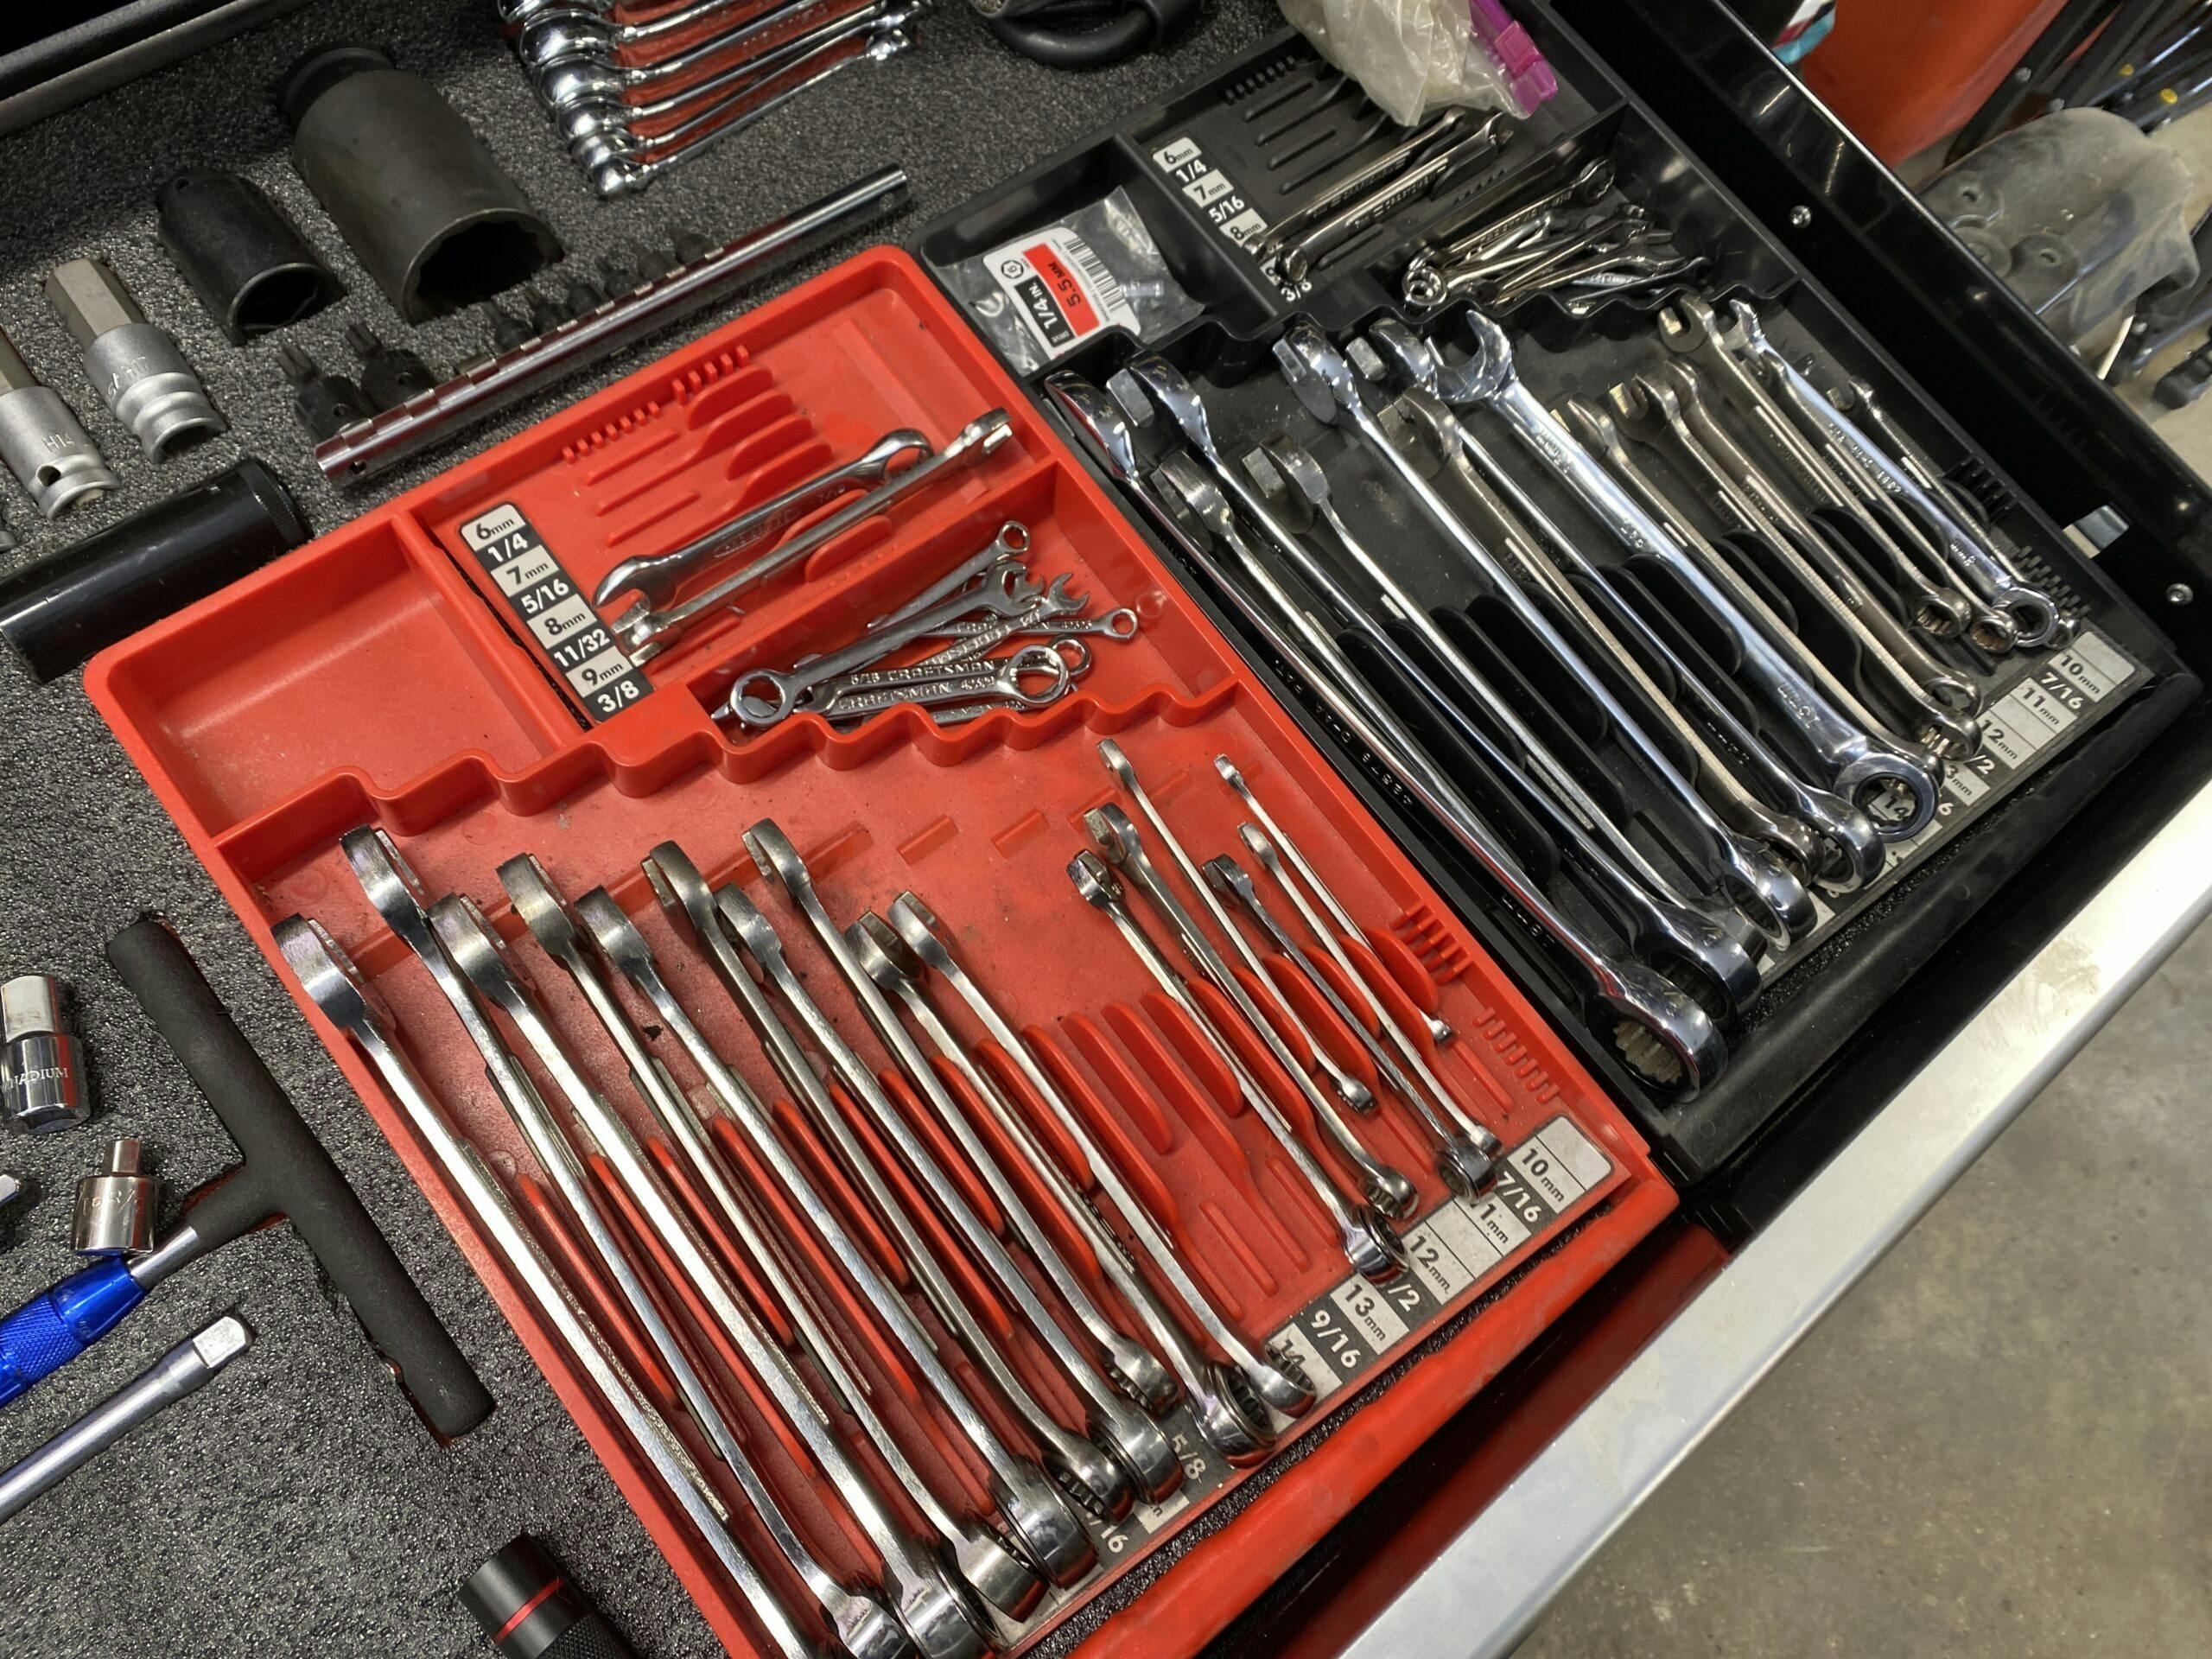
To most, this is the level that is considered “basic organization.” The toolbox now uses dividers in its drawers, or various fixtures to attach like-minded tools together. This creates an environment that makes for quicker locating of tools while working on a project. This level of organization also makes it easier when working on something new, or a project with mixed fasteners: I’m looking at you, American OEMs that mix metric and SAE fasteners.
When sockets are mounted to a rail, you can grab the whole rail and take it to your workspace, instead of making multiple trips to get the right size for the task. The rail also ensures sockets will not roll away while performing automotive yoga under a dashboard. Nothing hurts like watching something roll (or fall just out of reach) while literally shoulder-deep working on something. But sockets on rails can’t roll.
Level 4: It’s right there, and I can tell immediately if it’s not
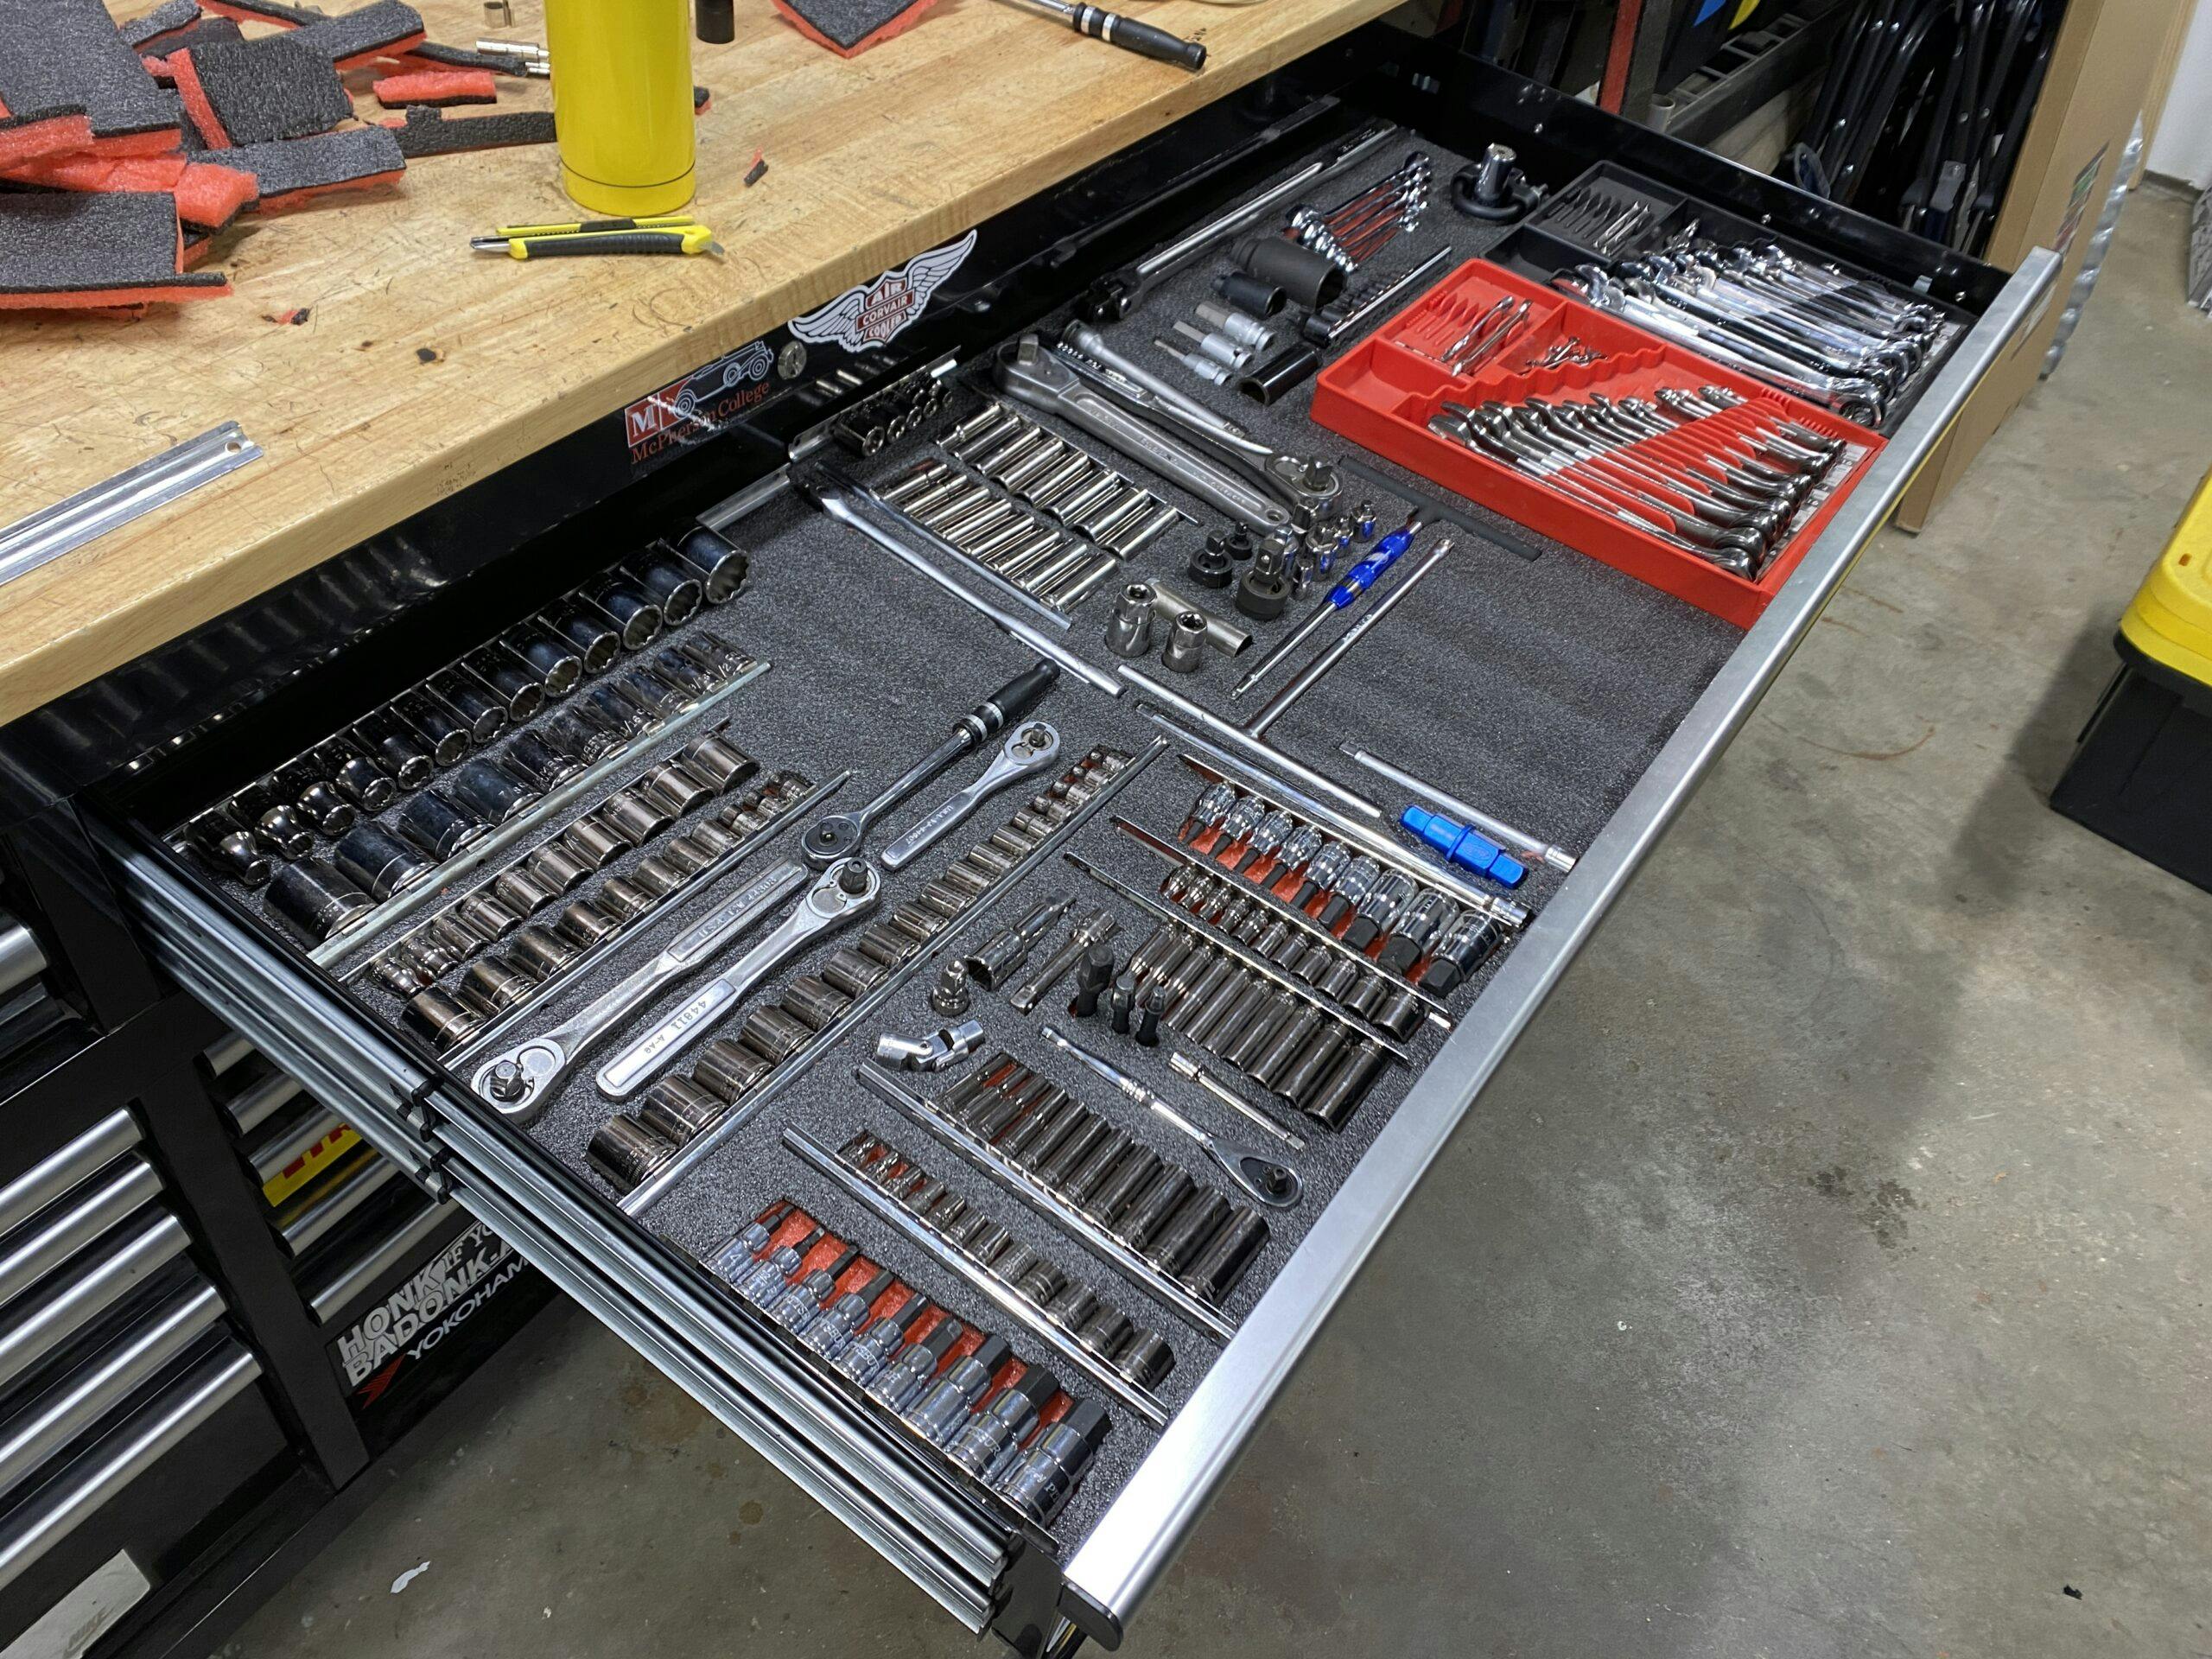
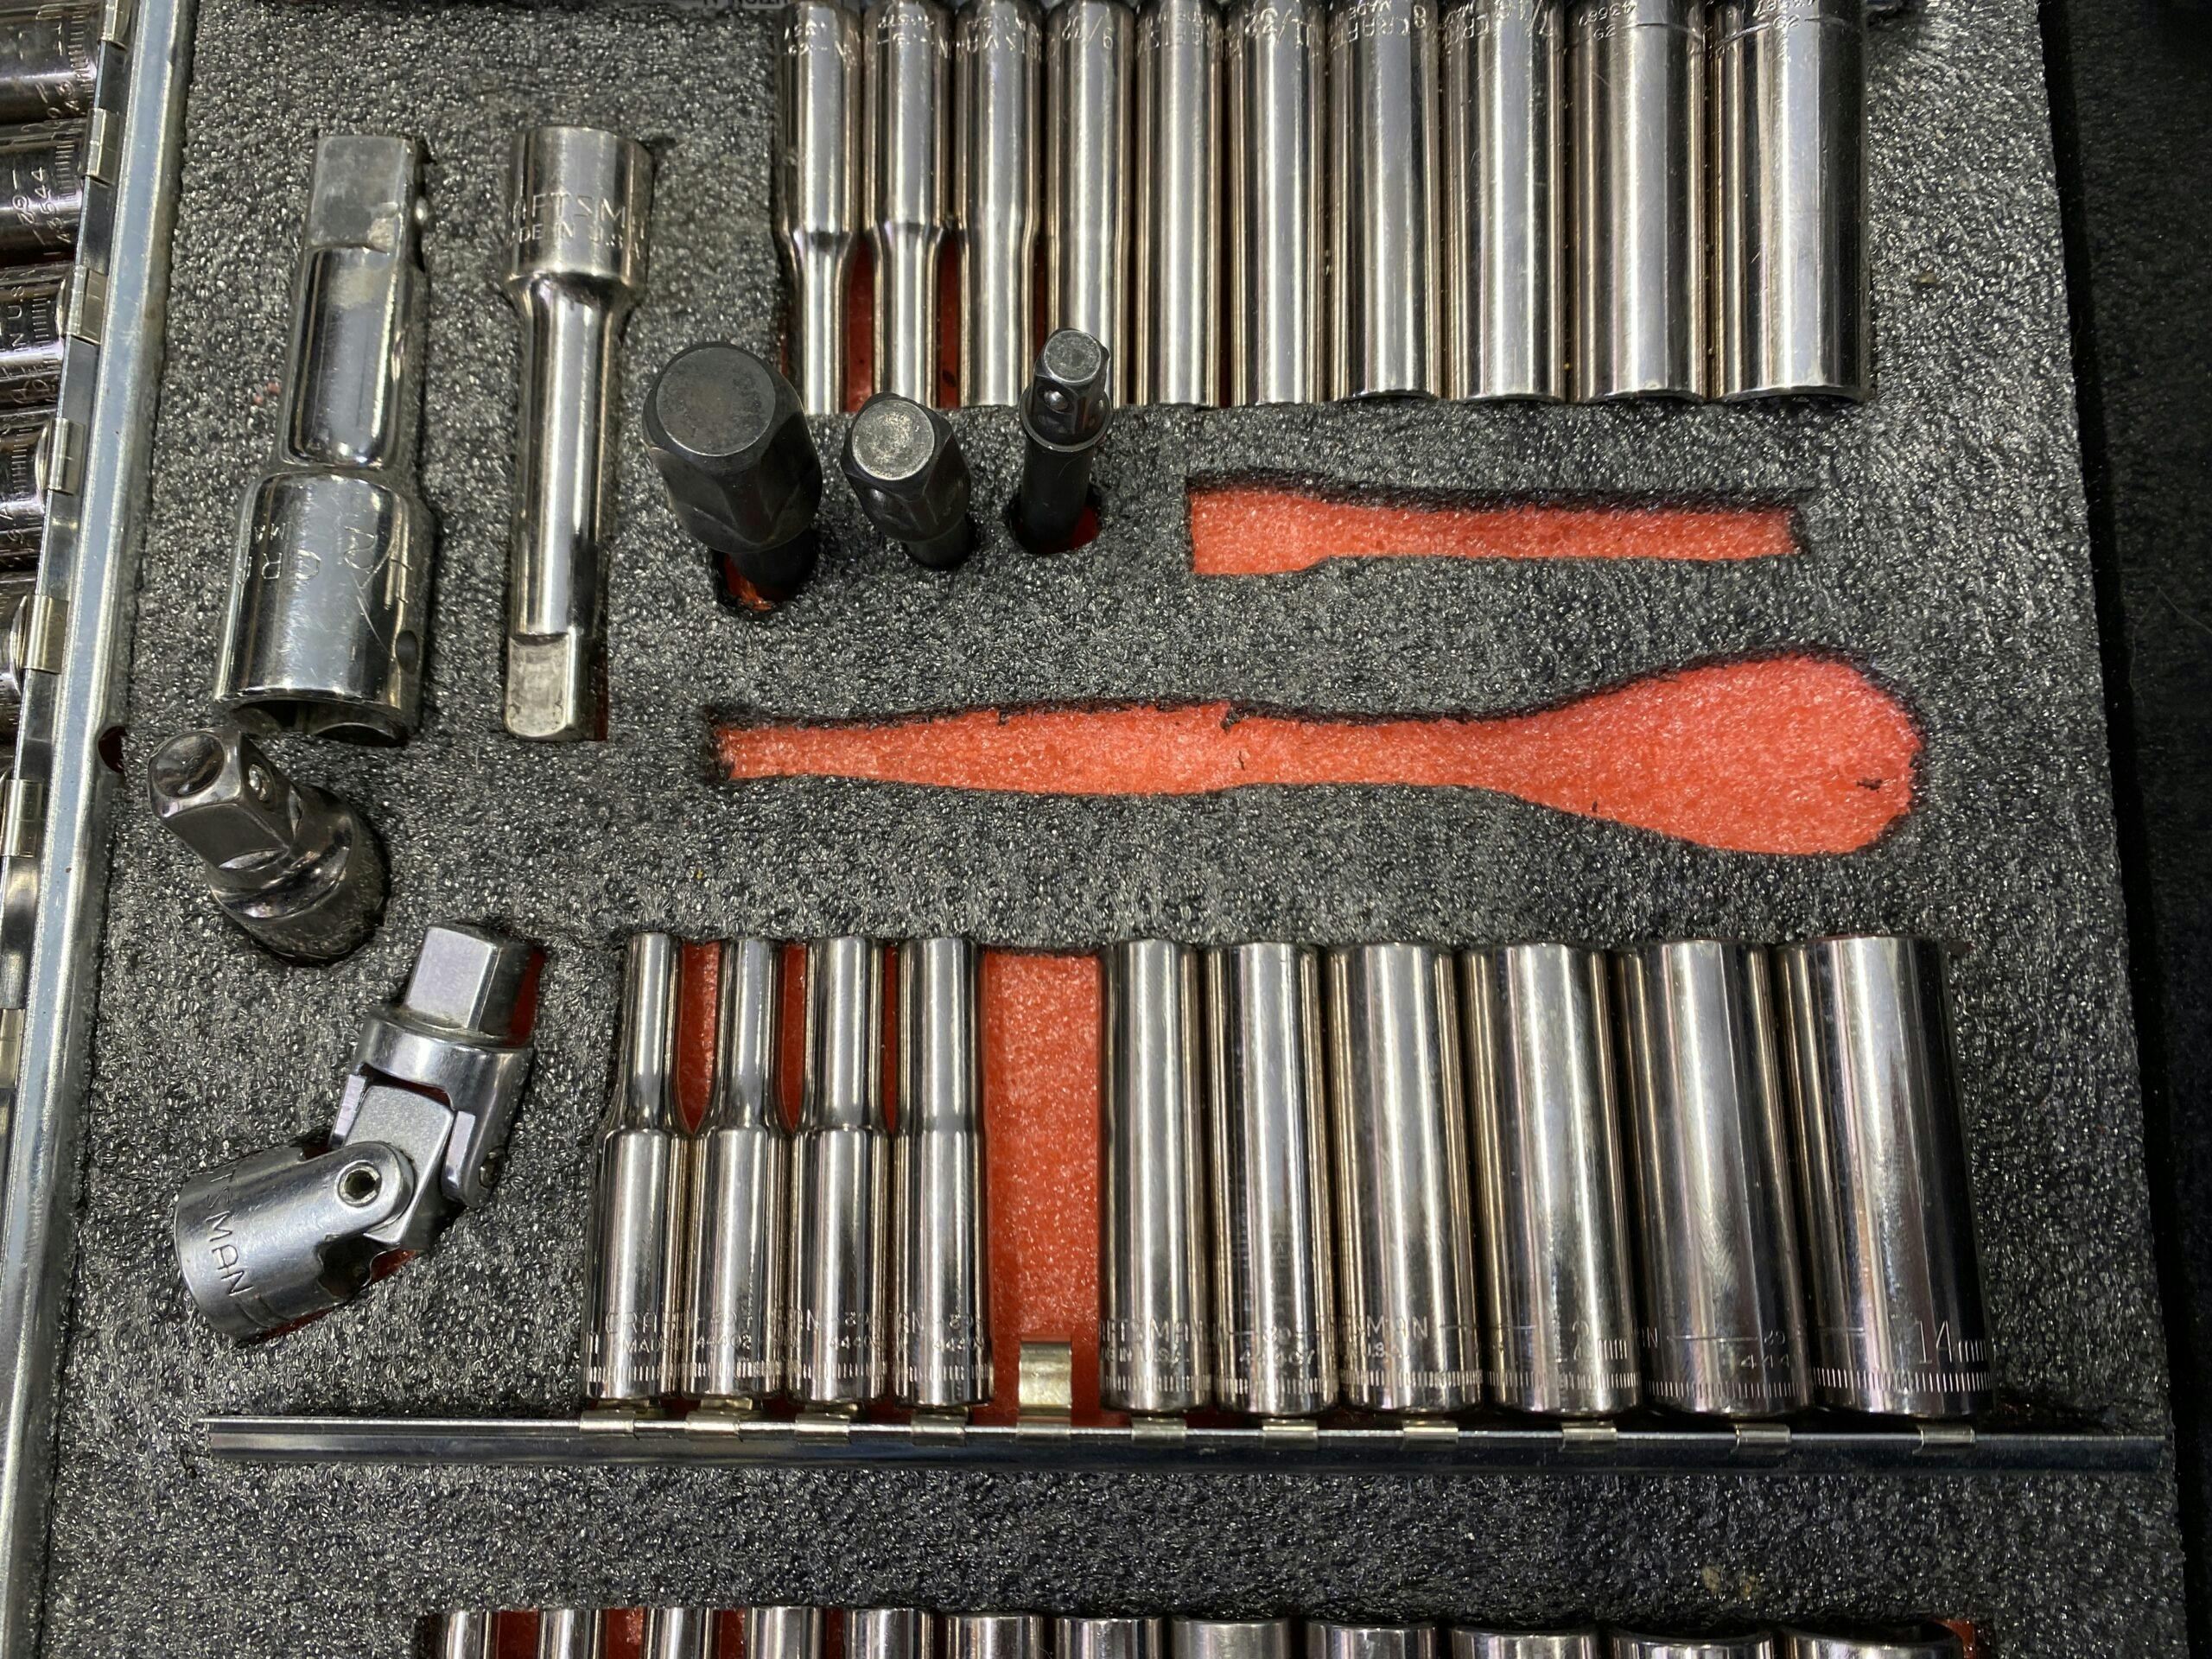
For neurotic wrench turners, there is the ultimate in organization: Custom cut foam. It’s commonly referred to as Kaizen foam, but that is like calling all nose-blowing tissue a Kleenex. This is a multi-layer foam that can be sliced into, then pulled out in sections to exactly fit various tools or parts. We think it might have jumped into garages from the camera and film world, because this foam is great for packing delicate items into travel cases.
Each layer is 1/8″ thick, so it is as simple as tracing the tool you want to store, setting the depth of your knife, cutting the shape (while ensuring you keep the knife vertical), and removing the now-released foam. Bingo: you now have a perfect pocket for cradling anything you can imagine. And as a bonus, most of these foams have one color on top and a different color in the middle layers, allowing you to sight-check if anything is missing.
The idea of tool organization is likely as old as tools themselves, which means the cost to keep your toolbox tidy has dropped over the years. Time is money, and your time is not free. Socket rails and organizers are things that we can say with 100% confidence are worth a trip to Harbor Freight.
So where do you fall in this hierarchy, and do you want to see more tips on keeping your box organized and ready for work? We may have a few tricks that are cheap or free that we could be convinced to share, but only if you promise to not be a level zero organizer. Don’t worry, we’ll take your word and won’t ask for proof.
***
Check out the Hagerty Media homepage so you don’t miss a single story, or better yet, bookmark it. To get our best stories delivered right to your inbox, subscribe to our newsletters.


I’m definitely a Level 2 in some areas and Level 3 in others. I doubt I’ll ever attempt to get to Level 4, as I try to mollify any tendencies to be totally anal by keeping some sense of reality about what I’m really doing in my shop…which is MY HOBBY, not earning a living. So the whole “time is money” thing doesn’t really apply to me. I’m just a DIY’er who can really afford a minute of two to look for something that I didn’t put away in a blueprinted drawer.
Yep, my automotive tools are between Levels 2 and 3.
But my electronic repair parts/tools are Minus Level 4!
I’ll be the first to admit that I’m anal and proud of it. However, I have no desire to get to Level 4 because as soon as you add the socket or wrench that you don’t have in your set, you don’t have a place for it, so have to redo the whole drawer. I’m happy at Level 3.
I feel the same way with the peg board on my garage wall. It’s easy to scan the wall for the desired item, but I don’t paint outlines around the tools, because sooner or later I’ll need to re-arrange to wall to hang up a new tool.
Ah yes, that old pegboard demon has bitten me, too, Tom. Long ago, when I first learned of the outline-paint idea, I thought it was brilliant and immediately applied it to TWO of my tool walls. Then I came to realize the reality: one will get new tools, or decide that the “fab” area should move to another part of the shop, or some such change that requires re-painting the outlines to the new layout. Now all of my pegboards are plain white (tool show up better to my old eyes against a white background), and changing the layouts is simpler! 🙂
Last time I moved locations I peg-boarded the entire area. The main reason was the ability to see what’s missing at a glance. “Misplaced tools” never happen anymore and the staff know where it should be. Tool loss is now minimal.
The tool boxes now have all the AN hose, ends, adapters and brake calipers etc. The high dollar stuff that has legs.
You have a good point, and that is why I have only cut foam for only the tools that have been in that drawer for 5 years. It’s funny because building a toolbox is using the various forms of organization in different places. I would never cut foam for my whole box, and I would never just check anything in any drawer. Time and place for everything.
If I cut foam for my tools, I would have to double the number of drawers….. nothing wrong with “stacking”. 🙂
Exactly. I can make do with my Matco chest and drawer set by jamming all the automotive hand tools in a drawer. If I went full anal with foam, I’d have to leave a car outside to make room for another tool box or two. I will admit to having a couple smaller boxes with less used tools (engine rebuild stuff like piston ring grinders and compressors) on the wire shelf rack.
I also use pegboard and have done 80% of a two-and-a-half car garage. To me, that is the easy way to keep tools organized. I put the most seldom used tools up at the top and the most commonly used tools in the midrange. The sometimes used tools go near the bottom.
I’m a 2-3 dentist/aircraft mechanic (work on my own machines) which places me pretty high on the anal-retentive scale. In the operatory of course we change out and sterilize between each patient. The carry over to the shop/hangar is I’ve found it is much more efficient if I put everything away at the end of the day. Even if it’s late at night and I’m totally spent and the project’s only half done I take 5 minutes (that’s all it takes) and clean off the work bench or cart so I can start clean & fresh the next morning. Leave the half done project in place but gather up all the tools, unused hardware and the general junk that’s accumulated during that work session and stow or trash it. My method for getting it done quickly is to just start gathering up things and saying to myself, “I know where this goes, I know where that goes, . . .”, and it really can be done in under five minutes. When you come back to it the next morning, or start the next project, you’ll know exactly where that tool is you need and it’s way easier to dive back into it, as opposed to being overwhelmed by the clutter and having to search for that thing you need to get started.
I was a Level 3 when I was a working mechanic. Now that I am strictly a hobbyist wrencher, I have devolved into a low end Level 2. There is a drawer for everything, but I generally have several projects going simultaneously and things don’t always make it back to the drawer
I have seen some pretty meticulous tool organizers, and I have seen people burn up a lot of time fussing with tool organizing – especially the ones who insist on continually doing it mid-project… I need a 10mm to take of the bracket… put the 10mm back. I need it again to take of the doohickey…
That describes me pretty well too. However I fall to Level 1 during extended projects; I leave the tools in the last place I used them because, well, because I’m still working on the car. A day or several go by and then I have to hunt for the tool I need at the opposite corner of the car or on the thing I removed from the car and am now fiddling with on the bench. I keep telling myself I’ll start putting the tools away each day, but so far that ain’t happening.
10 mm, you have only one???
I was a Level 4 a long time ago when I was a working technician. Time was money, and I could find any tool blindfolded with the other arm in the engine bay.
Still like that, more or less, but I’m not as finicky about putting tools away since there’s nobody else in the shop to steal them.
I’m a level 1 and 2, with a few socket rails mixed in. Also, I do refer to nose-blowing tissues as Kleenex, and all cotton swabs as Q-tips.
The only reason I am not a level 4 is I do not have a bigger tool box or garage.
Mostly 2, some 3. My COVID project was either going to be get to your level 4 in my tool chest, or digitize my large CD collection. I picked tunes…it took weeks!
Coming from a military aircraft maintence background, I use level 4 and do a visual tool inventory after each work session.
How else would I remember to retrieve that screwdriver that dropped down into some completely hidden nook?
I’m a low level 3 that stresses about achieving level 4 brilliancy! I used to be a 1-2; throw them all in a bag or tool box and go, but that got old when I stopped doing field repairs. I’ll just have to learn to live with level 4 envy for now… good to know where I sit in the Tool Hierarchy!
Yeah, I thought a tool bag was a great idea, until I used one…
Having always been a mechanic, raised in a generational family that lived by the adage “you take it out you put it back” I’ve been the 3+ my whole life and still am. I see the enormous value of time and not wasting it as
the main reason. Pride of work and respect of the tools as well. I sleep better knowing all my stuff is where it belongs and will be there when I need it again tomorrow. Added bonus that it will look good when I’m dead and it’s all being sold at the estate sale:)
Mine will all be out on the curb a week after the funeral, marked “25 cents each!”
B^)
Level 1 to 3, depending on the day of the week!
A mainstay of any “kaizen” event is the application of the “5S” method- Sort-Straighten-Shine-Standardize-Sustain.
When we do 5S- For the little ones that don’t lend themselves do a shadow board or cutting out foam we put them in a box, but require that the box have a laminated list of what belongs in the box. And you don’t add anything to the box unless you update the list
Kaizen!
Gesundheit!
I am a level 3 and will never be a level 4 for the reasons already discussed, plus the fact that I don’t want to make the time to do that level of organization.
One great solution that I use for projects, is that I use a roll-around shelf cart when I am working on a project. That way, when I use a socket, screwdriver, special tool, etc to take something apart, I put it on the cart because I know that I will need it again to put the item back together. That way I don’t have to keep going back to the tool box and trying to figure out if it is a 12mm or a 1/2″ wrench. I also don’t put anything on the cart that wasn’t used, i.e., I put that 1/2″ back in the tool box if the 12mm was the correct one.
The lower cart shelves are also great for holding parts that were taken off so they are handy when it is time to put them back.
Jake – I do something similar, and I agree that it serves several purposes. My favorite cart also has a cup holder in one corner that an insulated travel mug full of hot coffee fits into perfectly! For those moments when just standing back and cogitating over my next move are made for taking a swig… 😃
Level 4+
Just add a cup holder here:
https://sonictoolsusa.com/products/metric-and-sae-toolset-advanced-1183-pcs/?sku=N1511810K#product-details-area
That is genius level thinking. Another improvement I look forward to making. Thanks.
Totally agree about the project cart. I started using this method a few years back and it’s been super helpful for me to complete projects successfully. It’s gotten to the point that I use the project cart for almost anything I do around the house from automotive to gardening to painting projects.
I just use a 5 gallon bucket per working task. End of task back to level 3+ chest. Paused projects always back to the chest unless they are daily.
We have a HF cart to use under and around our lift when doing almost every project.
Holds all the tools you need within easy reach, and then wheel it back to the tool storage to put away when done. Would not be without at least one at the garage.
As a professional aircraft technician, it’s imperative to know exactly where my tools are (or aren’t). I had to buy a bigger toolbox to shadow all my tools at work. It certainly took a lot of time in planning where to put them! It took a bunch more time to do the deed. In retrospect, I’m glad I did it. The process wasn’t much fun, but I think it saves time in the long run.
I’ve carried a lot of this over to my home tools. It might not be quite the safety issue on my cars, but it can certainly save time, money, and frustration when you have better control over your tools. I even use torque seal on critical fasteners so I know that they are tight.
Because, FOD!
There are pills available for level 4 and above
… we could work WELL together sir …