Replace your wheel studs before you lose your wheels
In the interest of style, I removed the 13-inch steel wheels from my 1965 Chevrolet Corvair last year, but I have a confession: I didn’t replace the wheel studs, though the new alloy wheels were thicker, and thus, the lug nuts lacked proper thread engagement. After a year of driving around knowing it was a problem, I finally got around to addressing the issue. It was a simple fix in the interest of safety that I should have done months ago.
Thread engagement on items like wheel studs and lug nuts is critical. The threads take the rotational motion of turning the lug nut and create a linear force—the force used to hold the wheel in place. The number of threads engaged determines the holding strength. Too few threads creates a higher likelihood of the lug nuts coming loose or failing in catastrophic fashion.
Scary? Yes. Losing a wheel is not a fun situation. Fortunately, lug studs are fairly easy to replace. I started by pulling the wheels off, which is not normally my first step, but since I have been planning some suspension work, the Corvair has been on jack stands for months.


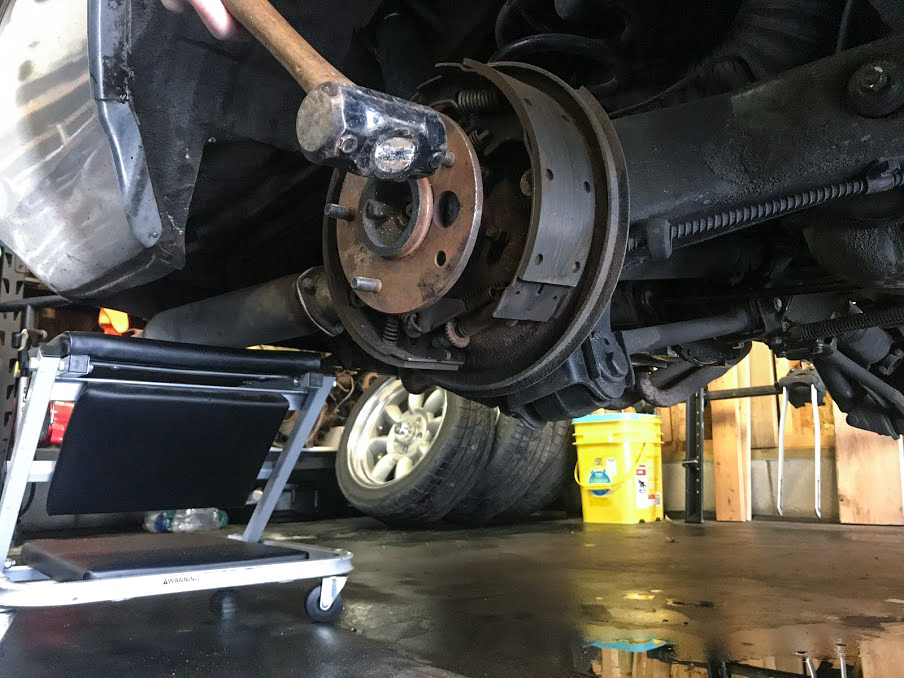
Next, I slid the brake drums over the studs. This gave me access to hammer the studs out of the wheel hubs and also to inspect the drum brake components. I have a tendency to let projects spiral out of control so this could have meant going deeper into the repair rabbit hole, but regularly inspecting brakes never hurt anyone.
A few of you readers out there might be screaming at the computer at my mention of hammering the studs out with the hubs still installed on the car. “The poor wheel bearings!” you cry. You aren’t wrong. The proper way is to remove the entire hub and use a press to remove and install the new studs, but I didn’t have that kind of time. Calculated risk.
Also, the shock load of hammering out these studs was minimal. They appeared to be original studs, and they popped out with just a few taps from a relatively small hammer. On most, the threads didn’t even deform. I also checked the wheel bearings after a few thousand miles of driving, before I started this project, and all appeared healthy.

With the hubs still installed on the car, I had limited access to the back of the wheel studs. Pushing the studs into place is not an option, so I had to find a way to pull the new studs in. An easy process; using the old lug nuts, I created a spacer stack of two washers and two oversized nuts. This ensured the stack stayed perpendicular to the hub surface, since crooked wheel studs are worse than too-short studs. I then grabbed my electric impact wrench and used old lug nuts to pull the studs into place. Why old lug nuts? Because the torque required to pull the knurling of the new studs into place can damage the lug nut threads, so just to be safe, I use an old set and when done send them to the recycler.
After about an hour of work, I was able to bolt up my fancy wheels and have the confidence that they are not threatening to fall off as I drive down the road. Which is good, because I plan on being in the seat more hours than I am under the car this year. Whether or not the car agrees with that plan remains to be seen.


