How to Use a Multimeter, Part 2: Measuring Voltage
Last week, we introduced you to the multimeter (“John, this is multimeter. Multimeter, this is John. John owns a vintage car. John really needs you.”) Today we’ll tell you how to use the multimeter to measure voltage—the most common of the three measurements a meter is typically used for, the other two being resistance and current.
For starters, let me explain a few big picture things about how a multimeter meter is used. As I said last week, a meter has to be configured for a specific measurement, which involves make sure: 1). the red-and-black probe leads are plugged into the correct sockets, and 2). the big rotary dial is turned to the corresponding setting. In addition to that, you need to determine whether the measurement needs to be taken with the circuit powered or unpowered, in parallel with the circuit or in series, and on the whole circuit or a portion of it.
I’ll quickly explain the permutations for all three measurements (voltage, resistance, and current) so you’ll become accustomed to them as we continue to discuss the Multimeter here and in future installments:
- A voltage measurement is taken with the circuit powered, in parallel with the circuit, on the whole circuit.
- A resistance measurement is taken with the circuit unpowered, in series with the circuit, on a portion of the circuit.
- A current measurement is taken with the circuit powered, in series with the circuit, on the whole circuit.
Print that, cut it out, and tape it to the wall somewhere.
You also need to realize is that usually when you take a voltage measurement in a car, you’re simply trying to verify whether or not 12 volts is present on a wire leading to a device.
Okay, let’s do a voltage measurement.
First, configure the multimeter to measure voltage. There are three configuration steps:
- Put the black probe in the socket labeled “COM” for “common,” meaning it’s common to all measurements. Once it’s there, it’ll never need to be moved.
- Put the red probe in the socket with the V. It’s almost certainly the one that’s also labeled with the omega symbol (Ω) for resistance.
- Turn the big rotary dial to the setting for DC voltage, which is a V with solid lines over it. It’s not the one with a wavy line over it; that’s for AC voltage (house electrical current). If you don’t have an autoranging meter, select the voltage range that’s above but closest to 12V. This is almost always the 20V range.
A multimeter configured to measure voltage (red probe in the “VR” socket, rotary dial turned to DC voltage setting).

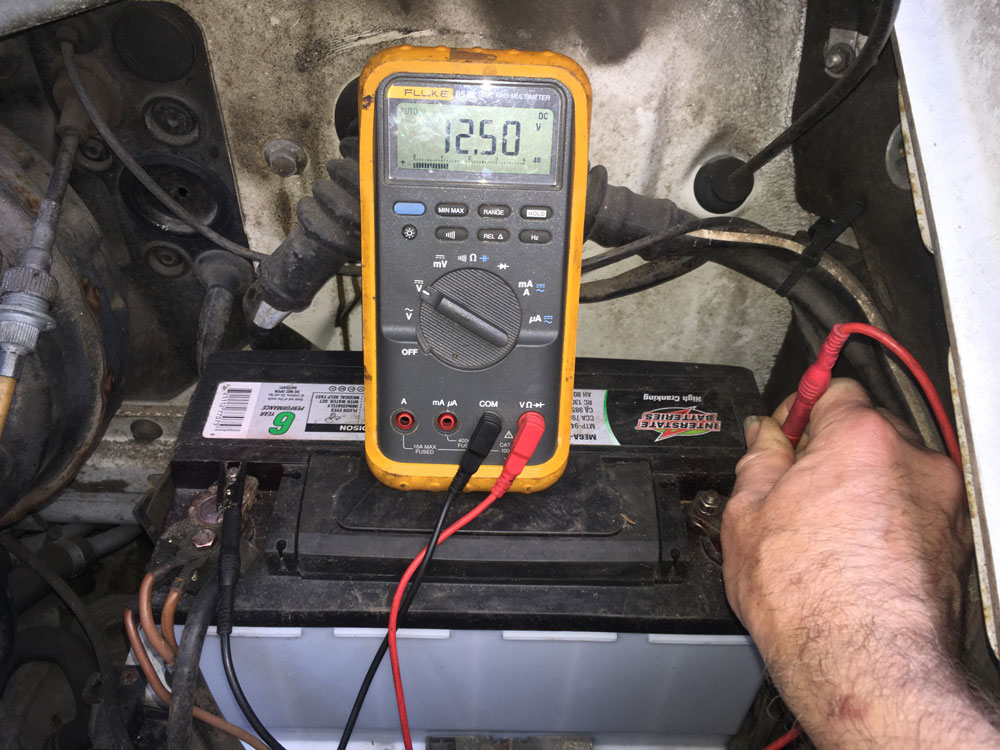
Next, test the battery, as that’s the simplest measurement you can take with a multimeter. Take the black multimeter probe and hold it against the negative battery terminal, and hold the red probe against the positive terminal. The meter will display the battery voltage. As I wrote several weeks ago, with the engine off, it should be 12.6V for a fully-charged battery, and about 13.5 to 14.2 volts with the engine running. Don’t worry if the probe leads are reversed; the meter will simply read a negative voltage.
Using a multimeter to measure battery voltage. This one is a tad low.

But wait a minute. Earlier, I said that a voltage measurement required a whole powered circuit. If all you’re doing is testing a battery, where’s the circuit? Why does that even work? That’s actually a very good question.
You have to understand that the way a multimeter measures voltage is that it actually completes a circuit. It has a very high internal resistance, like 10 megaohms (ten million ohms). When you connect a multimeter across a voltage source, that causes a tiny amount of current to flow through the meter. You can calculate it using Ohm’s Law:
I (current) = Volts / Resistance
= (12 volts) / (10,000,000 ohms)
= 0.0000012 amps. (Like I said, tiny.)
So, if there is no circuit, as is the case when you’re simply testing a battery, the meter creates a circuit. On the other hand, if there already is a circuit, the internal resistance of the meter is so high and the amount of current flowing through the meter is so low that the meter does essentially nothing to disturb the circuit. With that detour complete, let’s get back on the road…
Next, power the circuit you want to test. Voltage is only there to be measured when a circuit is powered. So if, for example, you’re trying to determine if a headlight is out because the headlight is bad or voltage isn’t reaching the headlight, turn the headlights on.
Hold the black probe lead to ground. The best ground is the negative battery terminal, but if you can’t reach that, use the nearest convenient chassis ground. Make sure it’s clean and you’re getting a good connection. This is the time when you wish that you’d bought that probe lead attachment set I encouraged you to buy, because then you can alligator-clip the black probe lead to the negative battery terminal and free up a hand.
Using an alligator probe lead attachment to hold the black probe to ground means that a measurement requires one hand, not two.

Hold the red probe lead against the point you’re trying to test for voltage. Again, if you’re trying to determine if voltage is reaching the low beam bulb, hold the red probe lead against an exposed metal terminal on the wire connected to the low beam.
An immediate question comes up: Does that wire need to remain connected to the headlight (or whatever) for the voltage measurement to work? Or do you need to pull the connector off and then touch the red probe to the detached connector? The answer is: It doesn’t matter. Because a voltage measurement is done in parallel with the circuit, the device—in this case, the headlight—can remain connected. A headlight connector is often open in the back, allowing you to reach in with the probe lead and touch the metal part of the connector. In either case, don’t jam the probe lead into the connector; just touch it. You don’t want to damage the connector.
You can leave the connector in place and hold the red probe lead against the terminal in the back of the connector that’s attached to the wire being tested (in this case the yellow one), or…

… pull the connector off and measure the voltage at the terminal in the front of the connector

Remember, most of the time, you’re looking for the presence or absence of 12V, so how much voltage should you see? Well, about 12 volts. What does that actually mean? Well, let me break it down like this:
- If you’re doing this with the engine off, the battery should be putting out about 12.6 volts. If you’re testing with the bulb disconnected, or if the bulb is connected but not working, you should thus see about 12.6V.
- If the engine is off and the bulb is connected and is working, the electrical load from the bulb will cause the voltage to sag, so instead of 12.6 volts, you might see between 11 and 12 volts.
- If you’re doing this with the engine running, the alternator and voltage regulator should be putting out about 14.2 volts. If you’re testing with the bulb disconnected, or if the bulb is connected but not working, you should see about 14.2V.
- If the engine is running and the bulb is connected and is working, the electrical load from the bulb will cause the voltage to sag, so instead of 14.2 volts, might see between 11 and 13 volts.
Any of the above readings indicates that battery voltage is present at the connector.
An example of normal “voltage sag” caused by the electrical load from the light bulb pulling the voltage from 12.6 down to 11.3 volts.

So that’s what I mean by “about 12 volts.” If you see numbers in that range, it means our low beam bulb is getting voltage, and if the bulb isn’t turning on, either the bulb is bad or there’s a bad ground, which we’ll cover next week.
If, however, instead of “about 12 volts,” there are very low numbers that are “about zero” (numbers like 0V, or 0.32V, or 1.1V), then the voltage is absent—12V needed to drive the bulb isn’t reaching it, and rather than replace the bulb, you need to troubleshoot why.
So that, in a nutshell, is most of automotive electrical troubleshooting—configuring a multimeter to measure voltage, connecting the black probe to ground, powering the circuit you want to test, and using the red probe to check for the presence or absence of voltage at a device that is malfunctioning.
Next week, we’ll cover using the multimeter to measure resistance and verify continuity.
Rob Siegel has been writing the column The Hack Mechanic™ for BMW CCA Roundel Magazine for 30 years. His new book, Ran When Parked: How I Road-Tripped a Decade-Dead BMW 2002tii a Thousand Miles Back Home, and How You Can, Too, is available here on Amazon. In addition, he is the author of Memoirs of a Hack Mechanic and The Hack Mechanic™ Guide to European Automotive Electrical Systems. Both are available from Bentley Publishers and Amazon. Or you can order personally inscribed copies through Rob’s website: www.robsiegel.com.

