The laborious DIY process of valve adjustment in a shimmed engine, Part 3
Last week I’d ordered and installed the new valve shims in my 1974 Lotus Europa Twin-Cam Special and was about to button things up when I realized that the cam bearing caps are held down by nyloc nuts. I routinely reuse nylocs as long as the nylon locking sleeve still feels like it’s biting the threads properly, but not this time.
Despite only having been installed last year, the nylocs holding the cam bearing caps felt weak, and the fact that they’re only torqued to 9 ft-lb gave me pause about reusing them. I re-read the cam installation section of Myles Wilkins’ Lotus Twin-Cam Engine, and he did stress the importance of using fresh nylocs. After all, they’re under the valve cover and subjected to oil and heat. Clearly this was the time to spend four bucks for a box of nuts and not have to worry that every time I wind the engine that the cam bearing caps may vibrate loose.
So, I put in an order to McMaster-Carr for a box of 20 Grade 8 5/16-24 nuts, not because I needed the strength of Grade 8 but because those were the only ones available in pretty yellow zinc to match the ones I’d removed. Hey, it’s the little things, right?
In the meantime, I figured I’d use the old nylocs to tighten down the cams, which needed to happen so I could measure the valve clearances and check if I’d gotten them right, put the gears on the cam faces and reattach the timing chain while making sure the cams were properly aligned to TDC, and rotate the engine to check the clearances. Interestingly, the Wilkins book recommends using non-locking nuts on the cam bearing caps for this initial fitting, as you may have to pull the cams multiple times before you get the clearances right.
I had what I thought was a novel idea that I could simplify this initial fitting process by rotating the block away from TDC to pull all four pistons down in the bore and away from the valves. I figured I could install one cam at a time, rotate it all the way around while doing the clearance measurement for the valves on that cam, replace any shims if I found that the measurements were out of spec, do the same for the other cam, and then rotate both cams to TDC and the pistons in the block back up to TDC. Then—when I was sure the clearances were in spec—I would attach the cam gears and timing chain.
However, when I posted this idea on two Lotus forums, I was told: A) You can bend valves if intakes and exhausts are fully extended at the same time and hit each other; B) There’s no easy way to rotate the cams, particularly the exhaust cam, against the pressure of the valve springs without the gears and chain on them (it’s not like other engines where the cam gear is held on by bolts so you can just partially thread the bolts in and turn the cam with a screwdriver between them); and C) If you measure everything carefully and reassemble the traditional way, it’ll probably be fine.
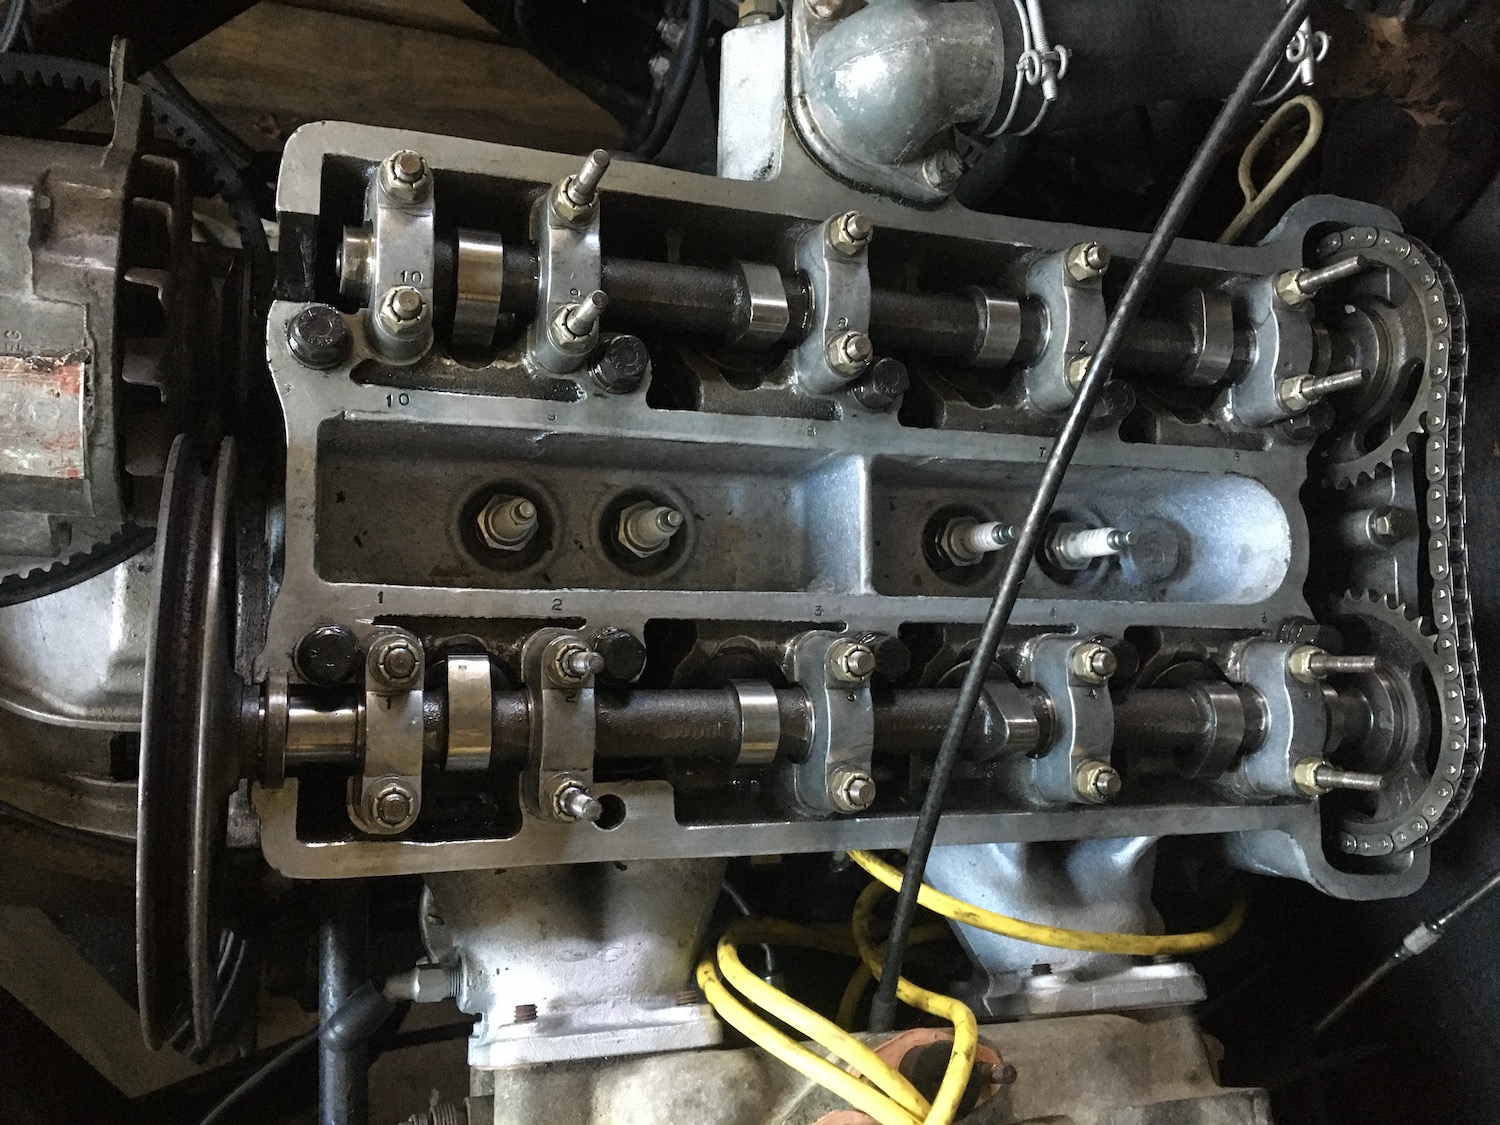
I took a deep breath and put it all together. I wiped down the cams and the bearing shells with a rag, squirted on a light coating of oil, laid the cams down as close to TDC as I could (given that some of the lobes press on the valve springs), and snugged down the bearing caps. As I described in Part 1 of this process, the pain-in-the-butt part is cam alignment. It’s not trivial to get the alignment correct even with the engine out of the car, and since the timing marks are on the front of the cam gears—and you can’t see the marks at all with the engine installed (the Europa is a mid-engine car, with the cam gears inches from the firewall at your back)—it’s challenging to do it as part of an engine-in valve adjustment. You can use a mirror to see the marks, but the parallax throws you off. I’d marked the alignment points on the backs of the cams with a straight-edge and Wite-Out, but the blobs were imprecise, and it still took some jiggering to get the gears onto their dowels on the cam faces and within a tooth of alignment. The intake cam can be rotated by grabbing the large pulley on the back that drives the alternator, but rotating the exhaust cam to get things to line up is challenging. I couldn’t budge it by twisting the cam gear on the front.

Not sure of what else to do, I took a pair of Vise-Grips, carefully clamped it around one of the non-machined sections of the exhaust cam, interposing a piece of rubber inner tube so I wouldn’t gouge the cam, and rotated it into position. I was certain that this was the biggest ugliest hack I’d done in years, but later, when I was re-reading the section in Wilkins book on head installation, I laughed when I saw the following passage: “All the marks should line up correctly. If incorrect… with a pair of locking grips, carefully grasp the camshaft and turn it slightly so the sprocket can be attached to it again.” As they say, necessity, she’s a mother.

With the valve train temporarily assembled, I rotated the engine with a socket and a ratchet handle a few times to make sure it turned over freely and that the alignment of the timing marks still appeared good. I then got the go/no-go feeler gauges, using the .009 to .011 blade for the exhaust valves, and .005 to .007 for the intakes.

And… all the intake valves were good (that is, the tip of the blade slid in, but it stopped at the step). However, the #4 exhaust valve was clearly too tight. The tip of the .009 to .011 blade wouldn’t even go in. I had to back off to the .008 to .010 blade to take a measurement and even that felt a tad snug.
Damn!
I checked the tables and calculations I described last week. Unless I’d written something down wrong, the original measured clearance was .007 to .009, the original shim was .0886 as measured with the micrometer, so I needed a shim that was .002 thinner to bring the clearance to .010. When you order shims, they’re rounded to the nearest thousandth, so I’d ordered a .086 shim. Its actual thickness was .0865. It was likely a series of additive errors that caused the valve to be too tight, but whatever the reason, too tight it was. The cam had to come back out, and I needed a thinner shim.
I hated to have to wait the four days it’d take to order another valve shim, and wondered if I could simply shave the one I already had by a little over a thousandth. I spent a few hours poring over websites for vintage cars that use shims. The consensus on filing, shaving, or grinding valve shims seemed to be: A) DIY mechanics do it all the time, B) If there’s concern about cutting through the hardened shim surface, the hardening probably goes deeper than the thousandth or so I was talking about shaving; and C) It can be done with emery paper or crocus cloth on a flat surface, lapping in a circular motion, and rotating the shim frequently to help ensure even shaving. On the Lotus head, the actual contact surface with the valve stem is a spot in the center of the shim about the size of a pencil eraser, so I wasn’t terribly concerned that I might shave it unevenly.
So, although I hated to do it, I pulled the cam gear off the exhaust cam, hung the timing chain back up on the coat hanger, undid the bearing caps, and carefully pulled them off, mindful of not dropping a bearing shell into the engine compartment. I then pulled the cam up and out of the head, swung it out of the engine compartment, heard an alarming little tink, and realized that I hadn’t taken the same care with the bearing shells UNDER the cam, and one of them had lifted out, stuck to the cam, and dropped on my disgustingly filthy garage floor, and skittered off into some crevice.
Crap!
I spent a few anxious minutes with a flashlight until I found the errant bearing shell. I cleaned it off, inspected it, and, other than a little running-in wear, it looked OK. I didn’t see any obvious damage from my carelessness. Whew!

I then parked myself, the shim, the micrometer, and some emery paper in front of the television. After about 40 minutes, I’d taken a little over a thousandth off the shim.

The bucket tappet, cam, and bearing caps went back in. I reinstalled the cam gear and timing chain. This time the alignment process took only minutes, as I was less shy about muscling the cam around with a Vise-Grip. I re-measured the clearance on exhaust valve #4, and this time it was in spec; the .009–.011 blade slid in and stopped at the step. I re-checked all the others for good measure, and they were fine.
Yes!
I buttoned up the valve train, replacing the old nylocs with the pretty new zinc ones and tightening them down to 9 ft-lb with my little torque wrench. And I torqued down the nuts holding on the cam gears, although with the scant clearance between them and the firewall, it was challenging getting the torque wrench on them.

Lastly, on went the valve cover (for now, I’m re-using the original gasket in case I need to quickly pull the cover back off), and in went fresh oil.

But when I went to find the oil cap, it was nowhere in sight. This was odd, because the cap is tethered in place with a little cable. Of course, as I thought about it, it’s tethered to one of the valve-cover studs, so with the valve cover removed, the tether doesn’t prevent you from misplacing it, which I did. I searched in ever-widening circles, laboring on the rational construct that it’s got to be somewhere. Of course, we all know that that’s not true; to quote the old Kliban cartoon, sometimes things really are squirted out of the universe like a watermelon seed, never to be seen again. As I did when I dropped the bearing shell, I got down on hands and knees on my filthy garage floor. I eventually found the cap cowering beneath two uninstalled fluorescent bulbs.

And, with that, I am no longer a valve shim newbie. Although this began as a routine 700-mile-post-rebuild valve adjustment, I discovered and corrected an intake valve that had closed to the point where it had almost zero clearance, so finding and fixing that alone moved the exercise from routine maintenance to likely preventing engine damage.
Start to finish, it took me about three weeks. Much of that was because, being my first time, I was hyper-careful. And the time frame was stretched out because the car is off the road for the winter months and I was happy to work on it a little each night. I’m sure that next time I could knock it off in two or three sessions. Still, it’s a far cry from the 20 minutes it takes to do a valve adjustment in an engine with rockers and shafts.
Lastly, if you do this on your car, make sure that you record, clearly, in a place you won’t lose, the thicknesses of the installed valve shims. That way, in theory, the next time you check the valve clearances and find that they need adjustment, you can do the calculation for required shim thickness and order any needed shims without first removing the cams to find out what’s in there and have to wait for delivery of new shims to button things back up.
Of course, in practice, the shim thickness may change due to pounding from the tip of the valve stem, but it’s worth a try.
***
Rob Siegel has been writing the column The Hack Mechanic™ for BMW CCA Roundel magazine for 34 years and is the author of five automotive books. His new book, Resurrecting Bertha: Buying back our wedding car after 26 years in storage, is available on Amazon, as are his other books, like Ran When Parked. You can order personally inscribed copies here.

