How to Use a Multimeter, Part 1: Introduction
First, thanks for all the comments, both here and on my Facebook page, about the piece on Electrical Safety two weeks ago. I felt that, if I made it short and kept to the important stuff, people might actually read it, and apparently I was right.
As several folks pointed out, I did, however, leave out two important bits of battery safety:
- When removing or replacing a battery, always undo the negative battery cable first, and attach it last! The reason is this: If you’re undoing the negative cable, and the wrench slips and touches the body of the car, the body is already attached to the negative battery post, so the wrench isn’t completing a new circuit, so no additional current will flow. In contrast, if the negative cable is still connecting the negative post to the body, and you’re undoing the positive cable and the wrench slips and touches the body of the car, the wrench will complete the circuit from the positive terminal directly to ground, creating a massive and immediate short circuit that can badly burn your hand.
- Don’t set any tools down on the battery! It’s tempting because it’s a convenient flat surface, but tools can easily create a short between the battery terminals, or between the positive terminal and the body of the car.
With that, let’s continue our electrical series and introduce you to your new best friend: The multimeter.
Introduction to The Multimeter
The multimeter is the quintessential tool for dealing with electrical problems in a car. A few weeks back, in in our introduction to electricity, we said that there were three main electrical parameters: Voltage, current, and resistance. A multimeter is the tool to measure these three parameters. In fact, it’s actually three tools in one:
- It’s a voltmeter that measures voltage.
- It’s an ohmmeter that measures resistance and continuity.
- It’s an ammeter that measures current.
Originally, these actually were separate pieces of electrical equipment, but for nearly a hundred years they have been combined together into the multimeter. Multimeters used to be analog instruments with a big swinging needle, but digital multimeters supplanted analog ones many years ago. We will call them multimeters or simply “meters,” but they are also called “digital multimeters” (DMM), “digital volt meters” (DVM), and “digital volt ohm meters,” (DVOM, and no, it doesn’t stand for “digital volt’o’meter,” even though that’s funnier).
What Kind of Multimeter Should You Buy?
Let me say this straight out: Most electrical troubleshooting consists of verifying the presence or absence of voltage, and the presence or absence of continuity (and we’ll tell you how to do that in upcoming articles). Any multimeter will let you do these two things.
Now, you can go to Harbor Freight and pay $5.99 for a perfectly functional multimeter—and I have several of these so I can leave them in the glove compartments of several cars and laugh if they get stolen—but really you should pay more like $25 and get an autoranging multimeter. Here’s why.
If you look at the photograph below of the $5.99 Harbor Freight special compared to an old meter I have, you’ll immediately see that the big dial in the middle of the $5.99 meter has many more choices. This is because the $5.99 meter does not have autoranging—that is, you have to manually set its range of values. If you are using a non-autoranging meter to measure voltage, you choose the range closest to the 12 volts in the car’s electrical system, which is usually the 0 to 20 volt range. But, generally, rather than spend $5.99 for a non-autoranging meter, it’s better to spend perhaps $25 for an autoranging one, so you can just turn the knob to voltage or resistance or current or whatever you’re trying to measure and have the meter determine the proper range.
The Harbor Freight $5.99 multimeter (left) does not have autoranging, and consequently, its center selection dial is cluttered with options. In contrast, any autoranging multimeter (right) has a much simpler dial.

Another desirable feature is an audible beep to confirm continuity. Every meter except the least expensive ones will likely have it. That way, you don’t need to look at the meter when you’re tracing out a wire; you can just listen for the beep (we’ll get to this in a later article).
If your car has a conventional points-based ignition, a meter with a capacitance measurement is useful for checking if the ignition condenser is bad. If your car doesn’t have points ignition, don’t worry about it. Even if it does, there are other ways to test the condenser. It isn’t that big of a deal.
A meter with min-max capability—the ability to log a certain amount of data and report the minimum and maximum values with the recorded segment—can be handy, but it’s rare that I use it.
A word about Fluke multimeters. Fluke is like the—choose your favorite automotive superlative (Porsche, Cadillac, Ferrari, BMW, whatever)—of multimeters. They make a very high-quality, long-lasting, reliable product. I have several Flukes that I’ve inherited from my 30 years in engineering. But just like a do-it-yourselfer doesn’t need Snap-On tools, a do-it-yourselfer doesn’t need a Fluke meter. It’s like anything else. Set yourself a budget, and buy an autoranging meter within that budget. Don’t not buy a meter because it’s Fluke or nothing. Buy a cheap meter, and if you also want a Fluke, buy one when you have the dough.
How Accurate does a Multimeter Need to Be?
If you are an electrical engineer or a technician who will also be using a multimeter to test and repair printed circuit boards or electronics, then you need an accurate meter. But, again, most of automotive electronic troubleshooting involves verifying the presence or absence of voltage and the presence or absence of continuity, and any multimeter is accurate enough to do this. It really doesn’t matter if the meter reads 12.6 volts or 12.5; what matter is whether it reads 12.6 volts or zero.
What are “Automotive Meters?”
For basic automotive troubleshooting, you’re simply trying to measure a static signal (that is, a signal that isn’t changing). However, in the 1980s, cars began incorporating Variable Reluctance Transducer (VRT) sensors such as ABS wheel speed sensors and crankshaft position sensors that output a sinusoidal wave whose frequency varied with speed. In the 1990s, these sensors were largely replaced with Hall Effect sensors that output a square wave. To test these, you need a multimeter that is capable of detecting these sine wave and square wave signals and reporting their frequency (and, in the case of square waves, the pulse width and duty cycle). This is sometimes referred to as an “automotive meter,” but there is no standard definition of the term, so it is possible to buy something with the phrase “automotive meter” printed on it that doesn’t do what you think it should. This is a complicated subject that is covered extensively in my book The Hack Mechanic Guide to European Automotive Electrical Systems. If you own a vintage car without ABS or fuel injection, don’t worry about it.
And “True RMS” Meters?
This is a term that has to do with how well a meter distinguishes between square waves, sine waves, and other time-varying signals, and how well it reports parameters like amplitude and frequency. If you’re trouble-shooting sensors that output time-varying signals, or systems with household 120 volt alternating current (VAC), it can be very important, but for the static 12V DC environment of a car, don’t worry about it.
Probe Lead Attachments
Any meter will come with a pair of red and black probe leads, but in addition, it is incredibly handy to have a set of attachments. For about fifteen bucks, you can buy a probe lead kit that has a number of attachments that plug into the ends of the probe leads. By far the most handy is a set of alligator clips that let you attach one of the probe leads to either the measurement point or to a ground location on the body of the car, allowing hands-free measurement. Also valuable is a set of thin pointy probe tips that allow you to back-probe connectors while they’re still plugged in.

An inexpensive set of probe lead attachments.

The two most useful probe lead attachments: Alligator clips and back-probe pins.
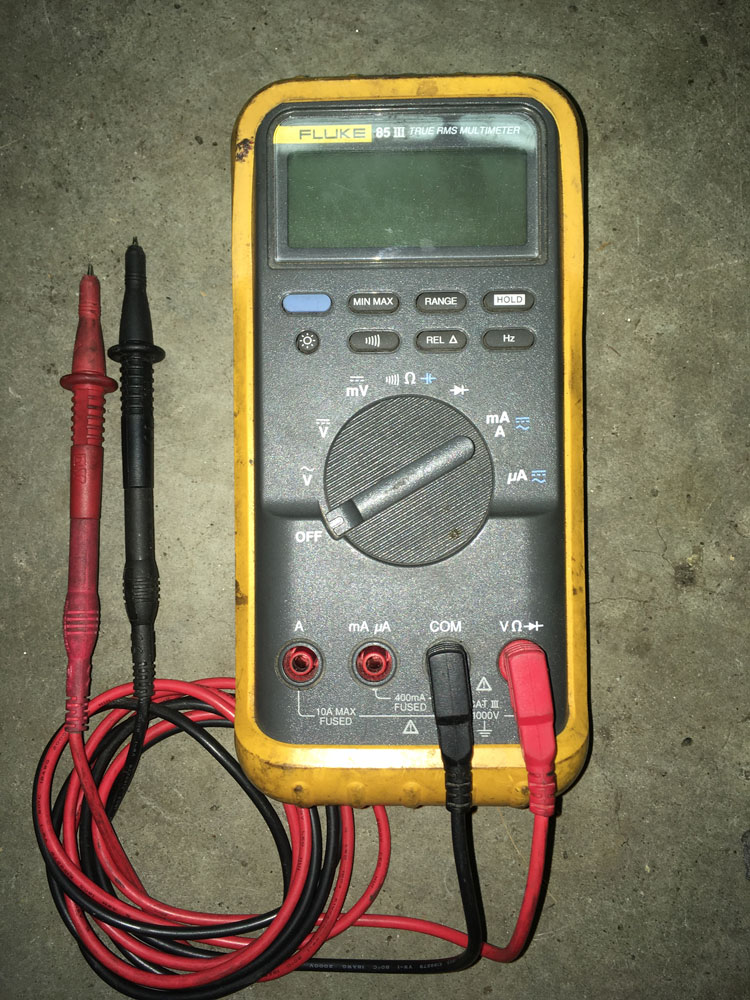
The Anatomy of a Multimeter
Every multimeter has the following four main areas:
- The display at the top of the meter showing you the measured value.
- The option buttons just below the display.
- The big rotary dial in the middle of the meter used to select the basic measurement.
- The sockets at the bottom used to plug the black and red test probes into.
The thing to remember is that, in order to take a measurement, you need to twist the dial to the correct setting and have the probe leads in the right socket and possibly hit one of the buttons.

The familiar layout of a multimeter with display, option buttons, rotary dial, and plug sockets.
With this introduction out of the way, next week, we’ll actually use a multimeter to take some measurements.
Rob Siegel has been writing the column The Hack Mechanic™ for BMW CCA Roundel Magazine for 30 years. His new book, Ran When Parked: How I Road-Tripped a Decade-Dead BMW 2002tii a Thousand Miles Back Home, and How You Can, Too, is available here on Amazon. In addition, he is the author of Memoirs of a Hack Mechanic and The Hack Mechanic™ Guide to European Automotive Electrical Systems. Both are available from Bentley Publishers and Amazon. Or you can order personally inscribed copies through Rob’s website: www.robsiegel.com.


Great article on this most useful of tools. I have a multimeter, but have never been able to use it effectively. As someone who obviously has some kind of electrical learning disability, through reading this article I’m finally starting to understand the multimeter. Very much looking forward to the next article for some hands-on visual demonstrations. Well done Rob.