Get Organized With a Tool Board
If you’re a tool junkie like me, the first New Year’s resolution on your list for 2006 is probably to find a better way to organize your tools. You can run out and buy that Carroll Shelby signature edition three-stacker tool chest for about $3,500 or you can put about $350 aside to build a tool board for your garage or shop. When you’ve finished your tool board, you’ll be able to find whatever tool you need at a glance, know which tools are missing, and have a tool organizer with a funky old-fashioned look that complements the classic styling of your car.
Properly designed and built tool board is like a piece of automotive art. It’s much more than a piece of pegboard and some snap-in-place hooks. Pegboard might work in an ordinary person’s garage, but it wouldn’t survive very well in the shop of a serious restorer. First, pegboard tends to warp fairly easily. Second, it’s a material that naturally collects dirt and doesn’t clean well when it gets dirty. Third, a heavy breaker bar, a large pipe wrench or a sledge hammer hung on pegboard can break the fiberboard or even bend the hooks. A pegboard looks nice the day it’s first hung, but usually doesn’t look the same a year later.
That’s why mechanics prefer a tool board. In fact, they are often seen in schools where mechanics learn their trade. McPherson College, in McPherson, Kansas, is nationally known as the only school that offers a bachelor’s degree in Automotive Restoration Technology. And McPherson has a nice assortment of tool boards. The mechanics at the Mercedes-Benz Classic Center in Stuttgart, Germany, also have tool boards in their shop. In fact, some of them are built like folding cabinets and roll on wheels.
Bill Kroseberg, an Automotive Technology instructor at
In a home shop, standard 4×8 sheets of ½-inch ACX plywood will do fine. This type of plywood is a bit smoother on one side for a nice look. You’ll want to stain it with an oil satin poly-coating. Molding to frame the edges of the tool board is optional.
If you know the spacing of the studs in your garage or shop, you can attach the stained plywood panels to the walls by driving 2 ½-inch course drywall screws into the studs. If you can’t find the studs, wall anchors will be a good idea. The tool board will be carrying a lot of weight and needs to be securely attached. If your shop has wood or concrete walls, different attaching methods will be required. Check with the experts at your building supply store.
If you’re going to frame your tool board with molding, it can be attached with good quality wood glue. You may want to use small finishing nails to make sure it’s securely attached. Drill guide holes before nailing, as wood molding splits easily. Using a miter box to get frame-type corners is a nice touch if you’re going for appearances.
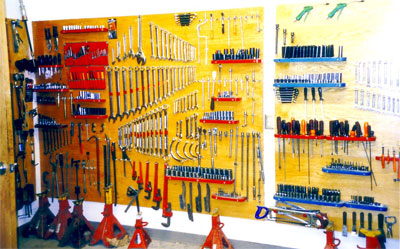
Once the wood paneling is prepped and mounted on the wall, the fun begins. Many methods can be used to build shelves and racks that hold different tools on the board. Many tools like box-end wrenches and C-clamps can simply be hung on nails. Small shelves can be made from lumber for other tools. A set including different size hole saws that attach to your drill can be purchased for $6 or $7. You can cut the proper size holes in your shelves to hang screwdrivers, files, socket wrenches, pliers and other tools.
Many tools sold today come in their own plastic cases or holders that can be mounted directly to the tool board with drywall screws. In fact, it’s common for plastic cases to have keyhole-shaped slots on the back. The wider portion of the slot (on the bottom) fits over the head of a screw, and then you pull it down so the narrow portion is locked into place by the screw head. Tools such as punches and chisels come in pocket pouches that you can mount directly to the tool board with screws. When doing this, be sure to drill guide holes to try to keep the plywood from splitting.
Tools such as open-end wrenches, socket extensions, ball-joint separators and pry bars can be attached to the tool board with store-bought spring clips. Hammers can be hung through holes drilled in a wood shelf. Socket wrenches can be attached to store-bought organizer bars that can then be attached to wooden shelves. The organizers usually have holes on one or both ends to slip over nails. On the other end, you can use a loop or bracket to hold the handle of the organizer bar.
Planning the arrangement of tools on your tool board is an important part of building one if you want everything to be organized when you’re done. If you can find a school or business in your area that uses a tool board, call for a visit to check it out. Seeing how it’s organized will help you plan better when building your own.
Some tool boards have outlines of tools painted on the board. These images come in handy when a tool is missing. “The shop teacher can tell at a glance when a student forgot to put a tool back,” says Kroseberg. “That’s one thing we didn’t do when we built our tool board and I’ve always regretted that – it’s a very nice touch.”
Building a tool board isn’t a quick project; it’s a job that takes a lot of thought – a job you can savor for weeks while the snow is falling. And by the time your ready to give your collector car its spring service, your tool board will be done and you’ll be glad you’re organized.
John “Gunner” Gunnell is the automotive books editor at Krause Publications in Iola, Wis., and former editor of Old Cars Weekly and Old Cars Price Guide.

