Five of the most important things I learned on my first lathe, a 1925 South Bend

Lathes are one of those tools of the promised land that you dream of for years. By the time one comes into your life, there’s probably already a list of ideas brewing on how to make small, round objects out of larger—also usually round—objects… Well, sure, that’s probably a gross oversimplification of the lathe’s machining process, but that’s the simplified beauty of these machines. They’re centuries old now, used in the production of anything from table legs to canons, and their utility goes beyond the custom parts you can imagine until it’s right in front of you. Need to shorten a bolt? Bam, the lathe. Weird replacement A/C clutch not fitting? Chuck it up, lathe down the hub and fix the problem without another trip to the parts store to gamble with another clutch. With a lathe, it’s easy to make or modify components precisely, and it can also be a game-changer on just about any project. The trick is that its learning curve is steeper than the Grapevine and comes with harsh consequences for failure—to both you and the machine.
I came into a crusty, seized-up 1925 South Bend C9-10 Jr., recently. Underneath a crumbling plastic tarp in the Arizona sun, the change gears and carriage had begun to rust. The spindle could rotate a bit, though the crunching from deep inside the machine asked for patience. For a few weeks, I had worked penetrating oil in, dropping heavier machine oil in the bearings. There was more risk in spinning it dry than anything else, but eventually, it could be coaxed into a few care-free revolutions by hand.

Once I plugged it in and hit the power switch for the first time, I had no clue the slippery slope I was about to hop down. The most obvious thing you need is practice time, there’s just nothing that replaces hands-on experience, but to get there you’ll need a good foundation to work on when it comes to picking up your first lathe.
1. Tools
Lathes are machines in the truest sense, they’re complicated and slightly cantankerous with several moving parts that require their own set of tools to support their use. We’re not talking cutting tools and the like just yet, but the box full of Allen keys, wrenches, screw drivers, and whatever else is needed to operate the lathe. This is a secondary investment too, you can always pull what you need from the general tool box, but over time, the lathe grows its own dedicated pile of tools so that everything is in close reachso you won’t need to wander off in search of a tool to continue the project.

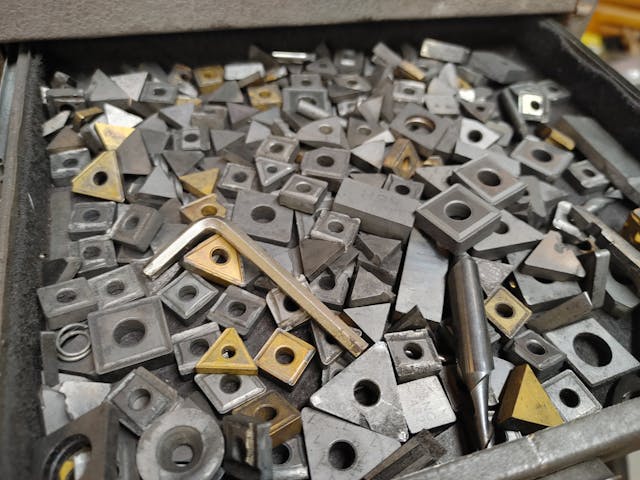
The tooling itself —the sets of cutters, drills, and fixtures that shape the part—is probably another story in itself, but I’ve found the best way to affordably stock up on a variety of pieces is to buy out old tool boxes from retired machinists. They’ve spent years perfecting a toolset, weeding out superfluous things, and finding every other useful bit of tooling for any given situation. The key things you’ll want to start with are basic cutting tools for exterior shaping (tool steel bits are cheap and can be resharpened when dull, but buy into insert tooling as the need arises for faster cutting speeds), centering and drilling tools for boring holes, and a parting tool for cutting off the final piece—at a bare minimum. You’ll also need a basic pair of dial calipers to start, though it won’t be too long before you start to dive into hyper-accurate dial indicators, bore gauges, and micrometers.
Chips, the pieces of metal that are removed from the part during the machining process, are also a chore to clean, trash, and dispose of. There’s a catch pan (old baking sheet) under the lathe for catching chips, I have a pair of needle-nose pliers for grabbing birds nests, use mechanics gloves during post-work clean up to prevent cuts, have a dedicated broom for sweeping chips (so they don’t spread to other areas of the home or shop space), and use extra-thick trash bags to prevent tears.
2. Maintenance

Just like any mechanical system on your project car, lathes require maintenance and occasional cleaning too. This will be a little more case-specific to your exact machine, but for this early 1925 South Bend, it needs an oiling routine on top of the usual clean-up that goes with machining tools. This required purchasing a handful of industrial oils and greases, hand-oilers for dispensing them, and various sizes of paint brushes too. Newer lathes may be less needy, but the South Bend demands a routine to maintain its smooth operation with oil-film bearings and to prevent unusual wear that could lead to sloppier parts. About a dozen lubrication points are hit, before the ways (the rails upon which the carriage and tooling slide) get a light coating of heavy oil for the carriage’s oil-retaining felts to soak up. From there, periodic checking of oil cups on the spindle and motor counter shaft, along with the occasional squirt in the lead screw bearings becomes just another operation in your machining process. Once the project is complete, the lathe is brushed clean of chips and made to be as spotless as possible before a final round of oiling—these kinds of things stack up over time in operating costs, though the extra time is relatively cheap compared buying another machine.
3. Safety!
If you don’t already have genuine respect for machine tools, look up “lathe accidents” on your favorite video hosting site and prepare to be shocked at the incredible power these workhorses have. A big chunk of mass spinning at high RPMs behind a gear-reduced motor has little concern over reeling your arm in like a fishing line and generally ruining your day from there on out. Still not enough? Search up images of rusting pieces of metal in the whites of people’s eyes, chips machining—yeah, buddy. Lathes demand respect that many handtools don’t thanks to the inherent traits of their capabilities, so extra attention goes into having the right routines and gear. Safety glasses are cheap insurance, sleeves must be short, wild hair has to be tamed, gloves are generally a no-no, and total situational awareness is of the utmost importance.
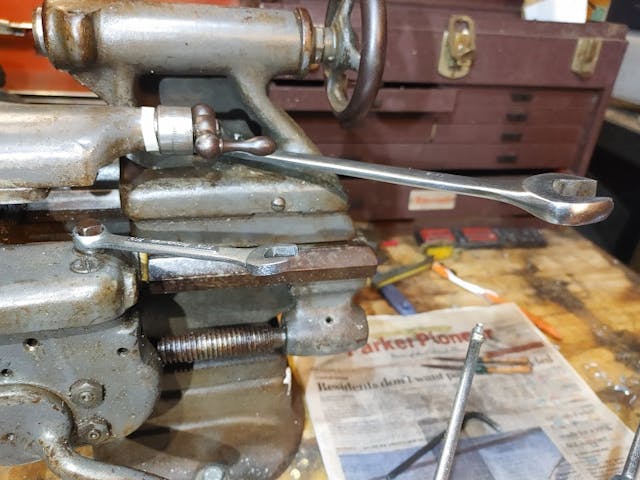
Routines build up a subconscious checklist, so it helps to do every machine operation as consistently as possible. Take the chuck, for example. If I need to loosen or tighten it, I’ll always pull the belt tensioning handle and put the lathe in neutral by disconnecting the motor from the spindle. On the lathe’s bench, the chuck key has a hole drilled in the table just for it to sit in, right by the power switch. The routine is to always pick it up and place it down there, never leaving it in the chuck. These little habits are there so that the result of the routine leaves the lathe in a “safe” state of being, bumping the switch won’t accidentally power the lathe while handling it, the chuck key won’t be in the actual chuck when you power it up—potentially jamming the machine or simply moon-shooting the T-handled projectile in any given direction.
4. Upgrades

No machine is perfect, however. Most often too, you’ll be picking up something vintage. Decades-old machines are what most people come into as their first lathe. Research into the lathe you’re buying, find out if there’s any immediate upgrades that need to be budgeted for, or what things are mere conveniences. For the South Bend, a quick dig of the McMaster Carr bible will bring up a bearing upgrade that replaces a fiber washer with a needle roller thrust bearing. The fiber washers wear away and mine needed to be replaced, but this upgrade eliminates one maintenance item (having to adjust the tension of the spindle on that washer as it wears) while also providing a little more stiffness to the overall assembly. For cheaper mini-lathes, there are also upgrades to bearings, change gears, and other minor fixes that help to solve many of the budget-focused issues they have.
Once you get down the rabbit hole of variable speed motor controllers and digital read-out kits, the wallet begins to get wrung out, but there’s little functional difference at the end of the day between an old and new lathe for the home shop, so if the value proposition is right, adding modern features to vintage machines can really bring up the bang-for-the-buck. If the lathe can meet your tolerances consistently, they’re worth that extra investment down the line, with many upgrades being transferable to a new machine as you upgrade.
5. Research

New to machining? Besides looking for local technical classes, YouTube is a surprisingly great resource. The community of machinists who have contributed to this mineshaft of video on all aspects of the work has done incredible work in bringing the barrier of entry down for machining, with channels like Blondihacks, Joe Pieczynski, Tubalcain, Keith Fenner, and This Old Tony working as great starting points for you watch-and-learn types. For my South Bend, the company released a series of books over the years titled How to Run a Lathe, which gets into machining technique as well.
You’ll also want to know as much about the machine as possible too, what service parts to have around, oils, and other considerations. You might get lucky on YouTube here, I was able to find guys like Halligan142 that documented their South Bend upgrades and maintenance; but the real stuff to dig up are the factory books on the machine. Having a line on replacement parts, maintenance intervals, and assembly diagrams can make a huge difference in how quickly you get a handle on a new-to-you lathe.

