Diagnosing (and solving) distributor problems
In comparison with modern cars and their solid-state ignition systems, the distributor has to be one of the most infernal parts of an older engine. If not regularly checked and maintained, it can cause all kinds of problems, like poor starting, misfiring, low power and, er, being stuck on the side of the road. The distributor is both a crude and at the same time, elegant way of “distributing” high-tension current (many thousands of volts) from the coil to each spark plug at precisely the right time. It also contains the contact breakers (points) and condenser which, between them, work with the ignition coil to generate the high-tension current which creates each spark.
To understand more about how that works in detail and what each bit does, have a look here at how to maintain your car’s ignition system, but here’s a quick summary. Points inside the distributor open and close triggering an high-tension (HT) current in the coil, which is transmitted back to the distributor and then out to each spark plug via a spinning “rotor arm.” The distributor, then, is doing two jobs simultaneously and has two separate electrical circuits passing through it.
One is a low-tension (low voltage) circuit which includes the points and the ignition coil, fed by electricity supplied from the battery (usually 12 volts). The second is an HT current which passes from the coil, to the distributor cap, to the spinning rotor arm then straight back out to the plugs via contacts in the cap. The coil end of the circuit and the spark plugs are earthed to close the circuit, but to complete that circuit, the HT current must jump the gap in a spark plug.
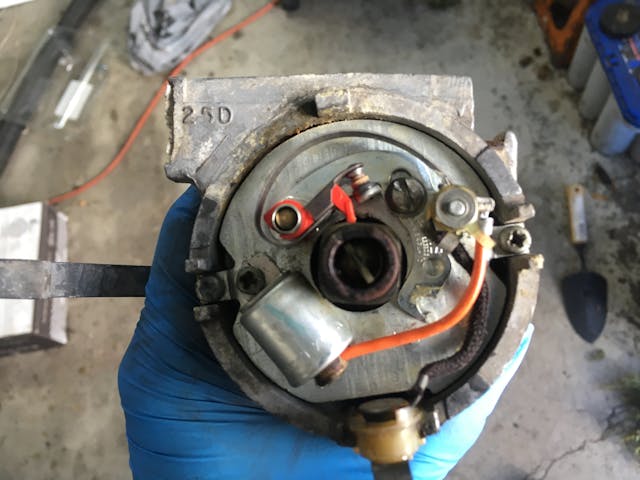
The distributor consists of an outer casing, a cap made from an insulated material, a rotating shaft running through it topped by a rotor arm, a movable plate carrying the contact breakers, a condenser, some bob-weights and springs and a small external vacuum chamber which on Lucas designs, looks like a flying saucer.
It works like this: The points are opened and closed by a cam on the shaft with the same number of lobes as the number of cylinders. As it rotates, the points open at each lobe triggering a spark at one of the spark plugs and firing one of the cylinders. The cam is connected to bob weights and as the revs increase, the bob weights move apart against small springs, twisting the cam in relation to the shaft and advancing the timing of the sparks as the engine speeds up. The vacuum chamber is connected to the engine inlet manifold and if the driver opens the throttle to develop more power, the pressure drops and this also advances the ignition.
Several things are critical to keep this lot working as it should. One is that the points are adjusted to the correct gap when fully open. They are opened by an insulated heel touching the cam and as this wears the gap will close. This will affect the length of time they are open and consequently how well the engine performs, starts or runs at all. There’s usually a felt pad clipped against the cam which should be moistened with a light oil. If this is missing, or not maintained, the heel of the points can wear more quickly. Checking the points is something that on a classic is worth filing under “routine and regular maintenance.” If the spark is weak, the engine is rough under load (working hard) or higher revs, or the points are badly burned, or the condenser could be failing. It’s worth replacing this as a matter of course or at least having a new one as a spare.
The distributor cap must be in good condition, dry, and most important, be free of any cracks and securely clipped to the metal casing. The rotor arm should also be in good condition and the contact on it, which relays the spark to the contacts in the distributor cap, should be in good nick and not excessively burnt. The HT current from the coil is transferred from the distributor cap to the rotor arm in the first place, by a spring loaded carbon contact. Make sure this is intact and in good shape.
Really knackered distributors may need more drastic work and should be completely stripped, inspected and rebuilt as a matter of course in a full engine rebuild. Things that can go wrong are worn shaft bearings (normally bronze bushings) so that the shaft flails around when rotating. This is an absolute no-no as the points gap and opening duration will be changing on the fly. Similarly, the shaft can be badly worn and need replacing along with the bushings.
The springs holding the bob-weights together must be exactly the right part for that distributor as their characteristics control the rate of advance of the ignition as the engine speeds up. If one is broken or they’re weakened with age, the ignition will advance too far too soon. During the rebuild of my 1968 Mustang project, the distributor didn’t look too bad from the outside but when I stripped it down, one of the two springs had been randomly replaced with one several times stronger. This would have prevented the ignition advancing as it should and—as well as reducing power—could have caused overheating. The fix was to track down exactly the right part number springs for that distributor and engine, something that was easier than it sounds.
Bushings can be replaced, either in the home workshop or by a machine shop and are available for many common distributors along with the other parts. There are specialists who will do the job for you or alternatively, brand new replicas are available for some older classics at the cost of originality. A freshly overhauled distributor will give long service, but don’t forget to keep an eye on that points gap!


Toyota hilux bakkie swing but not starting. Distributer rotor shows burn mark but distributor contact looks OK. I mean no cracks except contacts looks whitish. Do I have to clean them before replacing rotor arm because it’s burnt