Building your own spring compressor is possible, if done carefully
Note to the reader: If you’re planning to make your own spring tool, we probably can’t stop you. We can show you what we’d do to minimize—but not completely eliminate—the chance you’ll end up becoming a ghost instead of driving a Phantom. If you’re the type that’s comfortable risking critical bodily harm to save a few bucks on a spring tool, however, keep reading….
If you’re a regular patron of my Hagerty columns, you know that I’m in the middle of a budget front-end refresh of my 1974 Lotus Europa Twin-Cam Special. This time around, I’m focusing on separating the shocks and springs.
There were two reasons why this task was required on the Lotus. First, one of the goals of the refresh was to evaluate the condition of the original shocks. I had performed the classic test to see if the shocks were seized or blown by bouncing the car at all four corners and checking that each corner moved and then stopped. However, the shocks were 45 years old, felt very soft, and I’ve been wrong before about the difference between “very soft” and “blown.”
This is a much better test: With the spring/shock assembly out of the car, remove the springs and then manually compress and extend the shocks. This allows you to directly feel if they’re blown or binding. The second reason was that, while I had things apart, I wanted to lower the nose via replacing the front springs if that was cost-effective to do so or cutting them if it wasn’t.
On nearly all front suspensions, whether a car has double wishbones and coil-overs like the Europa or MacPherson struts like my vintage BMWs, the springs are mounted directly on the shocks. To disassemble the pair, the spring must first be compressed. With MacPherson struts, there’s a housing with an integral bottom spring perch, and an upper perch plate and a bushing at the top that looks a bit like a man’s hat. The bushing contains a bearing, as the whole point of the design of a MacPherson strut is that it absorbs the shock as well as rotates when you steer the car. The top of the shock piston is threaded and protrudes through the center of the bushing. A nut holds it all in place.

On a double wishbone suspension, however, the shock and spring don’t directly interact with the steering, so there’s not the same hat-shaped bushing/bearing at the top. Instead, they’re configured like rear coil-overs with just the traditional rubber through-eye bushings at both ends of the shock. The spring is held in place with a retaining plate or collet that tightens as the spring presses upward on it.

In either case, in order to disassemble the shock and spring, you first need to compress the spring to release the pressure on whatever nut, bushing, or retainer is holding it in place, remove that piece, and then, in a controlled fashion, release the tension in the compressed spring. If you didn’t know what you were doing and simply undid the nut at the top of a MacPherson setup (and don’t EVER do this), the tension from the spring would suddenly and explosively release, and the nut, bushing, upper perch, and spring would violently eject themselves, possibly into your face. On a coil-over setup like the Lotus has, you’re prevented from that form of idiocy, as the spring must first be compressed to take the pressure off the slotted retainer, which is then withdrawn around the shock’s piston.
Now, compressing a spring does carry some risk. Those springs are beefy enough that they support the weight of the car without bottoming out. And you need to compress the spring even further in order to remove the nut or retainer. This creates the dangerous triad of A) an increased amount of stored energy, B) a configuration that’s inherently less stable than the assembled spring and shock, and C) having parts that are now unsecured and can act as projectiles if something goes wrong. For these reasons, you’ll often read that compressing springs is an inherently dangerous activity best left to professionals.
Of course, you can say that about any auto repair. With the proper tools and procedures, spring compression and removal can be performed safely, but if you jury-rig it, you’re courting danger. I’ve been wrenching on my own cars for 40 years, have pulled apart a lot of shocks and springs, and have never even come close to having a mishap. I don’t regard it as a binary “safe/dangerous” thing. I more think about it the same way I do jacking up a car and working under it—something with risk that needs to be managed with proper tools and practices. If you use a commercially-available spring compressor designed for your application, you’re on the safer edge of the envelope. Conversely, if you hastily jury-rig something using ratchet straps or, worse, hose clamps (don’t do either of these things!), you’re risking disaster.
I have several different spring compressors. The first is the ubiquitous style with a pair of threaded rods, each of which have pronged “claws” at the top and bottom. You place one of them on each side of the spring, then tighten them evenly with a wrench or a socket on the nut at the top of the rod. Because, structurally, there’s not much to them, and because if they break or slip the results can be catastrophic, these claw compressors have gotten a bad rap over the years. The ones I own are probably 40 years old, high quality, American made, and the claws are plenty long enough to wrap around the spring and hold it. I see that some of the new ones now being sold address the slippage issue by having pins that lock the claws in place around the spring.

The second is a big mechanically-cranked plate compressor that resembles an old-style tire-changing jack with two twisted plates on it. You crank it open, insert the plates between the coils of the spring, and crank it closed, pulling the plates together and thereby compressing the spring. I use this one unless there’s some reason I can’t, such as the spring being too big or small to fit between the plates.

So, imagine my surprise when, after removing the front coil-overs from the Lotus and laying them on the floor, neither of these spring compressors would work. Both had the same problem: The coils of the springs were too closely stacked together to get either the plates or the claws between them to grab and squeeze the spring.
I looked on several Lotus forums (as well as on Jaguar forums, as the skinny coil-overs on E-Types are similar) to see what spring compressors people use, and the answer was most surprising: Folks build their own. The favored design uses a pair of metal plates with a right-sized hole at each end to trap the spring but allow the end of the shock to pass through, and several threaded metal rods with nuts and washers to pull the plates together.
Now, I didn’t want to build a spring compressor. I was happy to pay for something that was the right tool for the job, worked quickly and efficiently, and was commercially available and thus presumably vetted for safety. Plus, I don’t have the means to cut that big of a hole in plate aluminum. In addition, as it happens, the two-plate design doesn’t easily work for Spax shocks where the perch and the collet are combined into a single retainer, as the thing the plate would be pushing down on would be the very thing that needed to be removed.
I asked for some advice from the owner of one of the Lotus parts houses I buy from, and he said that some folks report success using motorcycle spring compressors. Most of these are compact variants of the threaded-rod design with a single claw on both ends small enough to fit between tightly-packed springs.

However, when I read the reviews, I saw many comments like, “Junk; lasted for one spring.” Also of concern was the caveat that warned “For motorcycle springs only—not for ATVs or UTVs.” And here I was, looking at applying these products to something even bigger—springs on a car. Granted, the Europa is only a 1600-pound car, but still.
I bought a compact spring compressor I found on Amazon that reportedly was car-spring-capable and had small single claws. The reviews seemed to say that it worked fine as long as you don’t try it on large truck springs. Unfortunately, when it arrived, I found that even its small claws were too big to fit between the Lotus’ tightly-packed springs. I considered grinding the claws down with a Dremel tool, then thought better of it and returned it.

Stymied for a solution, I looked at dozens of videos on YouTube about homemade spring compressors. For motorcycle springs, many folks simply used a pair of ratchet straps looped through the coils and passed around a bolt through one of the eye bushings. However, anyone who has worked with ratchet straps knows that there’s not a controlled way to release the tension. One fellow demonstrated a very clever way of ratchet-strapping a coil-over to a floor jack, snugging the straps, then raising the jack to compress the spring. In theory, this has the advantage of allowing you to control the release of the spring tension by slowly letting down the floor jack. It was intriguing, but the Lotus’ coil-overs were quite a bit taller than those on a motorcycle, and I wasn’t convinced they could be centered, held upright, and balanced on the jack safely.
In the middle of all this, I was researching new shocks and lowering springs. I learned that the preferred route these days is to buy shocks with adjustable damping rates and height-adjustable spring perches so both the stiffness and the ride height can be tweaked. Unfortunately, the cost for such a set is about $1300, which was more than I was prepared to spend on my somewhat ratty survivor Europa. I found a guy on eBay selling a set of vintage Spax adjustable shocks with fixed perches and springs on them for $225 shipped. He agreed to a 14-day return period during which I could evaluate them and return them if the shocks were seized or blown or if the adjustable damping didn’t work. I figured that, for that price, it was worth it just for the adjustable shocks, and if the springs turned out to lower the car, it was gravy. So I bought them, and when they arrived, I had 14 days to build a spring compressor and disassemble and test all four shocks.

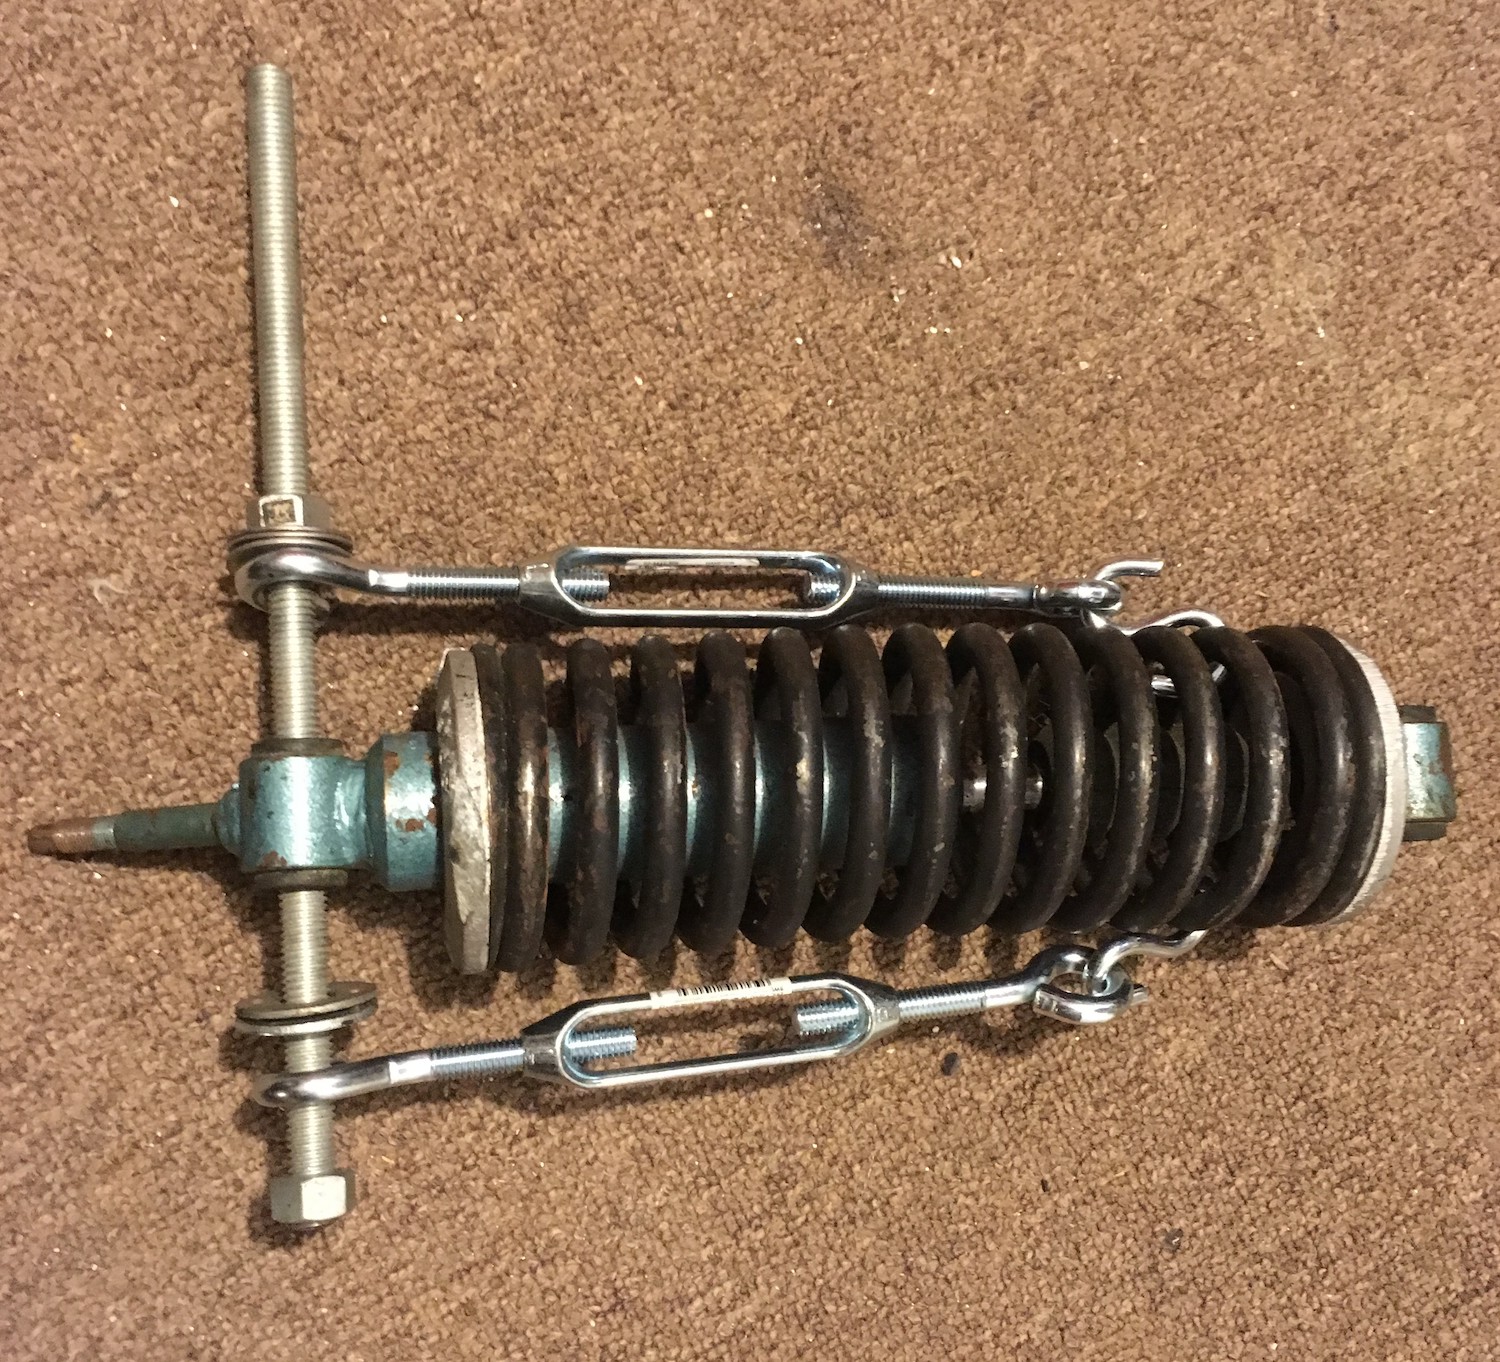
I took one of the front shock/spring assemblies to a local hardware store and tried a variety of things, including turnbuckles—those devices with a right and a left-threaded hook where you rotate the body and the two hooks are pulled together. I found that a turnbuckle with a 4-inch-long body and 3/8-inch diameter hooks was about the right size to—when secured to the bottom of the shock with a threaded rod through the eye bushing—reach near the top of the spring. Unfortunately, the diameter of the 3/8-inch hooks was too big to fit between the coils.

I found, though, that 3/16-inch S-hooks were just small enough to fit between the coils. I could then grab the other end of those with the turnbuckles. I bought what I needed, took my treasure trove home, and went to work.
At this point, my inner lawyer is yelling at me to tell you A) not to build a spring compressor at all, and B) not to build one using hardware store-bought components with an unknown weight rating. In my defense, the components I bought were stainless steel and were purchased from the rigging-related hardware section (that is, the S-hooks weren’t for shower curtains). If I had to do it again, I’d figure out what I needed, order proper weight-rated components from McMaster-Carr, and use threaded carabiners (“quick links”) instead of S-hooks. And, again, I stress that the larger context of this was that I could not find a workable commercially-available compressor, and the one recommended by a Lotus parts supplier had horrible Amazon reviews explicitly stating that it failed.
I laid everything on the floor and gave the turnbuckles and hooks a few test-tightenings, compressing the spring to the point where the retaining plate was loose, then backing off. I looked for bent components and found none. The only issue was that the hooks tended to slide unevenly down the incline of the coil spring, causing the spring to twist and tilt, which threw it off center and made it difficult to remove the retainer.

I solved this problem by clamping a small Vise Grip on the downward-facing side of each hook to prevent it from sliding. After that, it worked perfectly. Taking great care to never have the compressed spring aimed at any part of my body, I was able remove the retainer, unscrew the turnbuckle, and remove the spring.


When I tried the turnbuckles and hooks on the rear assemblies, though, there was a problem: The rear springs were much longer, so the turnbuckles weren’t able to reach the tops of the springs. I extended them with lengths of chain. That allowed reach, but the 4-inch body of the turnbuckles didn’t allow for enough spring compression. I found that temporally inserting a rod through the upper eyelet to trap the partially-compressed spring, removing the chain links, and tightening the turnbuckles further solved the problem. To release the tension from the spring and remove it, I needed to do the same thing in reverse.

I photographed my home-engineered turnbuckle-and-hook-based solution and posted it on Facebook. An acquaintance who works at one of the two Lotus parts houses in this country commented “Well done. That’s how we do it at the shop.”
The little compressor saw quite a bit of use, as I needed to disassemble not only all four original shocks and springs to satisfy my curiosity (one of the rears turned out to be so soft as to effectively be blown) but also to test the four used Spax shocks I’d just bought (all were fine, and the adjustable damping appeared to function). Before I use it again for reassembly, I’ll buy some 3/16-inch threaded carabiners (“quick links”) to replace the S-hooks.
To summarize: In my opinion, spring compression is not a binary safe/unsafe thing. If you have any doubt regarding its safety, don’t do it; just pay someone. But the point is, you can buy a new spring compressor with poor reviews, try to use it on a spring that’s bigger than what it’s designed for, and have it break and injure you. Or you can select one with good reviews, use it carefully for its intended application, and probably be fine.
In my case, I felt I had no choice but to build my own. But whatever else you do, remember this: Test it, go slow, look for bent parts, and never aim a compressed spring at any part of your body!
***
Rob Siegel has been writing the column The Hack Mechanic™ for BMW CCA Roundel magazine for 33 years and is the author of five automotive books. His new book, Resurrecting Bertha: Buying back our wedding car after 26 years in storage, is available on Amazon, as are his other books, like Ran When Parked. You can order personally inscribed copies here.

