What’s the best way to build your project car?
Tackling a car restoration or customization project can be daunting. There’s no sugarcoating that it’s a big, expensive, and time consuming job. There are so many interconnected tasks that it can be hard to know where to start, let alone what steps to do in what order. Paint, powertrain, carpet… what’s the best way to line everything up for a successful build?
To get some expert advice I spoke with Steve Strope, from Pure Vision in Simi Valley, California, a shop with decades of experience building award-winning customs and restomods, to ask about their process for taking on a new project. Their work may be a bit loftier than your average daily driver refresh, but their process can help you make better decisions when attempting a project yourself. I also spoke with George Poteet, who has had scores of custom cars built over the last 20+ years, to see if he offered up any advice. Here’s what they told me.
Have a Plan

George Poteet always has a plan, “Don’t get into it and start making changes.” He told me, “You decide what you’re going to do before you start. Don’t ever change anything once you get going.” Several high-end shops showed me build plans that they complete with every vehicle owner prior to turning a wrench. Some of these plans are dozens of pages long and include simple questions like, “will the car have air conditioning?” and “what transmission will you be using?” It’s always better to have that information before the project starts.
Steve Strope agrees, noting that buying parts twice due to deviating from the plan adds cost and time to the project. He focused on setting realistic goals and deadlines. “Find a design you like that fits in your budget.” Strope advised, “That gives you a path to success.” Too many times big goals lead to a project that languishes. “This is why there’s a disassembled 2nd-gen Camaro in your neighbor’s garage.”
If you test drive a C7 Corvette and decide that a rear-mounted transmission and IRS is your new favorite thing, consider it for your next build, but don’t add it midway through a project. Having a rendering of the completed car can help in the planning stage, keeping you motivated and making sure everyone involved is on the same page with the same goal in mind.
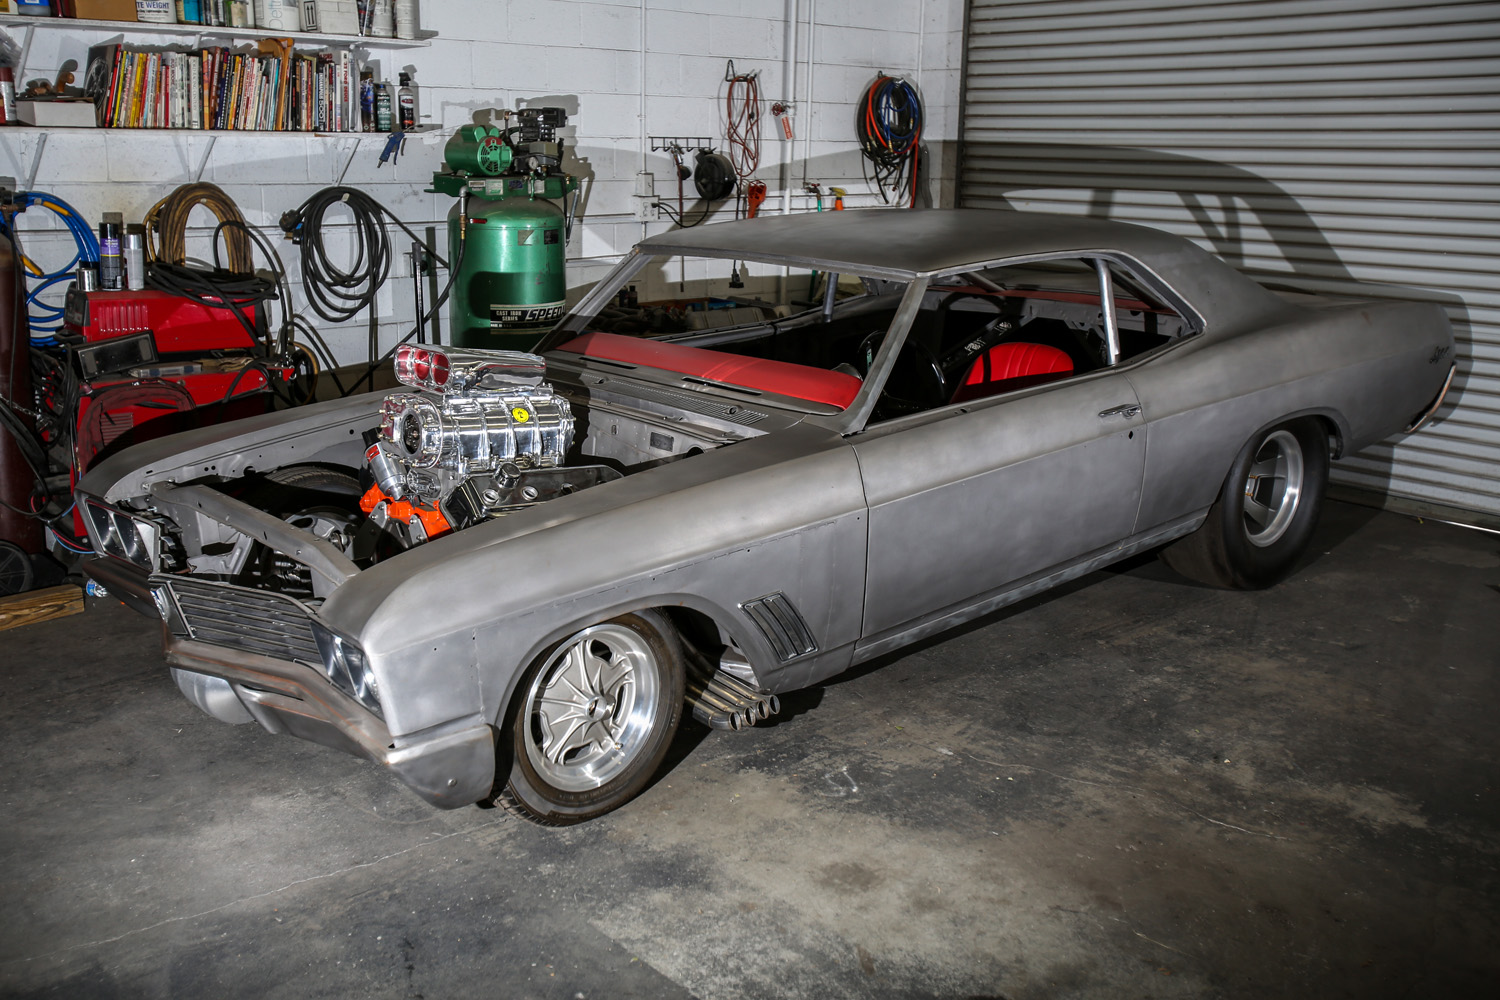
Chassis
It’s often best to start on the chassis, as wheel and tire choices will determine whether or not wheel tubs need to be widened or flared. As with any other aspect of the build, choices here have cascading effects, as wheel choices determine what brakes will fit or vice versa. Engine and transmission choices might necessitate firewall or floorpan modification as well.
Engine

The engine block can be used for mockup purposes before the car is full assembled and painted, which is why you got the chassis sorted out first. Once that’s done, get going on the engine. I’ll assume that you won’t be boring, honing, and decking your block yourself. In that case, send the engine off to be machined. There’s plenty of stuff to work on while it’s gone. Oh, and if you need a transmission rebuild or a custom bellhousing adapter, now is a good time to get those started.
Bodywork
If you plan on a full restoration you’ll want access to at least the door jambs and sill plates, and likely the entire floorpan and dash as well. Strip the car down as far as possible, especially because everything will get covered in sanding dust. Once the panels are nice and straight and rust is repaired, the bare metal and filler can be sealed.
Dry Fit

High-end shops will assemble and disassemble a car dozens of times. A dry fit allows panel gaps to be set to double check the bodywork and find any fitment issues that could cause paint to rub. Seat frames and anything else that bolts in can be checked to make sure new components match the factory locations. Now is the time to get your engine back in between the framerails to plan where your wiring and plumbing will go and to confirm that your headers fit. Strope likened this part to model car building. “You don’t paint the car then cut the hole in the hood for the blower.” The same mentality applies to mounting a new aftermarket radiator or EFI ECU. All of it should be laid out before paint. Strope added, “You’re gonna be banging all over the bottom of your car and firewall bending brake lines. Plus you’ll need places to mount the clamps to the frame. You’ll want to drill those holes before the frame is powdercoated.”
Paint
With the panel gaps and mounting and fitment issues sorted, it’s time to do the final priming and block sanding before the basecoat and clearcoat are sprayed on.
Interior and Final Assembly

At this point you should be very familiar with your car’s every nut, bolt, and wire. Most importantly, there shouldn’t be any surprises when everything goes in its proper place and your project car is once again a driver. It’s especially important during these final steps to stick to the same methodical process you’ve been doing all along, lest you undo months of careful planning.


It’s helpful to learn what we’d consider when planning a full car restoration. My dad won an auction last week and wants to focus on restoring the car starting next month. I’m sure he’d be glad to read your information about customizing a car’s bodywork. https://www.kellymoss.com/membership/base