Avoiding a Sticky Choke
The automatic choke found on most American collector cars is a simple flapper valve in the “throat” of the carburetor. When you close the flap, less air enters the engine. More gas goes in, which is what you want for cold starting.
As the engine warms, the flap opens to let the engine breathe more air. If the choke valve sticks, the mixture will stay rich. Your warmed-up car will be hard to start, run poorly and waste precious gasoline.
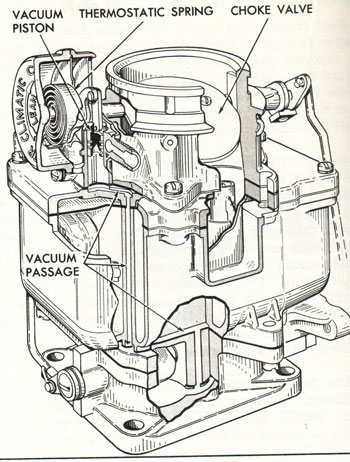
A bimetallic spring in the choke housing on the carburetor is connected to the shaft on which the flap rotates. This spring coils tight when cold, causing the shaft to rotate and close the valve. Because the shaft is slightly off center, the valve doesn’t close completely. A slight opening lets in just enough air to create a proper starting mixture. There may also be a choke pull-off piston, operated by the manifold vacuum, that pulls against the spring to open the choke part way.
A tube – or choke stove – will run to the choke housing. As the engine warms to operating temperature, the heat travels up the tube to the bimetallic spring. As the spring heats, it opens the flapper valve even wider, creating a leaner mixture for better hot starting, good gas mileage and proper performance.
Many automatic chokes have rods linking the choke to the throttle. The linkage operates a fast-idle cam that keeps the throttle from closing tight. Speeding up the idle prevents the cold engine from stalling. As the engine warms, the choke opens wider, the cam moves off fast idle, and the idle speed drops.
The cam also helps you start a flooded engine. A flooded engine has too much gas, the mixture is too rich, and the flap is closed tight. But when you press the accelerator all the way to the floor, the cam causes an “unloader” mechanism to open the choke to clear excess gas out of the carburetor. When the car starts, you let off the pedal and the choke goes back to work.
Automatic chokes are engineered with specific bimetallic spring rates, specific cam designs and precise spring tensions. They also require set clearances and adjustments. Nevertheless, in most cases, caring for them is only a matter of cleaning. It’s rare for parts to break or for adjustments to get way out of kilter. Choke-related problems are usually due to gummy gasoline residues or carbon deposits. These are maintenance items that you can take care of with common household tools and chemical cleaners.
- Lay down newspaper on a clean surface or floor. You’ll need a screwdriver, needle-nose pliers, an adjustable crescent wrench, a cleaning solvent, a parts-cleaning brush, several clean rags, some clear plastic food-storage bags, index cards and a coffee can or oil drain tub. For personal protection, wear eye protection, a respirator and latex-free surgical gloves.
- Remove the air cleaner. Use your adjustable wrench to loosen the clamping bolts and put them in a plastic bag. Describe or draw pictures how the clamps fit together on an index card and seal it in the bag with the parts. Write “#1” on this index card. If the car has an oil-bath type air cleaner, don’t tip it or you’ll have an oily mess. Keep it level and carefully lay it aside for now.
- Next, disconnect the choke-stove. Put it in a second bag with your #2 index card description. Using needle-nose pliers, remove the tiny linkage clips (put them in a third bag and don’t lose them). Disconnect the linkage rods at their upper ends. Loosen the screws that hold the choke housing on the carburetor. Put the screws in a bag with a card description.
- Remove the choke housing cover and do the baggie trick again. If it has a thin metal gasket or little mantle-clock-shaped tabs, put them in the same bag. The choke housing itself can be laid on the newspaper. Using your parts-cleaning brush, brush the solvent on the choke housing. In the old days, many mechanics used lacquer thinner or spray gun cleaner as their solvent. Today, some very effective spray-on carburetor cleaners are available. Use the coffee can or tub to catch the solvent you rinse off.
- Work the solvent into all areas. Go through the cleaning process twice, using clean solvent each time. This will prevent contaminated fluid from leaving gummy fuel deposits around the throttle shaft and pull-off piston. Move the piston by hand to force fluid out of the cylinder. Carbon caked on the choke housing is a sign of an engine that burns oil. Normal carbon deposits in carburetor air passages can be cleaned out with a dental pick or by running a drill through it.
- Because you have the air cleaner off the car, it’s a perfect time to clean it. In fact, if it’s scratched or pitted, you may want to sand it down and repaint it. On an oil-bath air cleaner, check the oil level. There will be a mark around the inside of the base section to indicate how high the oil level should be.
- Beginning with the highest-numbered plastic bag, start the job of putting the pieces back together. By proceeding in numerical sequence and following the parts descriptions you wrote on each index card, you should have no trouble re-attaching the clean choke housing and putting the pieces back in it properly. Make sure the housing cover “catches” the bimetallic spring so that it’ll move the flapper valve as it changes temperature.
Experts used to recommend cleaning automatic choke housings every 5,000 miles. In the good old days, that meant about twice a year – usually spring and fall. Though hobbyists drive their cars fewer annual miles, there’s no excuse for not doing this car care at least every spring. Avoiding a sticky choke could save you a lot of gas, which is more important today than it was when these cars were new.
John “Gunner” Gunnell is the automotive books editor at Krause Publications in Iola Wis., and former editor of Old Cars Weekly and Old Cars Price Guide.

