7 tips for plumbing your car

Even if you are doing a restoration, the task of assembling and filling all the systems of your car that have fluids in them is a large task. It’s often part of the last 10 percent of a project that often takes 90 percent of your time. While on the surface it is as easy as threading a few connectors, bleeding out air, and enjoying the drive, there are also a few things to keep in mind as you make some of what could be the final connections of your project car.
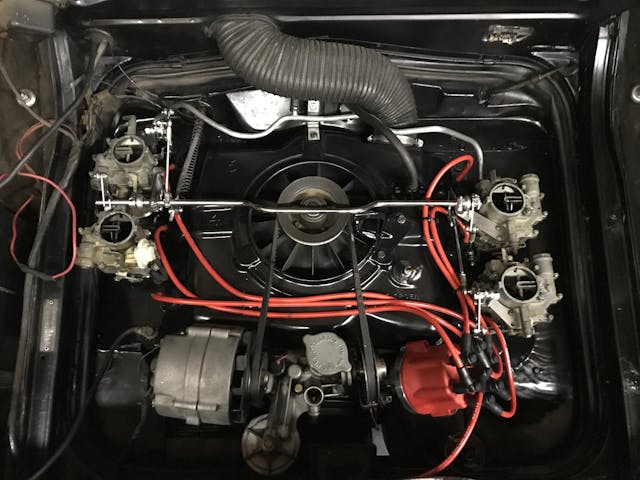
This topic came to mind when I dropped by the Redline Rebuild Garage to chat with one of Hagerty’s resident project car experts and Special Projects Editor Davin Rekow. He has been running wide open building a 440 Chrysler V-8 as of late, but off to the side sits the car that orange Mopar will live in: The Snowball dirt track racer. The team is pushing to get that car back on track and that includes sealing up all its systems. From the hustle and bustle in that shop, here are seven tips that will make your project better than ever—with no crack showing.
Take your time
This is a step that can make or break a project and it is best to take the moment ahead of actually picking up tools and parts to lay out a plan. What systems need plumbing? What materials are needed? Are there any techniques you’ll need for the job that you should try out now? The first time using a tubing bending or flaring tool should not be on what you hope is the finished part. Sure, that can work, but being lucky is a fickle thing, and trusting expensive parts and materials to luck is a fool’s errand.
Really this tip just comes down to the old saying “do it right or do it twice.” Davin has been plugging away at various aspects of this car for some time and is excited to have it done, but that doesn’t mean rushing and assembling a half-baked plan for things like brake lines, coolant hoses, fuel lines, or even oil lines and fittings. Well-thought-out and functional things take time to build. Give yourself enough time to do it right.
Mark the direction of flow
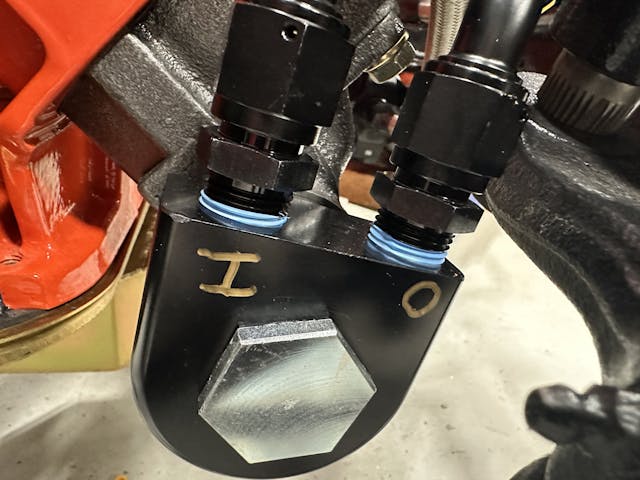
Sure, it seems obvious now, but what hose is going where and also what is inside of it and the fluid’s direction of travel is not as obvious once everything is assembled and you are no longer focused on the literal ins and outs of this system. Labels can be as boring or as interesting as you can imagine. A simple label by hand with a permanent marker is enough to get by but consider using zip ties or heat shrink to color code inlet and outlet hoses to prevent accidentally misassembling items in the future.
Keep it simple
The shortest distance between two points is a straight line. While show-winning cars have lines tucked ever so tidy and carefully bent over every hump or lump in the chassis, most at-home projects cars are a more nuanced blend of function and form. Save time and effort by doing what is needed to keep the lines safe but also install easily. This is something that might need servicing in the future and if it takes all afternoon to make a single brake line that could end up damaged and need re-done it could be mildly infuriating.
Allow for movement

Cars move and flex when they are driving. If there is no allowance in the running of the lines that travel to various parts of the car to keep those lines from stretching or binding, it is only time before a failure occurs. Take a look at the hydraulic systems of your car and you will realize none of those are fun to lose suddenly and catastrophically.
Don’t confuse allowing some movement with us endorsing letting everything run wild. Like a toddler in a grocery store, the plumbing on your car is best kept in order, and from touching things it shouldn’t. The front brake hoses appear miles too long at first glance, but the suspension of this car is set up to allow for a fair amount of travel. The last thing you want limiting that travel is your brake hose.
Use the proper product

It should go without saying, but use the right material for the job. Fuel line doesn’t make a good vacuum line, and vacuum line makes a terrible fuel line. Don’t even mess around with anything not designed for a brake system being installed inside that critically important system. For example, the hoses routed to the fuel pump feeding the 440 in this race car are approved for ethanol usage. Will this engine run on ethanol? Hopefully not, but if blended fuel ends up in the tank it won’t cause problems. Future-proofing is basically free right now.
In a similar way, a braided stainless line is better than a rubber line for most applications according to Davin. Rubber lines collapse internally given enough time, or are easily sliced or rubbed through. Stainless braided withstands that and a whole lot more for a fractional price difference.
AN fittings can be great

The history of this often colorful hose ends traces back to the war effort during WWII. The Army and Navy agreed on the standards that became the AN fitting. It centers around a two-piece fitting that clamps to the hose and makes it easy to make custom hoses of various lengths and sizes. Davin likes using it on his automotive projects because it makes things more serviceable and tidy at the cost of unoriginality—and literal cost. If you can tolerate deviating from factory-correct and budget has some room using these fitting can make life a lot easier. AN fittings and hose are not cheap but the customization possible now that the fittings come in various colors, and the fact that you can get hose for just about any application off the shelf, make it tough to turn down—and that’s before you talk about how serviceable these connection make a car.
Square up
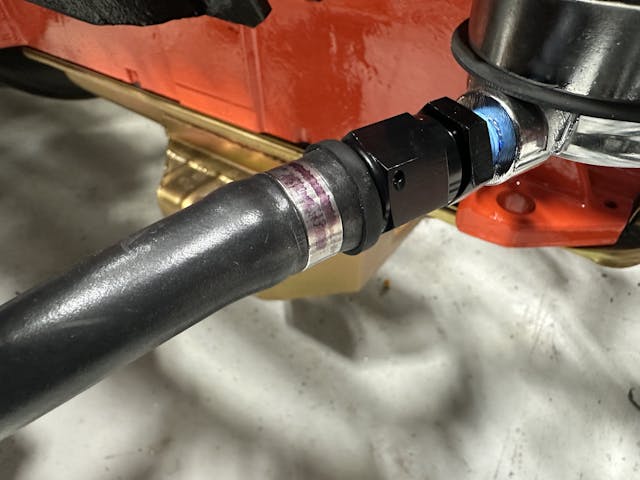
If there is one little detail that always catches my eye, it’s nicely square-cut hose ends. They fit on fittings cleaner, and when clamped correctly have a very finished look despite being the simplest and cheapest way of joining a hose. Using proper hose cutters or taking the time to dress the end of a hose with a razor knife is basically free and can add a subtle touch that elevates your project from “thrown together” to “nicely detailed.”
If you seasoned veterans have any additional tips that might make someone’s next plumbing job easier, cleaner, or more efficient, please share them in the comments below.
***
Check out the Hagerty Media homepage so you don’t miss a single story, or better yet, bookmark it. To get our best stories delivered right to your inbox, subscribe to our newsletters.


Just don’t forget to slide the nut on the tube BEFORE flaring it…but I’m probably the only one who has done that….
You too!!!
Ah, Tinkerah, sorry to disappoint you, but that club has sooooo many members that you and I just disappear into the masses. 😃
But it is still a very good point to add to this list, simply because it is so easy to forget and yet so very important to remember!
I am member!
Yes Tinkerah- I think we all- at one time or another have made that same error- like “cut once measure twice” the mistakes are made when we rush or frankly are working on to little sleep (just like I’ve never been working an all nighter to get a project done for a race or show). A bit to add on clamps- make sure that the clamp is compatible with the type of hose used- twist lock hose, silicone hose and good old rubber require different types of clamps- as does high pressure fuel injection hose.
99.9%+ of us have.. for sure..ha
Welding wire is an awesome tool to help with layout/length ect. I looked through the entire house to realize, we don’t have metal clothes hangers anymore..haaa
When I was a little kid, duct tape and wire hangars were #1 and #2 options (for the actual “repair”..ha) from gocarts to my first few vehicles.. Now I laugh as I use these frequently as mock up assistance.
There’s not enough comment space for all of us to reply !!
Even braided hose will break down over time when exposed to ethanol fuels. Inspect them regularly and be prepared to change them periodically.
When laying out a hard-line plumbing run, grab a couple of wire coat hangers, cut the ooks off and straighten them out. Use them to then make templates for the hard line you will install. Also, be Familia with the bend radius of the tubing bender you will use. We have several small pre-bent sections of different diameter tubing in different radii, from 45 to 180 degrees. The samples have marks on them that correspond to marks on our bender(s.) We place the sample next to the new tubing then make those same marks on the tubing prior to bending so that the bends end up where we need them.
These are great points to make – I rate this the SECOND-best comment of the day.
I like to use stainless lines with AN fittings for my fuel lines from the tank to the engine (with flex lines at each end to allow for vibration). Bending 3/8″ stainless is hard (no pun intended) and the line is expensive. What I do is buy a long length of regular steel line, mark it in 1″ increments with a permanent marker (which comes off with rubbing alcohol) and bend it to the shapes that I need. Once I have it bent to where I want it (usually with some corrections along the way), I also mark my stainless line in 1″ increments and duplicate the steel line’s shapes and bends on the stainless line in my bending tool. It adds a little cost, but saves a lot of cost if you make a mistake with the stainless line. The other suggestion if you are bending a lot of lines or building a car, is spend the money and get a pro-style tubing bender. Mine is a bench mount tool (fits into my bench vice) and has dies for different size tubing. Again, an little bit of up-front cost that makes life a lot easier if you are doing a complete car and also makes it much easier to duplicate a pattern (e.g., steel to stainless). FWIW.
Familiar, not Familia. Stoopid fone!
And this one is the BEST comment of the day, hands-down! 😂
If you notice how manufacturers run flexible brake lines to front wheel assemblies, they generally run somewhere through or very close to the steering axis. This helps minimize the amount of flex line needed to get to the wheel while still allowing plenty of turn-and-vertical-travel on the assembly. That line running from the frame to the finned drum brake assembly in the photo above looks like it’s asking for trouble. Enough line for a left turn, but barely enough for a right. There should be a 90 degree fitting facing aft on the brake backing plate where the straight-through fitting is. That should get the amount of rubber line required about matched between left and right turns.
Sorry but I am not a fan of AN fittings on automobiles. They are great for your backhoe, and the line pressures when running hydraulics, but for fuel lines, radiators?
Different strokes for different folks, and that’s okay.
Using the right material is tantamount to longevity. I recently purchased an oil catch can and it came with SAE J1402 DOT air brake hose which is made with EPDM and is NOT oil resistant. I am sure you have seen heater hose that is swollen and gummy. That is what oil does to EPDM. You can’t go wrong with Teflon SS braided hoses. You can save money by using your local Parker Store or Danfoss distributor instead of using somebody like Summit Racing. There are usually gearheads working at these places that enjoy helping other gearheads. Trust me, I was one. Now retired.
Actually one of my favorite parts of a non-restoration build. Materials, routing, access & serviceability, complementary colors, and tidiness all come into play. It should also be as intuitive as possible if others will work on the vehicle, something I learned on race cars. Fasteners should be accessible, and heat, component movement, and possibly impact survival, should be thought out. I can say the same for wiring & electrical as well.
I wish you would cover what to do with all of the used fluids. It is easy for me to recycle oil at a local auto parts store, but how should home mechanics dispose of used coolant, brake fluid, gear fluid, etc.?
Our city has very convenient hazardous waste drop offs for fluids , old paint, etc. Very easy. Check into it where you live.
All good tips. I had a flexible brake line’s bracket break once. At least the line rubbing against the wheel decided to pour it’s guts when I got to the shop as opposed to the highway.
Tubing wrenches are a must. Not open ended wrenches and NEVER box end wrenches. Learned that one in my early teenage years.
Use the proper wrenches for the job. AN fittings need AN wrenches or the hose ends will get gobbed-up.
I keep spare examples of oft-used AN fittings for designing the next plumbing project. It always looks like a 90 degree angle until it isn’t. I keep straight, 45, 90 and 120 degree sample fittings in AN 6, 8 and 10 for racecar projects. I try not to use 180’s (because they allegedly restrict flow).
Another plumbing challenge is knowing what internal diameter to use. Monster horsepower engines need to be fed by big hoses. Calculate size based on pounds per hour for fuel or ask someone with a successful car which size they use. Err on the side of too big, not too small. And if it’s gravity fed going into the pump and filter from the fuel cell, use two fuel cell outlets or go as big as the internal fuel cell diameter outlet for the hose internal diameter. Pumps push better than they pull.
Finally, unless it is under extreme pressure, the newer nylon-braided teflon-lined hoses are resistant to caustic fuels like alcohol (or my favorite, Q-16 oxygenated). Nylon hoses replaced my older, beautiful stainless-braided hoses and saved me 7 pounds. I only use stainless-braided hose on the oil dry sump pump to engine, where pressure is 100 psi.
One thing to keep in mind about proper size hoses on a fuel system, you MUST start INSIDE the tank, or your 3/8″ or 1/2″ hose that LOOKS impressive is sucking thru a soda straw !~
On my son’s ’79 Mustang, 351W (+.030″ so a 358″ engine) I matched the shape of the INSIDE tank pickup tube with 1/2″ .032″ wall DOM steel tubing. 1/2″ ID will flow 4X the amount of fuel as will a 1/4″ ID. (do the math, compare cross section area) This then fed 3/8″ ID Areoquip braided all the way up to the pressure regulator, went 5/16″ ID for the dual inlets on the Holley carb, THEN added dual OUTLETS to the opposite sides of the float bowls for return lines back to the tank. A lot of plumbing, yes, BUT, the fuel stays a LOT cooler if it’s flowing, not sitting getting heat-soaked in a float bowl.
And this was for a street machine, not a race car. The electric pump was really about 3X larger in capacity than the car needed, so we never were wanting for flow.
No nitrous, single 4-BBL and producing 540 HP (no correction factor, real output) on the dyno. We tested with Amoco Ultimate, Shell V-Power & Mobil’s top premium, since one of the 3 should be able to be found anywhere. The 540 figure was the average, testing with all 3 of the fuels.
Yeah, we did our homework 😉
What is the blue tape that is used for the fuel pump connections? It looks like Teflon tape which I understand is not acceptable for gasoline.
Blue is extra thick:
https://plumbuniversity.com/teflon-tape/
A minor thing. I use fuel injection hose clamps on small hoses rather than the standard ones. They look a little neater and will hold more pressure..
Teflon tape is essentially 100% teflon, a fluorocarbon, that is one of the most chemical resistant materials on earth. Gasoline will not effect teflon in any way.
It not an issue that teflon tape is not compatable with gasoline , it is that a piece of tape can clog a needle and seat or a jet on a fuel system.
Yes S C but use the real stuff. Good Teflon is pink ( or yellow for natural gas). That white stuff is just plastic.
Thanks Kelly, I’ll keep that in mind.
The pictures above show blue, what’s that rated for?
Blue is extra thick:
https://plumbuniversity.com/teflon-tape/