5 Things Heat Can Do for You and Your Projects

There are a lot of ways to get things done when working on project cars, but few methods are as handy as leveraging heat to do work for you. Whether disassembling crusty things or creating new pieces by joining metal with the heat of an electric arc, the judicious use of heat can unlock new avenues and techniques of solving common problems faced by DIY enthusiasts everywhere.
First off, let’s make something clear: We aren’t really talking about heat itself in most of these, we are talking about the powers of temperature differential. It’s that one part heated or cooled to a temperature different than the other parts creates advantages for the task at hand. For instance, it’s not the mere fact that the bolt is hot that helps you, it’s that the material of that bolt expands when heated. But we are getting ahead of ourselves: Here are five ways heat can help unlock your superpowers in the garage.
To Diagnose
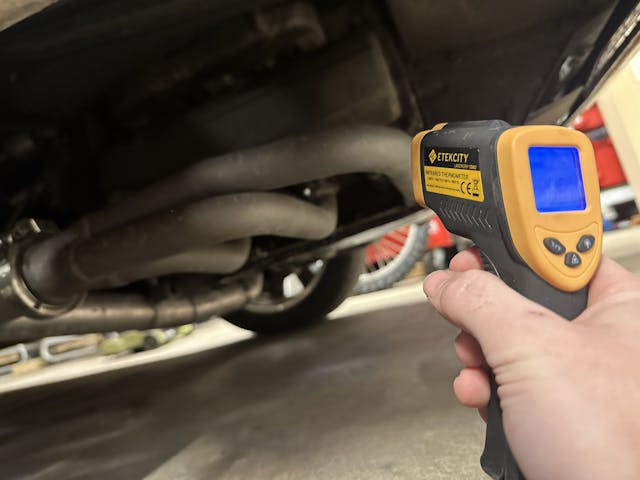
There are a lot of moving parts in an automobile. Friction is the universal enemy of almost all of them. When friction starts winning the battle, it often shows in the form of heat buildup. This is also true for electrical connections and relays too. When something doesn’t feel right even though it all passes visual inspection, it is easy to start poking around and seeing what is warm. A prime example is diagnosing wheel bearings on trailers.
Small infrared heat guns are a really handy tool now that the prices are nearing novelty purchase territory. Even just feeling things by hand can be telling sometimes, but using non-touch methods allows much more capability, as you would burn the heck out of your hand if you wanted to confirm if a particular cylinder was running right by checking header temp. There’s a tool for every job.
To Break Corrosion
Cars are built from a mulitude of different materials. In modern manufacturing, the usage of appropriate fasteners and hardware is figured out during the design process to ensure that they will not react adversely with others in the assembly. We often aren’t working on vehicles straight off the line though, and the facts of life tell us that everything corrodes, it’s just that some things resist it better.
For rusted hardware, heat helps break the bonds between that surface corrosion and the base metal, allowing things to move freely again. To prove the point made earlier about temperature differential, those who have the ability to freeze hardware rapidly know that can be just as powerful as an oxy-acetylene torch. The key to making it work is that the subject metals expand or contract with big swings in temperature. It works for breaking the bonds of corrosion but we can also leverage that fact…
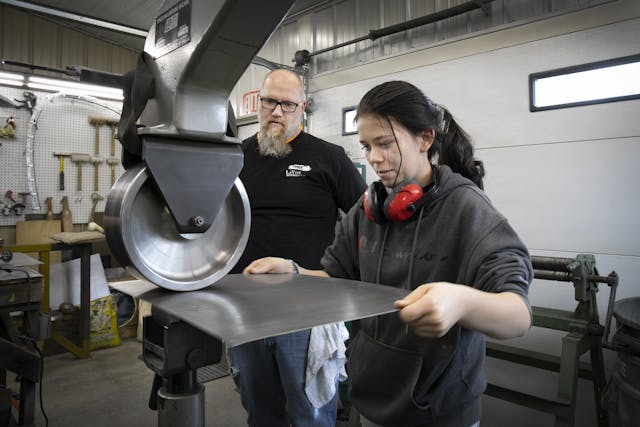
To Aid in Assembly
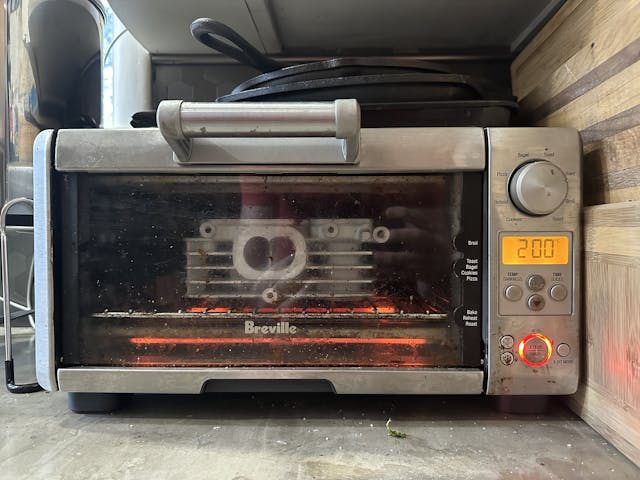
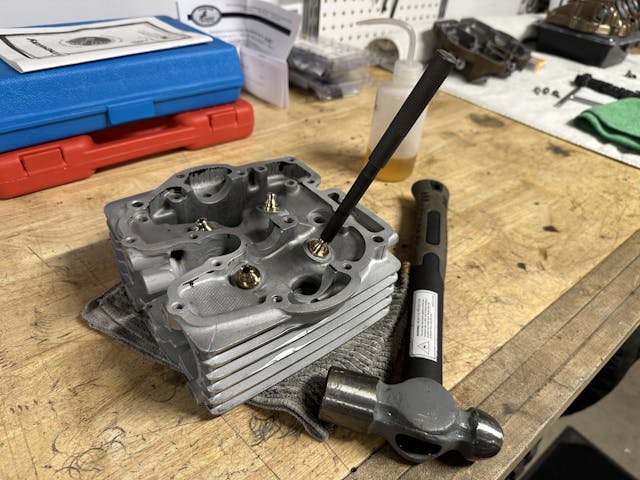
The other day I needed to press eight bronze valve guides into two aluminum cylinder heads. The setup instructions for the parts called for .0015″ to .0025″ press fit, and with everything prepared and reamed to size, the guides were put in the freezer overnight and the heads were put in the toaster over at 200 degrees for 20 minutes. I used a special punch to align the guide and took light taps with a hammer to set them home. When the metals normalized to the 60-degree garage temps, everything was pressed and secured solidly.
The exact physics of it are a bit murky to me yet, but luckily you or I don’t need to understand that to know exactly what to expect from heating things. Thermal expansion coefficients can be looked up in resource materials like Machinery’s Handbook, or the internet—whichever is more handy.
To Add or Remove Hardness
The materials we work with are fascinating when you get down to it. Even as at-home mechanics, we have the power to alter the properties and behaviors of steel or aluminum. This can be great for making tools, fabricating, or even reusing parts. Annealing a sheet of aluminum makes it much easier to form, and also works for copper gaskets or washers to help make them a little more malleable and thus seal small imperfections better. The process involves heating to high temperatures then cooling either rapidly or slowly and controlled in a heat sink material like sand.
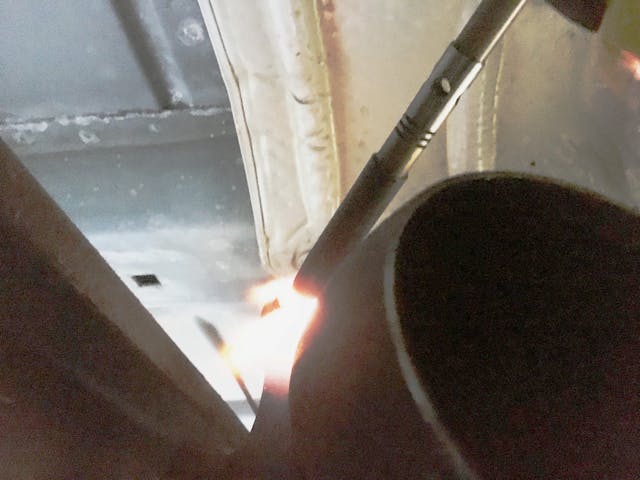
To Weld

Add enough heat to a part or material and it will likely liquify. Doing so in a very controlled method with the addition of a filler material gives the ability to create a strong bond between what was formerly two different parts. Welding is a garage superpower that comes with great responsibility—mainly that we be realistic about how good we are at it. A great weld is extremely solid and strong, but a mediocre or bad weld is downright dangerous in the wrong spot or place. Know the limits of your skills, machine, and materials in order to utilize welding in the most effective way possible.
Heat is a superpower in the garage that we can use for all these things, and quite a few more. There are a multitude of methods to add or subtract heat which range from totally normal to unconventional, but they’re all effective. Regardless of what method you use, know that heat can be your best friend if you know how to use it.
***
Check out the Hagerty Media homepage so you don’t miss a single story, or better yet, bookmark it. To get our best stories delivered right to your inbox, subscribe to our newsletters.


You can’t become a good welder until you’ve been a bad welder… so don’t necessarily let your limitations stop you
Of course not, but I’ve also been shown roll cages with welds that still haunt my dreams–and the “fabricator” was very proud of their work. There is a time and place to learn.
if the bolt your heating expands into the threaded area of where it’s fastened would that make it tighter ????
The application of heat into my workshop on cold winter days has indeed furthered many of my projects by allowing me approximately 90 more days per year to potentially be out there doing something. Also, the application of heat to water in order to brew coffee out there has removed my excuses of having to come back into the house whenever my cup has emptied. I consider these two examples of what heat has done for my project progress to be the most important ones I can think of. 😉
++ on the coffee. Add to it the removal of heat from some of my favorite 12-ounce beverages…….especially when bench racing, hangar flying, admiring a task well done or contemplating what to do next.
👍👍
One of the greatest recent tools is induction heating. You can heat the part that need heated and not those around it that can be damaged.
For many years we would heat suspension parts to remove bolts and damage the part from the heats. It would become fragile.
The best use of heat in a car in my part of the country is the advent of the heated steering wheel. I hate gloves and the heated wheel has been a blessing. People down south may not know the full effects of this but up north they are appreciated.
I also was going to list insulated and heated shops. Mine in the dead of winter is a blessing. I turn up the heat remotely. The shop will be u0 degrees in 15 min. I make the short dash to the shop in shots and work out there like it was July in December.
Years ago I worked in the cold and my hands would ache. Often many things like washing and detailing just could not be done till the weather breaks. My productivity actually increased. I keep my work up and often have friends bring cars that need help in winter for a place to work.
Many community colleges offer evening welding courses for beginners at modest prices. It is worth the cost to learn proper techniques, what the numbers on welding rods and wire mean, stick, mig and flux core machine settings etc. usually you learn flat welding first, then you can go back for horizontal, vertical and overhead lessons if you wish. Tig is another technique but not many of us have that machine in our garage.
I just bought a TIG and it is more like soldering than welding. I definitely need more time with it… unfortunately I keep jumping back to the ol’ faithful MIG to get things done… and it is generally 3:1 on the time it takes to TIG vs MIG
I’ve done it the other way round! Had a MIG years ago, took a TIG class and got the machine. I just bought a MIG again, as I was going through too much gas on mild steel projects that were not critical, like the snow blade for my riding lawn mower.
I wish I could find a course like that. The local community college has only a comprehensive program designed for would be professionals pursuing certification.
The introduction to welding class is a good way to get started, sometimes you can repeat it several times spending free time on one process each semester
My local CC had a similar program but I contacted the teacher and he allowed me to audit the introductory welding class. That might be worth a try.
My one regret on the class is that, based on his recommendation, I stayed with MIG when the class moved on to TIG. His logic was that TIG machines were so expensive – c2000 – that I would never realistically be able to do it, so better to focus on my MIG skills.
I have both TIG and MIG, and used to have a stick welder. Never had a class. For me it is better to learn by doing. Today, there are 10,000 teachers on youtube showing you how to weld and you don’t have to go anywhere. With the price of welders today, pick one up and start practicing, it is fun. If you practice on your own, you’re going to screw up. If you take a class on welding, you’re going to screw up. Practice.
I should also have said it is important to know which rods are compatible with your stick machine. I’ve helped friends with their welding often because they are on the wrong polarity or trying to weld with DC rods on an AC machine. Also damp electrodes or poorly coated mig wire. Electrodes should be kept warm and dry. Same for spools of mig or flux core.
If there is any lack of shine on your MIG spool, throw it out. MIG wire is not that expensive
Not so sure about that advice. Aluminum immediately forms an oxide on it’s surface when exposed to air. The oxide melts at a higher temperature than the base metal. The heat of the arc will eliminate the oxide. Run a few passes on a piece of scrap if you are concerned.
Side note- The aluminum oxide layer is also the three most important rules or welding aluminum are : Clean-Clean-Clean!
Let’s not forget the assistance of hot air from tune up experts.
When I was helping on a stock car the car owner called the guys who stopped by to lean on the fenders and offer advice never got their hand dirty were tune up experts.
At times they did help, in their own way.
Yep, helps with the process of elimination. Been there, listened to that.
Be careful when heating aluminum (Or “Al-YOU-mini-um”. Unlike steel, it does not change color when heated and it begins to melt around 1250F. You might want to use a “Temp-stick” or some other method to keep track of how hot things are getting. I learned this the really hard way by putting my hand on a tube that had been tack-welded into place a few minutes earlier.
When welding, helping someone weld, it is always a good idea to brush any piece of metal lightly with your fingertips before wrapping a paw around it. Good luck and stay safe!
When heating for shrink fits / press fits in steel, the coefficient is easy to remember: .0000065 Inches Per Inch Per Degree Fahrenheit of expansion. That’s five zeros, then a six. That’s how much expansion per each inch if length you get as you raise the temperature (contraction if you cool the shaft). Practically speaking, roughly the same for diameters. Did a lot of keyless shaft fits working for Philadelphia Gear Corporation when I was barely out of college. Be careful not to ruin the heat treatment of the part (we used to use temperature crayons). Be especially careful with bearings.
As a fabricator, heat and rapid cooling (wet rag) applied to sheet metal can help when you need to shrink something, like an oil can bulge. There’s a whole art to that, and a lot written. Good technique to learn.
The article made reference to annealing aluminum. I had a wise old aircraft mechanic show me something interesting once: He set an oxyacetylene cutting torch to give a sooty flame and proceeded to soot up the surface of the .080″ aluminum he was going to form. Then he sharpened up the flame to a neutral flame and very carefully dusted the soot off with the flame. He said that was the most field-expedient way of annealing aluminum sheet. He then proceeded to use a body hammer and wooden cone to form a funnel shape (he sooted and annealed again to get rid of work hardening as he went). Interesting technique. I’ve never seen it in any of the books I’ve read, but I have used it myself. The man that showed me that is no longer with us, but I still have his cone and body hammers……..
@TonyD95B- Great post. Very informative. I had forgotten about the carburizing (sooty) flame method of annealing aluminum. I spent 35 years working for Philly Mixers #1 competitor in the fluid mixing industry- Mixing Equipment Co. Philly had probably one of the most knowledgeable folks on gear manufacturing in the world. Small world.
You are correct, the soot disappears at around 900 degrees and will take your aluminum to about a zero state for easy forming.
Heat from a heat gun makes old flexible hoses and vacuum lines soft and easy to remove and reinstall without splitting. It also helps reshape plastic panels that have gotten warped or bent. If it’s too hot to touch it’s probably too hot, so be patient.
I’ve reshaped some sun damaged plastic parts with the heat gun before. Very handy. You just have to be patient.
If your project car becomes a frustrating liability, heat in the form of a garage fire can net you some insurance money. (Sorry Hagerty!)
It can also get you ten years room & board on an arson charge.
Note to self and others: don’t necessarily follow any advice written by Tim Blackburn (or at least not until after consulting with your attorney) 😁
Heat-shrink tubing is flat-out the best insulation especially for automotive electrical work.
Heat (applied to wires to be soldered) for making reliable electrical connections is infinitely better than crimp connections and twisted splices.
My heat gun has become invaluable for heat shrink and removing the harness connector on many 4L60 and 4L80 transmissions. GM uses a glue like sealer and you must use heat to soften it.
For stubborn rubber hoses, grommets and such I heat them in hot water. It works on those plastic snap in items too. When I worked at at a small engine manufacturing facility we would heat the small lengths of gas line in a crackpot filled with water. They slipped on the barbed fittings like butter. I have also used the heat and freeze method on suspension parts. Control arm in the oven and bushings in the freezer. I’ve done whole suspensions and steering systems without a press using this method. A big vise and assorted sockets, a big mallet and it can be done.
A torch was the only thing that allowed me to remove the downpipe from the back of the turbos. Air gun alone would not do it. Torch the nut and they moved.
Years ago I drove a cement mixer. Hanging off the frame is a large probably 50 gallon water tank. There is a large hex shaped nut about 4-5” diameter with a rubber flap in the center. You put a 2” water hose in there to fill the tank. When done there’s an air valve you turn to pressurize the tank- the rubber flap seals up the tank. One day the flap on my truck broke loose and fell inside the tank. The mechanic took his torch with a rosebud tip and heated it up. Then he took a shop rag soaked in cold water and set it on the hot nut. About 30 seconds later he took a large pipe wrench and gave it a little tug. Proceeded to spin it out by hand the rest of the way. I thought he was some type of magician. I’ve been a backyard mechanic my whole life and get by pretty well on my projects but I still have respect for the professionals.
I wish to mention that mistaking a magnesium part for aluminum is dangerous when using a torch . Magnesium will ignite and burn with a blinding flame . My brother was heating a flywheel on a lawn mower to free it ,all that was left was a white powder on the ground . p.s. work outside if possible away from combustable items .
Also important, when working with magnesium, to NOT use water, on burning magnesium, to extinguish the flame. That will just cause a serious reaction, with the oxygen in water, and the burning becomes even more intense.