4 ways to take your project car to the next level
When it comes to the projects we choose to tackle in the garage, most of us look to turn out the best finished product we can. Sure, sometimes “good enough” is good enough. But once we have a given task under control, often it’s worth it to do those final few steps to take things up a few notches. Sometimes, they’re at the very end, which can seem like an exhaustive affair. It shouldn’t because it isn’t.
In fact, the vast majority of projects can be dressed up quite easily while working. Taking the time to make a few minor tweaks—which also happen to be affordable—can take a project from merely functional to something worth looking at and being proud of. Here are four items that I use in my garage to dial up the fit and finish of the cars and motorcycles that occupy my time.
High-quality paint
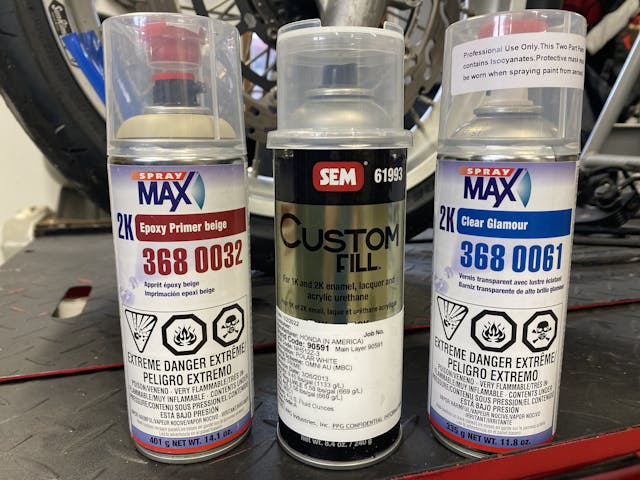
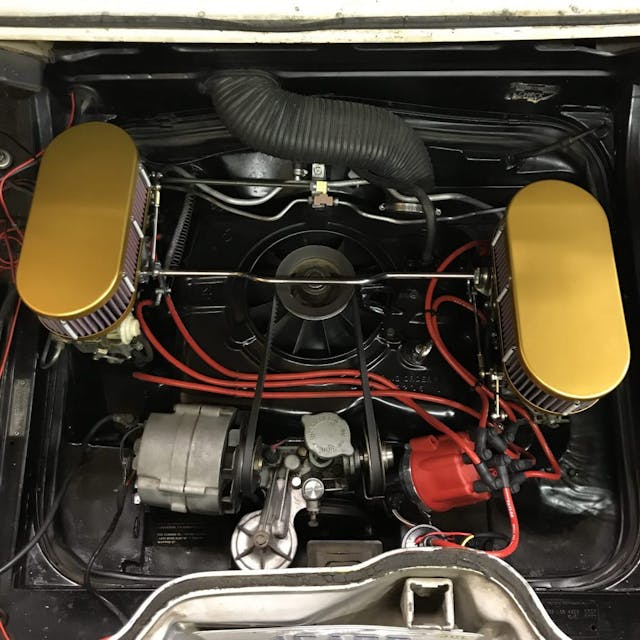
Most projects require some level of disassembly. That means you’ll have parts out on your workbench that might possibly never come off the car again. Now is the time to take an hour or two and put on some paint. Cleaning alone might be enough for some parts, but a good coat of paint creates a nice, even finish that, when properly applied, will last a long time.
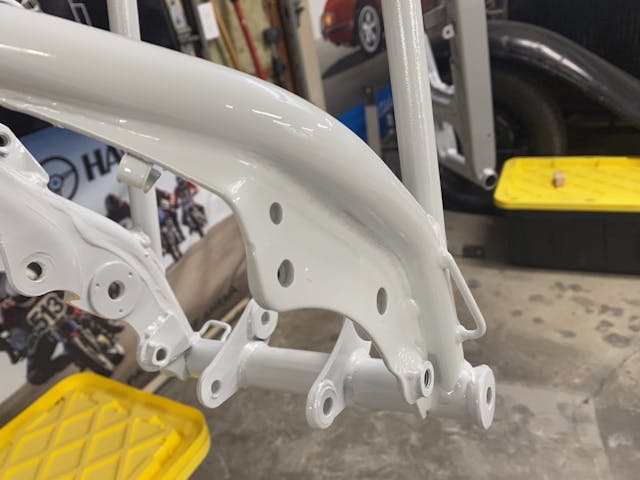
You don’t even have to call up a painter to get good results. Find your local autobody supply and talk to the folks behind the counter. They exist to help you and will set you down the proper path in terms of selecting the right primer, color, and clear coat to get the best results. Yes, Rust-Oleum will work, but the durability provided by a properly catalyzed clear coat goes a long way when it comes to vintage engine bays that accumulate coatings from fluids like oil and gas over time. An added bonus is that most paint counters can mix custom colors into aerosol cans for you, and that means you can add one more custom touch. Granted, this bit of the extra mile will cost you more than a cheap rattle can, but the finished product is worth it. I promise.
New hardware
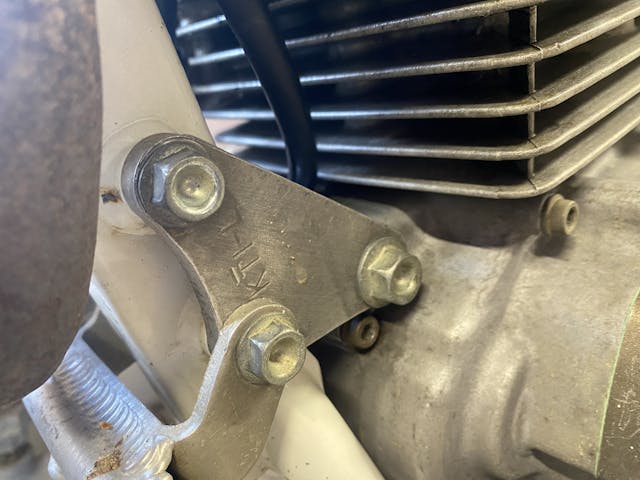
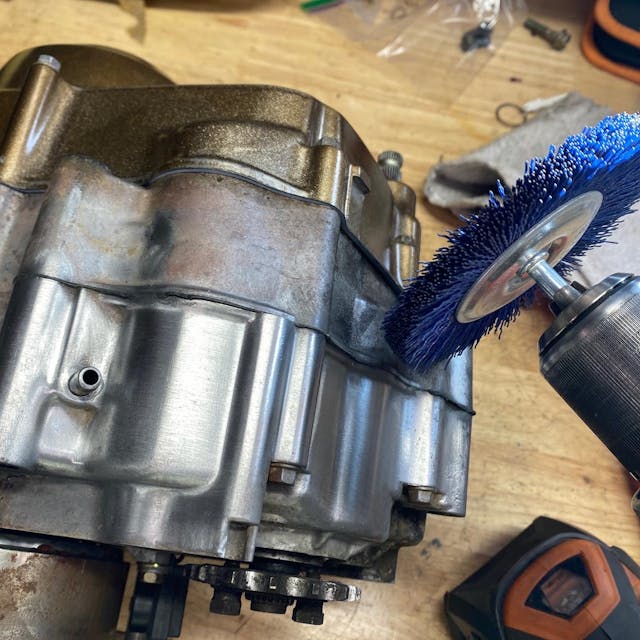
More and more, modern cars are produced with throwaway torque-to-yield bolts, but our vintage rides are composed of hardware that is often safe to reuse. That doesn’t mean it’s the best idea, though. Replacing partially rounded or otherwise damaged hardware is a quick way to dress up any repair. It also ensures that future you will not be left cursing present you for putting back in hardware of questionable integrity.
If replacing is not an option, at least grab a wire wheel and knock off all the crusty bits. A bench-mounted wire wheel is great, but the same effect can be had by clamping the hardware in your bench vise and using a drill to spin a cheap wire wheel. Be careful, because wires will fly out of these wheels. Eye protection is critical, and sweeping up right after is the best way to keep those small wires from getting into tires or other delicate areas.
Removing tags and labels
Whether it’s the California cancer warning or installation instructions, leaving unnecessary stickers on parts as you install them all but ensures the finished product will look odd. Removing stickers and labels creates a cleaner, more cohesive finished product. Use rubbing alcohol or dedicated cleaner to remove gooey adhesive once you’ve pulled off the stickers. If the sticker contains important information you might need in the future, consider simply relocating it to an area of the part that isn’t as visible when the assembly is together, or documenting the sticker with a photo and written notes in your project car log. You do keep a project car log, right?
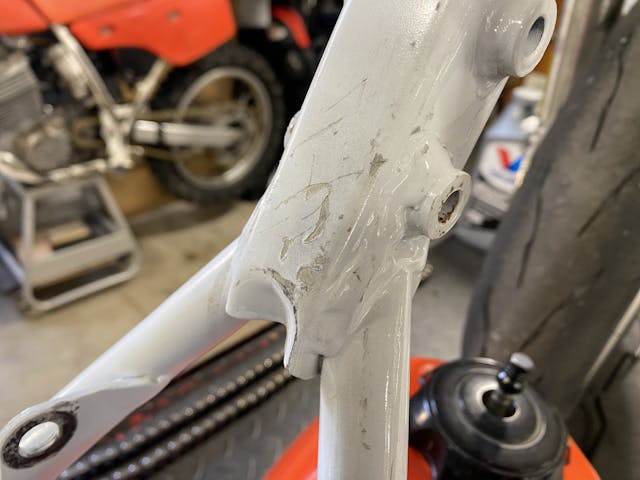
Assembly protection
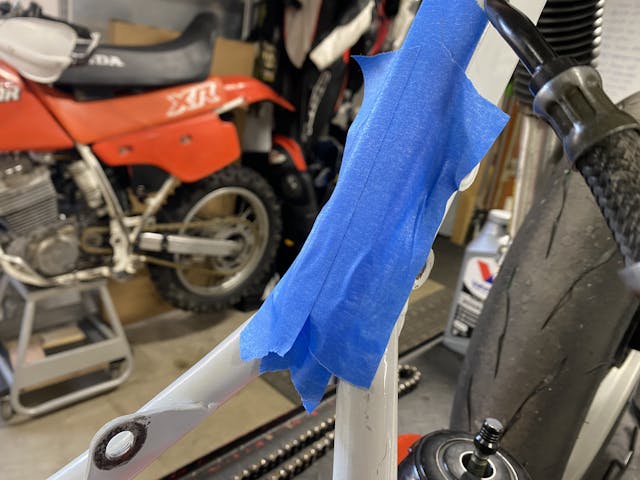
Nothing—and I mean nothing—is as disappointing as having a bench full of clean parts ready for assembly, only to drop a wrench or knock something over and cause a scratch or chip on finished surfaces. Going back far enough to properly fix it is a huge delay, and living with the damage is hardly fun. Instead, this is a situation where an ounce of prevention is worth a pound of cure. Wrapping things in rags or covering them in painter’s tape ensures that everything will stay the proper finish, right up until the last second, when the project is put back together. Only then should you remove the protection. I have even used cheap vinyl wrap left over from other projects to act as a paint protection, since it is a little more durable than tape and comes off clean. Just be sure anything you painted is fully cured before covering. Peeling the paint off after it is all assembled is even worse than scratches. Ask me how I know…
***
Check out the Hagerty Media homepage so you don’t miss a single story, or better yet, bookmark it. To get our best stories delivered right to your inbox, subscribe to our newsletters.


Looks like maybe a Nyalox brush on the lead photo, although not mentioned in the article.
I agree, Kyle! One thing stands out to me–people selling their vintage air-cooled VWs and the car looks stupendous on the outside. BUT, just open the engine compartment and there is oil, dirt and missing parts through out! WHAT!? Why would anyone NOT take the time to do as you encourage–to at least make the sale go more smoothly and quickly! Keep up these practical and sensible tips, Kyle! jay
Many years ago in my younger life, I had a ’29 Model A Sport coupe (stationary cloth top, landau irons). Not being of driving age, my dad and I worked on it, and I was introduced to the finer points of “owning” a car.
I/we worked on the mechanicals, made it safe to run, clean under and around, and a rattle can black paint finish. To the “normal” car buyer, it would be a nice cheep purchase. I saw one in a used car lot that was all “gussied up” with the chrome, and a beautiful paint job, albeit with a fancy price tag on it. I opened the hood, and found that it looked like nobody had even touched the important mechanicals – dirty engine, loose brake rods, rust, and the rest of the underside of the car was the same. Seems to me that a lot of people will buy from the cosmetics, rather than whether or not the car is mechanically sound and safe to drive. Lot of disappointed people out there that have learned that the beauty fades when the car’s unsafe.
Good info – I would add:
If painted surfaces might see fuel/oil/coolant contact, make sure the paint can survive it.
Evaporust is a great cleaner for rusty items, as is tumbling in appropriate media.
My personal aesthetic is minimizing the amount of different colors on an engine: I paint aluminum intakes & etc same color as the block. Looks more integrated to me.
I’ll paint racecar engines & transmissions a light grey so any leaks or issues can be spotted easily – that’s an old Traco/Penske trick.
In complete agreement with this entire article. I made a point to thoroughly clean every part that came off this winter, the shiny bits in my engine bay are a roadmap of what’s been done and what is left to do. I feel satisfaction when I open the hood.
An additional benefit to extensive cleaning is finding flaws that might have been overlooked.
Paint the brake drums and diff. cover red and put lights on the traction bars. That’s how you did it in high school in the 70’s (snarkiness intended).
What is that blue rotary brush being used to polish metal. Some sort of plastic wire wheel?
I put the wire wheel in my drill press and hold small parts in my gloved hands. I hold larger parts with vise-grips. It just seems to work better for me than putting the wire wheel in a hand-held drill motor.
I have 4 bench grinders. I put a bolt a small piece of angle iron to each of them. when I need one I clamp it in the vise. One of them I have a wire brush on one side other a wheel that to polish. I we are gloves & safety glasses a must. One of the others I have a buffing wheel & extra fine grinding wheel. The other 2 basicly for grinding. Clamping them in vise saves a lot of counter space.l am a old car guy I am double 7’S that is77 & still going strong.
When I fixed up my Triumph T-120, I replaced most of the old nuts and bolts with chrome-plated hardware. It really made a difference. I wish I had known about that brand of spray paint you use, though. Krylon was the best I knew how to find.
A clean interior, engine bay say so much about the owner and the condition of the car.
Good advice. I restored a ’71 Midget a few years ago. A super cheap and easy upgrade was to replace every single nut and bolt in the engine compartment with a nice stainless piece. Amazing change for very little money and effort. When I saw the lead photo of that plastic brush/wheel chucked into a drill, I immediately thought of an upgrade I have done many times over the years… We all eventually need to replace an old alternator/generator, right? It’s one of the easiest fixes out there. Most of them come from the box with a very ho-hum “finish”. Pretty much just a rough casting and bare metal. A few minutes on the bench grinder with a wire-wheel loaded up makes for an amazing transformation – not quite like polished chrome, but a big difference that looks stock, only somehow better. One of those things where you can’t quite place what is different, but know it looks better than it should do. Oh – and take the opportunity to remove and paint any fan blades and pulleys before putting it all back together. (and as Kyle reminded us – do that after the paint cures – ask me how I know!)
Stainless hardware may not be capable of handeling the required load for the application. Use new properly load rated bolts and nuts. New looks good as well.
Every car part that I buy has a California Proposition 65 label on it.
“Caution! This steel bracket can cause Cancer!”
It’s absolutely ridiculous!!
The amount of time, effort and money that gets wasted because of those STUPID stickers is incomprehensible.
I know it may sound harsh, but…. I often find myself wishing that whoever came up with Prop 65 gets Cancer.
California: other than not enough rain/snow – too much rain/snow, earthquakes, fire storms. land slides, power blackouts, insane cost of living, taxes and bizarre propositions – it’s a “fantastic” place to live.
Enough of the Cali bashing, or any other state for that matter. Please, I find welcome refuge in a site like Hagerty, free from politics. Let’s keep the comments related to topics car nuts, and gear heads come to this site for.
Hear Hear John, it seems every time there is a story on California everyone piles on with the negative comments. It’s not perfect but there is a saying that is very appropriate, “Smile California your the center of the world.”
Wishing cancer on who came up with Prop 65 definitely sounds harsh. While shopping for seat covers I found the California Prop65 warnings helpful. Yes, it took a little more time, and a few more $ to find covers without the warning. I don’t want to be exposed to the outgassing of harmful chemicals.
Even clear enamel will make a huge difference with those parts whose outer surface will fade more quickly with moisture + heat + dust and dirt.
I’ve taken a hair dryer to remove the yellow/black stickers on my sun visors — I don’t have to be reminded every time I drive the car. Also, I had some carbon fiber-like 3M stickers from a bimmerfest event that I cut up and placed over the orange seat belt receivers — the orange goes with nothing in or outside the car and keeps the colors more in visual concert with the gray/black/chrome theme.
Great points made in the article! My mantra is “Nicer than it needs to be” (“A lot” winds up in front of that sentiment quite often, but hey it’s just time), and sometimes it doesn’t take much extra effort. A casual observer may not immediately recognize what’s been done, but just gets a sense that things are tidy and well presented.