Pressure testing an engine’s cooling system isn’t a bunch of hot air
In the last update about my 1974 Lotus Europa Twin-Cam Special engine rebuild, I fought through some clearance issues and reached the point where the motor was finally assembled.
Next step: pressure testing. That had two components. The first was conducting a leak-down test just to be certain that air isn’t somehow getting past the valves and rings and streaming out of the combustion chambers. (I described the basics of leak-down testing last year.) With this motor, however, the main issue was pressure-testing the coolant system.
As I described in earlier stories, the Lotus-Ford Twin-Cam engine in both the Europa and Elan uses a conventional Ford 1600 block, to which a Lotus twin-cam head has been added. When the block is part of a Ford engine, it employs a pushrod configuration with the camshaft in the block and a flange-style water pump bolted to the front of the engine. However, to make the block work with the Lotus twin-cam head, it was necessary to design a front cover that could enclose the timing chain that stretches to the head to spin the camshafts, while also making use of the original water passage in the center of the front of the block for the water pump. The resulting configuration is very unusual. There is an inner cover referred to as the backplate. Then there is an outer timing cover that encloses the timing chain and tensioner. The water pump is integrated directly into the front cover, which means, unfortunately, that the head and cover have to be removed to replace the pump. And, to do that in the mid-engine Europa, the engine must be pulled.

The aftermarket kit from Dave Bean Engineering that I’m installing solves this unpleasant problem by using a water pump that’s a replaceable cartridge-style unit about the size of a small can of soup, which slides through concentric bores in the inner and outer covers.

But whether on an original or aftermarket setup, the coolant seal is made up of the paper gasket and adhesive that sit between the block and backplate, an o-ring where the water pump goes through the bore in the backplate, and sealant on the metal-on-metal interface between the center flanges of the two covers. If those seals are not perfect, mixing of the coolant and oil can occur, and you’ll get the dreaded chocolate milk shake in the oil pan, the radiator, or both, and have to tear the covers off to fix it.
For this reason, even if you’re assembling a bone-stock Lotus Twin-Cam engine, it’s strongly advised that you pressure-test the cooling system prior to installation. And because my kit has a removable water pump and a configurable water neck, there are more places for coolant to leak, making testing even more important.
Now, I do a lot of air conditioning work, so I am quite familiar with pressure-testing to prophylactically find and correct leaks. In the A/C world, I connect a nitrogen bottle to a manifold gauge set and use it to pressurize the system. Large leaks are immediately obvious because you can see that the gauge doesn’t hold pressure and you can hear the leak’s hiss. For smaller leaks, the gauge sinks slowly over the course of minutes, and spraying with soap solution (I use a refrigeration product called Big Blu) easily reveals the source of leaks because they blow big, obvious, soapy bubbles. The smallest leaks may only manifest themselves with the gauge dropping over the course of hours and tiny bubbles clustering together, looking like insect egg cases. In A/C work, the goal is to eliminate all leaks, and the best way to verify that is to pressurize the system close to operating pressure and leave it overnight. If, in the morning, the pressure hasn’t budged, you’ve succeeded. My goal was to apply this A/C-derived knowledge and equipment to pressure-testing the cooling system of the Lotus engine.
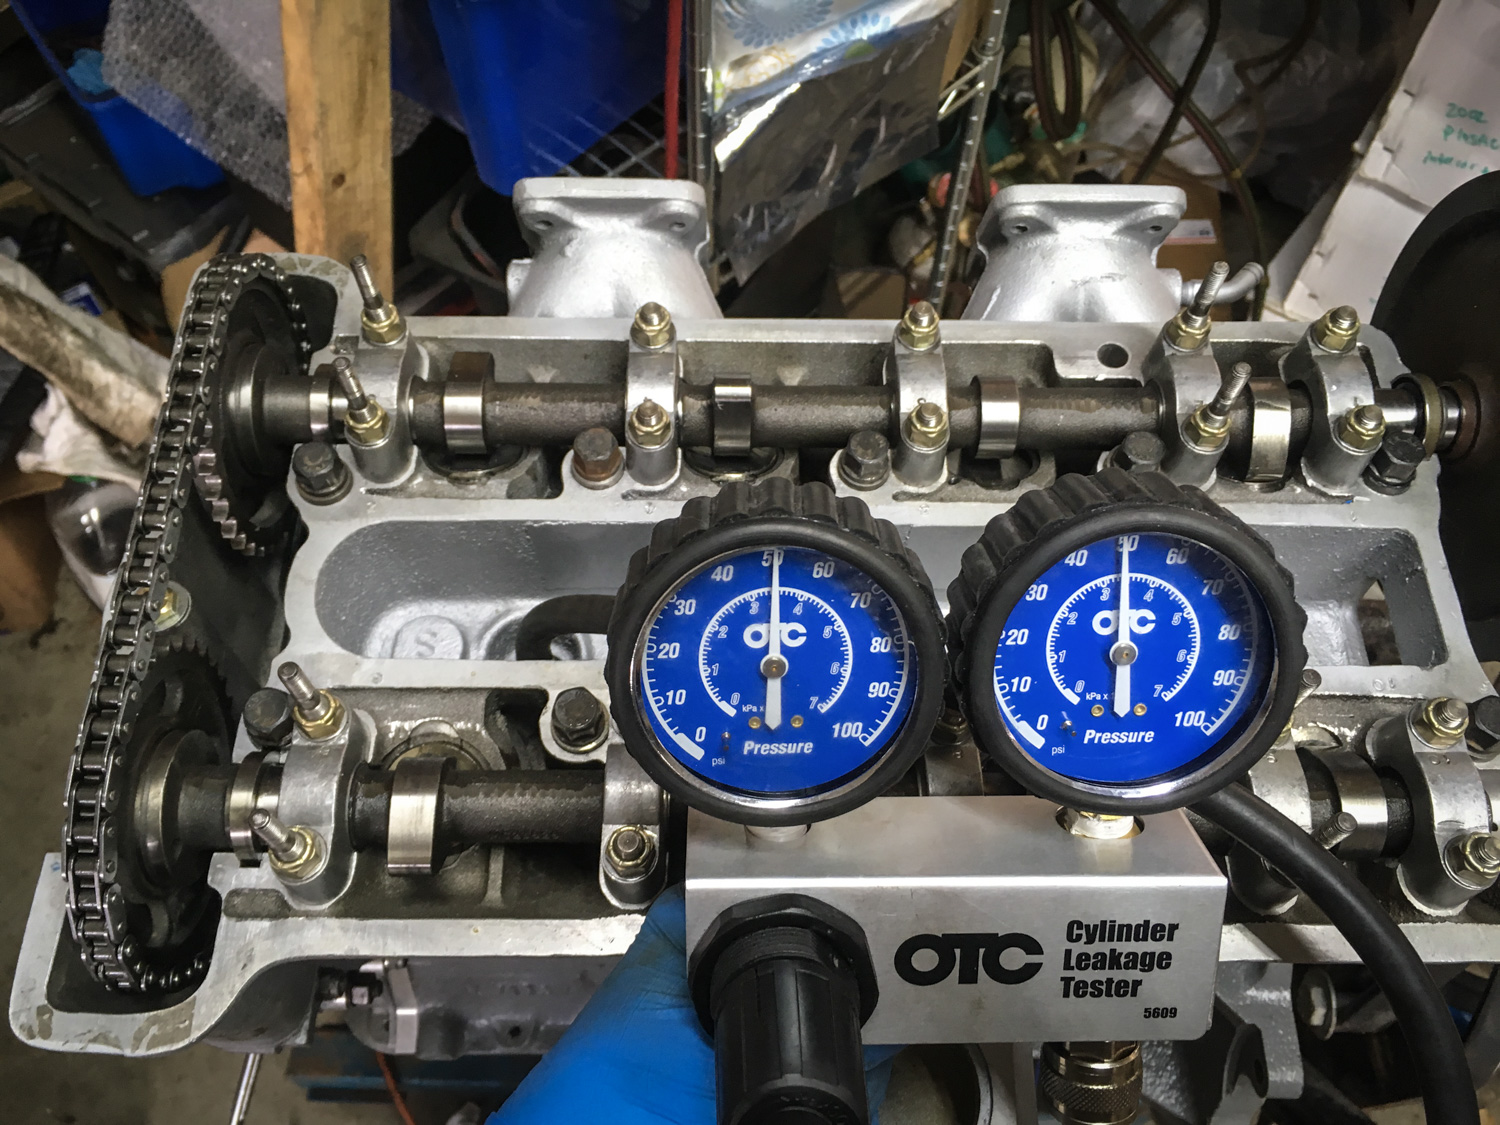
The first task was to block up the engine’s coolant ports and find a way to introduce the pressurized nitrogen. I plugged a couple of coolant hoses with rubber corks held in place by hose clamps and threaded the temperature sensor back into its hole in the head. By sheer luck, I found that a half-inch NPT to quarter-inch NPT adapter I had lying around threaded into the hole in the head where the heater valve normally screws in, providing a place to connect the gauge set and the nitrogen bottle.

This kind of pressure-testing is akin to peeling layers of an onion. You need to fix whatever leaks you find, even if they’re in non-operational places (such as the adapter itself), because only then will you be able to find the small leaks. To wit, on my very first pressure test, it was immediately obvious that neither the adapter nor the coolant temperature sensor was sealing. I learned that, although the two ports appeared to have the same thread, one was tapered, and one was straight. I swapped the fittings, but they still leaked. I replaced the Teflon tape with plumber’s pipe putty (later cleaned out and replaced with proper thread sealant) and got them to seal.

The leaks in the next layer were just as obvious. They came from the thermostat flange. I’d done a quick assembly of this using a skim coat of RTV on the gasket but without the thermostat in place, as I hadn’t yet ordered a new thermostat.

On disassembly, I found that there was substantial corrosion damage on both faces of the flange. I fixed it with JB-Weld SteelStik, sanded it down, ordered a thermostat and a new gasket, sealed it up with Aviation Form-A-Gasket, and on the second attempt, it sealed up tight.

With these big obvious leaks squelched, I began seeing what I was most concerned about—small leaks from the water pump-related hardware. The Bean water pump kit has an interesting design using two threaded holes, one on the front of the cover and a second one on the side. The purpose of these is to allow the kit to be configured either for a Europa like mine, where the water neck is on the front of the engine, or for the more common Elan and Cortina arrangement where the coolant neck is on the side of the cover. With this design, the same cover can be used for both configurations, and it’s simply a question of which port has the water neck and which has the threaded plug. Unfortunately, I found that mine was leaking through the threads on the neck.

I spoke with Bean and learned that, to preserve flexibility, they’d assembled the threaded plugs with anti-seize rather than sealant. They sent me another neck that had a crush-ring and an o-ring, and I sealed the threads with Permatex Seal+Lock. On the second pressure test, it held.

Unfortunately, once the neck was sealed up, I found a small leak at the threaded plug in the side. This shows the iterative nature of leak detection—you have to peel the onion and find and fix the larger leaks in order to unearth the smaller ones.

Between ordering fittings and waiting for sealants to cure, the process took weeks. The good news was that, once the threads were sealed up, I wasn’t seeing any bubbling either from the water pump flange or from the seams between the block, backplate, and outer timing cover. This was the result I was hoping for.
At some point in this process, I discovered a minor problem with the cartridge water pump and exchanged it for a different one from Bean. I’d installed the first pump, as per Bean’s instructions, with RTV on the pump’s three o-rings to ensure proper sealing. When I pulled the pump out to replace it, there was, not surprisingly, RTV on the inside bore surface that I had to carefully clean out. I almost coated the new pump’s o-rings with RTV, but then I thought about it carefully. The whole point of the cartridge-style pump is that, if it fails, it can be changed with the engine in the car by undoing two bolts, pulling the pump out, and popping in another one.
Since a Europa is a mid-engine car, that pump is right behind the small of your back, close to the firewall. While it is possible to maneuver the cartridge out with the engine in the car, you’re not going to be able to easily look into the bore to clean out old RTV. So, as an experiment, I installed the new pump not with RTV but with a smear of silicone brake grease on the o-rings.
I put it all together and pressure-tested things yet again to 20 psi. Initially, I was elated by what I saw—the gauge holding steady, and no big soap bubbles anywhere. I left the garage and went inside for dinner.
When I rechecked a half hour later, though, I found that things were not perfect. The pressure on the gauge had fallen from 20 to 18 psi. There was an “egg sack” of small bubbles on the flange of the water pump, indicating that, without the RTV on the o-rings, it was leaking a small amount.

Far more troubling, though, was the fact that, with the big leaks squelched, I was seeing “egg sack” bubbles at the back of the engine, at the head/gasket/block interface. Then, when I sprayed around the entire head/block interface, I began to see them everywhere along the head gasket seam. When I looked carefully, I could see that the bubbles appeared to be coming from within the layers of the copper head gasket.
Damn.

I sought advice from one of the Lotus forums, and the prevailing wisdom was that a) Things are likely to look worse when pressure-testing with nitrogen than they really are (liquid coolant doesn’t escape as easily as nitrogen); b) applying air conditioning-based leak detection techniques was incredibly useful in pressure-testing the Lotus engine, but it may simply not be reasonable to expect it to hold pressure indefinitely like an A/C system should; c) a small amount of weeping from the old-style layered copper head gaskets isn’t unusual; and d) it might seal up once the engine is heat-cycled a few times.
On the one hand, with the engine still on the stand, it would never be easier to yank the head and change the head gasket to one of more modern composition. But on the other hand, it was possible that nothing was wrong at all, and if I put the engine in the car and plumbed with coolant, I can run it—and if it still leaks, pulling the head with the engine in the car isn’t that much more work.
So that’s where things are. I’ll be mating the engine to the transaxle and installing the pair over the next several weeks. I’ll let you know how it goes.

***
Rob Siegel has been writing the column The Hack Mechanic™ for BMW CCA Roundel magazine for 30 years. His most recent book, Just Needs a Recharge: The Hack Mechanic™ Guide to Vintage Air Conditioning, is available on Amazon (as are his previous books). You can also order personally inscribed copies here.
