The Great Lotus Shift Linkage Repair
As drivers, we are perhaps the most sensitive to the parts of the car we actually touch. A tight gearshift feels heavenly; one with obvious play in it drives many folks crazy.
The practice of tightening up sloppy shift linkages in my vintage BMWs is very straightforward. The design uses a gearshift lever with a ball suspended in a cup. The cup is part of a shift platform that’s bolted to the back of the transmission with a pair of rubber bushings in the front and a support bracket in the back. A hole in the bottom of the gearshift lever connects to a linkage rod via two forked tangs and a pivot pin. A pair of nylon bushings take up the slop, or most of it, at the pivot location. The back of the linkage rod has a knuckle (essentially a small universal joint) that connects to a shift rod that protrudes out the back of the transmission. This all allows front-to-back and side-to-side motion of the gearshift to translate into motion of the transmission’s selector rod. Obviously, things vary car to car, but this basic design is fairly common.


Troubleshooting shifter or linkage slop in a configuration like this is pretty straightforward. You pull up the gearshift boot and look at the cup in which the shift lever sits. If there’s any motion of the cup at all, the problem is in the bushings attaching the shift platform to the back of the transmission (the bushings can wear out or the bolts can come loose) or in the rear-mounted support bracket. A missing bolt on this piece will cause the shift platform to touch the spinning driveshaft when shifting into second or fourth and make it sound like a lathe. (Pro tip: Diagnosing this over the phone is easy and makes you sound like a god. I highly recommend it.)
If the cup holding the shifter is stationary, as it should be, then side-to-side shifter play is usually due to deteriorated nylon bushings at the pivot between the shift lever and the linkage. If, after replacing the bushings, there’s still unacceptable play, it’s possible that metal components themselves may be worn. Aftermarket shift kits are often available that replace sloppy nylon bushings with tightly-machined bronze ones and give a tighter feel than when new.
That’s pretty much it. It’s highly unusual, after stepping through this process, to have excessive slop or difficulty in engaging any gear.
Which is to say that, as was the case with so many things, working on the shift linkage on my vintage BMWs did not prepare me for the analogous job on my ’74 Lotus Europa Twin-Cam Special. To quote Casablanca, “Shocked! Shocked!”
Although the Europa is a mid-engine car, the linkage pieces aren’t that different from the cars I’m familiar with, at least not conceptually—there’s still a shift lever ball suspended in a cup, two tangs at the bottom connected to a linkage rod and with nylon bushings taking up the slop at the pivot point, a universal joint, and a connection to the transaxle’s shift rod—but, as you can imagine, with the transaxle at the back of the car, the linkage is quite long.
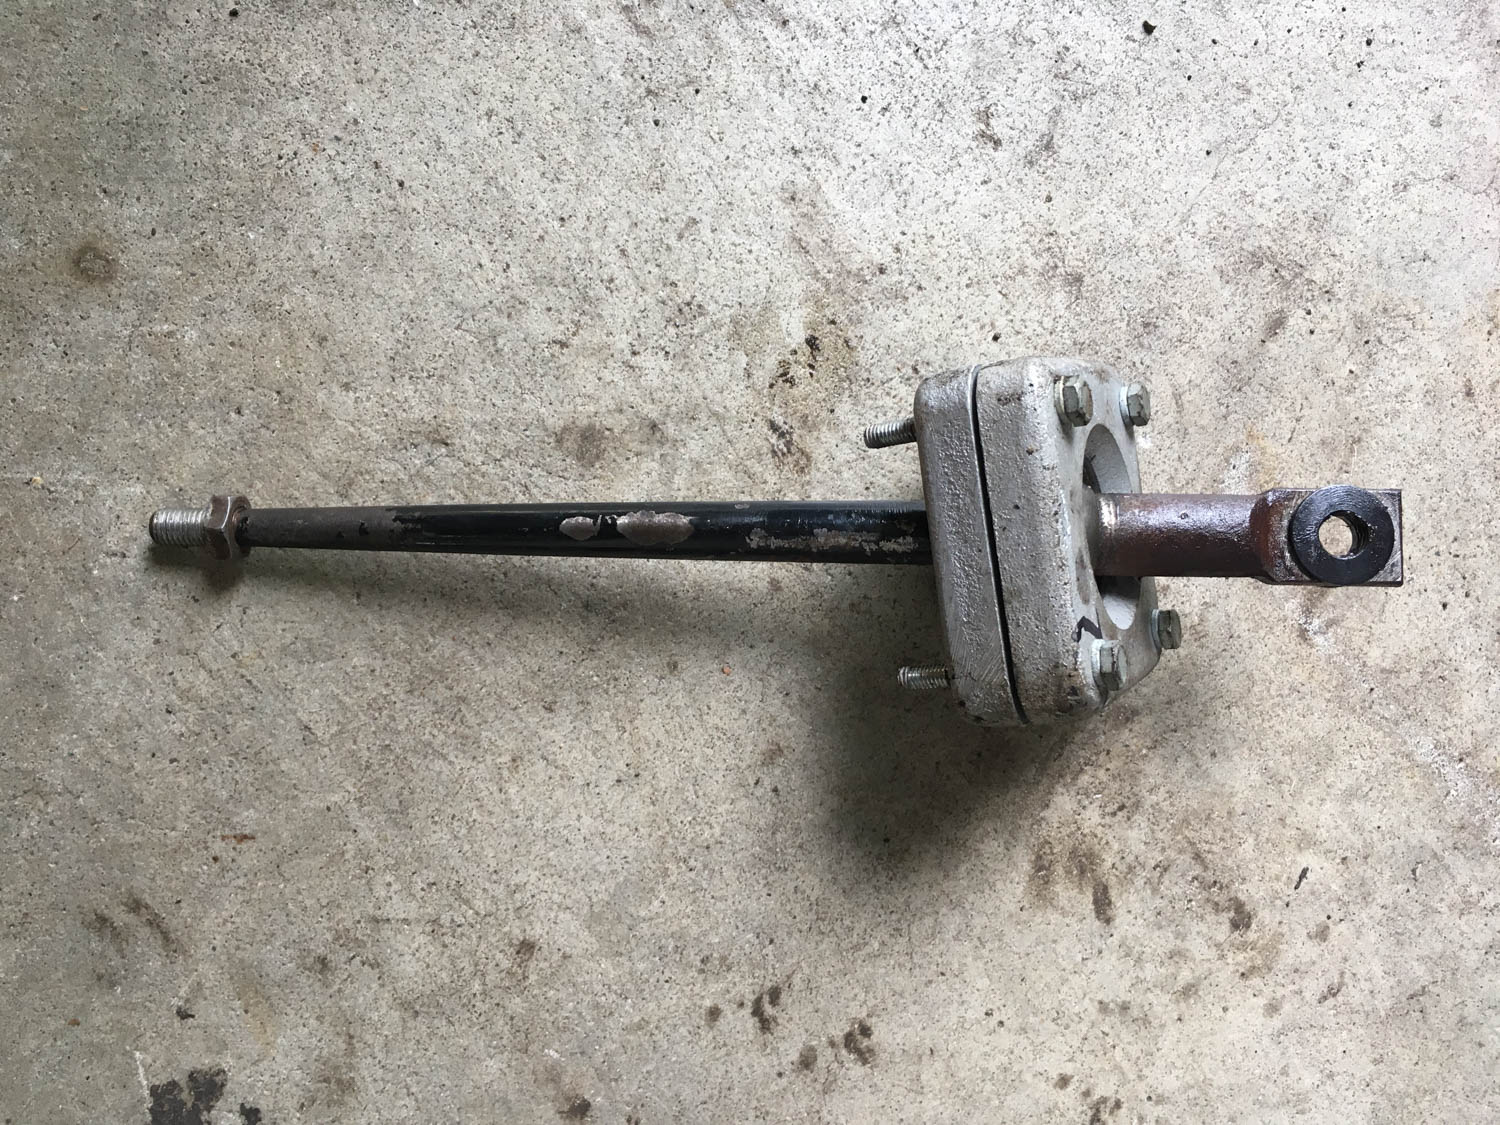
On the Lotus, there are two “linkage tubes,” each with a bend to route it around undercarriage components. The tubes are connected to each other with a big universal joint, one of whose ends is reverse-threaded to allow the joint to be twisted and the entire length adjusted (like a turnbuckle). That universal joint is held in place by a Heim joint and a rubber bushing secured in a bracket to the side of the bell housing. A second, smaller universal joint attaches the rear linkage tube to the shift rod coming out of the back of the transaxle right below the rear bumper.

Here’s the problem. Because the shift tubes aren’t straight, they have a required orientation relative to the position of the gearshift lever and the transaxle. The front one is fixed because it has the tangs in it to hold the gearshift lever, but the “clocking” of the back section relative to the front is obtained by rotating one of them on the threaded rod that comes off the end of the universal joint. This doesn’t sound like a big deal, but the orientation is fixed with roll pins driven into holes drilled through the body of both sides of the shift tubes and threaded rods. So, in order to change the orientation, you need to drive out the pins, heat up the joint to break the Loctite that’s been on there for 45 years, readjust it, then drill a new hole in a new location and drive in a new pin.
Why would you need to change it? Well, in theory, you wouldn’t, but there’s an expression: “In theory, theory and practice are the same thing, but in practice, they’re not.” Things get old. Things wear. Things bend. What was aligned in 1974 needs to be aligned differently.
So, with that backdrop, here’s how “The Great Lotus Shift Linkage Repair” unfolded.
This past spring, after nearly six years of effort, I finally got the Lotus’ engine rebuilt and the drivetrain back in. I dutifully reattached the linkage’s big universal joint and bushing to the side of the bell housing and the small universal joint to the transaxle itself, then sat in the seat and tested the linkage.
Yuck. Horrible side-to-side slop, a metallic smacking sound on engaging reverse, and a complete inability to find fifth gear. The punch list for getting the car running and drivable was already quite long, however, so I lived with the slopping linkage.
But around mid-summer, I had the car running well enough that I began taking it on the highway, and found that, in fourth gear and at 55 mph, the engine spun at around 4000 rpm, which was a bit high for the recommended break-in procedure. I really wanted to get it into fifth but couldn’t.
The recommendation in the Lotus forums was the same as it is in the vintage BMW world—start with replacing the nylon bushings at the bottom of the shift lever. Unfortunately, on the Europa, the bottom of the shift lever is inside a barely-accessible body channel. It’s easiest if you unbolt the shift cup from the body, undo the two universal joints from the transaxle, and draw the entire linkage mechanism rearward and out of the car. I did and found that the two nylon bushings were completely missing.
I installed new bushings, along with the special pivot bolt and nyloc nut, and put the linkage back in. Sitting in the car and rowing through the gears, there was no question that installing the nylon bushings made much of the side-to-side slop vanish. However, I still couldn’t find fifth gear.
And now we get to the issue of detents. Unless you’re driving a vintage Ferrari with an externally-gated shifter, most transmissions have some sort of detent you need to lean against to engage reverse and fifth. Although it feels like the shift lever is in direct contact with the detent, it’s usually not; usually the detent is a ball-and-spring arrangement inside the gearbox itself. The Europa’s Renault 365 transaxle is a bit unusual in that the detent arrangement is actually external. If you remove a little plastic cover on the back, you can see what looks like a silhouette of Batman’s helmet with two ears pointing up. When you lean the shift lever left and right, the “helmet” ears push the detent ball back against its spring, allowing access into reverse and fifth, respectively. At least that’s what’s supposed to happen.

In my case, when I leaned the shifter left and pushed hard, it would cause one ear to pop the detent and go into reverse with all the subtlety and grace of hammering a nail into a 2×4, but no amount of leaning it right would cause the other ear pop the detent and go into fifth. By grabbing the linkage attached to the back of the transaxle and twisting it, I could move that ear manually and pop in the detent ball and shove the selector rod into fifth, but I couldn’t get it there using the shift lever. One reason was that the lever itself appeared to be running out of room. When I leaned it right, it would hit against the side of the cut-out in the plastic console.
I posted this to a Lotus forum, and a few people chimed in that, yes, fifth gear can be hard to get into, but they advised that I shouldn’t think of it as a stationary “lean and pop” like reverse but more a quick motion of the wrist and an on-the-fly “flick and smack.” And yes, it isn’t elegant and may smack the plastic.
I took the car out and tried the flick-and-smack maneuver, and, lo and behold, I was in fifth. Engine rpms dropped dramatically, and I could drive at highway speeds without worrying about violating the guidelines for engine break-in. (Violating speed limits was, of course, another matter.) The flick-and-smack was ugly, but effective.
Then, over the next few months, it became harder and harder to get it into fifth gear. As fall came and the trees turned their gorgeous colors, it became almost impossible. I was heading home from a leaf-peeping drive when the car gave its final “I’ll never go into overdrive again, and no amount of smacking will make me!” Five times I reached for fifth, and five times I was greeted with a clutch-slipping near-redline excursion into third. I thought, well, when life gives you only first through fourth, take the backroads. This was not hardship; I wound up having the best through-the-twisties-and-colors drive that I could’ve possibly imagined.
When I got the car home, I examined the linkage closely and found several things that were problematic. The play seemed to have returned to the shifter, as if the newly-installed bushings had failed. In addition, when the shifter was in reverse, it almost stood straight up, and was leaning pretty far to the right in third and fourth. I wondered if, for the short term, I could simply remove the console so the lever wouldn’t smack into the right side of the cut-out, but found that hitting the console wasn’t the central problem—it was that the bottom of the lever was hitting the left side of the underside of the shift cup when I leaned the shifter right.
Clearly the two halves of the linkage tubes needed to be “clocked” relative to one another. So out came the entire shift linkage. Again. Yeah, yeah, I know, but sometimes you have to do a repair twice because you didn’t have sufficient knowledge the first time.
As soon as the linkage was lying on the garage floor, I saw what the play issue was with the bushings. They still were there, but all the flicking and smacking trying to get it into fifth had caused the nyloc nut to loosen, which in turn allowed the two tangs to yawn open, creating play. I tightened the nut and put another nut on as a jam nut to hold it in place.
Next, the “clocking.” There are roll pins on both sides of the universal joint, but I thought I only needed to bang out one of them in order to rotate and clock the two halves of the linkage. After multiple attempts at heating and beating, I got the forward pin—the one on the side of the shaft that is conventionally right-hand-threaded—out. Unfortunately, I saw that two holes for two other pins had already been drilled, and neither was in the place I needed it. Real estate for a new hole was scarce.
Clearly, having to drill holes and bang in roll pins in order to clock the two halves was a terrible design. What was needed was something you could install and adjust in-place. I wondered if you couldn’t simply use a jam nut and a lock washer instead of the roll pins. I looked closely at the universal joint and its threaded rods. The forward part didn’t seem to have enough space to allow even a thin jam nut, but the rear part certainly did.
So I heated the back end with the torch and beat the pin out of it (the back pin was so stuck that I needed to resort to the “can’t be tight if it’s liquid” approach), then ordered the proper ½-20 UNF (fine) left-hand-threaded jam nut from McMaster-Carr. I also ordered some new roll pins and a ½-20 UNF thread-repairing die, as when I took the thing apart, the threads were pretty munged up.


When the parts arrived, I reassembled used the left-threaded jam nut and a lock washer and put everything back in the car. I clocked the two halves, so the shift lever was just slightly right of vertical in third and fourth gear, then tightened the jam nut against the lock washer. The shifter now had sufficient enough movement on the right side that I could get the car into fifth, though I still couldn’t just lean into it and pop the detent like reverse; it still required the on-the-fly “flick and smack” maneuver.

I turned my sights back to the little Batman piece and the detent ball. I noticed that the profile on the ear for fifth seemed to be a little sharper than the one for reverse, and so it wouldn’t roll against the detent ball as smoothly. I wondered if a small piece of metal used as a little step for the ball might help.
I grabbed a coat hanger I had, uh, hanging around in the garage, poked it into the corner just below the ear, and manually rotated the linkage so the ball rolled over it. It easily pushed the detent and went into fifth. It was incredibly promising.
I cut off a piece of coat hanger and bent it into a configuration where it could be held in place by the nut securing the little Batman-shaped piece. I test-fit it several times, tweaking and bending it until the end hung into the corner of the ear.


I tightened everything down, got into the car, and shifted. For the first time ever, it went into fifth like butter. Then I drove it. It was even better. A week passed and the novelty of being able to shift into fifth like a normal car still had not worn off.
So, a left-handed jam nut, a coat hanger, and a little Yankee ingenuity, and we’re… overdrivin!
As it happened, a week later, I was looking on the web site of Lotus parts supplier RD Enterprises and saw that the shift linkage universal joint they now sell—you guessed it—no longer has role pins but comes with two jam nuts. So my idea was hardly an original one. Theirs cost $189, however, while mine cost about $5 worth of fasteners from McMaster-Carr.
The coat-hanger detent fix, though, I probably should patent.
***
Rob Siegel has been writing the column The Hack Mechanic™ for BMW CCA Roundel magazine for 33 years and is the author of five automotive books. His new book, Resurrecting Bertha: Buying back our wedding car after 26 years in storage, is available on Amazon, as are his other books, like Ran When Parked. You can order personally inscribed copies here.