Buttoning up my Lotus Europa front-end refresh, but not before trunnion duty
In my last installment, I inspected, ordered, and installed front lowering springs for my 1974 Lotus Europa Twin-Cam Special, and also installed the used set of Spax adjustable damping shocks that I’d bought. This week, we’re going to put the front end back together.
Cleaning and painting components… or not
While I certainly clean the grease and dirt off old undercarriage components before reinstalling them, I don’t paint them. There are several reasons. Proper painting requires proper preparation, meaning sanding and priming, and I’ve never had the patience to do it so that the end product looks new. When I’ve tried, things come out bumpy and uneven and looking clearly like an old part that someone has hastily repainted. And even attempting to do it makes the time frame explode. Plus, you rapidly get into “Shipwright’s Disease” territory (google it) and decide that adjacent parts of the car don’t measure up and slide down the slippery slope towards restoration, and that’s something I don’t do. To me, it’s fine if original parts look 45 years old (they are). If you get pleasure out of going through a car and, while working on each system, making it look as new as possible, have at it, but as Austin Powers said, it’s not my bag, man.
The trunnions
Before heading straight for reassembly, there was one item left to rebuild—the trunnions. I know—these sound like some engineered Frito Lay snack product sold in a can next to the Pringles, or an item you’d order at Outback (“I’ll have a bloomin’ trunnion, a quart of Foster’s, and a hind quarter of a wild boar”). What they are, however, is the lower part of a non-MacPherson front end that allows the hubs to steer.
If you really want to understand trunnions (which is one of the stupidest sentence fragments I’ve ever written), you can go down the rabbit hole as I did and spend hours reading up on the history of suspension development. Basically, when cars moved slowly and had little or no suspension to them, steering was facilitated via a simple kingpin design—basically a vertical metal pin that runs in a sleeve through several holes—that allows the hubs to be steered left and right but not to change their angle in response to bumps.

As it became necessary to improve control and ride comfort at higher speeds on rougher roads, front-wheel independent suspension was developed. For nearly 50 years, the way that most cars have facilitated this is with so-called MacPherson struts, the whole point of which is that the assembly that does the shock absorbing is also the assembly that rotates when you steer the car, keeping both of these axis aligned with each other. Any MacPherson strut design has a ball joint at the bottom that it rotates on, and some sort of steering knuckle that is pulled by a tie rod to create that rotation.
But before MacPhersons, many cars had some sort of A-arm front suspension. Both the spring and the shock have to go somewhere, and there needs to be an assembly on which the axle (and rotor and wheel) mount. On cars with a single A-arm suspension, the spring and shock are usually further inboard, between the A-arm and the body, and there’s still an old-fashioned kingpin near the outside to let the hub swivel side-to-side.
On cars with a parallelogram-based double A-arm suspension, the coils typically mount on the shocks, and the coil-over pairs sit in the open space of the A-arms. If the A-arms are beefy-looking, stamped or cast as a single piece, they’re usually called, well, A-arms, but if they’re thin pieces of welded tubular steel, they’re often called “wishbones” because that’s what they look like.
On the Lotus, the wishbones are thin stamped pieces with separate front and rear halves. The design is such that the coil-over is sandwiched between the halves. One advantage of this is that the vertical link, the thing on which the axle mounts, can also be attached in between the halves of the wishbones on something with more degrees of movement than a kingpin.

In the Lotus and Triumphs from which it borrowed, the vertical link is attached at the top by an upper ball joint, and at the bottom by a trunnion, which is a pair of tubes at right angles to each other. The horizontal tube has nylon bushings in it and is sandwiched between the two lower wishbones and held there with a through-bolt, allowing the A-arms to move up and down around it. But the other tube, the vertical one—and this is kind of strange—has thick beefy threads in it. It holds the threaded lower end of the vertical link. So, when you turn the steering wheel, the vertical links—and with them, the axles and wheels—not only rotate in their trunnions, they also move up and down slightly on the threads. Weird, right?


Because much of the Europa’s front end, including the trunnions, cross-references to a Triumph Spitfire or GT6 (shades of my youth!), trunnions aren’t an exotic part. Rebuilding them consists of disassembly, cleaning, inspection for cracks and wear, and replacing of the nylon bushings and the rubber boot, reassembly, and checking for play.


After installation, the threads of the trunnions need to be lubricated. The Europa workshop manual calls for them to be filled with 80W90 weight lubricant, leading to the not-a-joke that old British cars can actually leak oil from their suspension. Reading up on Lotus forums, though, I found that there’s an oil camp and a grease camp. The argument in favor of oil is that, because it’s liquid, you know it will flow into all of the threads’ nooks and crannies. The argument against oil is that it can leak out (both of the Lotus’ trunnions were bone dry). Grease, on the other hand, will stay put, and modern grease is much better than what was available 50 years ago. I replaced the oil plugs with standard grease fittings and pumped them full of bearing grease.

Ball joints and tie rods
One of the things that triggered whole front end rebuild was that, during the car’s 40-year sit, the rubber boots on the ball joints and tie rods had completely disintegrated. Like the trunnions, these cross-reference to Triumph parts, and thus are available and inexpensive. Removal of the ball joints and tie rods was much like any other car; a ball joint separator was employed to pry the tapered rods out of the holes in the vertical link. New parts were installed but not tightened until everything else was in place.


Sway bar links
The final item in the original front-end rebuild punch list was dealing with the broken left front sway bar link. Owing to Lotus founder Colin Chapman’s oft-quoted design philosophy of “Simplify, then add lightness,” the links are simple, slender, and graceful, but unusual and a bit of a pain.
First, they’re quite long. The reason why is that, on most cars, the middle section of the sway bar is clamped directly to the front subframe with U-shaped brackets, underneath which is a split rubber bushing that wraps around the bar. However, because the Europa has no separate front subframe, the middle of the sway bar has to attach to the metal backbone of the car, which is nearly a foot above it. So these foot-long links that most folks would assume are for the ends of the sway bar are actually for the middle. In contrast, there are no separate end link pieces; the holes in the ends of the sway bars slide directly over threaded posts that are integral with the bottoms of the shocks.
Second, the bushings are challenging to replace. The bushing at the upper end is press-fit into place, and, with age, is difficult to remove. The lower bushing isn’t press-fit; instead it must be slid over the end of the sway bar, and it’s a very tight fit. The metal tube at the lower end of the link then must be worked over the bushing. It was this metal tube that was broken off one of my links. Twice I’d tried welding it back on, and twice it had broken again. For any modern car, you’d simply buy new links with new bushings in them for 40 bucks or so, but for the Europa, the links are $90 each and come without bushings.

And there’s a third issue. If you lower the nose of the Europa, the links push the front of the sway bar down. The sway bar is already the lowest thing under the car, and lowering it further risks impact with speed bumps, frost heaves, squirrels that have been working out, etc.
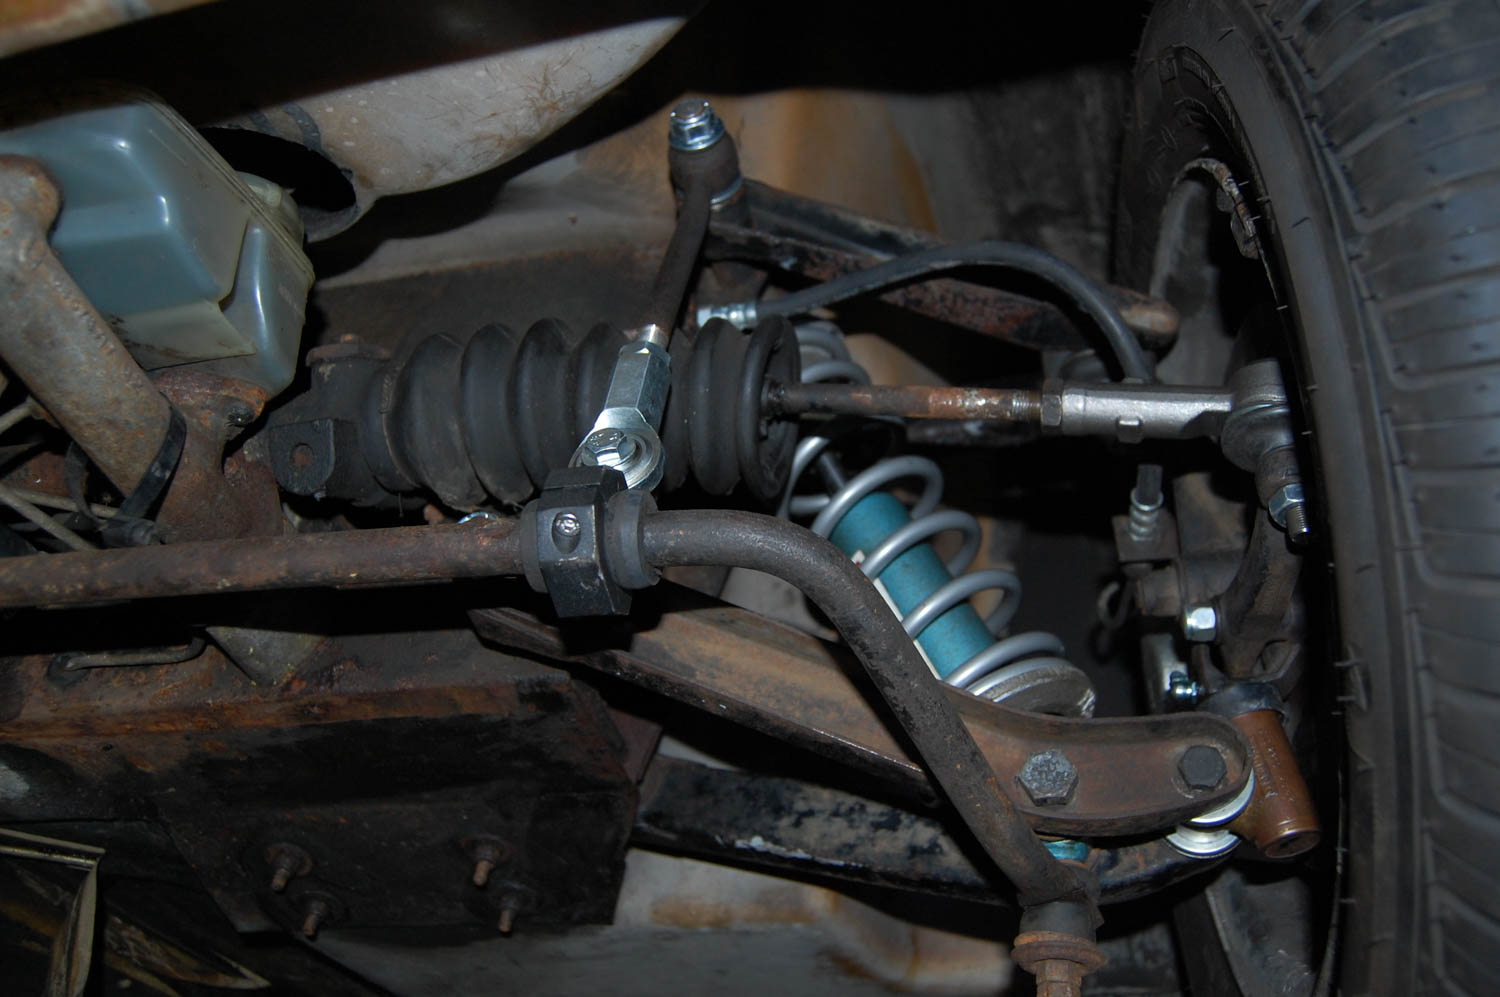
For these three reasons, dealing with my broken left sway bar link morphed into needing adjustable-length links. As was the case with the spring compressor I wrote about a few weeks ago, my assumption was that I simply could buy something, but to my surprise, I found no adjustable sway bar links for sale that would fit the car. Reading up on Europa forums, though, I found plenty of examples of roll-your-own solutions. Many folks cut off the upper bushing, threaded the rod, and screwed on a Heim joint, but since one of mine was already snapped off at the bottom, it made sense to modify that end instead. This had the added benefit that I could replace the work-it-on-from-the-side bottom attachment with a two-piece clamp that screwed in place.
 and adjustable front sway bar links.")
There was one surprising difficulty. Irrespective of the shortened links, when I tried installing the sway bar, the holes in the ends wouldn’t fit over the threaded posts at the bottom of the Spax shocks. They were off by a lot, like about an inch. I held an old shock next to one of the Spax to verify the posts came down at the same angle. They did. I couldn’t understand it.
I searched on forums and learned that the sway bar must be compressed in order to be installed and that its outward-sprung tension is actually part of the suspension design. Funny, I didn’t recall having any difficulty taking it off, but whatever. I cobbled something together with a ratchet strap and two thin S-hooks. This arrangement gave just enough room to pull the ends of the bar toward each other while allowing the threaded posts to pass through. It worked perfectly, though I felt like I was building some sort of crossbow.

Replacing and tightening fasteners
When reassembling a system like a front end that uses rubber bushings and nyloc nuts torqued to a specific setting, it’s important that the nyloc actually still works. I tend to err on the side of reusing old fasteners, as I find the look of brand-new hardware against old components a little jarring, but if you thread a nyloc nut on and you can turn it by hand without the nyloc biting the threads, it isn’t doing anything, and you need to replace it.

Then you face a choice on where and what to buy. For the Lotus, the original ½-inch-20 nylocs used in the front end are slender. I wasn’t necessarily surprised that my local hardware store only had big tall silver ones. I was, however, surprised that McMaster-Carr didn’t have ones that were the same size. Obviously, there are fastener houses other than McMaster, and it’s possible that one of the Lotus parts houses I use might have the original-sized fasteners in stock, but eventually I just ordered the ones from McMaster that were closest in size. They also had an integrated seating flange, which I felt couldn’t be a bad thing.

With assembly finally complete, as per the manual I round-robin snugged all the fasteners holding the bushings, struts, wishbones, ball joints, and sway bar links. I then torqued them to spec. As is the case with many front-end bushings, those holding the wishbones needed to be torqued under load—that is, with the car at road height. The Europa is so low that this is difficult to do. After checking on several Lotus forums that this is kosher, I did what I do on my BMWs, which is to fully support the car at four points on my mid-rise lift, then jack up under one hub, compressing the spring until that corner just starts to rise off the lift point, and torquing the nut to spec. I’ll probably revisit this once the car has been driven.
And with that, the front end was, at last, buttoned up. Whew.

***
Rob Siegel has been writing the column The Hack Mechanic™ for BMW CCA Roundel magazine for 33 years and is the author of five automotive books. His new book, Resurrecting Bertha: Buying back our wedding car after 26 years in storage, is available on Amazon, as are his other books, like Ran When Parked. You can order personally inscribed copies here.