5 ways to bleed your brakes
Releasing the air trapped in your car’s hydraulic brake system is crucial. Brake systems rely on a master cylinder to push fluid through the lines, and the fluid then imparts force on the piston (or pistons) in an individual wheel’s brake cylinders or calipers. The piston squeezes the brake drum or rotor, using friction to turn speed into heat and bringing the vehicle to a halt. The fluid is very efficient at activating the cylinder/caliper because it is nearly incompressible.
On the other hand, air is compressible; when it’s trapped in your brake lines, air can result in a spongy pedal and an ineffective stopping system. (Modern braking systems also use an electronically controlled distribution block for antilock- and traction-control systems, and the blocks are sensitive to air and to degraded fluid.)
So we agree that you want to keep air out of the system, but on the off chance that a few bubbles sneak in during a project, how remove you do them from the vehicle’s brake lines? There are multiple ways to bleed a brake system, and understanding each method is important so that you can decide the best approach for your project.
Gravity
Let’s start with the easiest of all the options: Doing nothing. Well, almost nothing. The concept here is simple. By filling the master cylinder and opening the bleeder screws at each wheel, gravity will gradually force the fluid through the lines and push out the air bubbles.
This method requires the appropriate tools to catch the fluid as it drips out of the bleeders. In addition, you must ensure the reservoir for the master cylinder never runs dry. Letting it run dry reintroduces air into the system, and you’ll have to drain all the fluid and start from scratch.
What sounds like the simplest method is actually one that’s very situationally dependent. Simple brake systems like those found on early hydraulic-brake-equipped cars can possibly be finished after a gravity bleed, but more often than not, the gravity approach is just the first step of bleeding a system. One of the following processes is usually needed to finish the job.
Pump and pass

Rather than leave the dirty work to gravity alone, sometimes it’s best to make the system work for you. That means using brake pressure to push fluid through the lines. You’ve likely performed this method before: Use a friend to pump the brake pedal three to four times to build up pressure, and then tell them to hold their foot on the pedal while you open the bleeder screw at one wheel. This allows the system to burp fluid—and, hopefully, air bubbles. Close the bleeder before your helper releases the brake pedal and repeat the process until no more air bubbles exit when the bleeder screw is opened.
There are a couple of things that make this pumping method more effective than gravity bleeding. For one, the fluid moves faster, making it more likely to force out any trapped air. Then there’s the fact that building pressure in the system shrinks the air bubbles—because the air compresses—so it condenses large bubbles and speeds their evacuation.
The pump-and-pass method can help when your brake lines have multiple unions, bends, or valves. Each of those tends to allow air pockets to hang around, causing frustration if you stick with just gravity bleeding.
Check valve
The pump-and-pass method is the most popular, but it can be tiring or annoying for the person helping inside the vehicle. Luckily there is a way to eliminate the need for a helper, and it doesn’t require fancy tools.
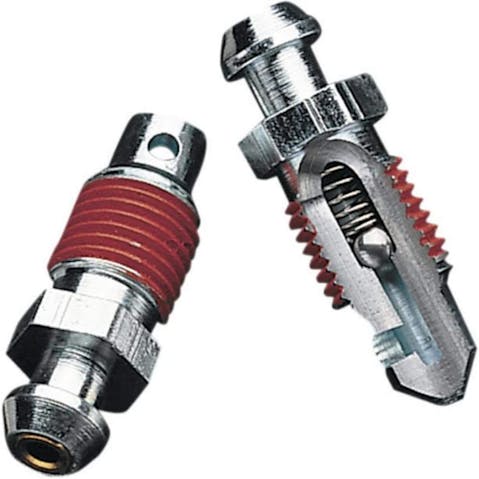
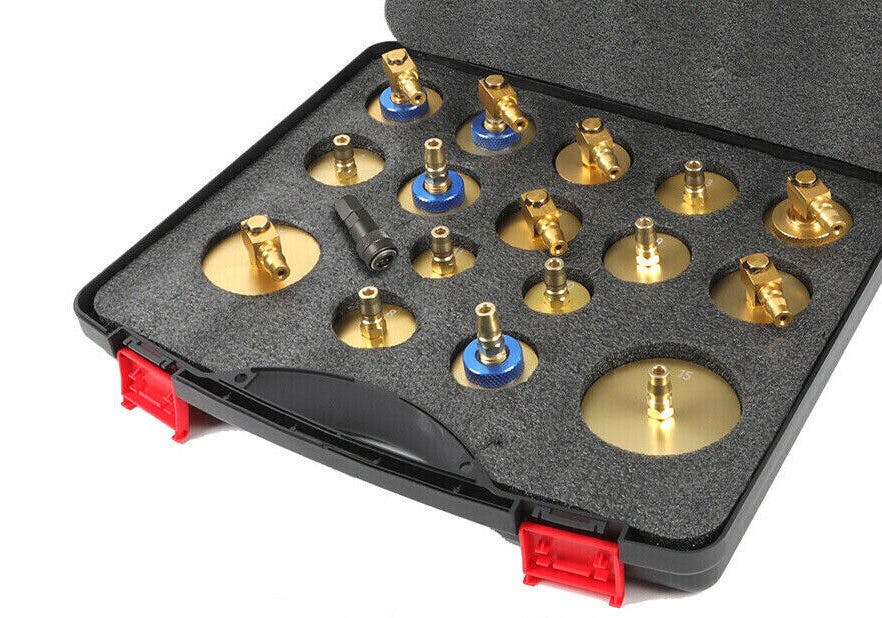
The first option is Speed Bleeders. These replace the bleeder screw at each wheel with one equipped with a small check ball and spring, making the screw a one-way valve when the check ball is loosened. Connect a hose to the bleeder, open the screw, pump the pedal until no more air is being pushed out, then tighten the bleeder and move to the next wheel. The method is pretty simple, but it does require changing out the bleeder screws.
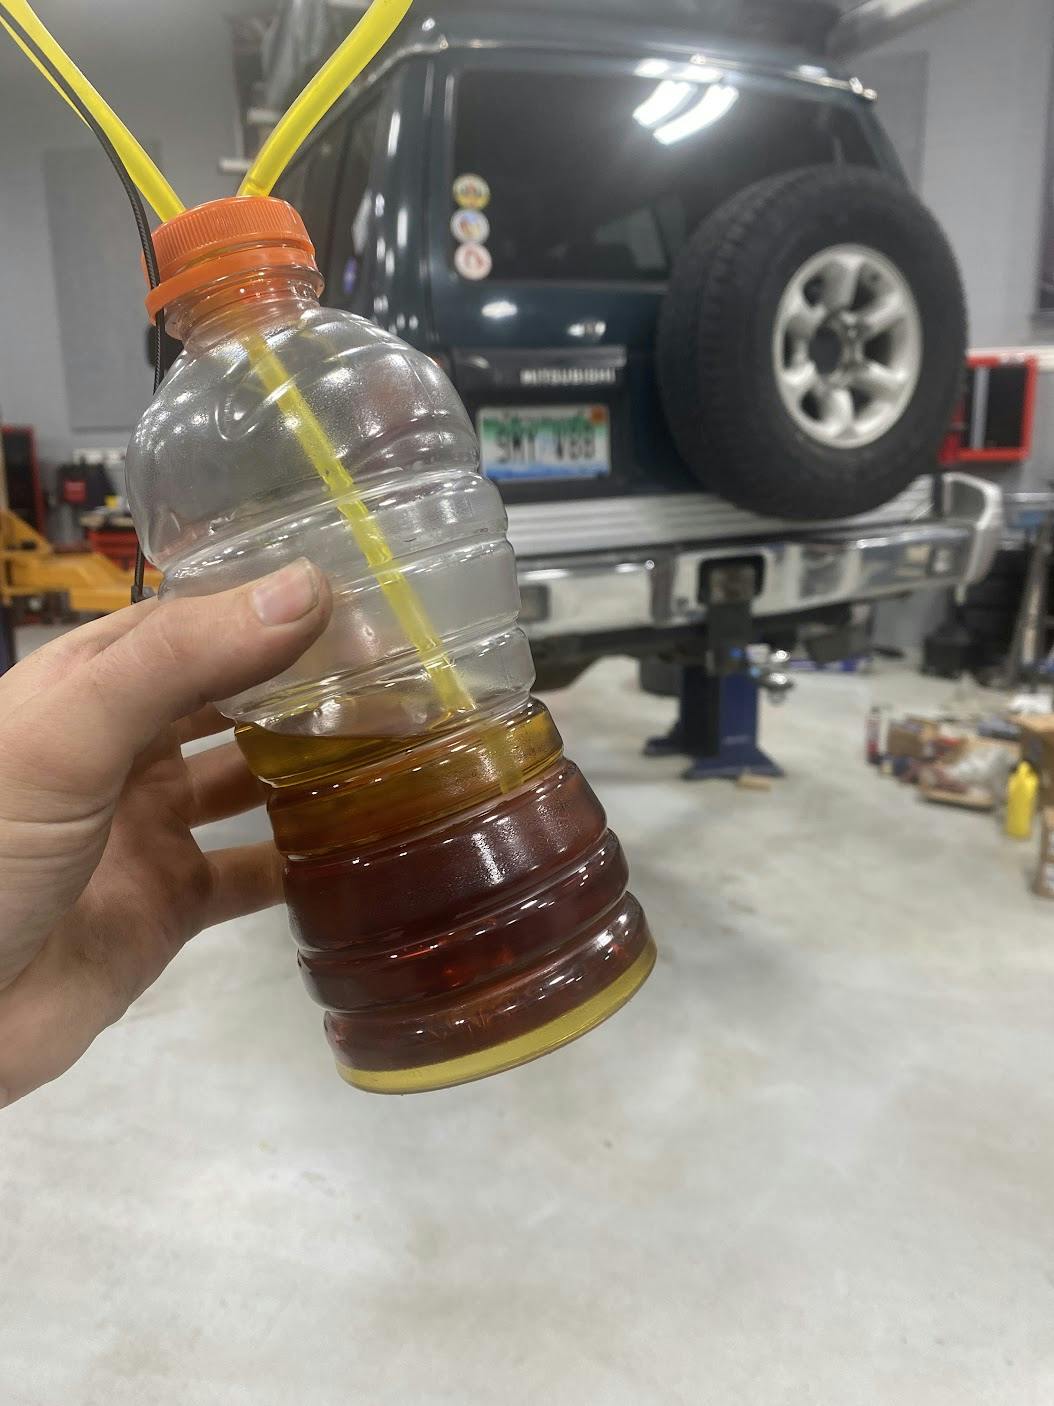
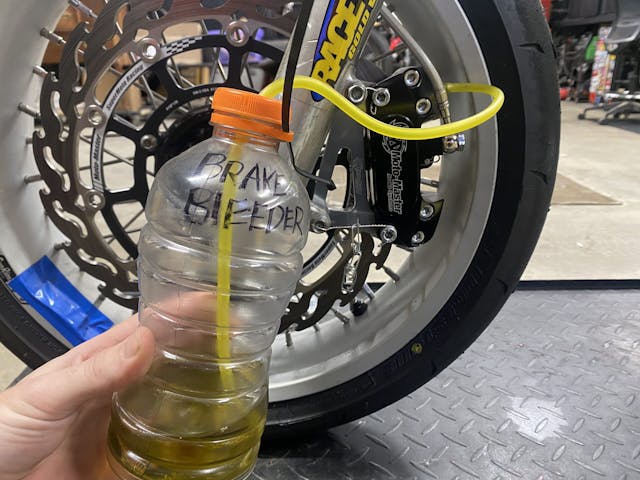
If you want to accomplish the same task without buying bleeder screws, use a simple bottle and a hose. An empty brake-fluid bottle is often best, but you can create these devices with any number of containers.
Start by pouring a small amount of clean brake fluid into the bottle, then insert a hose, making sure the end will stay submerged in the clean fluid. Then connect the loose end of the hose to the bleeder screw. Open the bleeder screw and pump the pedal slowly to push the fluid and those pesky air bubbles through the system. The bottle will slowly fill as the fluid is pushed out, and since the end of the hose is submerged, it will prevent any air from being pulled back into the brake system.
To make the process even easier, add a zip tie or piece of string to hold your new bleeding apparatus above the brake caliper or wheel cylinder, an orientation which encourages the trapped air to rise up the hose. Cut a hole in the upper part of the bottle so that air you’ve expelled from the system can also escape the bottle and not cause unwanted pressure inside that as well.
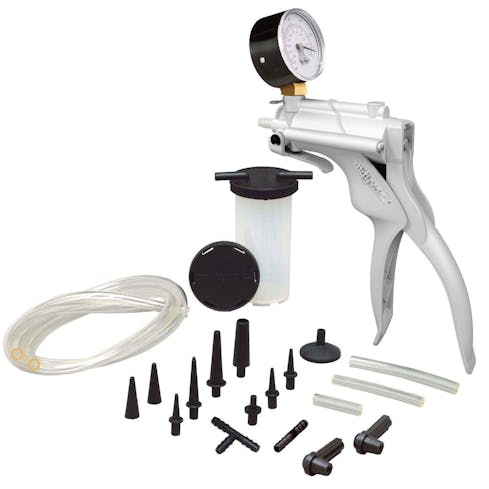
Pressure

Sure, the options above are various ways to apply pressure, but they all use the brake system to create the fluid’s push. Another method uses an external tool to place pressure on the brake master cylinder without someone operating the pedal.
The system of tools pictured above creates a steady pressure that keeps air bubbles moving, preventing them from getting stuck in little pockets like proportioning valves or distribution blocks.
Using one of these makes the bleeding process easier, but it also requires extra care when setting up and when topping off the fluid during the bleeding process. Since the master-cylinder reservoir is under pressure while this system is in use, there’s a risk that the outer gasket of the tool leaks while you’re forcing pressure through the brake lines or when you take the tool off to top up the reservoir. Since most brake fluids easily strip paint, don’t take this risk lightly.
Vacuum
Maybe those methods are too pressurizing for you. Luckily, this option is the opposite. We are talking about negative pressure—vacuum, to be precise.
Rather than using the master cylinder to push fluid through, this vacuum tool pulls fluid through the system from the bleeder screw. Vacuum tools make quick work of bleeding a brake system that is dry, or one in which many parts have been replaced (in such a situation, you’ll need to draw fluid over a larger distance).
Products like the MityVac use a hand pump to create the vacuum, but other options are connected to a compressed-air source to pull a vacuum without the need for manual labor.
These tools can be a decent investment if you are bleeding brakes regularly, but if you’re only doing this once or twice a year, the extra effort needed for the other tool-less methods might be worth the savings.
No matter how you decide to bleed your brakes, use the proper fluid and follow the process to ensure you have safe and predictable stoppers. Have a tip? Leave a comment below.
Check out the Hagerty Media homepage so you don’t miss a single story, or better yet, bookmark it.

Mine only worked one time. Think the rubbers went bad from the residual fluid, I’m not a fan of their stuff.
Over the years, I have used all of these methods except the check valve one, simply because I didn’t know about it. One of my first times using the vacuum method, I was perplexed that air bubbles kept coming out of the hose until I realized that the pump was drawing air around the threads of the bleeder screw, making it impossible to know which bubbles were from the brake line and which were from the bleeder screw.
Exactly
Same here. That’s when I went to Motive.
That’s why new check valve bleeders have a thread sealer on them from factory.
Good point! Note that Speed Bleeders have a sealant compound on the threads. Motorcyclists frequently change fluid and a popular solution is installing Teflon Tape on the threads before beginning the sequential bleeding of each caliper. The comment on running the ABS motor in purge mode is essential on many Bosch systems. Thanks Everyone for their experienced input!
I’ve had the same problem with vacuum bleeding, either leaking around the threads or the vacuum hose it’s self.
I concluded once I see clean fluid, the air must be gone. Best one can do using vacuum bleeder.
Did vacuum for many years on my Vipers … no issues which included several track events … pad lift helped a bunch, also …
I used a device that is used on small aircraft. It is a hand pump that actually pumps fluid from the wheel cylinder to the master cylinder. You just need to leave room in the master cylinder after you bleed each wheel so it doesn’t run over. It worked great on my 54 Olds. I never see this method mentioned anywhere.
Used on mountain bikes with hydraulic disc brakes and individual master cylinders.
Unless you have left-hand thread on the calipers on your bike you have them safety wired backward. You want the safety wire pulling in the direction that would not permit the bolts to come loose. As a previous helicopter technician I have done a lot of safety wiring.
Correct. I looked at the motomaster website and there was no mention of LH mounting bolts. The (1) was clockwise and it should have been CCW and the other end of the safety wire had no direction (straight pull) when it should have been CCW…either bolt would then have resisted backing out if loosened.
LOL..one method not mentioned is pressure bleeding UP from the wheel caliper(s). It’s used on mountain bikes with individual master cylinder for each disc brake caliper.
I’ve found the pump & pass method to be the most reliable. It moves the fluid fast enough (b/c of the high pressure) to get ALL the bubbles out of the trapped places.
I used a Motive pressure bleeder with mixed results. The reservoir cap that came with the basic kit does not have a rotating hose fitting, so to tighten the cap, I had to rotate the whole bottle (containing a quart of pressurized fluid) which was awkward. They sell an aluminum cap with a swivel, $$ but much better. Also, they suggest too high a pressure, 10-20PSI which produced cloudy fluid (minute air bubbles) in the container which you absolutely do not want. Using only 2-4 PSI worked better. I also bought the Harbor Freight compressor/vacuum type that is used at each bleeder. I like it, but the hose connector is bulky for tight spots and didn’t seal very well, so I ended up using clear tubing that fit tightly. You need a decent compressor, or one that will maintain 90-120PSI. My older Home Depot Campbell/Hausfield 5HP will build pressure to 125PSI, but quickly depletes and did not keep up with the demand of the tool. I like this type of bleeder, better quality kits are available, but IMHO, the compressor is the important part.
I never bleed brakes anymore. For the last 40 years, every third oil change follows a transfer of the master cylinder fluids. I use a turkey baster to suck out the old fluids and replace with new. Never had a brake problem since other than routine Maintenace.
That’s just not good as the old fluid remains in the brake calipers and lines.
That only suggests that you either don’t keep your vehicles long enough to reach the average age of brake failure, or you don’t live in a corrosive, winter salted roads environment.
Doing that may keep your master cylinder from corroding “as” quickly, but then that little bit newer fluid pushed, never displaces and replaces the original fluid in the lines and wheel cylinders. You aren’t removing the moisture or the associated copper contamination in the system.
If doing that works for your ownership period of the vehicle, I could see a justification for only doing that much, but I wouldn’t want to be the NEXT owner of that vehicle and find it needs more work sooner due to more internal corrosion than if the entirety of the fluid were replaced a few times instead.
I have changed brake fluid regularly for years, and typically empty each of my “modern” ABS systems reservoirs, and re-fill twice per year and often bleed brakes after a pad change. On my classics (without all the Nanny crap) I completely flush the systems every three years with brake cleaner spray and my air compressor, re-attach brake lines and replace all fluid. With my wife’s classic 77 TA I had brake problems because it sits most of the time, so i changed that to DOT5 and that pretty much ended any brake issues. However, last fall I helped my son with his modern Cadillac with ABS, and we did the container method with one in the seat on the pedal, and one holding / watching at each wheel, this worked fantastic! I was impressed, I have the bottle / hose unit for one person bleeding but, when you are actually there watching you can see it clean up, it is very satisfying.
There is no need or reason to flush out with brake clean and compressed air. You’ll just be putting moisture into the system ahead of refilling with new fluid. Granted a long enough bleed afterwards will remove that moisture too, but it’s just an extra step that also increases the amount of bleeding needed afterwards.
Back in the ’90s I made a pressure bleeder for my ’84 Caravan. I had a spare MC cap, (I think it had come from a wrecked Omni my Dad had bought for parts) and I drilled a hole through it and JB Welded a piece of copper tubing to it, then connected that to the output hose from one of those hand pump garden sprayers. You do have to remember to stop and top off the MC after each wheel.
This was a great article, going to get some of those ball check bleeder valves. At 80, I can still learn something, believe it or don’t.
Nice article, but your review of the pressure method was rather short and you seem to find more negative things than positive about it. I have the Motive unit and love it. One of the “tricks” you can do is to tap on the caliper (or other parts) when the fluid is bleeding, which will help release any trapped air. Since a caliper is cast, the inside is a rough surface which can hold onto tiny air bubbles. I had 4 new calipers on my car and after doing the normal bleeding until the fluid ran clear, I then tapped on the caliper and did another bleed. I could see additional tiny bubbles (sometimes referred to as champagne bubbles) in the fluid.
As far as hooking it up, the Motive unit does not have a valve on the pressure line, so I don’t know how you could hook it up while pressurized, unless some units have a valve. If that’s the case, just hook it up before you fill and pressurize the Motive unit.
worked on a few vehicles over the years where I’ve resorted to what I call reverse bleeding ,,taking a large syringe filled with brake fluid opening up a bleeder a screw and forcing fluid from the wheel side to the master cylinder to force air out of the system…. works really good bleeding clutch slave cylinders
Long time ago in some English car magazine there was a procedure described to run a hose from brake wheel cyl to clutch slave cyl, open both bleeder screws and step on brake to “reverse flow” fluid through hydraulic clutch system.
I replace my brake fluid at least every two years. The problem I have is that it is impossible to tell when the old fluid is out of the system.
There must be some reason brake fluid isn’t sold in a few different colors. (Yes, there is ATE Blue. But very spendy. I did find, the one time I used it, that 250ml will amply clear rear brakes, 200ml for the fronts.)
I would think if you can’t tell when the old fluid is gone and the new fluid is bleeding, then the old fluid must have still been very clean. Maybe every 2 years isn’t necessary.
It is if you have OCD.
That (knowing when the old fluid is completely expelled) is where brake fluid test strips would help.