5 ways to bleed your brakes
Releasing the air trapped in your car’s hydraulic brake system is crucial. Brake systems rely on a master cylinder to push fluid through the lines, and the fluid then imparts force on the piston (or pistons) in an individual wheel’s brake cylinders or calipers. The piston squeezes the brake drum or rotor, using friction to turn speed into heat and bringing the vehicle to a halt. The fluid is very efficient at activating the cylinder/caliper because it is nearly incompressible.
On the other hand, air is compressible; when it’s trapped in your brake lines, air can result in a spongy pedal and an ineffective stopping system. (Modern braking systems also use an electronically controlled distribution block for antilock- and traction-control systems, and the blocks are sensitive to air and to degraded fluid.)
So we agree that you want to keep air out of the system, but on the off chance that a few bubbles sneak in during a project, how remove you do them from the vehicle’s brake lines? There are multiple ways to bleed a brake system, and understanding each method is important so that you can decide the best approach for your project.
Gravity
Let’s start with the easiest of all the options: Doing nothing. Well, almost nothing. The concept here is simple. By filling the master cylinder and opening the bleeder screws at each wheel, gravity will gradually force the fluid through the lines and push out the air bubbles.
This method requires the appropriate tools to catch the fluid as it drips out of the bleeders. In addition, you must ensure the reservoir for the master cylinder never runs dry. Letting it run dry reintroduces air into the system, and you’ll have to drain all the fluid and start from scratch.
What sounds like the simplest method is actually one that’s very situationally dependent. Simple brake systems like those found on early hydraulic-brake-equipped cars can possibly be finished after a gravity bleed, but more often than not, the gravity approach is just the first step of bleeding a system. One of the following processes is usually needed to finish the job.
Pump and pass

Rather than leave the dirty work to gravity alone, sometimes it’s best to make the system work for you. That means using brake pressure to push fluid through the lines. You’ve likely performed this method before: Use a friend to pump the brake pedal three to four times to build up pressure, and then tell them to hold their foot on the pedal while you open the bleeder screw at one wheel. This allows the system to burp fluid—and, hopefully, air bubbles. Close the bleeder before your helper releases the brake pedal and repeat the process until no more air bubbles exit when the bleeder screw is opened.
There are a couple of things that make this pumping method more effective than gravity bleeding. For one, the fluid moves faster, making it more likely to force out any trapped air. Then there’s the fact that building pressure in the system shrinks the air bubbles—because the air compresses—so it condenses large bubbles and speeds their evacuation.
The pump-and-pass method can help when your brake lines have multiple unions, bends, or valves. Each of those tends to allow air pockets to hang around, causing frustration if you stick with just gravity bleeding.
Check valve
The pump-and-pass method is the most popular, but it can be tiring or annoying for the person helping inside the vehicle. Luckily there is a way to eliminate the need for a helper, and it doesn’t require fancy tools.
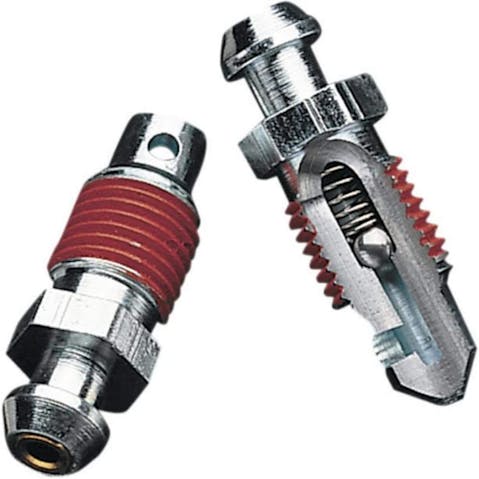
The first option is Speed Bleeders. These replace the bleeder screw at each wheel with one equipped with a small check ball and spring, making the screw a one-way valve when the check ball is loosened. Connect a hose to the bleeder, open the screw, pump the pedal until no more air is being pushed out, then tighten the bleeder and move to the next wheel. The method is pretty simple, but it does require changing out the bleeder screws.
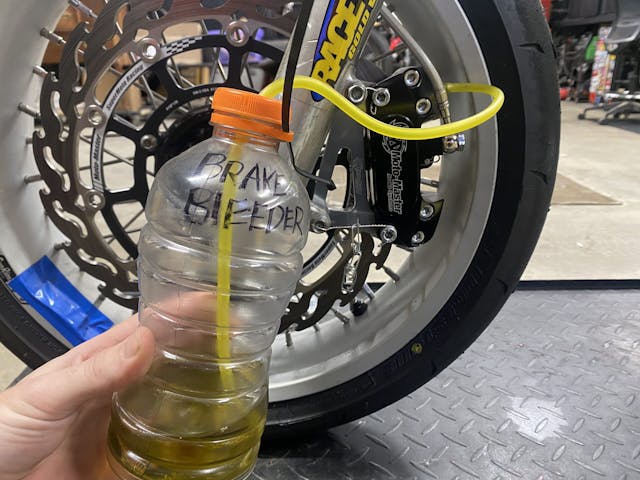
If you want to accomplish the same task without buying bleeder screws, use a simple bottle and a hose. An empty brake-fluid bottle is often best, but you can create these devices with any number of containers.
Start by pouring a small amount of clean brake fluid into the bottle, then insert a hose, making sure the end will stay submerged in the clean fluid. Then connect the loose end of the hose to the bleeder screw. Open the bleeder screw and pump the pedal slowly to push the fluid and those pesky air bubbles through the system. The bottle will slowly fill as the fluid is pushed out, and since the end of the hose is submerged, it will prevent any air from being pulled back into the brake system.
To make the process even easier, add a zip tie or piece of string to hold your new bleeding apparatus above the brake caliper or wheel cylinder, an orientation which encourages the trapped air to rise up the hose. Cut a hole in the upper part of the bottle so that air you’ve expelled from the system can also escape the bottle and not cause unwanted pressure inside that as well.
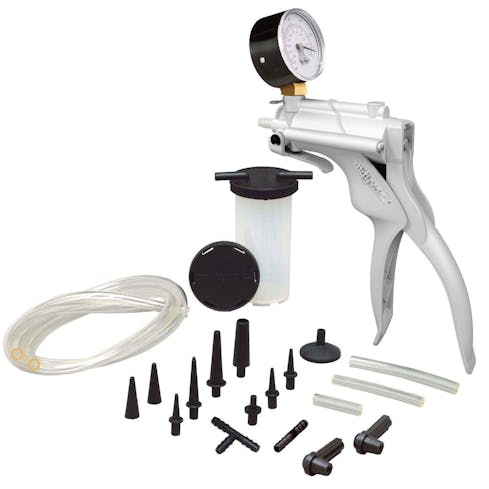
Pressure

Sure, the options above are various ways to apply pressure, but they all use the brake system to create the fluid’s push. Another method uses an external tool to place pressure on the brake master cylinder without someone operating the pedal.
The system of tools pictured above creates a steady pressure that keeps air bubbles moving, preventing them from getting stuck in little pockets like proportioning valves or distribution blocks.
Using one of these makes the bleeding process easier, but it also requires extra care when setting up and when topping off the fluid during the bleeding process. Since the master-cylinder reservoir is under pressure while this system is in use, there’s a risk that the outer gasket of the tool leaks while you’re forcing pressure through the brake lines or when you take the tool off to top up the reservoir. Since most brake fluids easily strip paint, don’t take this risk lightly.
Vacuum
Maybe those methods are too pressurizing for you. Luckily, this option is the opposite. We are talking about negative pressure—vacuum, to be precise.
Rather than using the master cylinder to push fluid through, this vacuum tool pulls fluid through the system from the bleeder screw. Vacuum tools make quick work of bleeding a brake system that is dry, or one in which many parts have been replaced (in such a situation, you’ll need to draw fluid over a larger distance).
Products like the MityVac use a hand pump to create the vacuum, but other options are connected to a compressed-air source to pull a vacuum without the need for manual labor.
These tools can be a decent investment if you are bleeding brakes regularly, but if you’re only doing this once or twice a year, the extra effort needed for the other tool-less methods might be worth the savings.
No matter how you decide to bleed your brakes, use the proper fluid and follow the process to ensure you have safe and predictable stoppers. Have a tip? Leave a comment below.
Check out the Hagerty Media homepage so you don’t miss a single story, or better yet, bookmark it.
Modern cars with ABS require that the ABS pump be cycled to get rid of potential air bubbles inside it or the control block. If you don’t have the equipment to do this, you might want to either borrow it, or take the job to someone who has the tools for this.
Gravity bleeding only works when the master cylinder is higher than the brake cylinders. Old cars, where the master cylinder is located below the floor, won’t gravity bleed. In addition, they have a residual check valve, usually part of the master cylinder, that keeps a very small pressure in the lines, and prevents fluid from draining back from the wheels to the master. Even later, 60s cars, with drum brakes, often have a residual pressure valve, that will prevent gravity bleeding.
I usually find a helper and use the “pump and pass” method. The vacuum method also helps if there are parts of the system where bubbles can lodge.
The check valve bleeders worked well for me one time. After a Michigan winter, they no longer worked. Too corroded.
It’s best to make sure that you have a method to bleed the brakes before you take them apart. Make sure the bleeder screws will open before you start the project. Older Chryslers had very small bleeder screws, and they often broke off since they had corroded to the cylinder.
I agree Bob,
In addition to this:
The purpose of the risidual valve is to maintain light pressure in the system (only with drum brakes). Without this residual pressure, air can be sucked in between the cups and the brake cylinder. On cars that have not always been properly maintained, there may be a build-up of dirt between the piston and the risidual valve. During bleeding, dirt can be pressed into the valve so that it also closes when the brake pedal is released again. Although the pedal does rise due to the spring on it, the piston remains at the bottom of the master cylinder and you can no longer build up pressure. Strange sensation if you don’t know this, instead of a hard brake pedal you have no counter pressure at all. End of the brake master cylinder.
I forget to mention that you can usually prevent this by not pressing the brake pedal all the way to the bottom when the bleeder nipple is open.
I always used the pump and release method until I bought a 67 Mopar with dual master cylinder. I had a helper pumping the pedal to pressure up the system but when I opened the bleed valve I wasn’t getting any fluid. I called an old mechanic friend who told me the dual master cylinders had a check valve that cut off the pressure to the system showing a loss of pressure. He said to use the gravity method because the check valve would not activate without pressure from the pedal. I used the gravity method from then on and have always ended up with a good hard pedal.
My Grandfather would park the car in the garage with the front end jacked up on blocks or on homemade (steep) ramps and leave the lid on the master cylinder cracked open. Any bubbles in the system would make their way to the master cylinder over night and pop. Haven’t tried this method myself – but on certain cars I imagine it would work!!
Not sure that this is possible since there’s no way for the air bubbles to get past the seals in the master cylinder. They may rise to the master cylinder but they have no way to escape and will remain in the brake hydraulic system.
Because the Master Cylinder is designed to be “one-way”, its unlikely your grandfathers method would be effective. Its possible that he used the open bleeder method as it was quite popular many years ago on older cars.
I have been successful in bleeding ABS cars without having a scan tool to cycle the ABS unit by performing a normal bleed, then driving and locking up the brakes on loose gravel to cycle the ABS, and repeating the bleed. Not ideal but it has worked for me. Sometimes this has worked better than cycling the ABS with a scan tool.
Doug, your method should work, thought about suggesting it myself. I’ve never bleed an ABS equipped car but do my motorcycles this way, only I use grass to cause the system to activate. That way if I did manage to lay the bike over I would be in soft ground instead something that would damage the bike.
My daddy taught me to start with the wheel closest to the master cylinder first. This prevents air from being drawn from the closer lines thru to the longer lines. What do you think??
I was taught the longest line from the M/C first. I’ve always wondered if it even matters.
Agree
Agree with what Thomas?
It does with some vehicles, Audi in particular. Check the service manual or online.
Factory procedures for each car differ and sometimes they specify starting with the closest brake, sometimes the longest line. If you are just flushing either method will get the fluid replaced. One or the other may end up using a little less fluid but for home maintenance it won’t matter. BUT, if you have replaced a component and introduced air to the system, you will be well served following the factory procedure.
Yes start with the furthest wheel away was my training. I have also gravity bled my brakes. Takes a bit, but cheap and works well when your wife our daughter isn’t willing to pump the pedal for you! Great article Kyle.
This is what I’ve understood as well… bleed the wheel closest to the Mater cylinder and then work your way to the farthest wheel.
OK… I stand corrected. 🙂 I have bled my own braakes for years. thanks.
Start at the farthest away and work inward…
Daddy was wrong. Start with the brake that is farthest from the master cylinder.
You have to start with the furthest, passenger rear wheel.
I was taught the opposite in tech. school. Furthest one first.
I believe it should be the complete opposite. Farthest wheel away and work your way to the closest wheel. If you start from the closest wheel you may not be able to get the old fluid out completely.
Actually most manuals recommend that you start with the wheel furthest from the master cylinder.
My dad was a master mechanic. The opposite is how you bleed. Start from the furthest away. That would normally be right rear, then left rear, then right front and then left front. Right is passenger side and left is driver side. Shop manuals will tell you this same thing. Don’t know about newer cars though. I don’t see why it would be any different though as I have done all ages of cars this way with no issues.
My 1956 Oldsmobile Repair Manual specifically says to start with the driver side front and work back, basically shortest to longest. Personally, I don’t see any difference as long as you’re opening one bleeder at a time. Fluid doesn’t magically push itself into a full line, it takes the easy path.
Mechanics often start at the wheel FURTHEST from the master cylinder
I was taught to start with the furthest from the master cylinder which normally is the right rear, then go to left rear,,then right front. That’s the way I’ve always done it at least on cars without ABS.
Everyone says to start with the farthest one but that makes sense, I’ll have to try that, no matter how much i bleed the brake are still a little spongy….
Longest line first. RHD and LHD cars would obviously be different.
I too have been told by many “mentors” to start at the farthest but have come to believe it simply doesn’t matter. I don’t see how a bubble in any un-bled line can contaminate any previously bled line.
It’s not about getting rid of bubbles, which is a repair issue. It’s about getting rid of old brake fluid, which is a maintenance issue.
I’ve done the mityvac thing and found it wanting (process was so so, hardware was total crap). Pressure bleeders are OK, and I have a Motive in the garage.
SpeedBleeders are da bomb, as far as I am concerned. They have been on my BMW MC for probably 25 years now, and on my daily driver Boxster (northwest NJ, so road salt is a reality) for probably 15 years. They will go on the Acadia and the Jetta as soon as I find my Round Tuit.
My $0.02…
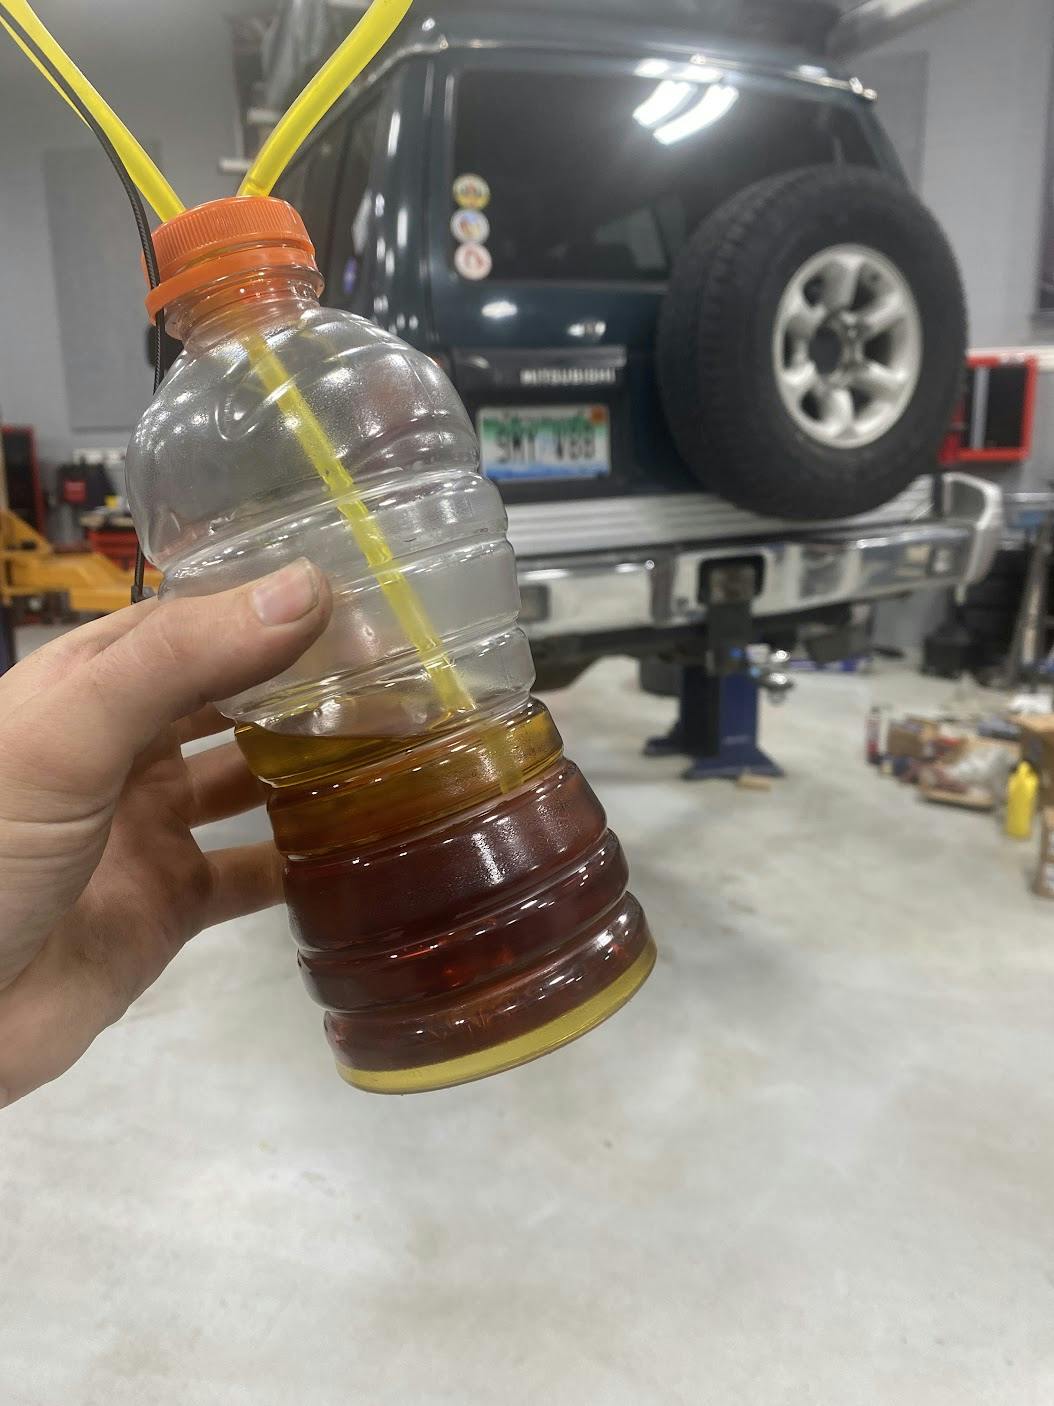
Looking at the color of the brake fluid in your bottle you should blead your fluid more often. I usually use a friend and then use gravity to flush out the system. Brake fluid is cheap and an opened bottle on a shelf will collect moisture. So use it up buy more next time.
Good observations.
many years ago while working at a Sears auto center a fellow worker was using a bleeder ball to finish off a brake job which included new wheel cylinders, someone had topped off the ball with brake fluid and didn’t tighten the cap, when the bleeder ball was pressurized with shop air the cap flew off and a half dozen cars got a brake fluid bath, a costly mistake as these cars needed to be repainted.
the error was pressuring the ball with shop air, apparently unregulated and high AF.
Motive makes a great pressure bleeder for doing it yourself. Practically foolproof.
Motive does make a good pressure pump, however it would be nice if they made more options for the Master Cylinder caps.
I do have the optional cover kit, but the plate and chains are hard to seal on older cars. Mike M
After many decades of bleeding-by-helper (annoyed spouse) in the cockpit, I bought a Motive pressure Kit. Absolutely AMAZING product! I can now bleed brakes efficiently, by myself, and quickly. After the same many years using a glass catch jar, I bought a purpose-made Bleeder Bottle (All Star brand), with magnet to attach to brake disc, and nipple for attaching loose end when not in use (no drips!). No more knocking over the glass jar, or having the bleed tube flip out of the jar and splatter brake fluid on my paintwork (I HATE brake fluid!). These items are SO much superior to the old school methods, I just can’t imagine Ever not using them. One last item of convenience: A drop of tracer blue dye every other fluid flush, so I can SEE when the new fluid replaces the old fluid.
I always start with the wheel furthest from the MC and work my way around towards it.
I used to do the ‘pump & pass’ and stopped that method many years ago when I took a closer look at that process. Try to visualize the bore in the MC. The first inch or so is bright and shiny due to each time you press on the brakes the rubber bits in the MC sweep the bore clean while pressurizing the brake line and stopping your car. Now when you go to bleed the line and you press the pedal to the floor those same rubber bits are now entering the part of the MC bore that is probably scaly with rust (assuming a cast iron MC) and other surface debris. Those same rubber bits are now shot because the rust and scale in the MC is like sandpaper to the rubber and you now need to rebuild the MC.
I’ve been using the MityVac for years and if that doesn’t do it for some reason then will use the pressure bleeder.
Harbor Freight seals a vacuum brake bleeder that uses your air compressor. $40. Works great. Quick and easy. One person.
Yep, borrowed a HF vacuum bleeder from a friend. After using it I immediately went and bought one. Cost was under $20 and the thing works great. Ok, it does use a lot of shop air so my compressor runs a lot while bleeding but a small price to pay for the convenience of making this a one man job.
In using the gravity method, attaching a piece of clear tubing to the bleeder valve that extends higher than the master cylinder will allow you to see when bubbles have ceased flowing in that line, without the risk of overflow or air reentering. Just be sure to watch the level in the master reservoir so it does not run dry and reintroduce air.
I have hydraulic clutch actuators on my cars so when I needed to replace the master cylinder, I tried simple gravity bleeding without success so bought the Mity Vac system but did not use it because by the time I received it, I had worked the air out. When I got a stuck piston in one caliper, I successfully used an assistant to press the fluid back into the empty caliper.
I upgrade all my vehicles to DOT 5 silicone fluid, purple color, does not harm paint.
No bueno with modern ABS systems…YMMV.
I think john is correct. That’s what the factory literature says about using DOT 5 brake fluid in an ABS system. But for everything else, using DOT 5 in a pre-ABS vehicle might be the last time a complete flush is needed. When I was restoring a 1959 BMW Isetta 600 in about 1990, brake parts were somewhat hard to find, particularly the tiny 0.5-inch diameter rear brake seals. With all new hardware–seals, hoses, rebuilt cylinders and master–I flushed out the brake system and installed DOT 5 fluid. When I finally got the car on the road 20 years later, the brakes still worked perfectly and the fluid showed no evidence of deterioration. The DOT 5 fluid does not absorb/attract water and the iron/steel parts of the system don’t rust. The advice given for using DOT 3 or 4 brake fluid is to use only fluid from an unopened container (since once it’s open, it starts absorbing moisture from the air); DOT 3 or 4 may start out relatively clear, but it darkens with age as it sits on the shelf. More modern BMW advice is to change out the brake fluid every two years, for example. Yes, DOT 5 costs more, but not having to worry about rust and deterioration in the brake system make it more than worth the cost.
DOT 5 (silicone) fluid is not recommended for ABS systems. The pulsing during ABS operation will beat small air bubbles into that fluid and then you have a spongy pedal. DOT 3 and 4 (glycol) fluid doesn’t do that. DOT 5 was designed for the military wanting fluid to work well at -40F temperature. It happens to not dissolve paint which is why a lot of show car owners use DOT 5. I have heard once it gets on paint, and is cleaned off, the paint is hard to repaint. I don’t know for sure.
I like pressure bleeding. It’s best to push liquids, not pull them. I have a tank tool with pump. When I owned a 1944 Ford M20 military armored car that had six wheels and 12, 1.5 inch brake cylinders, and two bleeders on the Bendix Hydrovac, and it had hydraulic clutch and throttle systems, I did not want go back to re-pump the tank. So I drilled and tapped the tank for an air fitting, and hooked shop air to it. 12 pounds is about right, set on the compressor. For those with old master cylinders with female threaded holes that accept a male threaded cap (like on early jeeps), I found a universal, expanding rubber plug cap kit that is part of the BG Products adaptor kit that came with their PF7 bleeder machine. If you find a shop that has a BG brake service machine you might talk the owner out of this tool because he never uses it. Or have him order it. The tool is PF9001 and it takes rubber plugs of different sizes in the PF9007 rubber plug kit. Those were the PNs many years ago.
Most of the time the two-person “pump and hold” method is fine. But, on some cars with ABS, getting bubbles out of the ABS valve block is tricky. The few times I’ve done this, I used my pressure bleeder and it got the job done. There was only one time that I needed to pulse the abs system to clear some air. I don’t have a scan tool that can activate the ABS, but I do have a gravel road. First I bled the brakes, then I did a few hard stops on the gravel road to get the ABS to pulse, then I bled them again to finish the job. The pressure bleeder is also great when you are starting with dry lines and cylinders. It’s also great when I don’t have a second person around. I asked my wife once, and it didn’t go as well as I hoped.
Some times the wife system works and some times it doesn’t.
One additional comment – bleeding air is typically due to either master cylinder replacement or wheel cylinder/caliper replacement. Aluminized brake lines rarely rot out these days. If the former, bench bleeding the MC will save an incredible amount of work, as opposed to doing that while it is installed and plumbed in.
Agreed – bench bleeding saves tons of time – worked at a Chevy dealer for many years. The 90s trucks had internally leaking master cylinders quite often. I would bench bleed the new cylinder, replace it and only crack the lines at the cylinder to further bleed, never had an issue, never had to go to each brake bleeder.
don’t tell the public this you might get in trouble
Aluminized brake lines are about the same as they’ve been for decades, do rot out and only give you (maybe) a couple more years till rot compared to bare steel, in winter-salted-roads areas. More manufacturers are turning to plastic coated line, simply because it’s the next cheapest improvement over stainless or CuNi.
Gravity IMO is the easiest, I put a small can of fluid upside down in the master so it doesn’t run dry. Start with furthest to clear the lines the closer will take less time to run clear. When I start work on a corner I open the bleeder and force caliper it expels the dirty fluid rather than pushing back through system. I leave open while putting pads or rotors and is generally clear by time I’m ready to move to next corner.
I think it’s important with modern abs systems to keep moisture to a minimum and have not had any issue with frozen calipers or other issues since renewing fluid every brake service