5 garage projects that look simple . . . but aren’t

As each of us progresses from rank novice, timidly swinging a ratchet with both hands, to a DIY superhero who can diagnose a non-running engine based entirely on an internet comment, we encounter projects that build skills and confidence. Some of those projects go exactly as planned. Others are surprisingly infuriating.
The second kind of project hides complexity at every step. It demands special tools you didn’t know existed and techniques often learned only by doing.
Haven’t run into these jobs? You’re lucky. Here’s a brief list of projects where, as they say, There Be Dragons. Consider yourself warned.

1. Building a roll cage
It’s just some welded tubes, how hard can it be? And yet, that isn’t the best attitude for building a device that might save your life. (Or, if you’ve done a really poor job, take it.)
A properly designed roll cage is just that—designed. Correctly tying a cage to a car’s body and/or chassis is critical if you expect the end result to have any safety value. This means deep consideration of things like tubing material, type, and thickness, but also the angles of those tubes and the placement of their nodes and footer plates. Geometry and load transfer are critical here, and with a roll cage, they hang on everything from tubing placement and bend radius to whether that floor supporting your main hoop will punch through in a roll-over.
Add in the required welds—they need to be structurally sound, with the right penetration and bead—and you have a complex recipe that can seem simple at first. If you don’t want the whole thing to turn into steel toothpicks when you need it most, educate yourself first. Or leave it all to a professional.
2. Sizing custom wheels
Loosen lug nuts, remove wheel, bolt new wheel on, done. At least, if you’re lucky.
If you’re fitting truly custom wheels, you’re likely playing a game of measurement. A game that needs half a dozen reference points to really work. Wheel diameter, width, and backspacing are all variables in a system, and changing any of them can drastically impact a car’s steering response, handling, and ride quality. To say nothing of the clearance between wheel and tire and body and suspension under full compression and full droop, or how the sidewalls deflect while cornering and what they might rub.
At the bottom of all this is the danger of conventional wisdom: Wider tires aren’t always better, a wider track isn’t always better, a shorter sidewall isn’t always better. There’s a lot going on.
3. Reassembling a differential
It’s only two gears, how hard can it be? Pretty hard, as it turns out. Hypoid gears, like those in automotive axles, are quite picky about lash—the amount of play between a pair of meshing gears, like a differential’s ring and pinion. Too much or too little and the gears will wear prematurely, or make noise, or even bind.
Add in the need to properly preload the bearing holding the pinion gear—some diffs make this harder than others—and you’ve got a complicated process. One that can cost a lot of time and money if you get it wrong.

4. Making an engine actually leak-free
A multitude of factors go into this one. Machining. Surface prep. Cleanliness. The right chemical sealant. The right torque, the right fasteners. Using the right seals—sometimes that means a factory piece, sometimes not.
The older the engine, the harder it gets. Old-world solutions like cork gaskets, rope seals, and oil slingers conspire against you at every turn. That’s before you factor in gaskets and seals that might look identical to original parts but aren’t made as they once were. (Sometimes for better, sometimes for worse.)
Sometimes, modern materials can solve the problem. A dab of the right silicone or sealant might be all that’s needed. Other times, stopping a leak can mean using a hammer and a dolly to straighten an oil-pan rail, or taking material off a warped manifold face to true it. Or even just having the self-restraint to not overtighten bolts and crush a gasket too much.
If it was easy, all engines would be leak-free. And we know that’s not the case.

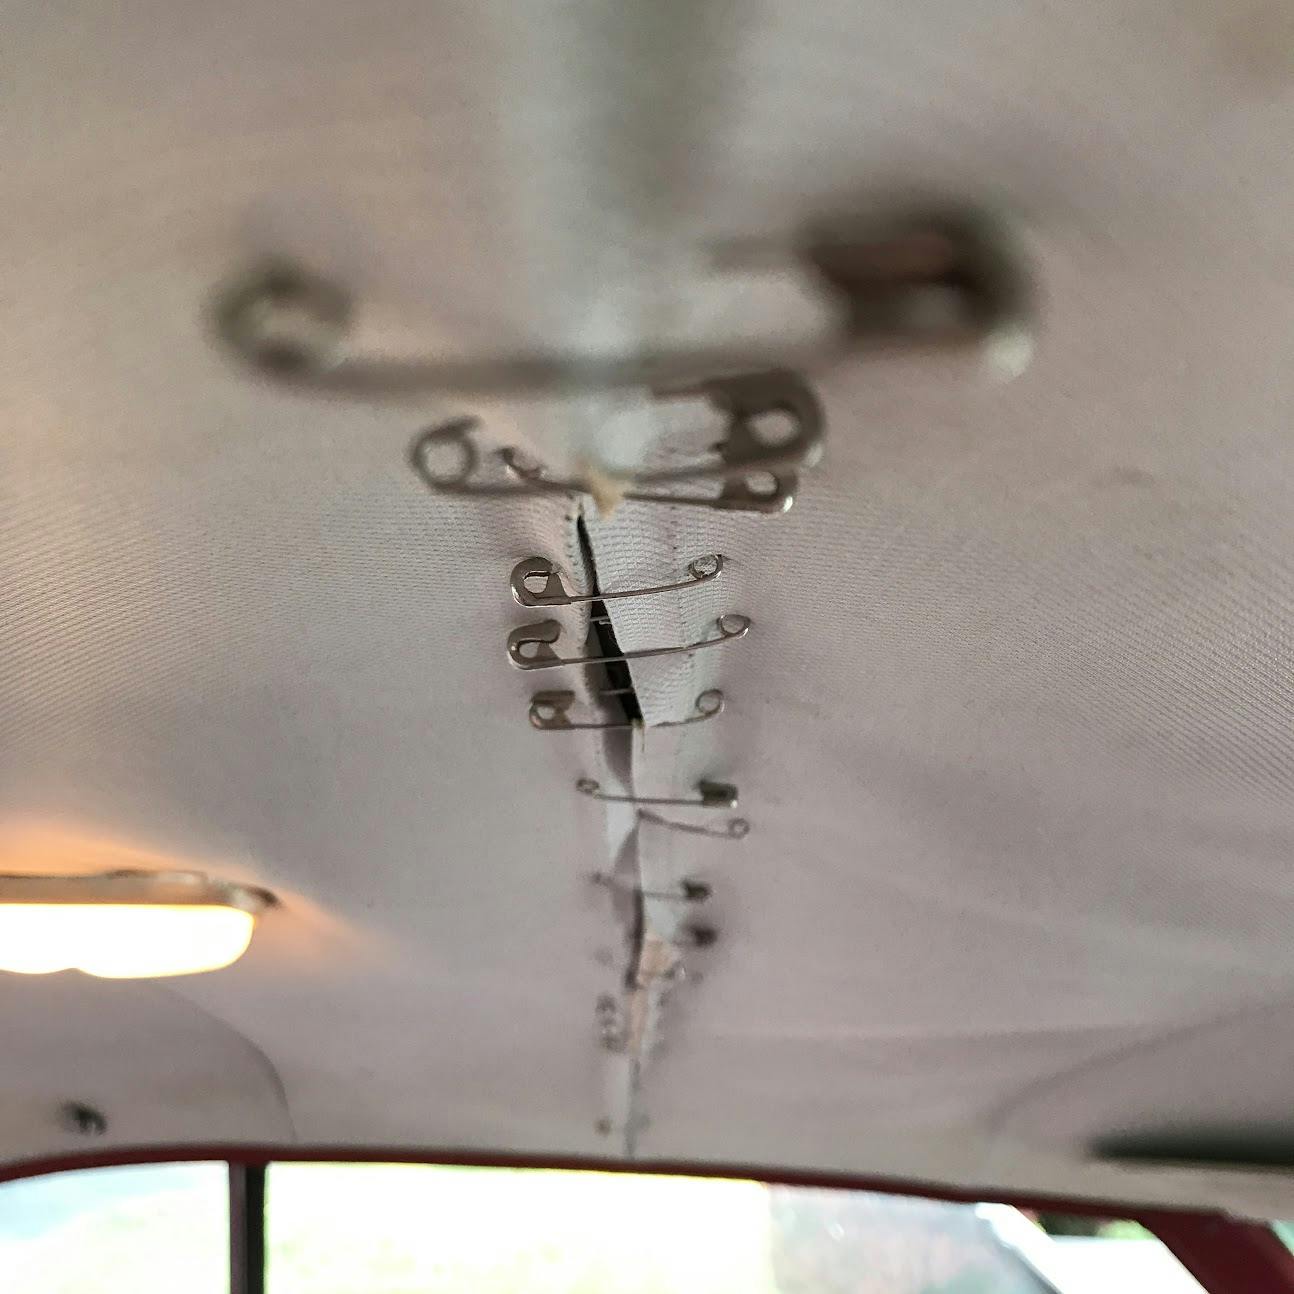
5. Headliners
They’re the finishing touch on any interior. Placement means that good work here is often underlooked. After all, a headliner lives above your head, and who looks up while driving?
A hung headliner takes a careful touch and careful planning to assemble. Bows must be tensioned at the right time, and any trimming of the headliner material must be judicious and careful. Cleanliness is paramount. Stretch the headliner’s various sections at the right time and in just the right direction, you won’t get wrinkles. Or maybe the whole job goes perfectly, but a small mistake at the end forces you to start over and order new fabric.
“Headliners,” as Hagerty editor-at-large Sam Smith says, “are like building a ship in a bottle: Straightforward, if you know the tricks. And it looks like magic if you don’t.”
If you’ve never tackled it before, the job can be mysterious and frustrating. Even the one-piece molded headliners of modern vehicles can be infuriating, as you never quite know just what, exactly, has to come out of the interior (sometimes it’s everything) simply to wrestle that large ceiling tray in or out of the car.
***
Of course, these jobs are just a sample. A virtually endless number of projects look easy but can, if approached casually, check up your confidence. Have a story or project to share? Tell us in the comments below!
The differential procedure mentioned is a bit over-simplified. If all you’re doing is bearings, then you just keep all the shims the same, and assemble it the way it came apart. The backlash is the last and easiest adjustment to make (assuming the shims are outboard of the carrier bearings, but with original shims you don’t even need to check that if you get everything back where it came from. BUT, if you’re changing to a different set of gears, even with the same ratio, there can and will be differences in the pattern. A bearing job can be done by almost anyone with good mechanical skills. Setting up a new set of gears, however, is best left to professionals.
It’s not the lash, but the pinion depth, that will need to be changed, perhaps multiple times, to get a good pattern. If you’re changing ratios, this will almost certainly need to be done, and if your pinion shims are under the bearing, that means either ruining several bearings pressing them back off, or making or buying a setup bearing that just slides on. The backlash only needs to be close during initial setup, and can be dialed in after the pattern and pinion preload are set; then run one final pattern after the backlash is set. If you’re changing ratios, you will NEED to buy both a pinon and a carrier shim kit, as the original ones are sure to not be the right thicknesses. AND with new gears, you need the proper break-in procedure, otherwise (especially if your car has some power) you’ve just ruined a new set of gears!
I would never attempt a roll cage. It’s a safety issue.
When your car roster includes vehicles at or approaching the century mark, you get used to oil leaks. In fact, if some of them don’t leak, you’re not maintaining them ! Case in point is the clutch throw out bearing on my ’21 Chevy. It’s a horseshoe-shaped hollow bronze casting with softwood horizontal dowels running through it. The casting is manually filled with oil from a hole in the top. It then seeps out though the dowels to lubricate the face of the bearing. The oil then drips onto the floor. Get used to it !
Dirty Harry said it best, “A man’s got to know his limitations!”.
Exactly!!
I would add changing coil springs to the list. Just because I can does not mean I should. Too darn dangerous for me.
Foam-backed headliners are indeed a pain. The one on my GTI started falling away from the foam and I thought of using one of the spray adhesives but the thought of wielding a spray can over my head in a rather closed space otherwise lined with leather upholstery made me nervous. My non-elegant but functional solution? Hand stapler. Not the kind you use in construction – just the one on your office desk. Flipped it open and started punching away. Now I have an el-cheapo version of a button-tufted headliner, albeit with staples as opposed to buttons.
Oil leaks? Ha! Were there not several puddles below my 60-year old British roadster, I would start to wonder if there was any oil in the engine. In the transmission and overdrive. In the rear end. Etcetera….
30 years ago i used curly push pins you twist into the foam to hold up the headliner. Now Amazon has ones with a clear flat button that look better than the ones I used. Spraying didn’t work for me, I kept making it worse and couldn’t hold everything together for it to stick.
You can’t say leakproof and “A” Series Austin engine in the same sentence. Deep down you know that don’t you?
Yes, you can. As others have mentioned, it is crankcase pressure that causes most of the leak.
NO such thing as a simple project. Some may appear that they are, but nope!
Climbing a mountain may be tough for some but to a mountain climber.
Just depends on your skill set and tools. Know your limitations.
I just put a headliner in my 2004 Cadillac Escalade. Not terribly difficult, but definitely time consuming. If you’re interested in watching https://youtu.be/hgfXGoZ20v0
You’ve been warned? How many guys grab a simple buffer or a rattle can of paint to touch up their car. The damage a buffer can do in seconds is truly amazing
I concur with the headliner item. I recently did the ‘liner in my ’62 T-Bird. The front two thirds of it looks fine, but for the life of me I couldn’t get wrinkles out of the C-pillar corner. Someday I will have to take it to a pro for a re-do. Headliners are good for keeping one humble…
In the process or replacing the headliner in my 07 Cayman S, removing the headliner ‘shell’ is a bit of a pita and require the removal of a fair amount of interior trim but the two biggest pitas so far were the actual removal of the thing from the vehicle and disconnecting the electrical plugs to the dome light and another item, never did figure out how to get the plugs off, had to sneak the items out through their respective mounting holes. I’ll pay someone to put the new headliner material on the shell, don’t really have the space to do it.
I usually enjoy these pieces from Mr Smith, but Who thought These projects were Easy? I can see that people might think swapping tire sizes are easy, but welding up a roll cage? I’ve known a lot of people who work on their own cars, and none of them have ever attempted that. Rebuilding a rear end? Sure, simple, unless you want to adjusted to work correctly. And re going to Jo Ann’s fabrics to fix your headliner – am pretty sure that will not work in a car with headliner bows. If it were so simple, wouldn’t cost three times or more what a newer board-mounted style does at an interior shop.
Easy, really? You’re fooling yourself
On my ’53 coronet sierra wagon (that’s a pretty LONG headliner – with bows) I bought fabric – made a pattern, and had my Mom sew in the pockets. A couple hours of cussing later I had an acceptable, if not perfect, headliner. Thankfully no “C” pillars though – – –
On my ’65 AMC classic the white headliner was brown from cigar smoke when I bought it – It came out the back window to be scrubbed with a quart of Fantastic and the garden hose on the driveway before being reinstalled. The “bronze” dash trim came back to shiny polished aluminum or chrome with the application of another bottle of Fantastic
I actually did my 1953 Coronet Siera wagon headliner with help from my Mom who was an expert seamstress.
There was not enough left of the original to make a full pattern so wejust trusted that several adjacent panels were duplicates. Went in with only a couple tiny wrinkles that dissapeared after it sat out in the sun for a couple of days. The ’57 fargo was a lot easier – cardboard headliner from a late sixties Dodge dump truck was a perfect fit and readily available from the dealer for CHEAP
Teslas don’t leak.