5 garage projects that look simple . . . but aren’t

As each of us progresses from rank novice, timidly swinging a ratchet with both hands, to a DIY superhero who can diagnose a non-running engine based entirely on an internet comment, we encounter projects that build skills and confidence. Some of those projects go exactly as planned. Others are surprisingly infuriating.
The second kind of project hides complexity at every step. It demands special tools you didn’t know existed and techniques often learned only by doing.
Haven’t run into these jobs? You’re lucky. Here’s a brief list of projects where, as they say, There Be Dragons. Consider yourself warned.

1. Building a roll cage
It’s just some welded tubes, how hard can it be? And yet, that isn’t the best attitude for building a device that might save your life. (Or, if you’ve done a really poor job, take it.)
A properly designed roll cage is just that—designed. Correctly tying a cage to a car’s body and/or chassis is critical if you expect the end result to have any safety value. This means deep consideration of things like tubing material, type, and thickness, but also the angles of those tubes and the placement of their nodes and footer plates. Geometry and load transfer are critical here, and with a roll cage, they hang on everything from tubing placement and bend radius to whether that floor supporting your main hoop will punch through in a roll-over.
Add in the required welds—they need to be structurally sound, with the right penetration and bead—and you have a complex recipe that can seem simple at first. If you don’t want the whole thing to turn into steel toothpicks when you need it most, educate yourself first. Or leave it all to a professional.
2. Sizing custom wheels
Loosen lug nuts, remove wheel, bolt new wheel on, done. At least, if you’re lucky.
If you’re fitting truly custom wheels, you’re likely playing a game of measurement. A game that needs half a dozen reference points to really work. Wheel diameter, width, and backspacing are all variables in a system, and changing any of them can drastically impact a car’s steering response, handling, and ride quality. To say nothing of the clearance between wheel and tire and body and suspension under full compression and full droop, or how the sidewalls deflect while cornering and what they might rub.
At the bottom of all this is the danger of conventional wisdom: Wider tires aren’t always better, a wider track isn’t always better, a shorter sidewall isn’t always better. There’s a lot going on.
3. Reassembling a differential
It’s only two gears, how hard can it be? Pretty hard, as it turns out. Hypoid gears, like those in automotive axles, are quite picky about lash—the amount of play between a pair of meshing gears, like a differential’s ring and pinion. Too much or too little and the gears will wear prematurely, or make noise, or even bind.
Add in the need to properly preload the bearing holding the pinion gear—some diffs make this harder than others—and you’ve got a complicated process. One that can cost a lot of time and money if you get it wrong.

4. Making an engine actually leak-free
A multitude of factors go into this one. Machining. Surface prep. Cleanliness. The right chemical sealant. The right torque, the right fasteners. Using the right seals—sometimes that means a factory piece, sometimes not.
The older the engine, the harder it gets. Old-world solutions like cork gaskets, rope seals, and oil slingers conspire against you at every turn. That’s before you factor in gaskets and seals that might look identical to original parts but aren’t made as they once were. (Sometimes for better, sometimes for worse.)
Sometimes, modern materials can solve the problem. A dab of the right silicone or sealant might be all that’s needed. Other times, stopping a leak can mean using a hammer and a dolly to straighten an oil-pan rail, or taking material off a warped manifold face to true it. Or even just having the self-restraint to not overtighten bolts and crush a gasket too much.
If it was easy, all engines would be leak-free. And we know that’s not the case.

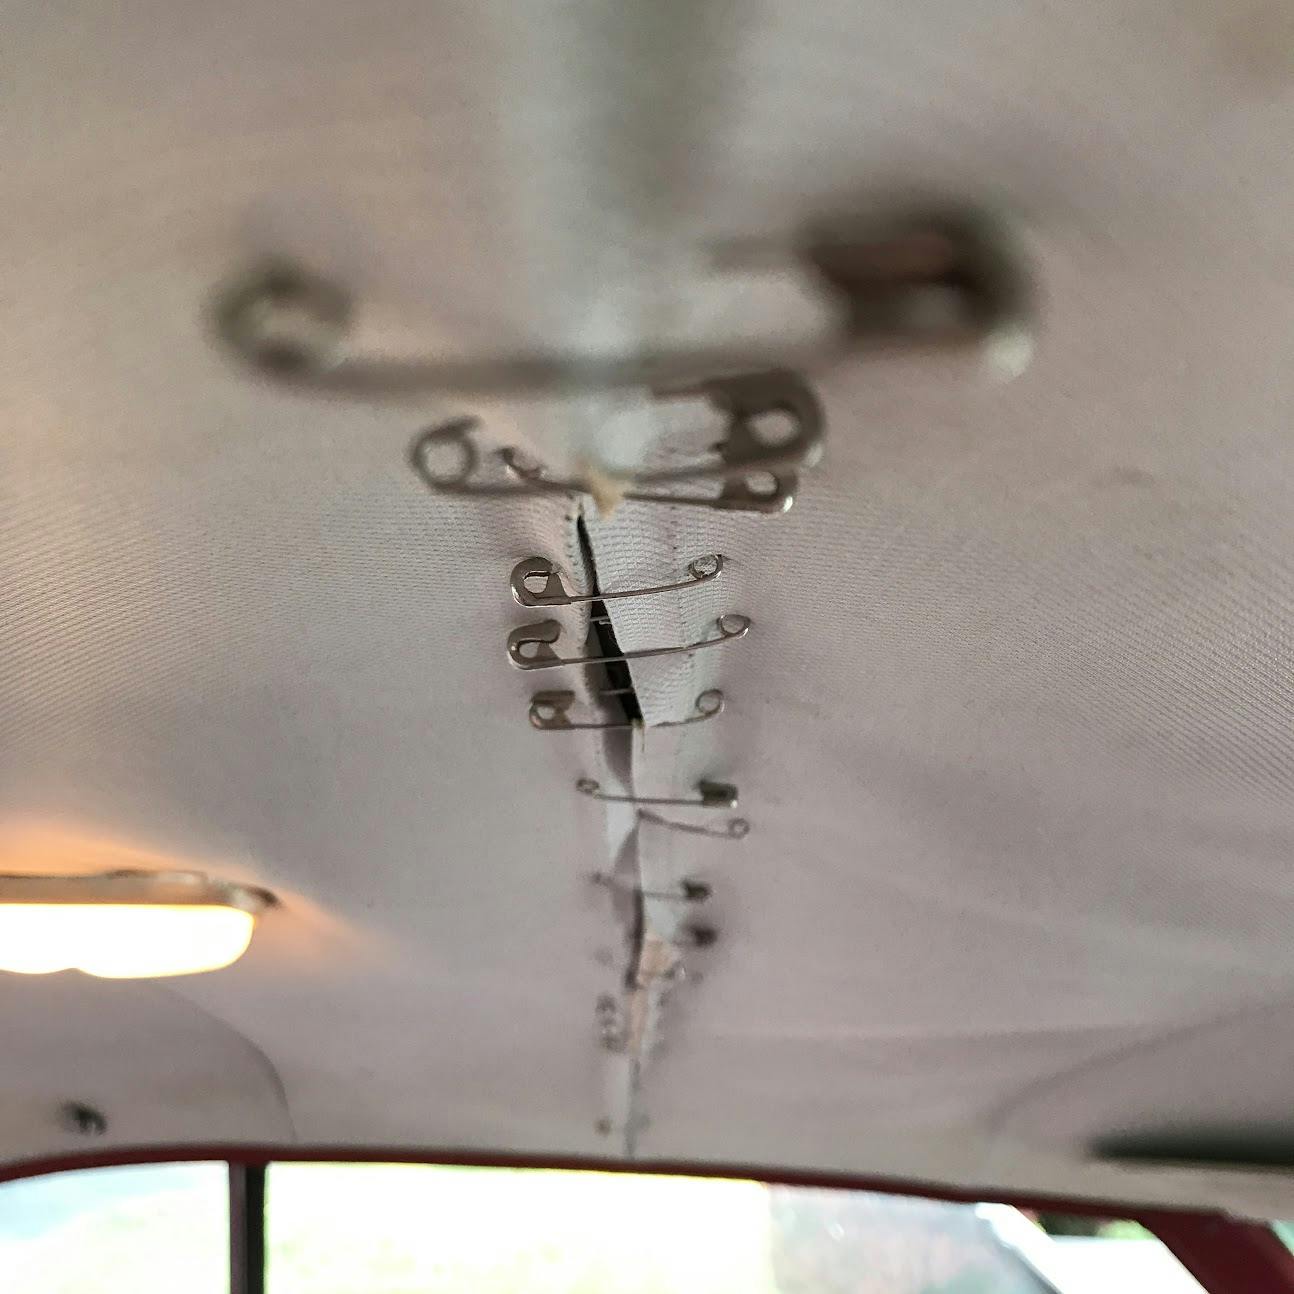
5. Headliners
They’re the finishing touch on any interior. Placement means that good work here is often underlooked. After all, a headliner lives above your head, and who looks up while driving?
A hung headliner takes a careful touch and careful planning to assemble. Bows must be tensioned at the right time, and any trimming of the headliner material must be judicious and careful. Cleanliness is paramount. Stretch the headliner’s various sections at the right time and in just the right direction, you won’t get wrinkles. Or maybe the whole job goes perfectly, but a small mistake at the end forces you to start over and order new fabric.
“Headliners,” as Hagerty editor-at-large Sam Smith says, “are like building a ship in a bottle: Straightforward, if you know the tricks. And it looks like magic if you don’t.”
If you’ve never tackled it before, the job can be mysterious and frustrating. Even the one-piece molded headliners of modern vehicles can be infuriating, as you never quite know just what, exactly, has to come out of the interior (sometimes it’s everything) simply to wrestle that large ceiling tray in or out of the car.
***
Of course, these jobs are just a sample. A virtually endless number of projects look easy but can, if approached casually, check up your confidence. Have a story or project to share? Tell us in the comments below!
I’m sorry, but I think that although quite a bit of “warning” is worked into the first item, it still leaves DIY’rs to think, “I can do that”. Nope. Roll-cage planning and construction should ALWAYS be left to professionals. If you are good enough to plan/cut/fit and weld a trustworthy cage, you ARE a professional. And all sanctioning bodies in all types of racing have established standards for cages, and exhaustive inspections/certifications. A made-at-home roll-cage by 99% of us has almost zero chance of passing to allow you on-track. And if you are not making a cage to get onto a race track, why are making one? To impress someone at a show ‘n’ shine?
It can’t be said any more stringently than this: if you want a cage, remember that your very life will depend on it being made right – do you want to leave to chance whether or not your skills are good enough?
@DUB6- And if your cage is made of 4140 Chrome-Moly tubing material, as it should be for strength, you had better find a welding shop who understands what they are working with.
It’s so true to have an expect weld your roll cage when you are racing. I had the wrong guy weld some racing wheels for our race car. A big mistake!!! In a race at Berln Raceway in 1968 I was behind Johnny Benson, second in place, when I tried for first place. Needless to say a wheel broke and I rolled and crashed because of a broken weld on the front wheel. Because it wasn’t the same guy that did the roll cage, I am here to tell the story.
Agreed – if it’s protecting my life, I want a well versed professional doing it. That being said, as a mechanical engineer I can even look at ‘pro’ cages and ask ‘Why doesn’t this tube meet these other tubes at the joint to properly transfer the load to the other tubes in a crash?’ Usually the guy who builds the cages is NOT the guy at the track, remember that.
So a cage made out of old greenhouse steam pipe, no pipe bender in sight and arc welded together isn’t the right approach?,……lol.
I thought some PVC tubing and pretty pool noodles would be an acceptable alternative…
As a former NHRA/IHRA Technical Inspector, I say leave welding to the pros. However, I would want to look at some of the roll bars done by the shop. Ocassionalyy, we would find welds that were ground smooth. That is a big NO. That area then becomes the weakest part of the bar because it is thinner right there. Most big tracks should have a hand-held device that measure the thinkness of the steel in your bar. In addition, if you take a look at the Roll Bar Section in the Rules Books, that is a good guide to see what you need. Putting a roll bar in a car with a unibody frame can be tricky but there are specs for that too in the Rule Books.
I would never have pegged any of them as simple garage projects.
Once upon a time I had a Century T-Type (the 4 door one, not the one that looks like a Grand National) and the headliner came down as they all do in that era of GM. The interior was grey, so I masked off the roof and spray painted the remaining fuzz from the headliner foam grey. Unless you really looked (and who looks up) you would never notice it didn’t have a proper headliner
My 2002 Dakota pick-up currently is headed well into the “terminal sag” issue. It’s not a “hung with bows” style, nor a one-piece molded type. It has material glued to foam (or at least, it USED to be glued). I’ve tried using some spray-on adhesive and re-sticking the material, but the “letting loose” is winning over the “re-gluing”. I’m thinking to just cut down all the material and leave the foam as headliner, but I figure that in time, that too will begin to come down. So I’ve not really done anything but “live with it”. Eventually, though, I’m going to be forced into some sort of action, because other than just being annoying, it’s soon also going to be a visibility problem.
Take it out, rub the foam off, paint, reinstall.
What he said.
3M Foam Fast 74 Spray Adhesive is great for gluing fabric and foam. Not cheap, but works.
The problem is the foam is deteriorating so each layer of adhesive just pulls off another layer of degraded foam.
Did my 88 K5 with a hole lot of snaps in a diamond pattern. Sold the truck 5 years later and still looked great, like the day I did it!
ditto
Had the same problem with other vehicles including one under restoration now. It’s a losing battle to try to reapply adhesive as the foam the adhesive is sticking to is deteriorating AND the junk stuck to the headliner is ALSO deteriorating. Here is a suggestion – just a suggestion that has worked for me. I’ve pulled the rubber trim away from the doors to carefully remove the headliner. Using a plastic “bondo” spreader, I’ve scraped the foam away from the headliner and/or the roof (doesn’t matter) to entirely remove the headliner. Then I’ve scraped the roof side completely clean of all foam and checked or replaced any wiring hiding above the liner. Then on a table, I’ve laid the headliner out and used the plastic spreader, scraped the deteriorating foam OFF the headliner. I’ve taking the headliner to a dry cleaner who inspected it after defoaming, to clean the headliner. Then I’ve glued NEW foam to the headliner fabric, (adhesive goes on both sides and when tacky, lay it down. Careful, if you saturate the foam, it will glue to itself and leave craters and divets! Then when dry – hours later, do the same thing to the headliner-foam and the roof. You can do this in sections starting at the best place that you can make sure your install is spot on as you’re not installing brand new and don’t have any excess to allow a fudge factor! Best of luck to you.
You can take out the headliner, rub off all of the old headliner material foam backer (not the foam shell), get some fiberglass cloth and resin, do a quick and dirty fairly thin fiberglass layer over the foam backer and then just spray glue the new headliner to that. The fiberglass will keep the foam from deteriorating any further and provide a barrier for the new glue, which eats away at the foam anyway.
Note that most sanctioning bodies have specific requirements for roll cage material, construction and complexity – so even if you know what you’re doing with the fabrication, you’ll need those specs, plus depending on class/speed/whatever, a certification and/or approval tag.
I learned the hard way of making a very low milage classic entirely “leak-free” the hard way. It took me years to get there but I still have no regrets. Often the fix was cheap in materials but required lots of work.
I had my Chrysler 440 built by a custom engine builder in town, and when I broke it in it was leaking out the rear main seal. Then it was gushing out the rear main seal. I replaced the main seal and retainer with a billet retainer and Viton seal. It still gushed. Pulled the transmission and checked the cam plug. No leaks. Installed a new seal. Still gushes. I’ve watched every YouTube video and read every blog I’m properly installing a Chrysler big block rear main seal. Now I’ve purchased an $80 continuous seal that seals both directions. You slice it apart, slide around the main, and glue the ends back together. We shall see if this does the trick. If it doesn’t, I’m finally going to break down and hold the car to a mechanic.
Just make sure your PVC system is working, or the pressure in the crankcase will always find a way to push oil out.
I learned this the hard way after needlessly replacing the rear main on our suburban, only to have the leak reappear in a couple of weeks.
Right on! Fluids leak for one of two reasons – gravity or pressure.
One way to GUARANTEE a leak-free engine – at least OIL leak free – is to run a vacuum pump on the crank-case.
440 Chrysler big blocks all require a rope seal. Put a rope in the rear and your leaks will be a bad memory.
For a “leak free” engine, familiarize yourself with the Loctite catalog. Not just the thread locker section.
For those of you who fondly remember J.C. Whitney, I was 18, my first car was a 48 Chevy 2-door sedan, a Stylemaster. It was 1974 and the Chevy looked real old. Ordered a full interior from JCW and sweated bullets over the headliner installation. But it was perfect when complete, not a wrinkle! I told myself, “Never again would I install a headliner!”
Oh yeah! JC Whitney was the “go to” place for me. Among other things, they had adapters for engines to transmissions, like the time myself and a buddy squeezed a 56 Cadillac engine into my 53 Studebaker commander coupe. It was than dubbed the Studelac. It was very fast and went thru transmissions so often that I always carried a spare obtained from junkyards for $15.00-$20.00. I more than made the money back by participating in the underground midnight drags.
I’ve done enough in my life that I know ALL of those have their own pitfalls. And I’d never put a cage in a car that wasn’t a track car, anyway. A non-helmeted head contacting a cage is a recipe for instant brain trauma/death.
I have succeeded in making a non-leaking Volkswagen engine or two, so at least I have that going for me! On engines that old crankcase ventilation needs to be added to the list of how to make them leak free. I can’t stress that enough, and people scoff at that all the time. Sorry, but oil slingers can’t do their job if the crankcase is pressurized!
One of the points that should be raised is that an engine gushing with oil leaks is often due to clogged PVC and/or shot rings. Gasket is going to keep oil from getting forced out when the blow-by can’t escape.
No gasket*
It’s PCV not PVC. PVC is a lousy seal material – – – –
Also a poorly calibrated dip stick has caused more than one nasty oil leak.
A friend had a VERY FAST hobby sportsman stocker that never won any races because it never finished – always got black flagged for oiling the track. He tried just about everything as far as venting, and used tubes of silicone trying to seal gaskets until one day in the pits I dropped the pan, established that his dipstick was an inch out of calibration, hammered his pan flange straight and installed a standard pan gasket – dry- and sent him out to win his first feature race – a quart low on oil (according to his original design)
I could comment on each on your list, but I’ll just say the only real DIY item was rims and tires, and that’s one that really requires thought (as you indicated). Swapping out rims for looks is OK, but keeping handling in mind, like you said, is important for your own safety. Trying to stay. Lose to the stock track, caster and camber, etc are important, but understanding how swapping out one item impacts another must be considered. You may add 5mm wheel spacers to get the correct offset with the plus-1 rims you installed to get a stiffer sidewall with that low profile tire, but did you take into account the stud length loss? You want to make sure the lug nuts have enough tread to grab. Did you consider that with that better grip and less tire roll that you may need to upgrade sway bar bushings or even swap sway bar size? Did you keep the same tire overall radius so your speedometer still reads accurately? Lots to consider to do it correctly.
Roll cage? Only if it is cosmetic can a non-designer do it. Why try? Custom wheels? Why? Ever try painting a car? Plenty of things are tough to do and get perfect results but trying and doing I think is what most car folks are about. To ponder life for a second, I think too few people try and/or can do much of anything and find the satisfaction in DIY, good or bad results. The Man in the Arena tells a good story sort of related.
For a “cosmetic” roll bar just use ABS pipe – – – Or maybe PVC
Not as hard on the noggin when you hit it. Or make it out of thinwall conduit supporting pool noodles wrapped in “pleather”
Bmw E90 oil pan gasket and water pump were surprisingly frustrating. If you want to give the tech inspectors a good laugh, build your own roll cage.
The headliner started coming down on my 1977 Olds 98. I took a couple hundred decorative metal thumbtacks and spaced them a couple inches apart width and lengthwise across the roof. It held the headliner up and provided a neat styling touch.
Electrical work looks so easy, what could possibly go wrong. I. Still remember dodging the “we can just cut the wires at the connector” bullet of car stereo install. That guy was NOT my friend.
None of these are always a tough job. It is a matter of skills and perspective and application.
Roll cage is more about #1 welding skill and things like a surface plate to well a balanced and handling car. If you have the skill and tools not a problem.
Head Liners. Most can be found in kits that are all there and not always difficult to do. I did the one in my Pontiac with a visit to Joann Fabrics and bought the material and adhesive and two hours and $30 it was all new.
Now some vehicles today are in need of having a windshield removed to pull it out if it is a large fiberglass backed liner. Just depends on what you work on. Same for seat recovers. Kits make it not a difficult thing to do. As long as you are sewing the new covers it is a matter of pulling them on and repairing any foam issues.
I have tackled all of these at one time or another and just balancing it out with what you are getting into and understanding your limits on skills and tools.
Also having a network of friends with skills that can come over and watch over you helps build your skills.
Leaking engines. Some are easy mostly new engines. Older near impossible. Pontiac real mains all leak. Chevy front seals leak. Ford and Chrysler and others all have their own known leaking areas. Better gaskets and seal make it better but the designs are often the issue.
Wheels is a matter of measuring properly. Also forums often will let you know what will fit and not fit. Also you can buy tools to measure these things properly. A number of web sites will offer wheel size fitment +1+2 DATA. This is not hard just working smarter.
GM Diff is not all that hard just you need to know what to so and have a dial indicator and marking material. Not the easiest but just knowledge and tools.